


实战:使用Git之前需要做的最小配置(成功测试-博客输出)-20210927

目录
文章目录
实验环境
git version 2.17.0
windows10笔记本
1、前言
Git跟踪谁修改了项目,哪怕参与项目开发的人只有一个。为此,Git需要知道你的用户名和电子邮件地址。你必须提供用户名,但可以使用虚构的username和电子邮件地址。
如果你忘记了这一步,在你首次提交时,Git将提示你提供这些信息。(也就是说,这个步骤是必须的)。
一般在新的系统上,我们都需要先配置下自己的 Git 工作环境。配置工作只需一次,以后升级时还会沿用现在的配置。
第一个要配置的是你个人的用户名称和电子邮件地址。这两条配置很重要,每次 Git 提交时都会引用这两条信息,说明是谁提交了更新,所以会随更新内容一起被永久纳入历史记录。
git 运行的环境变量有点像.bashrc,决定了 Git 在各个环节的具体工作方式和行为。这些变量可以存放在以下两个的地方:./.git/config 文件,~/.gitconfig 文件
2、命令
-
形式
用户名:tom
Email 地址:goodMorning@atguigu.com # 邮箱名不存在都可以,只是为了区分开发人员而已; -
作用:区分不同开发人员的身份
-
辨析:这里设置的签名和登录远程库(代码托管中心)的账号、密码没有任何关系。
-
命令
# Git 全局设置(推荐)
git config --global user.name  "hg"
git config --global user.email  "2675263825@qq.com"

# Git 项目级别设置
git config user.name "hg"
git config user.email "2675263825@qq.com"
(1)项目级别/仓库级别:仅在当前本地库范围内有效
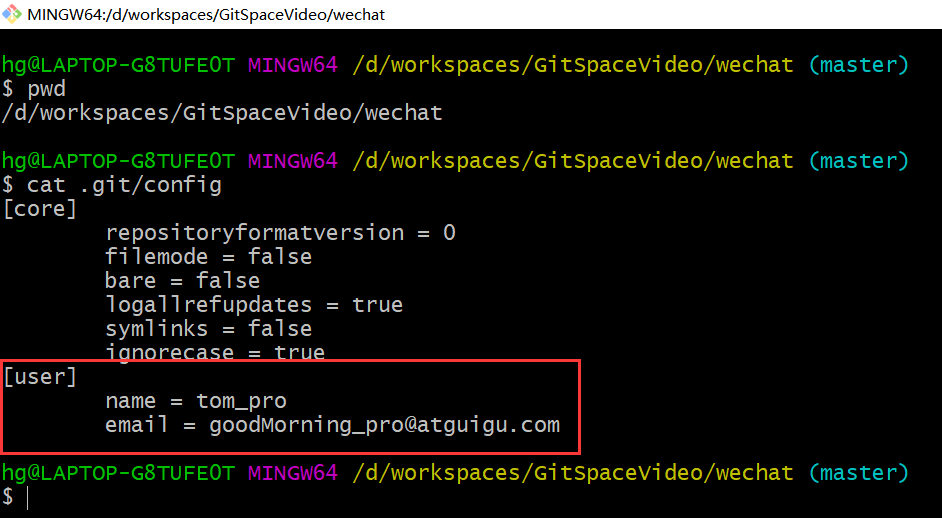
git config user.name "tom_pro"
git config user.email "goodMorning_pro@atguigu.com"
信息保存位置:./.git/config 文件
(2)系统用户级别:~/.gitconfig 文件:用户目录下的配置文件只适用于该用户。
当前项目.git 目录中的配置文件(也就是工作目录中的 .git/config 文件):这里的配置仅仅针对
当前项目有效。每一个级别的配置都会覆盖上层的相同配置,所以 .git/config 里的配置会覆盖
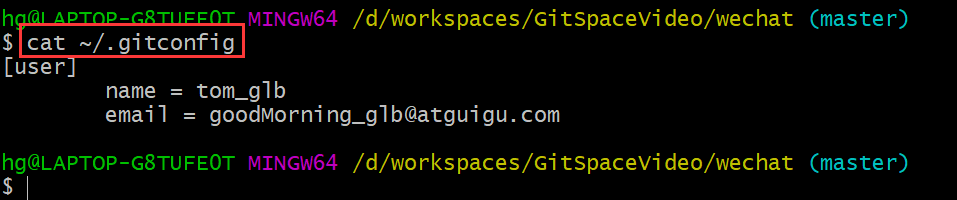
~/.gitconfig 中的同名变量。git config --global user.name "tom_glb" git config --global user.email "goodMorning_glb@atguigu.com"信息保存位置:~/.gitconfig 文件
3、注意事项
-
注意:实际工作中,只需要设置一个系统用户级别的签名就可以了,如果后续项目有另外需求的话,那么再设置下
项目级别签名就可以了。 -
注意:级别优先级
就近原则:项目级别优先于系统用户级别,二者都有时采用项目级别的签名;
如果只有系统用户级别的签名,就以系统用户级别的签名为准;
二者都没有不允许。
-
注意
如何修改项目或者系统级别的签名呢?=>直接重新执行命令就可以的,原来信息会被直接覆盖的。
-
注意:config的三个作用域
注意:
## 添加配置
git config [--local | --global | --system] user.name 'Your name'
git config [--local | --global | --system] user.email 'Your email'

## 查看配置
git config --list [--local | --global | --system]

local的在.git/config里面;global的在个人home目录下的.gitconfig里面;system应该在git安装目录的下

## 区别
配置level逐渐上升,生效priority逐渐下降;
1.local:区域为本仓库,只对某个仓库有效,切换到另外一个仓库失效
2.global: 当前用户的所有仓库,工作当中最常用
3.system: 本系统的所有用户,几乎不用

#总结:
1、最小配置有:user.name、user.email两个
2、有效范围常用的是:global
3、`重复设置user.name、user.email后会自动覆盖之前的。`
4、查看配置:git config -l或者git config --list
5、范围:system、global、local

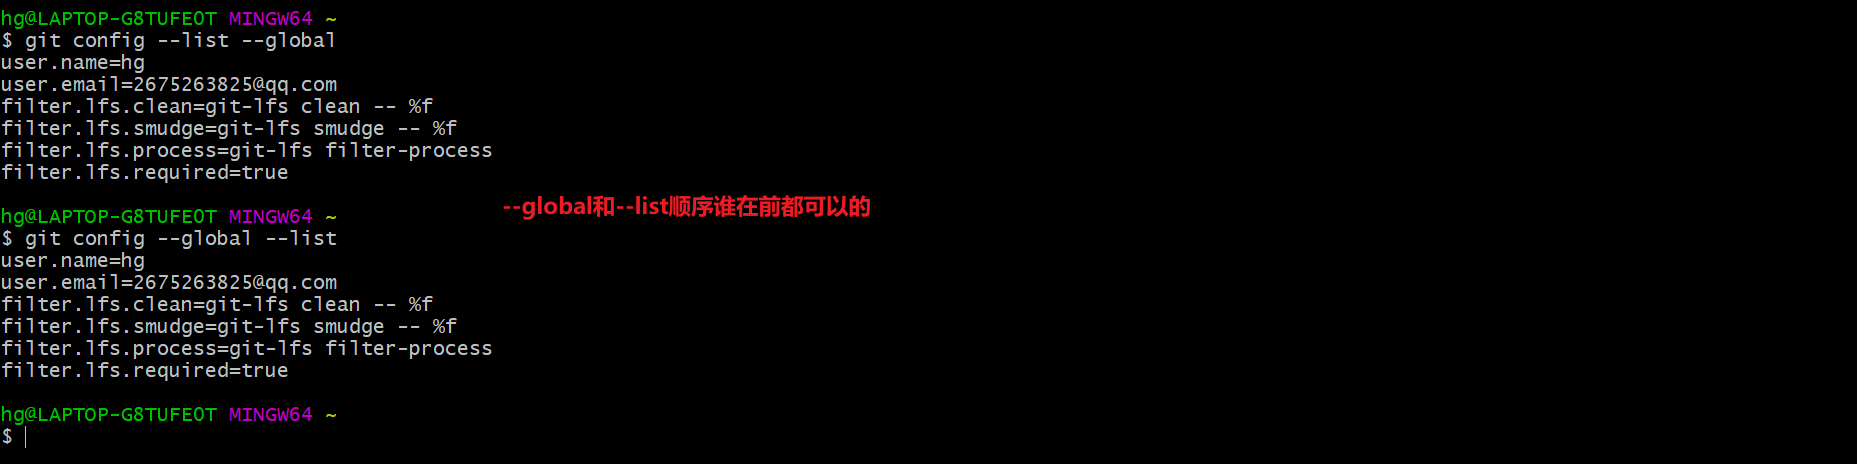
git config --list --global == git config --global --list
- 设置与清除
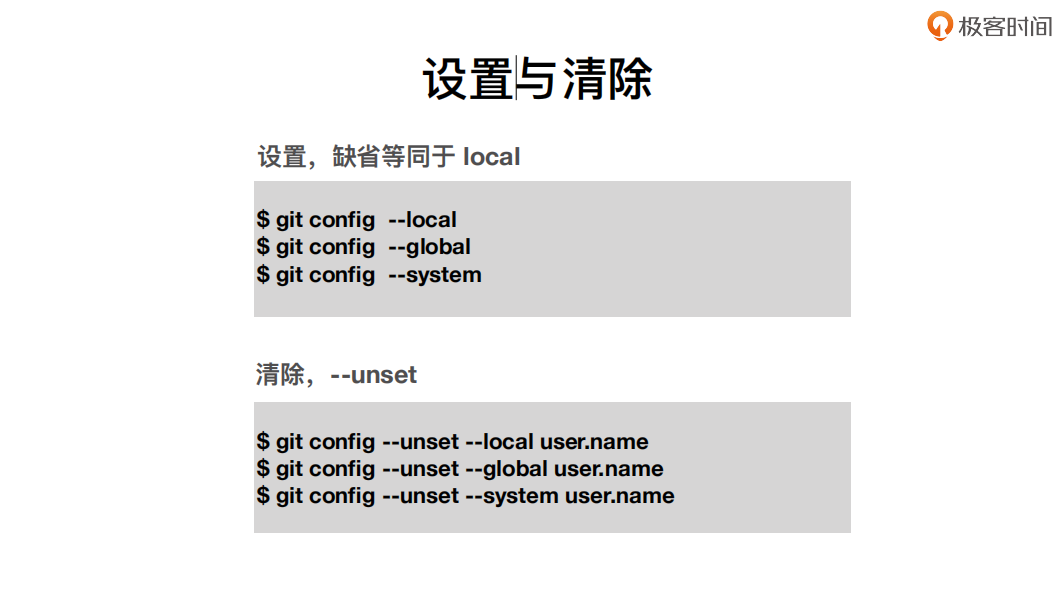
$ git config --unset --local user.name
$ git config --unset --global user.name
$ git config --unset --system user.name
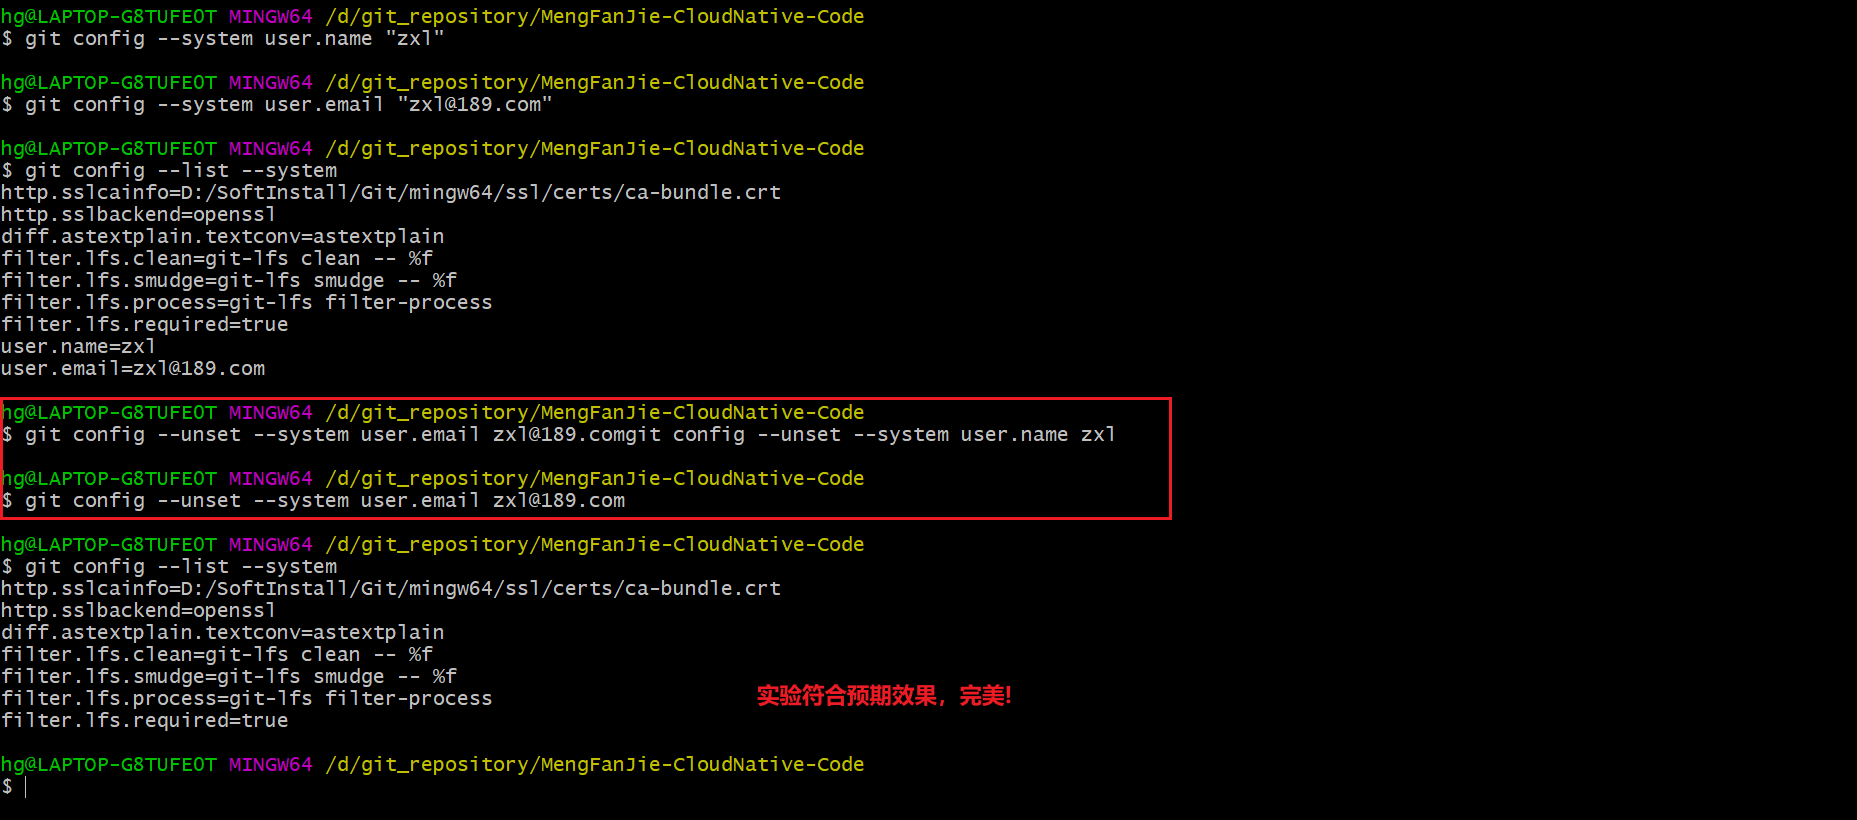
小实验:删除系统级用户签名测试
1、设置系统级用户签名
git config --system user.name "zxl"
git config --system user.email "zxl@189.com"

2.查看系统级用户签名
git config --list --system

3.删除系统级用户签名
git config --unset --system user.name zxl
git config --unset --system user.email zxl@189.com

4.查看效果
git config --list --system
4、课后实践:请动⼿⽐⼀⽐,local 和 global 的优先级及创建第一个仓库并配置local用户信息
- 老师课件
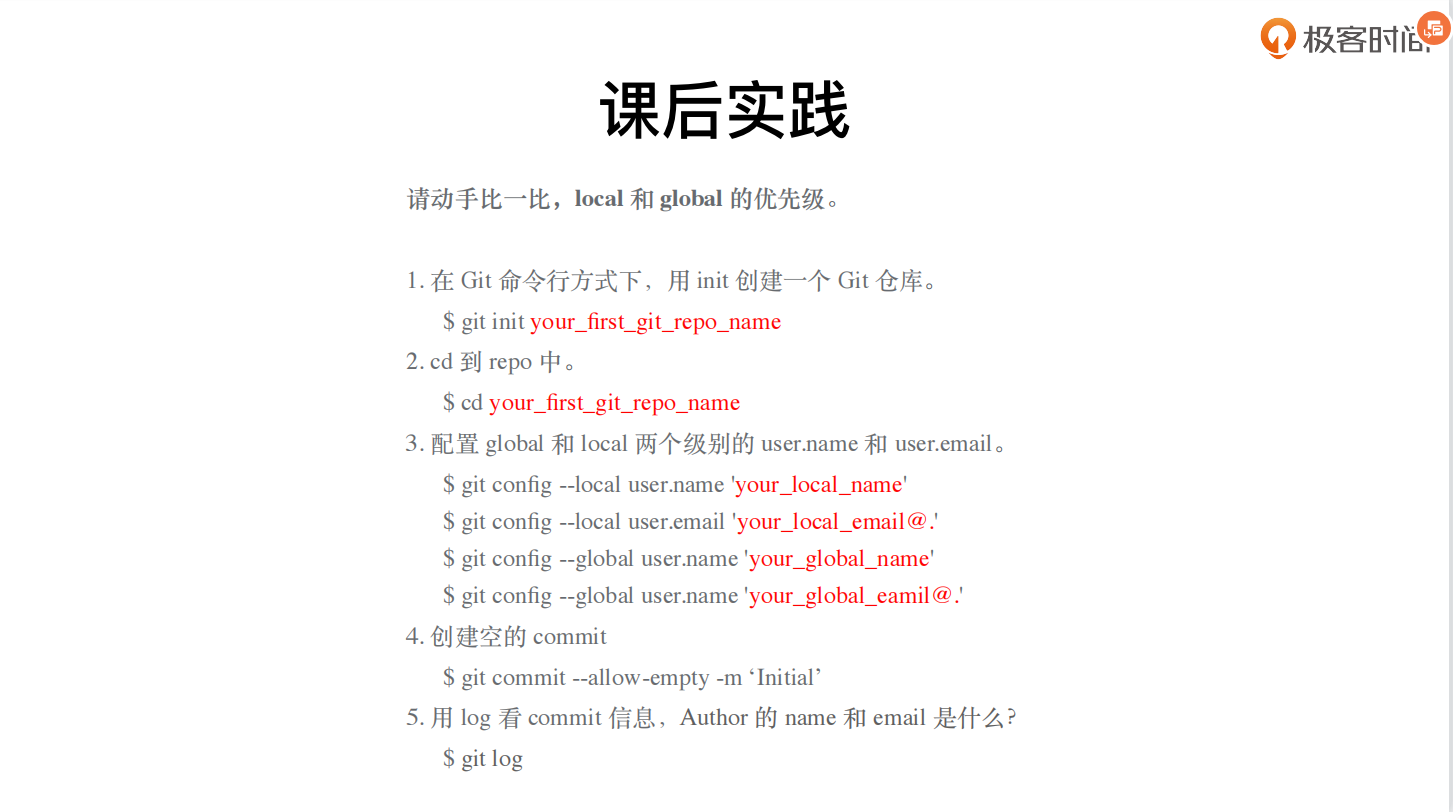
课后实践
请动⼿⽐⼀⽐,local 和 global 的优先级。
1. 在 Git 命令⾏⽅式下,⽤ init 创建⼀个 Git 仓库。
 $ git init your_first_git_repo_name
2. cd 到 repo 中。
 $ cd your_first_git_repo_name
3. 配置 global 和 local 两个级别的 user.name 和 user.email。
 $ git config --local user.name 'your_local_name'
 $ git config --local user.email 'your_local_email@.'
 $ git config --global user.name 'your_global_name'
 $ git config --global user.name 'your_global_eamil@.'
4. 创建空的 commit
 $ git commit --allow-empty -m ‘Initial’
5. ⽤ log 看 commit 信息,Author 的 name 和 email 是什么?
 $ git log
- 自己动手测试过程:创建第一个仓库并配置local用户信息
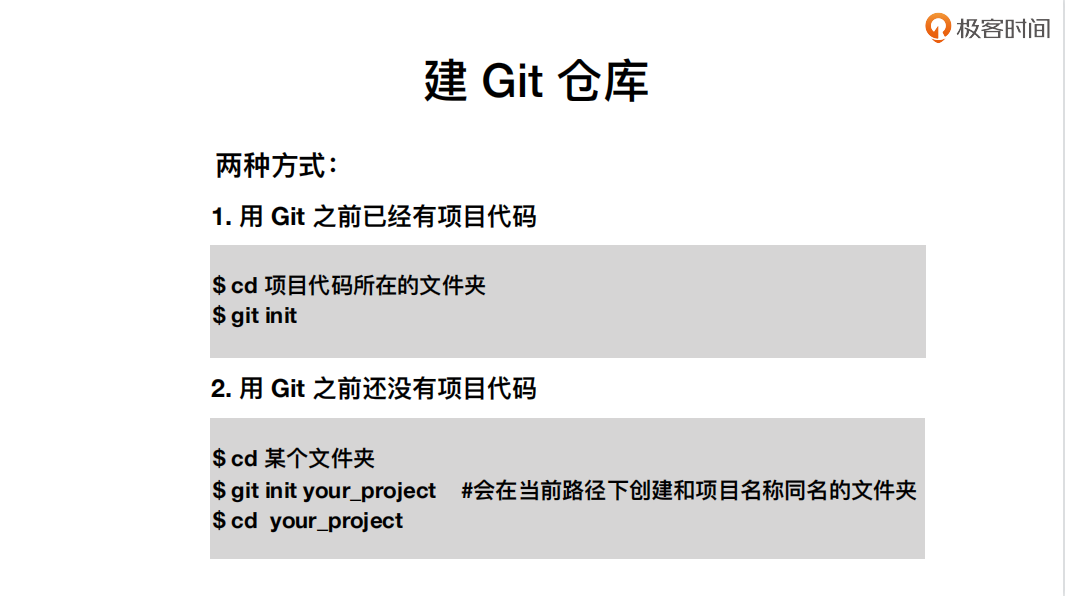
建 Git 仓库
两种⽅式:
1. ⽤ Git 之前已经有项⽬代码
$ cd 项⽬代码所在的⽂件夹
$ git init

2. ⽤ Git 之前还没有项⽬代码
$ cd 某个⽂件夹
$ git init your_project #会在当前路径下创建和项⽬名称同名的⽂件夹
$ cd your_project
开始测试:
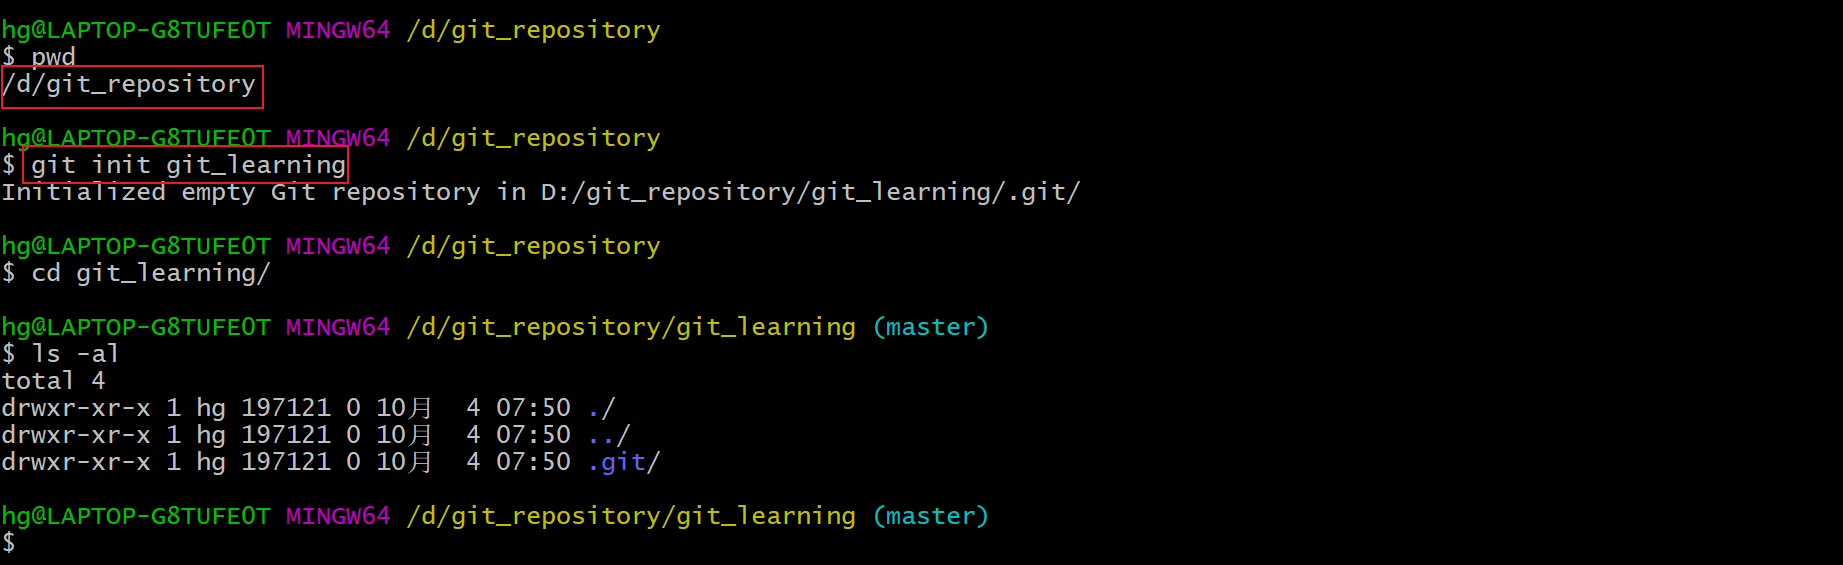
本次自己的git工作目录路径为:
winodws路径:D:\git_repository
git bash下路径为:/d/git_repository
进入到git工作目录:本次这个测试范例为:用git之前还没有项目代码
$ git init git_learning
$ cd git_learning/
$ ls -al #这个.git是git的核心内容,我们下次来讲解!
首先我们来查看下当前配置的global配置参数是什么?
$ git config --global --list

我们现在要测试的是:当我们给刚才新建的项目仓库配置了local参数后,这个和global哪个优先生效?
当然我们已经知道,肯定是local的优先级高于global优先级,我们接下来观察下实验效果。
我们来配置下local参数:
$ git config --local user.name "xyy"
$ git config --local user.email "xyy@189.cn"

查看刚才配置的local内容:
$ git config --local --list

此时,我们需要往我们的第一个仓库添加第一个文件:
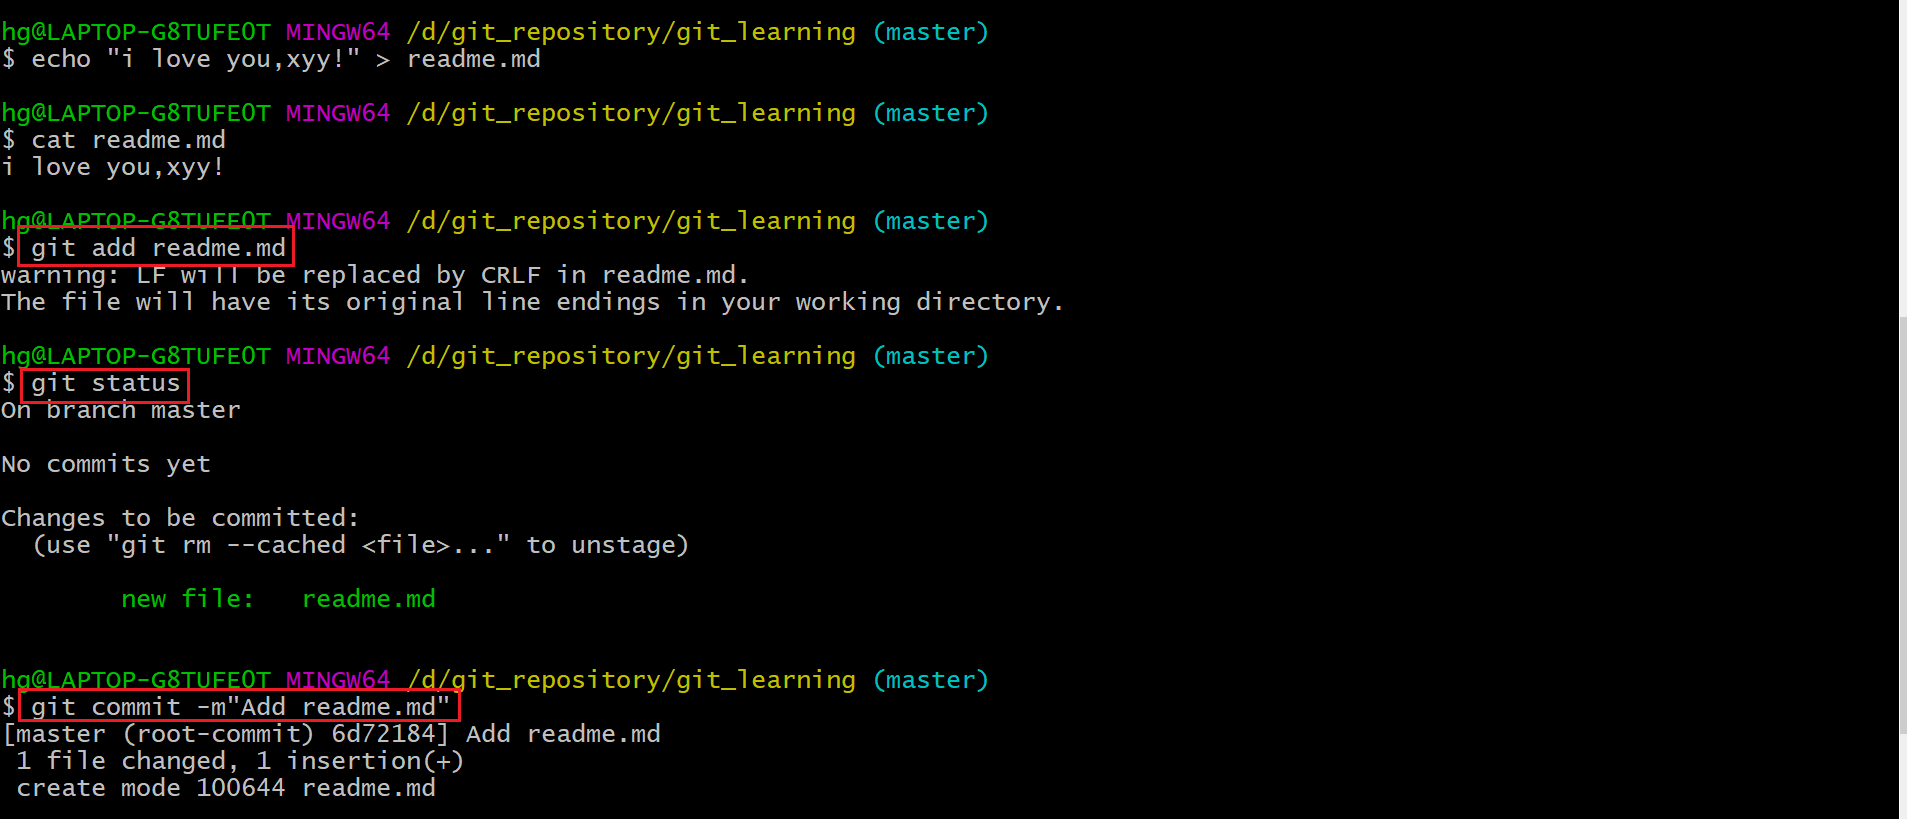
$ echo "i love you,xyy!" > readme.md
$ cat readme.md

$ git add readme.md
$ git status
$ git commit -m"Add readme.md"
⽤ log 看 commit 信息,Author 的 name 和 email 是什么?=>是local配置的信息,因此可以验证local的优先级高于global优先级!
$ git log

实验结束!
总结
以上就是关于如何在使用git之前需要做的最小配置了,接下来,我将带领大家去深入使用git。
最后,贴上我的女神photo,感谢大家阅读,see you later!


 557
557


 被折叠的 条评论
为什么被折叠?
被折叠的 条评论
为什么被折叠?
 到【灌水乐园】发言


