


前言
通过使用IdentityServer4给网关添加鉴权认证可以提高api的安全性。
在阅读本文之前,建议先阅读 02-01 .net core 3.1 使用 Ocelot搭建api网关
一、添加一个webApi项目,命名为IdentityServer(随意)
1、 然后用nuget安装IdentityServer4 包(如何操作不再赘述)

2、添加一个Config.cs(类名随意)
using IdentityServer4;
using IdentityServer4.Models;
using System;
using System.Collections.Generic;
using System.Linq;
using System.Threading.Tasks;

namespace IdentityServer
{
    public static class Config
    {
        public static IEnumerable<IdentityResource> GetIdentityResourceResources()
        {
            return new List<IdentityResource>
            {
                new IdentityResources.OpenId(), //必须要添加,否则报无效的scope错误
            };
        }
        // scopes define the API resources in your system
        public static IEnumerable<ApiResource> GetApiResources()
        {
            //可访问的API资源(资源名,资源描述)
            return new List<ApiResource>
            {
                new ApiResource("FirstApi", "FirstApi"),
                new ApiResource("SecondApi", "SecondApi")
            };
        }

        public static IEnumerable<Client> GetClients()
        {
            return new List<Client>
            {
                new Client
                {
                    ClientId = "firstClient", //访问客户端Id,必须唯一
                    //使用客户端授权模式,客户端只需要clientid和secrets就可以访问对应的api资源。
                    AllowedGrantTypes = GrantTypes.ClientCredentials,
                    ClientSecrets =
                    {
                        new Secret("secret".Sha256())
                    },
                    AllowedScopes = { "FirstApi", IdentityServerConstants.StandardScopes.OpenId,IdentityServerConstants.StandardScopes.Profile }
                },
                new  Client
                {
                    ClientId = "secondClient",
                    ClientSecrets = new [] { new Secret("secret".Sha256()) },
                    AllowedGrantTypes = GrantTypes.ClientCredentials,
                    AllowedScopes = { "SecondApi", IdentityServerConstants.StandardScopes.OpenId,IdentityServerConstants.StandardScopes.Profile }
                }
            };
        }
    }
}
因为我有两个下游api,所以我添加两个api资源和客户端
3、修改IdentityServer项目Startup.cs中的ConfigureServices方法
public void ConfigureServices(IServiceCollection services)
{
    services.AddControllers();
    //添加鉴权
    services.AddIdentityServer()
            .AddDeveloperSigningCredential()
            .AddInMemoryApiResources(Config.GetApiResources())
            .AddInMemoryClients(Config.GetClients());
}
如图

4、在IdentityServer项目Startup.cs中的Configure方法的最前面加上app.UseIdentityServer();也就是方法http管道中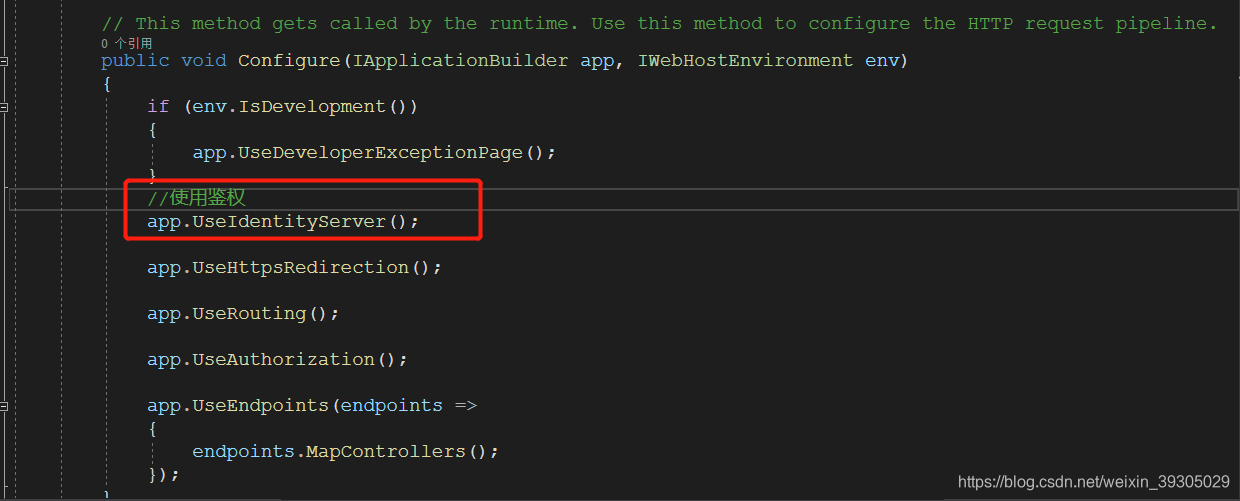
5、在IdentityServer项目添加一个TokenApiController,用来获取token
这里需要注意的是2.2.0及以下版本IdentityServer4和最新版的获取token的方式有所不同
(1)2.2.0以上版本IdentityServer4获取token的方式之一
using System;
using System.Collections.Generic;
using System.Linq;
using System.Net.Http;
using System.Threading.Tasks;
using IdentityModel.Client;
using IdentityServer4.Models;
using Microsoft.AspNetCore.Mvc;
using Newtonsoft.Json.Linq;

namespace IdentityServer
{
    /// <summary>
    /// 获取token
    /// </summary>
    public class TokenApiController : ApiController
    {
        [HttpPost,HttpGet]
        public string GetToken([FromBody]RequestTokenModel model)
        {
            var httpClient = new HttpClient();
            var disco = httpClient.GetDiscoveryDocumentAsync(new DiscoveryDocumentRequest
            {
                Address = $"{ Request.Scheme }://{Request.Host}"
            }).Result;
            if (disco.IsError)
            {
                throw new Exception(disco.Error);
            }
            var tokenResponse = httpClient.RequestClientCredentialsTokenAsync(new ClientCredentialsTokenRequest
            {
                Address = disco.TokenEndpoint,
                ClientId = model.ClientId,
                ClientSecret = model.ClientSecret,
                Scope = model.Scope
            });
            var json = tokenResponse.Result.Json;
            return json.ToString();
        }
    }

    /// <summary>
    /// 请求model
    /// </summary>
    public class RequestTokenModel
    {
        /// <summary>
        /// IdentityServer项目Config.cs的GetClients方法中配置的访问客户端Id
        /// </summary>
        public string ClientId { get; set; }

        /// <summary>
        /// IdentityServer项目Config.cs的GetClients方法中配置的ClientSecrets
        /// </summary>
        public string ClientSecret { get; set; }

        /// <summary>
        /// IdentityServer项目Config.cs的GetClients方法中配置的scope
        /// </summary>
        public string Scope { get; set; }
    }
}
(2)2.2.0及以下版本IdentityServer4获取token方式,仅供参考
public class TokenController : Controller
{
    public async Task<JObject> Get()
    {
        var disco = await DiscoveryClient.GetAsync($"{Request.Scheme}://{Request.Host}");
        if(disco.IsError)
        {
            Console.WriteLine(disco.Error);
            return null;
        }
		string clientId = "client";
		string clientSecret  = "secret";
		string scope = "FirstApi";
        var tokenClient = new TokenClient(disco.TokenEndpoint, clientId , clientSecret );
        var tokenResponse = await tokenClient.RequestClientCredentialsAsync(scope );
        if(tokenResponse.IsError)
        {
            Console.WriteLine(tokenResponse.Error);
            return null;
        }
        return tokenResponse.Json;
    }
}
请求api:http://localhost:5003/TokenApi/GetToken测试一下,如图说明已经拿到客户端firstApi的token了

如果http获取参数方式是FromForm,则以下面方式传参


二、给网关(WebApiGateway项目)集成IdentityServer
1、使用nuget给WebApiGateway项目安装IdentityServer4.AccessTokenValidation包,用于验证IdentityServer4中的JWT和引用令牌
2、在 WebApiGateway项目Startup.cs 的 ConfigureServices 中注册两个认证方案,在Configure 中配置IdentityServer服务。
注意:注册认证方案最好是加在ConfigureServices方法的最前面,配置IdentityServer服务最好是放在app.UseOcelot();后面
public void ConfigureServices(IServiceCollection services)
{
    //注册认证方案
    services.AddAuthentication(JwtBearerDefaults.AuthenticationScheme)
            .AddIdentityServerAuthentication("firstApiKey", x =>
            {
                x.ApiName = "FirstApi"; // 这个是认证服务(IdentityServer项目)Config.cs 的 GetApiResources方法中配置的api名称
                x.Authority = "http://localhost:5003";  // 这个是认证服务(IdentityServer项目)的地址
                x.RequireHttpsMetadata = false;
            }).AddIdentityServerAuthentication("secondApiKey", y =>
            {
                y.ApiName = "SecondApi";   // 这个是认证服务(IdentityServer项目)Config.cs 的 GetApiResources方法中配置的api名称
                y.Authority = "http://localhost:5003";  // 这个是认证服务(IdentityServer项目)的地址
                y.RequireHttpsMetadata = false;
            });

    //添加Ocelot,注意configuration.json的路径,我本身就放在了根路径下
    services.AddOcelot(new ConfigurationBuilder()
        .AddJsonFile("configuration.json", true, true).Build())
        .AddPolly() //添加 Ocelot.Provider.Polly 实现熔断
        .AddCacheManager(x => x.WithDictionaryHandle());  // 添加 Ocelot.Cache.CacheManager 实现缓存

    services.AddControllers();
}


public void Configure(IApplicationBuilder app, IWebHostEnvironment env)
{
    if (env.IsDevelopment())
    {
        app.UseDeveloperExceptionPage();
    }
    //配置使用Ocelot
    app.UseOcelot();

    //配置IdentityServer服务
    app.UseAuthorization();

    app.UseHttpsRedirection();

    app.UseRouting();

    app.UseAuthorization();

    app.UseEndpoints(endpoints =>
    {
        endpoints.MapControllers();
    });
}
如图


3、修改WebApiGateway项目的Oeclot配置文件configuration.json,在“ReRoutes”中的下游api对象中添加
//授权信息
"AuthenticationOptions": {
  "AuthenticationProviderKey": "firstApiKey",  //这个key就是在startup.cs中注册的key,不要写错了
  "AllowedScopes": []
}
如图:

Ocelot会去检查ReRoutes是否配置了AuthenticationOptions节点。如果有会根据配置的认证方案进行身份认证。如果没有则不进行身份认证。
AuthenticationProviderKey:是刚才注册的认证方案。AllowedScopes:是 AllowedScopes中配置的授权访问范围。
还需要在configuration.json添加IdentityServer api的网关配置
	// IdentityServer api,用来获取token
    {
      "UpstreamPathTemplate": "/identity/{controller}/{action}",
      "DownstreamPathTemplate": "/{controller}/{action}",
      "UpstreamHttpMethod": [ "GET", "POST", "DELETE", "PUT" ],
      "DownstreamScheme": "http",
      "DownstreamHostAndPorts": [
        {
          "Host": "localhost",
          "Port": 5003
        }
      ]
    },
如图

4、编译并启动WebApiGateway、IdentityServer、FirstApi、SecondApi四个项目
(1)访问http://localhost:5000/first/firstApi/getmessage,可以看到返回状态为未授权

(2)先访问http://localhost:5000/identity/TokenApi/GetToken

(3)获取到token后,在将token加到http://localhost:5000/first/firstApi/getmessage认证中,如图

(4)换下参数,拿到SecondApi的token

(5)访问SecondApi

至此IdentityServer4鉴权的基本用法就尝试成功了。
参考文章
IdentityModel最新文档
.Netcore 2.0 Ocelot Api网关教程(5)- 认证和授权
.Net Core使用Ocelot网关(二) -鉴权认证
IdentityServer4客户端获取Token的方法


 733
733

 被折叠的 条评论
为什么被折叠?
被折叠的 条评论
为什么被折叠?
 到【灌水乐园】发言


