


企业架构
拥有企业架构意味着什么?一般而言,企业架构是指具有数千个物理或虚拟服务器的多站点设计。企业设计中遇到的大量挑战与规模有关。例如,如果必须部署少量KVM服务器,与部署数百台KVM服务器相比,这是一项相对容易的任务。
KVM本身没有任何企业意识;很大程度上取决于您为KVM选择的管理解决方案。例如,如果您选择oVirt或RHEVM,它们都支持逻辑数据中心,可用于定义不同的站点并对其进行管理。
KVM管理程序配置
可以使用虚拟化集合在CentOS上安装KVM。安装相当容易;然而,诀窍是以企业规模和自动化方式进行安装。我建议使用Kickstart。使用Kickstart安装CentOS后,可以将安装虚拟化组作为安装后脚本的一部分进行安装。对于手动安装,清单3-1中的步骤说明了如何继续。
清单3-1。手动KVM安装
# Installing the virtualization group# yum groupinstall "Virtualization"Loaded plugins: fastestmirror, securityLoading mirror speeds from cached hostfileSetting up Group ProcessLoading mirror speeds from cached hostfilebase/group_gz| 212 kB 00:00epel6/group_gz| 237 kB 00:00Resolving Dependencies--> Running transaction check---> Package hypervkvpd.x86_64 0:0-0.9.el6 will be installed---> Package qemu-kvm.x86_64 2:0.12.1.2-2.355.0.1.el6_4.9 will be installed[SNIP]# Viewing the packages in Virtualization group# yum groupinfo VirtualizationLoaded plugins: fastestmirrorSetting up Group ProcessLoading mirror speeds from cached hostfile[SNIP]Group: Virtualization Description: Provides an environment for hosting virtualized guests. Mandatory Packages: qemu-kvm Default Packages: hypervkvpd Optional Packages: qemu-guest-agent qemu-kvm-tools# Creating a virtual machine. In this example, we are using br0, which is a network bridge, and routed mode. In addition, we are pointing to a local ISO image for installation, and displaying graphics of the VM using Spice.# virt-install --connect qemu:///system --name vm1.example.com --ram 32768 --vcpus 4 --disk path=/vm1/vm1.example.com.qcow2 --network=bridge:br0 --os-type=linux --os-variant=rhel6 --cdrom /vm1/iso/CentOS-6.4-x86_64-bin-DVD1.iso --graphics spice,password=mypassword –autostart# Enable libvirt to start automatically.# chkconfig libvirtd on# service libvirtd start# Starting a running VM# virsh start vm1.example.com# Stopping a running VM# virsh shutdown vm1.example.com# Shutting down a VM forcefully# virsh destroy vm1.example.com# Deleting a VM definition# virsh undefine vm1.example.comAutomated KVM InstallationKickstart can be tuned to support hundreds of hosts at any given time. Out of the box, after you tune TFTP limits, you can easily clone 500 hypervisors at a time. Basically, you configure PXE to boot the hypervisors. After that, install CentOS or RedHat followed by the installation of KVM packages. Listing 3-2 shows a sample PXE Linux configuration file and Listing 3-3 shows a sample Kickstart configuration file.Listing 3-2. PXE Linux Configdefault menu.c32prompt 0timeout 5menu title PXE Boot Menulabel 1 menu label ^1 - Install KVM kernel images/centos/6.5/x86_64/vmlinuz APPEND text load_ramdisk=1 initrd=images/centos/6.5/x86_64/initrd.img network noipv6 ksdevice=eth0 ks=http://ks/kickstart/ks.cfg i8042.noaux console=tty0label local menu label ^0 - Boot from first hard drive com32 chain.c32 append hd0Listing 3-2. PXE Linux Config
default menu.c32prompt 0timeout 5menu title PXE Boot Menulabel 1 menu label ^1 - Install KVM kernel images/centos/6.5/x86_64/vmlinuz APPEND text load_ramdisk=1 initrd=images/centos/6.5/x86_64/initrd.img network noipv6 ksdevice=eth0 ks=http://ks/kickstart/ks.cfg i8042.noaux console=tty0label local menu label ^0 - Boot from first hard drive com32 chain.c32 append hd0Listing 3-3. Kickstart Postinstall File
# commands sections (required)bootloader --location=mbrauthconfig --enableshadowkeyboard usautopart# optional componentsclearpart -allfirewall --disabledinstall --url http://ks.example.com/centos/6.4network --bootproto=static --ip=10.1.1.100 --netmask=255.255.255.0 --gateway=10.1.1.1 --nameserver=10.1.1.10#packages section (required)%packages@Virtualization# preinstall section (optional)%pre# postinstall section (optional)%post问题是:你如何让KVM的Kickstart对企业友好? 设置单个Kickstart服务器对于企业来说是不够的。 使用本章后面定义的Example.com的参考体系结构,如果我们有三个不同的站点,每个站点至少有500个虚拟机管理程序,我们需要为每个站点设置多个Kickstart服务器。 此外,由于PXE是基于广播的,我们必须在不同的虚拟机管理程序网络之间的路由器上设置IP帮助程序。 我们希望为所有虚拟机管理程序避免平坦的网络空间,因为它有点难以管理。 需要回答的一个重要问题是:您期望发生多少并发Kickstart? Kickstart架构的解决方案基于您的答案。 有许多方法来设计解决方案,我在以下部分中概述了两种可能性。
集群Kickstart解决方案
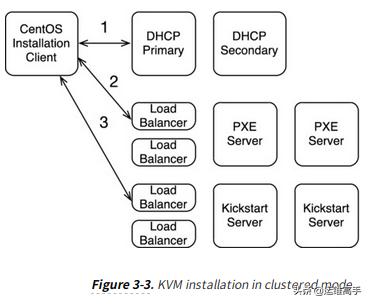
通过此解决方案,我们可以设置两个集群:一个用于PXE引导,另一个用于通过HTTP提供CentOS安装文件。每个站点将有一对集群。在集群中,我们将拥有一对负载均衡器和真实服务器。我们不使用PXE,而是使用支持PXE over HTTP的iPXE(http://ipxe.org/)。在主模式和辅助模式下运行的另一对DHCP服务器将为DHCP服务。无需在负载均衡器后面运行DHCP,因为如果使用Internet Systems Consortium(ISC)DHCPD(https://www.isc.org/downloads/dhcp/),则支持主要和辅助模式。使用群集解决方案的优势在于,您可以按需增长,同时减少服务器蔓延。每个站点都有一个集群,随着传入连接的增加,您可以增加负载均衡器后面的真实服务器数量以匹配负载。必须在跨管理程序网络的路由器上配置IP帮助程序,以将DHCP流量传递到DHCP服务器。一个例子如图3-3所示。
在BIOS中,管理程序的引导顺序如下:
- 硬盘
- 网络/ PXE
在第一次引导期间,由于未安装操作系统,因此硬盘驱动器引导将失败,然后尝试从网络引导。 因为我们已经配置了PXE,所以继续引导并且可以开始安装。 iPXE服务器和Kickstart服务器的负载平衡器可以是企业认可的负载平衡器。 HAProxy是一个可用于Kickstart服务器负载平衡的免费负载平衡器(http://www.haproxy.org/)。 HAProxy不支持UDP,因此对于PXE,您可能需要基于UDP的负载均衡器,例如来自F5网络(https://f5.com/)的负载均衡器。 清单3-4显示了使用PXE时的DHCPD配置文件示例。 请注意类pxeclients。
清单3-4。 PXE的DHCPD配置
subnet 10.1.1.0 netmask 255.255.255.0 { option domain-name-servers 10.1.1.2; option routers 10.1.1.1; pool { failover peer "failover-partner"; range 10.1.1.50 10.1.1.250; }class "pxeclients" { match if substring(option vendor-class-identifier, 0, 9) = "PXEClient"; next-server 10.1.1.3; filename = "pxelinux.0";}在DHCPD配置示例中,DHCP IP地址在10.1.1.0/24子网中租用。 提供的IP地址范围为50到250.当服务器引导时,它首先从DHCP服务器获取IP,此时DHCP服务器使用下一个服务器字符串指向PXE服务器。 然后,引导服务器使用TFTP联系iPXE服务器并下载服务器引导的PXE引导文件。 在使用PXE内核启动后,它可以下载CentOS或RedHat安装文件并开始安装。 清单3-5显示了DHCPD主服务器配置文件; 清单3-6显示了辅助DHCPD配置文件。
清单3-5。 DHCPD主配置
failover peer "failover-partner" { primary; address dhcp-primary.example.com; port 519; peer address dhcp-secondary.example.com; peer port 520; max-response-delay 60; max-unacked-updates 10; mclt 3600; split 128; load balance max seconds 3; }omapi-port 7911;omapi-key omapi_key;key omapi_key { algorithm hmac-md5; secret Ofakekeyfakekeyfakekey==;}清单3-6。 DHCPD辅助配置
failover peer "failover-partner" { secondary; address dhcp-secondary.example.com; port 520; peer address dhcp-primary.example.com; peer port 519; max-response-delay 60; max-unacked-updates 10; load balance max seconds 3; }omapi-port 7911;omapi-key omapi_key;key omapi_key { algorithm hmac-md5; secret Ofakekeyfakekeyfakekey==;}主要和次要配置来自https://kb.isc.org/article/AA-00502/0/A-Basic-Guide-to-Configuring-DHCP-Failover.html。
分布式Kickstart解决方案
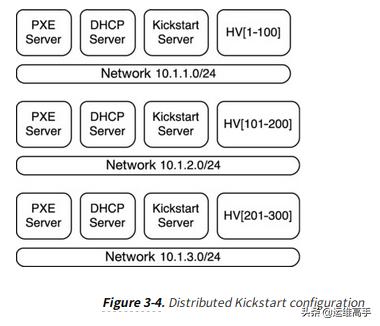
使用此解决方案,您可以设置多个DHCP,PXE和Kickstart服务器,而不是每个站点都有一个集群。使用分布式设置的优点是可以避免群集的复杂性,并且除了不同的主机之外,还可以将负载分散到不同的网络中。设置了多少个分布式服务器取决于网络的大小。例如,如果虚拟机管理程序分布在每个站点的十个网络中,那么您至少需要十个Kickstart,DHCP和PXE服务器。此设置的成本可能超过设置群集的成本,但您可以减少所有这些成本无法同时使用的可能性。此外,您不需要在路由器上配置IP助手将BOOTP DHCP流量转发到服务器。此解决方案的一个缺点是您需要管理更多硬件。虽然,如果特定网络的Kickstart关闭,只有该网络受到影响。图3-4给出了该解决方案的一个示例。需要记住的是,如果您拥有大量网络,此解决方案可能不切实际,您可能更愿意使用群集解决方案。
VM配置
安装KVM后,虚拟机的配置将在企业范围内发挥作用。 使用Kickstart也是VM的一个选项,如果您使用桥接网络模式,这很有效。 使用VM的一大优势是可以克隆它们并显着缩短配置时间。 例如,使用Kickstart,每个VM可能需要20分钟。 另一方面,从克隆模板部署VM可能不会超过几分钟。 清单3-7显示了如何使用virt命令克隆VM。
清单3-7。 克隆VM
# Use virt-sysprep to prepare a turned off virtual machine as a template# virt-sysprep -d centos.templateExamining the guest ...Performing "yum-uuid" ...Performing "utmp" ...Performing "udev-persistent-net" ...Performing "sssd-db-log" ...Performing "ssh-userdir" ...Performing "ssh-hostkeys" ...Performing "smolt-uuid" ...Performing "script" ...Performing "samba-db-log" ...Performing "rpm-db" ...Performing "rhn-systemid" ...Performing "random-seed" ...Performing "puppet-data-log" ...Performing "pam-data" ...Performing "package-manager-cache" ...Performing "pacct-log" ...Performing "net-hwaddr" ...Performing "net-hostname" ...Performing "mail-spool" ...Performing "machine-id" ...Performing "logfiles" ...Performing "hostname" ...Performing "firstboot" ...Performing "dovecot-data" ...Performing "dhcp-server-state" ...Performing "dhcp-client-state" ...Performing "cron-spool" ...Performing "crash-data" ...Performing "blkid-tab" ...Performing "bash-history" ...Performing "abrt-data" ...Performing "lvm-uuids" ...# Using the earlier created template, clone a new VM.# virt-clone -o centos.template -n newclone -f /vm1/newclone.imgAllocating 'newclone.img' | 8.0 GB 00:09Clone 'newclone' created successfully.# Make sure you can see the new cloned virtual machine# virsh list --all Id Name State---------------------------------------------------- 1 vm1.example.com running 2 vm2.example.com running - centos.template shut off - newclone shut off # Start the new cloned VM. # virsh start newclone Domain newclone started #Ensure that it is running. # virsh list Id Name State ---------------------------------------------------- 1 vm1.example.com running 2 vm2.example.com running 3 newclone running我们必须使用virt-sysprep来准备克隆映像。 virt-sysprep修改映像并删除某些设置,或取消配置某些设置,如果离开,则会在另一个VM上发生冲突。 sysprep代表系统准备。 您可以在http://libguestfs.org/virt-sysprep.1.html上阅读更多相关信息。
virt-clone克隆了从virt-sysprep创建的模板。 有两种类型的克隆:链接克隆和完整克隆。 链接克隆取决于克隆它的图像,并且无法删除原始映像。 另一方面,完整克隆与克隆它的图像无关。


 251
251


 被折叠的 条评论
为什么被折叠?
被折叠的 条评论
为什么被折叠?
 到【灌水乐园】发言


