


Ext1:本文源码解析基于 mybatis-spring-boot-starter 2.1.1,即 mybatis 3.5.3 版本。
Ext2:本文主要是对源码的讲解,着重点会是在源码上。

一、从 MybatisAutoConfiguration 说开去,mapper 文件是怎么扫描的?
我们知道配置 SqlSessionFactory 是我们集成 Mybatis 时需要用到的常客,SqlSessionFactory 顾名思义是用来创建 SqlSession 对象的,SqlSession 对象的重要程度不言而喻。源码中提到,SqlSession 是 Mybatis 运行最重要的一个接口,通过此接口,我们可以进行我们的操作指令,获取 mapper,管理事务等操作。
官网 给出了一个简单的配置demo,通过 SqlSessionFactoryBean 进行 sqlSessionFactory 的创建。
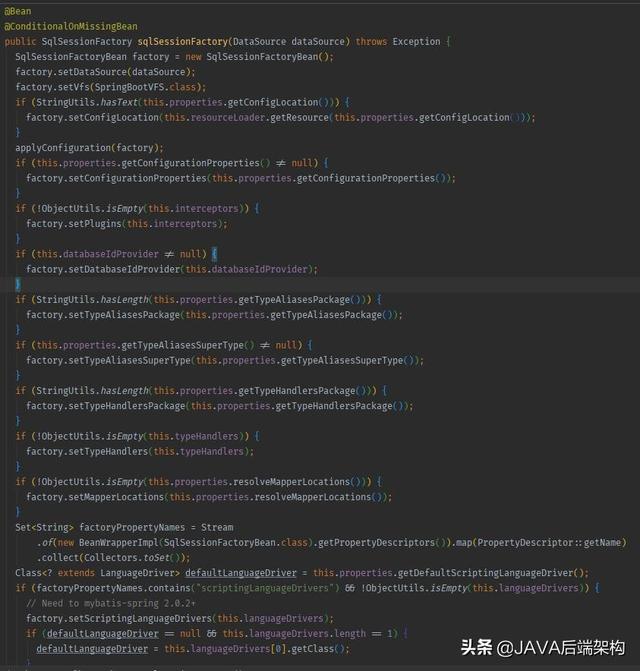
@Beanpublic SqlSessionFactory sqlSessionFactory() { SqlSessionFactoryBean factoryBean = new SqlSessionFactoryBean(); factoryBean.setDataSource(dataSource()); return factoryBean.getObject();}我们可以拿到这个 SqlSessionBean 来进行我们一些定制化操作,比如 mybatis插件,自定义的返回处理等等。如果我们不显式声明 SqlSessionFactory,则会使用 mybatis-spring-boot-autoconfigure 下的这个 bean 的注册:
我们可以看到在 mybatis 里的很多定制化常客,都出现在了这里。比如,配置 mapper 文件位置的配置,我们用以下的小段代码来看的话:
-- 来自代码 org.mybatis.spring.boot.autoconfigure.MybatisAutoConfiguration#sqlSessionFactory -- if (!ObjectUtils.isEmpty(this.properties.resolveMapperLocations())) { factory.setMapperLocations(this.properties.resolveMapperLocations()); }它的实现实际上非常简单:拿到我们所有的 mapperLocations 这个数组,解析成 Resource 数组。
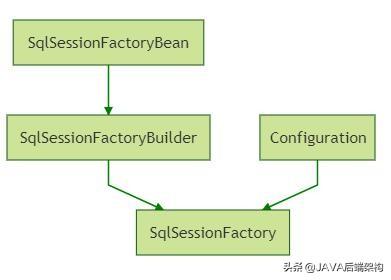
-- 来自代码 org.mybatis.spring.boot.autoconfigure.MybatisProperties#resolveMapperLocations -- public Resource[] resolveMapperLocations() { return Stream.of(Optional.ofNullable(this.mapperLocations).orElse(new String[0])) .flatMap(location -> Stream.of(getResources(location))).toArray(Resource[]::new); } private Resource[] getResources(String location) { try { return resourceResolver.getResources(location); } catch (IOException e) { return new Resource[0]; } }-- application.yml中的配置 --mybatis: mapper-locations: classpath*:com/anur/mybatisdemo/test/mapper/*.xml*/纵览一下这几者的关系,SqlSessionFactory 是根据配置 Configuration 与 sqlSessionFactoryBuilder 共同创建的,如果在 spring 项目中,则会由 SqlSessionFactoryBean 来替代 SqlSessionFactoryBuilder 进行创建。
二、SqlSessionFactory 的初始化与 XMLMapperBuilder
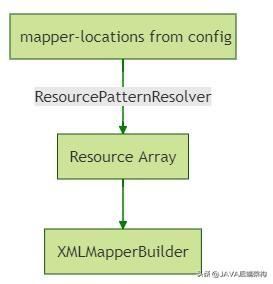
其实上面扯了那么多,只是想引入一下 XMLMapperBuilder。我们知道,我们的配置(比如Spring中的 application.yml),最后会被解析成 Configuration,而 mapper.xml 文件正是依据我们的配置来进行读取的,读取到的 xml 将被读取成 Resource文件,最后在 SqlSessionFactoryBean 初始化完毕后、也就是在创建 SqlSessionFactory 之前:会通过 XMLMapperBuilder 完成 xml 文件的解析。
XMLMapperBuilder 在完成初始化后,调用 org.apache.ibatis.builder.xml.XMLMapperBuilder#parse 来进行真正的 mapper 文件解析:
public void parse() { if (!configuration.isResourceLoaded(resource)) { configurationElement(parser.evalNode("/mapper")); configuration.addLoadedResource(resource); bindMapperForNamespace(); } parsePendingResultMaps(); parsePendingCacheRefs(); parsePendingStatements();}configurationElement 就是对我们 xml 文件的解析,通过parser.evalNode("/mapper") 拿到我们编写的 xml 的 标签进行初步的解析,源码如下:可以看到许多熟悉的身影,比如 namespace、resultMap、select|insert|update|delete之类的。
private void configurationElement(XNode context) { try { String namespace = context.getStringAttribute("namespace"); if (namespace == null || namespace.equals("")) { throw new BuilderException("Mapper's namespace cannot be empty"); } builderAssistant.setCurrentNamespace(namespace); cacheRefElement(context.evalNode("cache-ref")); cacheElement(context.evalNode("cache")); parameterMapElement(context.evalNodes("/mapper/parameterMap")); resultMapElements(context.evalNodes("/mapper/resultMap")); sqlElement(context.evalNodes("/mapper/sql")); buildStatementFromContext(context.evalNodes("select|insert|update|delete")); } catch (Exception e) { throw new BuilderException("Error parsing Mapper XML. The XML location is '" + resource + "'. Cause: " + e, e); }}给一个简单的 xml 看一下 mapper 标签里面的内容方便理解,就是 之间那一大段内容, mybaits 封装的这套 XNode 可以使得我们访问 xml 像访问 map 一样轻松:
<?xml version="1.0" encoding="UTF-8" ?> select * from tracker_config where in_use = 1 and user_id = #{followerId} select * from tracker_config where in_use = 1 and user_id = #{followerId} limit 1 三、ResultMap 是如何解析的
方才说到,configurationElement() 方法负责对 xml 文件进行解析,我们拿几个主要的元素出来讲讲,比如 resultMap:
resultMapElements(context.evalNodes("/mapper/resultMap")); 就是解析 resultMap 的入口,同样的,先拿到 resultMap 这个 XML 节点,进入到 resultMapElements 这个方法,resultMapElements 负责解析 xml,最后,将解析的结果交给 ResultMapResolver 处理。
我们先忽略 ResultMapResolver,简单看看 resultMapElement 中做了什么,对应的源码如下,大体可分为两类解析:
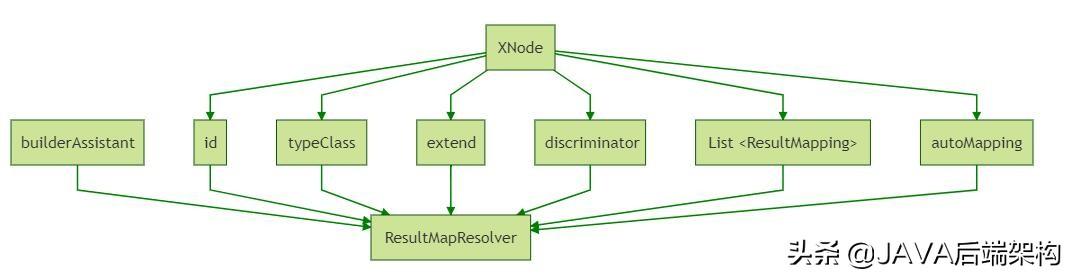
private ResultMap resultMapElement(XNode resultMapNode, List additionalResultMappings, Class> enclosingType) throws Exception { ErrorContext.instance().activity("processing " + resultMapNode.getValueBasedIdentifier()); String type = resultMapNode.getStringAttribute("type", resultMapNode.getStringAttribute("ofType", resultMapNode.getStringAttribute("resultType", resultMapNode.getStringAttribute("javaType")))); Class> typeClass = resolveClass(type); if (typeClass == null) { typeClass = inheritEnclosingType(resultMapNode, enclosingType); } Discriminator discriminator = null; List resultMappings = new ArrayList<>(); resultMappings.addAll(additionalResultMappings); List resultChildren = resultMapNode.getChildren(); for (XNode resultChild : resultChildren) { // 循环解析子标签 if ("constructor".equals(resultChild.getName())) { processConstructorElement(resultChild, typeClass, resultMappings); } else if ("discriminator".equals(resultChild.getName())) { discriminator = processDiscriminatorElement(resultChild, typeClass, resultMappings); } else { List flags = new ArrayList<>(); if ("id".equals(resultChild.getName())) { flags.add(ResultFlag.ID); } resultMappings.add(buildResultMappingFromContext(resultChild, typeClass, flags)); } } String id = resultMapNode.getStringAttribute("id", resultMapNode.getValueBasedIdentifier()); String extend = resultMapNode.getStringAttribute("extends"); Boolean autoMapping = resultMapNode.getBooleanAttribute("autoMapping"); ResultMapResolver resultMapResolver = new ResultMapResolver(builderAssistant, id, typeClass, extend, discriminator, resultMappings, autoMapping); try { return resultMapResolver.resolve(); } catch (IncompleteElementException e) { configuration.addIncompleteResultMap(resultMapResolver); throw e; }}- 一种是对 resultMap 本身属性的解析,也就是 getStringAttribute,例如当前 resultMap 的 type 是什么,它是否开启 autoMapping, id 是什么之类的。
- 一种则是对子标签的解析,子标签的解析,则分为 constructor、discriminator、以及其他字段的解析。
如图所示:
3.1 ResultMap 中的重要成员:typeHandler
在 mybatis 对 mysql 返回的结果集 resultSet 进行解析时,typeHandler 有着举足轻重的作用。mysql 的 JdbcType 有很多,比如 BLOB, VARCHAR, DATE 等等,而我们的 java 类型( mybatis 称之为 javaType,或者 javaTypeClass)也很多,还包括我们很多的 自定义的 TypeHandler,这里就不赘述了。
那么必然存在一个问题,如何将它们一一对应上?毫无疑问,JdbcType 可以被解析为多个 javaTypeClass ,如 VARCHAR 可以对应解析成我们的 JSON JAVA BEAN ,也可以解析为 String 等等;同样, String 类型也可以由多个 JdbcType 解析而来,比如 DATE 类型可以经过一定规则的解析,成为 String 类型的时间。
答案就在 org.apache.ibatis.type.TypeHandlerRegistry。
public TypeHandlerRegistry() { register(Boolean.class, new BooleanTypeHandler()); register(boolean.class, new BooleanTypeHandler()); register(JdbcType.BOOLEAN, new BooleanTypeHandler()); register(JdbcType.BIT, new BooleanTypeHandler()); register(Byte.class, new ByteTypeHandler()); register(byte.class, new ByteTypeHandler()); register(JdbcType.TINYINT, new ByteTypeHandler()); register(Short.class, new ShortTypeHandler()); register(short.class, new ShortTypeHandler()); register(JdbcType.SMALLINT, new ShortTypeHandler()); register(Integer.class, new IntegerTypeHandler()); register(int.class, new IntegerTypeHandler()); register(JdbcType.INTEGER, new IntegerTypeHandler()); register(Long.class, new LongTypeHandler()); register(long.class, new LongTypeHandler()); register(Float.class, new FloatTypeHandler()); register(float.class, new FloatTypeHandler()); register(JdbcType.FLOAT, new FloatTypeHandler()); register(Double.class, new DoubleTypeHandler()); register(double.class, new DoubleTypeHandler()); register(JdbcType.DOUBLE, new DoubleTypeHandler()); ........TypeHandlerRegistry 中注册了许多 javaTypeClass -> JdbcType 的映射,内部维护了一个变量 private final Map>> typeHandlerMap = new ConcurrentHashMap<>();
当我们获取某个 TypeHandler 时,先根据 javaTypeClass 获取到 Map,然后再根据 JdbcType 获取到具体的 TypeHandler。
例如,对于 javaTypeClass : java.util.Date 来说,默认有三种映射,分别是:
null -> DateTypeHandler"TIME" -> TimeOnlyTypeHandler"DATE" -> DateOnlyTypeHandler源码中,优先根据 jdbcType 获取,如果获取不到,则使用兜底的配置,也就是默认的 TypeHandler,代码如下:
private TypeHandler getTypeHandler(Type type, JdbcType jdbcType) { if (ParamMap.class.equals(type)) { return null; } Map> jdbcHandlerMap = getJdbcHandlerMap(type); TypeHandler> handler = null; if (jdbcHandlerMap != null) { handler = jdbcHandlerMap.get(jdbcType); // 优先根据 `jdbcType` 获取 if (handler == null) { handler = jdbcHandlerMap.get(null);// 否则获取默认的,key 为 null } if (handler == null) { // #591 handler = pickSoleHandler(jdbcHandlerMap); } } // type drives generics here return (TypeHandler) handler;}3.2 mapper.xml 配置与 typeHandler
上面只是说了 typeHandler 的获取,那么又是如何从 mapper 文件解析出我们需要的 typeHandler 呢?这里直接上结论,再一一解析。

上图看起来好像复杂,实际上解析过程十分简单,遵循以下几个获取顺序:
- 优先获取 xml 配置的 typeHandler,自己配置的 typeHandler 优先级最高
- 若果没有配置,则需要从刚才讲的那个 TypeHandlerRegistry 中,通过 javaTypeClass + jdbcType 获取
- 如果 javaTypeClass 为空则使用 Object.class 类型作为 javaTypeClass
- 如果 jdbcType 为空则获取默认的 typeHandler
javaTypeClass 也有自己的获取权重,顺序如下:
- 优先获取 xml 配置的 javaType
- 否则根据 property + resultType 根据反射来获取
3.2.1 typeHandler 的获取顺序
源码也很容易看明白,先通过 xml 文件获取 typeHandler
== org.apache.ibatis.builder.xml.XMLMapperBuilder#buildResultMappingFromContext ==String typeHandler = context.getStringAttribute("typeHandler");Class extends TypeHandler>> typeHandlerClass = resolveClass(typeHandler);比如对于下面这个xml,update_time 这一属性,会优先使用 Date2StrTypeHandler 来进行解析。
紧接着,如果 xml 中指定了 typeHandler,则创建一个 typeHandler 实例,如果没有指定,则 typeHandler 会在下一步骤进行创建。
== org.apache.ibatis.builder.BaseBuilder#resolveTypeHandler(java.lang.Class>, java.lang.Class extends org.apache.ibatis.type.TypeHandler>>) ==protected TypeHandler> resolveTypeHandler(Class> javaType, Class extends TypeHandler>> typeHandlerType) { if (typeHandlerType == null) { return null; } // javaType ignored for injected handlers see issue #746 for full detail TypeHandler> handler = typeHandlerRegistry.getMappingTypeHandler(typeHandlerType); if (handler == null) { // not in registry, create a new one handler = typeHandlerRegistry.getInstance(javaType, typeHandlerType); } return handler;}没有手动指定 TypeHandler,那么则会使用 javaTypeClass + JdbcType 共同来定位一个 TypeHandler,也就是调用 typeHandlerRegistry.getTypeHandler(resultMapping.javaType, resultMapping.jdbcType)这个方法,此方法在本文 2.1.1 有提到过
== org.apache.ibatis.mapping.ResultMapping.Builder#resolveTypeHandler ==private void resolveTypeHandler() { if (resultMapping.typeHandler == null && resultMapping.javaType != null) { Configuration configuration = resultMapping.configuration; TypeHandlerRegistry typeHandlerRegistry = configuration.getTypeHandlerRegistry(); resultMapping.typeHandler = typeHandlerRegistry.getTypeHandler(resultMapping.javaType, resultMapping.jdbcType); }}3.2.2 javaTypeClass 的获取顺序
javaTypeClass 也是一样的道理,先是优先从 xml 中获取:
String javaType = context.getStringAttribute("javaType"); Class> javaTypeClass = resolveClass(javaType);比如下面这个 xml 的 userId 这一属性,javaTypeClass 就是 Integer
但是如果我们不指定,源码中则是这么处理的,通过 property 这个 xml 配置,配合我们的 resultType,共同进行解析,还是拿上面那个 xml 为例, in_use 这个属性,由于我们没有指定 javaType,它会通过 resultMap 中我们指定的那个 javaBean ,也就是 TrackerConfigDO 连同 property = inUse ,通过反射来进行解析。
private Class> resolveResultJavaType(Class> resultType, String property, Class> javaType) { if (javaType == null && property != null) { try { MetaClass metaResultType = MetaClass.forClass(resultType, configuration.getReflectorFactory()); javaType = metaResultType.getSetterType(property); } catch (Exception e) { //ignore, following null check statement will deal with the situation } } if (javaType == null) { javaType = Object.class; } return javaType;}3.3 ResultMap 中的另一个常用属性: resultMap嵌套
resultMap 嵌套,包括使用 association 一对一的关联、collection 一对多的管理与 discriminator + case 的魔幻sql语句 (感觉这么写很蛋疼)
resultMap 嵌套大体分为两种情况
- 其一是指定直接嵌套,比如下面所示 xml 中的 collection 标签
- 其二是指定另一个 resultMap 进行嵌套,如下所示 association 标签
- (或者上面两种互相嵌套组合)
3.3.1 resultMap嵌套中的两种解析规则
3.3.1.1 其一,如果指定了显式的 resultMap,则直接拿到它的名字
这种情况,内嵌 ResultMap 十分简单,就是直接拿到名字:
String nestedResultMap = context.getStringAttribute("resultMap", // 下面会运行,但是不会生成的 id 和当前的 nestedResultMap 没关系,因为我们指定了 resultMap processNestedResultMappings(context, Collections.emptyList(), resultType));最后,如果你没指定 resultMap 是哪个包来的,则会给你加上前面的 namespace
public String applyCurrentNamespace(String base, boolean isReference) { if (base == null) { return null; } if (isReference) { // is it qualified with any namespace yet? if (base.contains(".")) { return base; } } else { // is it qualified with this namespace yet? if (base.startsWith(currentNamespace + ".")) { return base; } if (base.contains(".")) { throw new BuilderException("Dots are not allowed in element names, please remove it from " + base); } } return currentNamespace + "." + base;}例如指定了一个一对一关联:,我们拿到的 id 不是 customMap,而是 com.anur.mybatisdemo.test.TrackerConfigMapper.customMap
这种情况比较简单,这里就不赘述了(注意,这种情况也会递归解析(下面的这一小节)此标签,但是名字拿的是我们指定的名字)。
3.3.1.2 其二,如果未指定显式 resultMap,则递归解析,拿到其 ValueBasedIdentifier ,即 id
它的递归解析上大体如下图所示:
// 方法一,如何解析一个 resultMap,以及其子节点== org.apache.ibatis.builder.xml.XMLMapperBuilder#resultMapElement(org.apache.ibatis.parsing.XNode, java.util.List, java.lang.Class>) ==private ResultMap resultMapElement(XNode resultMapNode, List additionalResultMappings, Class> enclosingType) throws Exception { List resultChildren = resultMapNode.getChildren(); for (XNode resultChild : resultChildren) {// 调用方法二循环解析子节点 resultMappings.add(buildResultMappingFromContext(resultChild, typeClass, flags)); } ResultMapResolver resultMapResolver = new ResultMapResolver(builderAssistant, id, typeClass, extend, discriminator, resultMappings, autoMapping); return resultMapResolver.resolve(); }// 方法二,如何解析一个子节点,如果子节点中包含 resultMap,或者 association、collection、case 等,调用方法三 private ResultMapping buildResultMappingFromContext(XNode context, Class> resultType, List flags) throws Exception { String nestedResultMap = context.getStringAttribute("resultMap", processNestedResultMappings(context, Collections.emptyList(), resultType)); return builderAssistant.buildResultMapping(resultType, property, column, javaTypeClass, jdbcTypeEnum, nestedSelect, nestedResultMap, notNullColumn, columnPrefix, typeHandlerClass, flags, resultSet, foreignColumn, lazy); }// 方法三,调用方法一 private String processNestedResultMappings(XNode context, List resultMappings, Class> enclosingType) throws Exception { if ("association".equals(context.getName()) || "collection".equals(context.getName()) || "case".equals(context.getName())) { if (context.getStringAttribute("select") == null) { validateCollection(context, enclosingType); ResultMap resultMap = resultMapElement(context, resultMappings, enclosingType); return resultMap.getId(); } } return null; }用图表示则为以下三个方法:
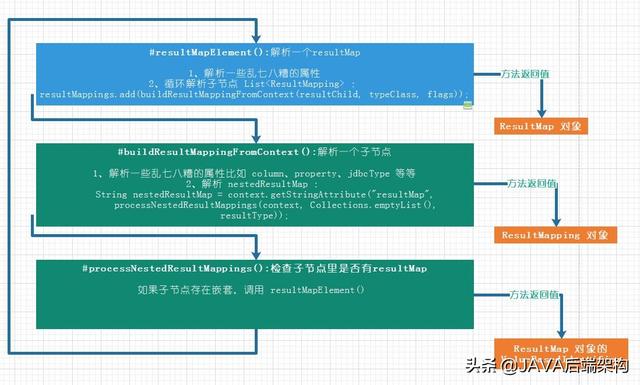
为了避免看起来很混乱,
下面将第一个解析 resultMap 标签的方法称为 resultMap解析方法,
将第二个解析子标签 resultMapping 的方法称为 子标签解析方法,
将第三个判断子标签有无内嵌 resultMap 如果有,则调用第一个方法的方法称为 内嵌解析方法
还是拿出我们的 xml 文件来举栗子:
- 首先调用 resultMap解析方法 解析我们当前的最外层,即 customMap,id为 xxx略xxx.mapper_customMap
- 发现有子标签,遍历子标签子标签 存在内嵌 resultMap调用 resultMap解析方法 解析其内嵌 resultMap(略)子标签 由于显式指定了 resultMap,所以其内嵌id 为 xxx略xxx.mapper_customMap子标签 没有显式指定 resultMap,故其内嵌id 从调用 resultMap解析方法 中来调用 resultMap解析方法 解析其内嵌 resultMap发现有子标签,遍历子标签子标签 role 没有内嵌 resultMap子标签 inUse 没有内嵌 resultMap解析完毕,此 resultMap Id 为 xxx略xxx.mapper_resultMap[customMap]_collection[configDOList]子标签 没有显式指定 resultMap,内嵌id 为 xxx略xxx.mapper_resultMap[customMap]_collection[configDOList]
3.3.2 ValueBasedIdentifier
刚才提到的 内嵌id,或者 id 实际上是“一个东西”,可以理解为地址和引用之间的关系。比如说,这个 resultMap 的 id叫做 customMap,它的子标签中内嵌了一个 resultMap ,内嵌id 为 customMap。
从上面的解析我们也可以看出,我们的 ResultMap 只有持有一层结构,即使, ResultMap 持有其所有子标签 resultMapping,而子标签 resultMapping 对另外 ResultMap,是通过记录其 id 的形式持有的。
这些 ValueBasedIdentifier 或者 id,生成规则如下:
public String getValueBasedIdentifier() { StringBuilder builder = new StringBuilder(); XNode current = this; while (current != null) { if (current != this) { builder.insert(0, "_"); } String value = current.getStringAttribute("id", current.getStringAttribute("value", current.getStringAttribute("property", null))); if (value != null) { value = value.replace('.', '_'); builder.insert(0, "]"); builder.insert(0, value); builder.insert(0, "["); } builder.insert(0, current.getName()); current = current.getParent(); } return builder.toString();}代码很好理解,优先获取标签的 id 属性、其次则是 value 属性、最后是 property 属性, 如果不为空,替换一下 .符号,避免它把你命名里面的 . 当成路径来解析,然后在左右套一个 []
(insert(0,val) + while相当于递归 + 按顺序 append,逻辑也更清楚)
总结规则为 _标签名[命名(可能为空)]
最后再在前面塞一个当前标签的标签名,然后 while 循环上层来向更上层命名。
也就是说打个比方,下面的 xml 最里层的这个关联标签会生成一个 mapper_resultMap[customMap]_collection[configDOList]_association[config] 的 ValueBasedIdentifier
3.3.3 ResultMap 解析总结
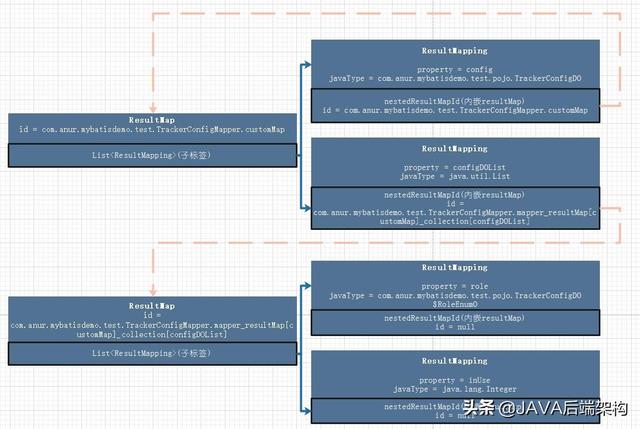
其实到现在已经很明了了,所有的 ResultMap 都会被生成一个独立的数据结构,所以无论怎么嵌套,起码在解析层面,是不会出问题的,它只会保存自己的所有子标签,用 List 表示,如果子标签中存在内嵌的 ResultMap,则仅仅保存其 id,并另外(递归)解析此 ResultMap
比如下面这个xml的解析结果:
如此图所示,虚线不是真正的关联,只是保存了一个叫做 nestedResultMapId 的属性,即 内嵌id
3.4 在解析 resultSet(查询结果集) 时是如何实现的,会不会死循环?
我们已经对 resultMap 的解析建立起了清晰的认知,那么此时还有另外一个问题,mybatis 在对查询结果集进行解析的时候,是如何使用 resultMap 的?
虽然此部分与 mapper.xml 无关,但如果无法建立起体系,单纯的 resultMap 分析只会让人一头雾水。
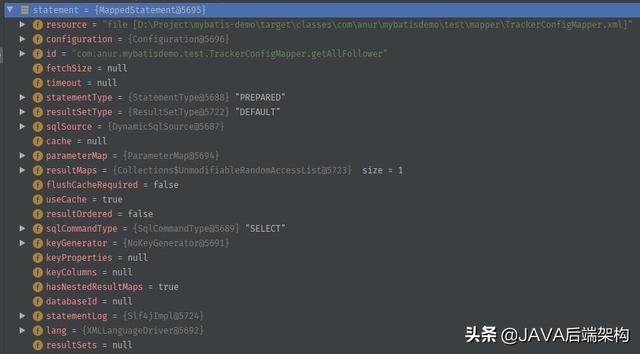
实际上在 resultMap 解析完成后,mybatis 会将其保存在 configuration 中。configuration 前面也提到过,里面保存了 mybatis 的配置,但它不仅如此,它还承担了我们 mybtais 上下文对象的作用。类似于 spring 框架中的 applicationContext 。
ResultMap resultMap = new ResultMap.Builder(configuration, id, type, resultMappings, autoMapping) .discriminator(discriminator) .build(); configuration.addResultMap(resultMap);目光来到我们的 ResultHandler,我们知道 ResultHandler 是 SqlSession,也是 mybatis 的核心组件之一,它负责对 ResultSet 进行解析。
解析的核心代码如下(有所删减,后续会有文章专门分析 ResultSetHandler,所以这里只是简单提一下)
private Object (ResultSetWrapper rsw, ResultMap resultMap, CacheKey combinedKey, String columnPrefix, Object partialObject) throws SQLException { final String resultMapId = resultMap.getId(); // 这个id 就是我们前面说了很久的那个 ValueBasedIdentifier Object rowValue = partialObject; if (rowValue != null) { final MetaObject metaObject = configuration.newMetaObject(rowValue); ancestorObjects.put(resultMapId, resultObject); applyNestedResultMappings(rsw, resultMap, metaObject, columnPrefix, combinedKey, false); ancestorObjects.remove(resultMapId); } else { final ResultLoaderMap lazyLoader = new ResultLoaderMap(); rowValue = createResultObject(rsw, resultMap, lazyLoader, columnPrefix); // 根据反射构建出当前resultMap的承载对象 if (rowValue != null && !hasTypeHandlerForResultObject(rsw, resultMap.getType())) { final MetaObject metaObject = configuration.newMetaObject(rowValue);// metaObject 是 mybatis 对对象的一套类似反射的封装,但不仅仅是反射这么简单 boolean foundValues = this.useConstructorMappings; foundValues = applyPropertyMappings(rsw, resultMap, metaObject, lazyLoader, columnPrefix) || foundValues;// 解析普通的子标签属性 ancestorObjects.put(resultMapId, resultObject); foundValues = applyNestedResultMappings(rsw, resultMap, metaObject, columnPrefix, combinedKey, true)|| foundValues; // 解析内嵌 resultMap ancestorObjects.remove(resultMapId); foundValues = lazyLoader.size() > 0 || foundValues; rowValue = foundValues || configuration.isReturnInstanceForEmptyRow() ? rowValue : null; } if (combinedKey != CacheKey.NULL_CACHE_KEY) { nestedResultObjects.put(combinedKey, rowValue); } } return rowValue; } // 解析内嵌 resultMap private boolean applyNestedResultMappings(ResultSetWrapper rsw, ResultMap resultMap, MetaObject metaObject, String parentPrefix, CacheKey parentRowKey, boolean newObject) { boolean foundValues = false; for (ResultMapping resultMapping : resultMap.getPropertyResultMappings()) { final String nestedResultMapId = resultMapping.getNestedResultMapId(); if (nestedResultMapId != null && resultMapping.getResultSet() == null) { // 如果子标签有内嵌resultMap,才会继续解析 try { final String columnPrefix = getColumnPrefix(parentPrefix, resultMapping); final ResultMap nestedResultMap = getNestedResultMap(rsw.getResultSet(), nestedResultMapId, columnPrefix);// 拿到内嵌的resultMap if (resultMapping.getColumnPrefix() == null) { // try to fill circular reference only when columnPrefix // is not specified for the nested result map (issue #215) // 解决循环引用的核心代码 Object ancestorObject = ancestorObjects.get(nestedResultMapId); if (ancestorObject != null) { if (newObject) { linkObjects(metaObject, resultMapping, ancestorObject); // issue #385 } continue; } } Object rowValue = nestedResultObjects.get(combinedKey); boolean knownValue = rowValue != null; instantiateCollectionPropertyIfAppropriate(resultMapping, metaObject); // mandatory if (anyNotNullColumnHasValue(resultMapping, columnPrefix, rsw)) { final CacheKey rowKey = createRowKey(nestedResultMap, rsw, columnPrefix); final CacheKey combinedKey = combineKeys(rowKey, parentRowKey); // 套娃递归~~ rowValue = getRowValue(rsw, nestedResultMap, combinedKey, columnPrefix, rowValue); if (rowValue != null && !knownValue) { linkObjects(metaObject, resultMapping, rowValue); foundValues = true; } } } catch (SQLException e) { throw new ExecutorException("Error getting nested result map values for '" + resultMapping.getProperty() + "'. Cause: " + e, e); } } } return foundValues; }对我们的对象进行赋值,实际上就是来来回回调用这两个方法,那么它如何防止resultMap套自己引起的无限解析呢?
3.4.1 借助额外的 Map映射 来解决 resultMap 套娃
实际上很简单,我们的 resultMap 都有一个唯一的 id,也就是我们所提到的 ValueBasedIdentifier,在第一次进入到 getRowValue 方法时,会通过反射创建我们的 resultMap 所表示的对象,比如上面 customMap 这个 resultMap,会创建一个 TrackerConfigDO 对象,然后在解析内嵌 resultMap 之前,有一个关键动作,将创建的对象放进 ancestorObjects:
ancestorObjects.put(resultMapId, resultObject); foundValues = applyNestedResultMappings(rsw, resultMap, metaObject, columnPrefix, combinedKey, true)|| foundValues; // 解析内嵌 resultMap是的,就是 ancestorObjects 这个map映射,在解析内嵌 resultMap 子标签时,发现 config 这个子标签所指向的 resultMap是它的父亲,也就是 config 这个子标签所引用的 resultMap 的 ValueBasedIdentifier 与外面 id = customMap 的相同,它会把我们刚才放进 ancestorObjects 里的那个对象拿出来,然后直接continue,不再继续向下解析了。
也就是打个比方 TrackerConfigDO@9999 这个对象中,有一个成员变量叫 config,它也指向 TrackerConfigDO@9999。
// try to fill circular reference only when columnPrefix // is not specified for the nested result map (issue #215) // 解决循环引用的核心代码 Object ancestorObject = ancestorObjects.get(nestedResultMapId); if (ancestorObject != null) { if (newObject) { linkObjects(metaObject, resultMapping, ancestorObject); // issue #385 } continue; }如果发现不是同一个 ValueBasedIdentifier ,则是一个递归解析,它会递归调用刚才的 resultMap 解析方法:rowValue = getRowValue(rsw, nestedResultMap, combinedKey, columnPrefix, rowValue);
和前面说的三个方法递归很像,就是它把解析的主体定义为一个 resultMap,在 resultMap 的子标签中如果发现了内嵌 resultMap,则进行递归,我这里就不啰嗦了。
Extra: 既然说到了这个 ancestorObjects map,顺便提一嘴。我们知道,一对多的映射,比如一条主数据对应10条从数据,在 mysql 中查询出来时,实际上是有10条的。是我们 mybatis 把这十条合成了一条,那么它是怎么做的呢?实际上也是通过 ancestorObject 来完成的,不过这里主要讲的是 mapper 部分相关源码,后续会有文章专门讲 ResultSetHandler
四、sql语句与 mappedStatment
饶了一大圈,视线回到我们的 XMLMapperBuilder:
private void configurationElement(XNode context) { try { String namespace = context.getStringAttribute("namespace"); if (namespace == null || namespace.equals("")) { throw new BuilderException("Mapper's namespace cannot be empty"); } builderAssistant.setCurrentNamespace(namespace); cacheRefElement(context.evalNode("cache-ref")); cacheElement(context.evalNode("cache")); parameterMapElement(context.evalNodes("/mapper/parameterMap")); resultMapElements(context.evalNodes("/mapper/resultMap")); sqlElement(context.evalNodes("/mapper/sql")); buildStatementFromContext(context.evalNodes("select|insert|update|delete")); } catch (Exception e) { throw new BuilderException("Error parsing Mapper XML. The XML location is '" + resource + "'. Cause: " + e, e); } }同样是拿到我们的 insert,update 等节点们:
private void buildStatementFromContext(List list, String requiredDatabaseId) { for (XNode context : list) { final XMLStatementBuilder statementParser = new XMLStatementBuilder(configuration, builderAssistant, context, requiredDatabaseId); try { statementParser.parseStatementNode(); } catch (IncompleteElementException e) { configuration.addIncompleteStatement(statementParser); } } }它的主要方法就是 statementParser.parseStatementNode();,构造函数里面什么都没有,就是对几个成员变量进行赋值,这里就不啰嗦了。
我们看到 parseStatementNode(),代码很长,但是我们不着急,现将它拆解成几个部分:
- 1、属性获取,大部分代码实际上都是在对属性(attr)进行获取,比如 resultMap,resultType之类的。
- 2、对内嵌语句 sqlFragment、SelectKey 的解析
- 3、生成 SqlSource
- 4、创建 mappedStatment
第一部分太简单,这里不啰嗦。可以理解为给你一个map,或者json,各种获取值,把它存起来,除此之外没别的了,这里主要对后面几个部分进行讲解。
public void parseStatementNode() { String id = context.getStringAttribute("id"); String databaseId = context.getStringAttribute("databaseId"); if (!databaseIdMatchesCurrent(id, databaseId, this.requiredDatabaseId)) { return; } String nodeName = context.getNode().getNodeName(); SqlCommandType sqlCommandType = SqlCommandType.valueOf(nodeName.toUpperCase(Locale.ENGLISH)); boolean isSelect = sqlCommandType == SqlCommandType.SELECT; boolean flushCache = context.getBooleanAttribute("flushCache", !isSelect); boolean useCache = context.getBooleanAttribute("useCache", isSelect); boolean resultOrdered = context.getBooleanAttribute("resultOrdered", false); // Include Fragments before parsing XMLIncludeTransformer includeParser = new XMLIncludeTransformer(configuration, builderAssistant); includeParser.applyIncludes(context.getNode()); String parameterType = context.getStringAttribute("parameterType"); Class> parameterTypeClass = resolveClass(parameterType); String lang = context.getStringAttribute("lang"); LanguageDriver langDriver = getLanguageDriver(lang); // Parse selectKey after includes and remove them. processSelectKeyNodes(id, parameterTypeClass, langDriver); // Parse the SQL (pre: and were parsed and removed) KeyGenerator keyGenerator; String keyStatementId = id + SelectKeyGenerator.SELECT_KEY_SUFFIX; keyStatementId = builderAssistant.applyCurrentNamespace(keyStatementId, true); if (configuration.hasKeyGenerator(keyStatementId)) { keyGenerator = configuration.getKeyGenerator(keyStatementId); } else { keyGenerator = context.getBooleanAttribute("useGeneratedKeys", configuration.isUseGeneratedKeys() && SqlCommandType.INSERT.equals(sqlCommandType)) ? Jdbc3KeyGenerator.INSTANCE : NoKeyGenerator.INSTANCE; } SqlSource sqlSource = langDriver.createSqlSource(configuration, context, parameterTypeClass); StatementType statementType = StatementType.valueOf(context.getStringAttribute("statementType", StatementType.PREPARED.toString())); Integer fetchSize = context.getIntAttribute("fetchSize"); Integer timeout = context.getIntAttribute("timeout"); String parameterMap = context.getStringAttribute("parameterMap"); String resultType = context.getStringAttribute("resultType"); Class> resultTypeClass = resolveClass(resultType); String resultMap = context.getStringAttribute("resultMap"); String resultSetType = context.getStringAttribute("resultSetType"); ResultSetType resultSetTypeEnum = resolveResultSetType(resultSetType); if (resultSetTypeEnum == null) { resultSetTypeEnum = configuration.getDefaultResultSetType(); } String keyProperty = context.getStringAttribute("keyProperty"); String keyColumn = context.getStringAttribute("keyColumn"); String resultSets = context.getStringAttribute("resultSets"); builderAssistant.addMappedStatement(id, sqlSource, statementType, sqlCommandType, fetchSize, timeout, parameterMap, parameterTypeClass, resultMap, resultTypeClass, resultSetTypeEnum, flushCache, useCache, resultOrdered, keyGenerator, keyProperty, keyColumn, databaseId, langDriver, resultSets); }4.1 sql 内嵌语句 sqlFragment
这两个标签相信大家都熟悉,就是提高sql复用率(个人不喜欢这种写法)。有了前面 resultMap 的基础,我们很容易猜得到,这些标签在解析完以后,会生成自己一个唯一的 id,然后存到 configuration 里面。
是的,这里也确实是这么操作的。
首先,sqlFragment 的解析代码如下:
== org.apache.ibatis.builder.xml.XMLIncludeTransformer#applyIncludes(org.w3c.dom.Node, java.util.Properties, boolean) == /** * Recursively apply includes through all SQL fragments. * @param source Include node in DOM tree * @param variablesContext Current context for static variables with values */ private void applyIncludes(Node source, final Properties variablesContext, boolean included) { if (source.getNodeName().equals("include")) { Node toInclude = findSqlFragment(getStringAttribute(source, "refid"), variablesContext); Properties toIncludeContext = getVariablesContext(source, variablesContext); applyIncludes(toInclude, toIncludeContext, true); if (toInclude.getOwnerDocument() != source.getOwnerDocument()) { toInclude = source.getOwnerDocument().importNode(toInclude, true); } source.getParentNode().replaceChild(toInclude, source); while (toInclude.hasChildNodes()) { toInclude.getParentNode().insertBefore(toInclude.getFirstChild(), toInclude); } toInclude.getParentNode().removeChild(toInclude); } else if (source.getNodeType() == Node.ELEMENT_NODE) { if (included && !variablesContext.isEmpty()) { // replace variables in attribute values NamedNodeMap attributes = source.getAttributes(); for (int i = 0; i < attributes.getLength(); i++) { Node attr = attributes.item(i); attr.setNodeValue(PropertyParser.parse(attr.getNodeValue(), variablesContext)); } } NodeList children = source.getChildNodes(); for (int i = 0; i < children.getLength(); i++) { applyIncludes(children.item(i), variablesContext, included); } } else if (included && (source.getNodeType() == Node.TEXT_NODE || source.getNodeType() == Node.CDATA_SECTION_NODE) && !variablesContext.isEmpty()) { // replace variables in text node source.setNodeValue(PropertyParser.parse(source.getNodeValue(), variablesContext)); } }我们一步步解析,这段代码有三个大的分支
- 第一个分支顾名思义,解析 include 标签用的,
- 第二个则是解析普通节点用的,
- 第三个 else 则是代表解析 Text 节点、CDATASection 节点。
先看看怎么解析普通节点,普通节点将节点拆成子节点,然后循环递归调用自己,这个没什么好说的,前面已经说了各种递归,这个也是一样的道理,mybatis 解析套娃,核心就是递归。
text 节点的解析也很简单,唯一值得注意的就是 variablesContext 这个东西,它实际上是从配置文件中来,我们可以通过配置全局 variables ,它会在这个时候将其填充进去。
打个比方,下面这个 testValue,我们在配置里面将其指定为全局变量,在写sql时,会将配置的值注入(不推荐)。
mybatis: configuration-properties: testValue: 43 select role,in_use, id as inner_id from tracker_config where id <= ${testValue} 后面两个解析很简单,主要是我们的第一个分支,就是如何去解析 include 标签:
看到我们这块分支的代码,上来第一步,是根据名字去 configuration 拿 include,这个很好理解。紧接着就是一个递归,直接忽略它,前面的几个小结讲了太多递归,这里懒得再讲了。
Node toInclude = findSqlFragment(getStringAttribute(source, "refid"), variablesContext); Properties toIncludeContext = getVariablesContext(source, variablesContext); applyIncludes(toInclude, toIncludeContext, true);// 递归解析 include标签 if (toInclude.getOwnerDocument() != source.getOwnerDocument()) { toInclude = source.getOwnerDocument().importNode(toInclude, true);// 进行资源的引入 } source.getParentNode().replaceChild(toInclude, source);// 将sql进行替换 while (toInclude.hasChildNodes()) { toInclude.getParentNode().insertBefore(toInclude.getFirstChild(), toInclude); } toInclude.getParentNode().removeChild(toInclude);// 移出引入sql的外标签我们还是将其分为四个步骤
- 1、递归调用,解析 include 标签里面可能含有的 include 标签
- 2、判断 include 元素与当前这个节点是否是同一个文件, 如果不是同一个文件,则将其引入。这个没什么好说的 = =,一些 xml 的 api
- 3、将include标签进行替换,也就是 source.getParentNode().replaceChild(toInclude, source);,也就是将真正的那段sql移过来。
- 4、一个while循环 + toInclude.getParentNode().removeChild(toInclude);,这部分实际上就是将刚才移过来那段sql的外层标签去掉,内容(childNode)拿出来。(主要是它没有 removeNodeWrapper(开玩笑的)这种方法,所以它这里采取了一种让人疑惑的写法)
我们拿这样的一段 xml 来模拟一下这个过程:
select * from tracker_config where id <= ${hashmap.id} 解析 id = getAllFollower 这个节点,它是一个普通节点,所以循环它的所有子节点,第一个子节点就是 ,首先根据 refid 拿到真正的资源,先给阿姨倒一杯卡布奇诺,先给即将引入的这段 sql 来一个解析套餐。
解析 id="including",一样的规则,它是个普通节点,循环它所有子节点,第一个子节点是 ,和上面一样,即将引入的这另一段 sql 也会被奉上解析套餐。
解析套餐三大分支都没什么可以对 select 做的,于是进入到我们的 include 四个步骤的后续步骤,先是将其替换,如下所示:
selectselect * from tracker_config where id <= ${hashmap.id} 然后来到第四步,也就是去“头“,如下:
select select * from tracker_config where id <= ${hashmap.id} 最里层的递归出栈,来到上层递归,也就是 的解析,一样的,先替换:
select select * from tracker_config select * from tracker_config where id <= ${hashmap.id} 然后去头:
select select * from tracker_config select * from tracker_configwhere id <= ${hashmap.id} 递归完毕, 解析完毕 。
4.2 selectKey 解析
个人不太推荐 selectKey 的使用,个人感觉类似存储过程...,在一个sql里面做各种事情,例如将某个值赋值为另一个sql的结果,比如插入自增id,或者在插入完毕后,SELECT LAST_INSERT_ID() AS xxxx 将插入主键拿到,这种需求更加推荐通过多个mapper + 业务控制、通过插件、或者修改源码的方式去写。
从代码也很容易看出来,实际上它就是构建了一个新的查询类型的 mappedStatement,将它存到 configuration 的 KeyGenerator 中。
builderAssistant.addMappedStatement(id, sqlSource, statementType, sqlCommandType, fetchSize, timeout, parameterMap, parameterTypeClass, resultMap, resultTypeClass, resultSetTypeEnum, flushCache, useCache, resultOrdered, keyGenerator, keyProperty, keyColumn, databaseId, langDriver, null); id = builderAssistant.applyCurrentNamespace(id, false); MappedStatement keyStatement = configuration.getMappedStatement(id, false); configuration.addKeyGenerator(id, new SelectKeyGenerator(keyStatement, executeBefore));有一点需要注意的是,就是它有一个执行顺序: boolean executeBefore = "BEFORE".equals(nodeToHandle.getStringAttribute("order", "AFTER"));
是在本sql之前执行,还是在之后执行,其实就是简单指定一下。
它保存的map keyGenerators,id 为当前sql的 id,我们执行这条sql语句之前,只需要根据当前执行sql的id,就可以拿到 selectKey 语句。
public void addKeyGenerator(String id, KeyGenerator keyGenerator) { keyGenerators.put(id, keyGenerator); }在生成执行语句 mappedStatement 之后,它会从 sql 中被移除,都很简单,我就不啰嗦了:
private void removeSelectKeyNodes(List selectKeyNodes) { for (XNode nodeToHandle : selectKeyNodes) { nodeToHandle.getParent().getNode().removeChild(nodeToHandle.getNode()); } }4.3 mappedStatement 的生成
实际上到了这里已经没什么可以讲的了,mappedStatement 就是一个存放解析对象的一个容器
MappedStatement.Builder statementBuilder = new MappedStatement.Builder(configuration, id, sqlSource, sqlCommandType) .resource(resource) .fetchSize(fetchSize) .timeout(timeout) .statementType(statementType) .keyGenerator(keyGenerator) .keyProperty(keyProperty) .keyColumn(keyColumn) .databaseId(databaseId) .lang(lang) .resultOrdered(resultOrdered) .resultSets(resultSets) .resultMaps(getStatementResultMaps(resultMap, resultType, id)) .resultSetType(resultSetType) .flushCacheRequired(valueOrDefault(flushCache, !isSelect)) .useCache(valueOrDefault(useCache, isSelect)) .cache(currentCache); ParameterMap statementParameterMap = getStatementParameterMap(parameterMap, parameterType, id); if (statementParameterMap != null) { statementBuilder.parameterMap(statementParameterMap); } MappedStatement statement = statementBuilder.build(); configuration.addMappedStatement(statement); return statement;它的实例化是一个比较纯粹的构造器模式,拿到各种配置的 attribute,解析出来的 resultMap 等,加以拼装,它并不是我们理解 mybatis 的重点,我们应该更加关注参与构造的这些参数是怎么来的,由于篇幅有限,再加上博主也懒得讲解一些不常用,或者比较简单的配置。如果哪里分析的有问题,或者希望博主对哪个部分进行比较深入的分析欢迎评论~
后续会有更多 mybatis 源码讲解~~
五、小结
小小的总结一下,在 mybatis 对 xml 的解析中,常用的几个技巧:
- 递归,递归来解决嵌套问题,同时也可以避免生成的java类层级过深
- id,几乎所有的 node 节点,都会有一个自己的全限定名,配合递归来使用事半功倍
- 统一的上下文,configuration 类,基本什么东西都可以往里面塞,就像是一个哆啦A梦的四次元口袋,它本身也比较纯粹,基本不参与什么业务操作,就是存了很多解析生成的东西
- 大量的兜底配置,实际上文章里很少提到的,但是代码里很常见,即兜底配置,实际上就是一种约定优于配置的思想,许多的额外支持仅仅暴露出来作为可选项,默认是有一套自己的实现的。
关注头条号《 JAVA 后端架构 》 ,话痨技术,职场,招聘,在线面试,进阶提升。每天一篇技术分享
没有做不到的,只有想不到的。


 854
854


 被折叠的 条评论
为什么被折叠?
被折叠的 条评论
为什么被折叠?
 到【灌水乐园】发言


