


前言
Promise 在前端开发使用中再频繁不过了,一开始出现的初衷是为了解决棘手的回调地狱问题,现在多是用来解决异步同步的场景。一起来尝试一下手撕这道经典的手写面试题【手写一个 proimse】
食用指南
Promise 基本API:reslove reject then
Promise 核心原理:链式调用解决回调地狱
Promise 其他API: race finally
其他手写系列面试题:拉到最底部
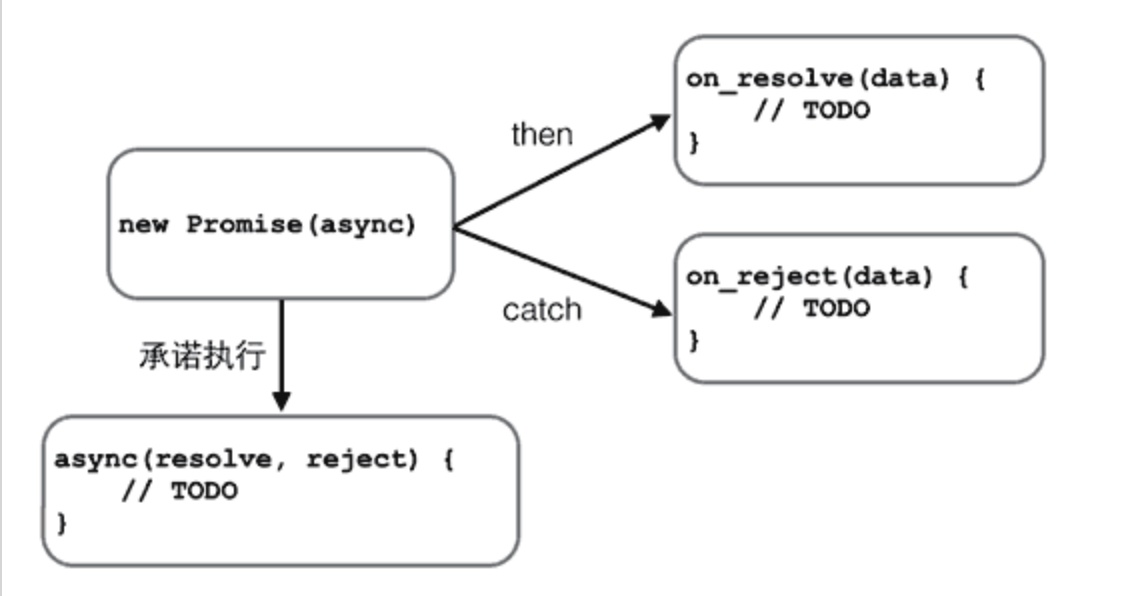
Promise基本功能

图片引用自廖雪峰
最常见的三个API: reslove reject then
最基本的三个状态:pending 过渡态 fulfilled 完成态 rejected 失败态
先来回忆下常用的Promise调用
const promise = new Promise(function(resolve, reject) {
    // ... some code

    if (/* 异步操作成功 */){
      resolve(value);
    } else {
      reject(error);
    }
  });
promise.then(result => {
    // const res = /*返回的数据*/
})
这里可以拆分为几个步骤
1. promise 是一个构造函数
2. resolve 函数用来接收成功结果, reject 函数用来接收失败结果
3. 执行 reslove / reject 函数时修改当前状态值
4. 将接到到的结果(full, fail)返回到 then 函数
尝试实现
function myPromise(executor) {
  let _this = this;
  _this.$$status = "pending"; // 声明初始状态
  _this.failCallBack = undefined;
  _this.successCallback = undefined;

  executor(resolve.bind(this), reject.bind(this));

  // 2.
  function resolve(opts) {
    // 3.修改状态值
    if (_this.$$status === "pending") {
      _this.$$status = "full";
      _this.successCallback(opts); // 将接收到的成功结果抛到then函数
    }
  }
  // 2.
  function reject() {
    // 3.修改状态值
    if (_this.$$status === "pending") {
      _this.$$status = "fail";
      _this.failCallBack(opts);
    }
  }
}

// 4.拓展then回调函数接收执行结果
myPromise.prototype.then = function (full, fail) {
  this.successCallback = full;
  this.failCallBack = fail;
};
测试代码
new myPromise((resolve, reject) => {
  setTimeout(() => {
    resolve("成功");
  }, 200);
}).then((result) => {
  console.log(result);
});
到这里就完成了Prmoise最基本的功能API,接下来尝试用Promise解决回调地狱。
Promise 主要功能
Promise 出现的最大的意义是解决了回调地狱,而Promise 最终会返回一个新的 promise 对象, 所以接下来继续思考:
- 如何编写调用.then() 链式调用函数来解决回调地狱的问题?
- 并且如何等待第一个.then()函数状态值改变后,再执行第二个.then()?
- 如何调用 Promise 会返回一个新的 promise 对象?
先来回忆下Promise的链式调用
function begin() {
 return new Promise((resolve) => {
 setTimeout((_) => resolve("first"), 2000);
  });
}

begin()
  .then((data) => {
 console.log(data);
 return new Promise((resolve) => {});
  })
  .then((res) => {
 console.log(res);
  });
尝试实现
这里主要拆解为几个步骤:
- then 函数返回新的 promise 对象(这也是可以链式调用的主要原因)
- 等待第一个回调函数状态发生改变后
pending->full,包装第一个 then 方法返回的值为新的 Promise,传递给第二个 then 方法。
先来实行第一步,简单扩展之前写的 then()函数
function myPromise(executor) {
  let _this = this;
  _this.$$status = "pending"; // 声明初始状态
  _this.failCallBack = undefined;
  _this.successCallback = undefined;
  _this.failDefer = undefined;
  _this.successDefer = undefined;
  executor(this.resolve.bind(this), this.reject.bind(this));
}

myPromise.prototype = {
  constructor: this,
  resolve: function (params) {
    // ...
  },
  reject: function (params) {
    //...
  },
  then: function (full, fail) {
    let newMyPromise = new myPromise((_) => {});
    this.successCallback = full; // 接受调用reslove()时传进来的执行函数
    this.failCallback = fail; // 接收调用reject()时传进来的执行函数
    this.successDefer = newMyPromise.resolve.bind(newMyPromise); // 为什么要绑定?继续往下看
    this.failDefer = newMyPromise.reject.bind(newMyPromise);
    // 1. 返回一个新的对象
    return newMyPromise;
  },
};
第一步比较简单,接下来继续第二三个步骤:
function myPromise(executor) {
  // 省略 如上
}

myPromise.prototype = {
  constructor: this,
  resolve: function (params) {
    if (this.$$status === "pending") {
      this.$$status = "success"; // 修改状态

      if (!this.successCallback) return;

      // 存储传进来的结果执行函数
      let result = this.successCallback(params);
      if (result && result instanceof myPromise) {
        // 2. 如果已经存在结果值,将结果传递给下一个then()方法。
        result.then(this.successDefer, this.failDefer);
        return "";
      }
      this.successDefer(result);
    }
  },
  reject: function (params) {
    // 同slove
  },
};
到目前为止已经实现了一个包含主要功能的Promise了,手写一个Promise可以更好的理解原理,其他API race all finally 手写可参考。
另外附赠其他 手写面试题系列传送门。


 5824
5824


 被折叠的 条评论
为什么被折叠?
被折叠的 条评论
为什么被折叠?
 到【灌水乐园】发言


