


Silverlight与MySQL数据库互操作,也是因为MySQL在平时开发中应用得很多,适合大多数开发环境与要求。本文用到的MySQL环境是MySQL Connector Net 6.1.1,需要大家提前安装。
准备工作
1)建立起测试项目
细节详情请见强大的DataGrid组件[2]_数据交互之ADO.NET Entity Framework——Silverlight学习笔记[10]。
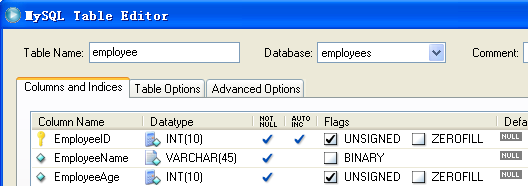
2)创建测试用数据库
如下图所示,创建一个名为employees的MySQL数据库,建立数据表名称为Employee。
3)安装MySQL Connector Net 6.1.1 ★
为了能让.NET操作MySQL数据库,请务必安装。
建立数据模型
EmployeeModel.cs文件(放置在服务端项目文件夹下)using System;
using System.Collections.Generic;
using System.Linq;
namespace dataformnmysqldb
{
public class EmployeeModel
{
public int EmployeeID { get; set; }
public string EmployeeName { get; set; }
public int EmployeeAge { get; set; }
}
}
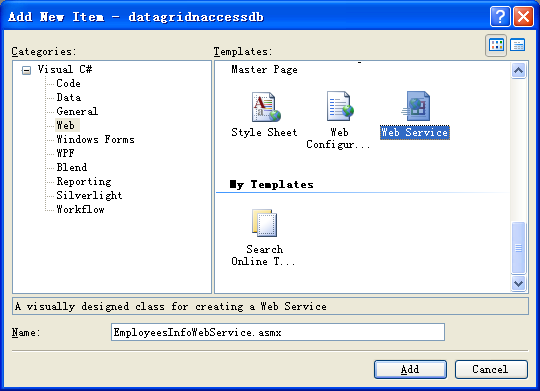
建立服务端Web Service★
右击服务端项目文件夹,选择Add->New Item....,按下图所示建立一个名为EmployeesInfoWebService.asmx的Web Service,作为Silverlight与MySQL数据库互操作的桥梁。
在Silverlight客户端应用程序文件夹下,右击References文件夹,添加名为MySql.Data的命名空间。之后,双击EmployeesInfoWebService.asmx打开该文件,将里面的内容修改如下:using System;
using System.Collections.Generic;
using System.Linq;
using System.Web;
using System.Web.Services;
using System.Data;
using MySql.Data.MySqlClient;//引入该命名空间是为了操作MySQL数据库
namespace dataformnmysqldb
{
///
/// Summary description for EmployeesInfoWebService
///
[WebService(Namespace ="http://tempuri.org/")]
[WebServiceBinding(ConformsTo = WsiProfiles.BasicProfile1_1)]
[System.ComponentModel.ToolboxItem(false)]
// To allow this Web Service to be called from script, using ASP.NET AJAX, uncomment the following line.
// [System.Web.Script.Services.ScriptService]
publicclassEmployeesInfoWebService : System.Web.Services.WebService
{
[WebMethod]//获取雇员信息
publicListGetEmployeesInfo()
{
ListreturnedValue =newList();
MySqlCommand Cmd =newMySqlCommand();
SQLExcute("SELECT * FROM Employee", Cmd);
MySqlDataAdapter EmployeeAdapter =newMySqlDataAdapter();
EmployeeAdapter.SelectCommand = Cmd;
DataSet EmployeeDataSet =newDataSet();
EmployeeAdapter.Fill(EmployeeDataSet);
foreach (DataRow dr in EmployeeDataSet.Tables[0].Rows)
{
EmployeeModel tmp =newEmployeeModel();
tmp.EmployeeID = Convert.ToInt32(dr[0]);
tmp.EmployeeName = Convert.ToString(dr[1]);
tmp.EmployeeAge = Convert.ToInt32(dr[2]);
returnedValue.Add(tmp);
}
returnreturnedValue;
}
[WebMethod]//添加雇员信息
publicvoidInsert(Listemployee)
{
employee.ForEach(x =>
{
string CmdText ="INSERT INTO Employee(EmployeeName,EmployeeAge) VALUES('"+ x.EmployeeName +"',"+ x.EmployeeAge.ToString() +")";
SQLExcute(CmdText);
});
}
[WebMethod]//更新雇员信息
publicvoidUpdate(Listemployee)
{
employee.ForEach(x =>
{
string CmdText ="UPDATE Employee SET EmployeeName='"+ x.EmployeeName +"',EmployeeAge="+ x.EmployeeAge.ToString();
CmdText +=" WHERE EmployeeID="+ x.EmployeeID.ToString();
SQLExcute(CmdText);
});
}
[WebMethod]//删除雇员信息
publicvoidDelete(Listemployee)
{
employee.ForEach(x =>
{
string CmdText ="DELETE FROM Employee WHERE EmployeeID="+ x.EmployeeID.ToString();
SQLExcute(CmdText);
});
}
//执行SQL命令文本,重载1
privatevoidSQLExcute(string SQLCmd)
{
string ConnectionString ="server=localhost;user id=root;password=yourpassword;database=employees";
MySqlConnection Conn =newMySqlConnection(ConnectionString);
Conn.Open();
MySqlCommand Cmd =newMySqlCommand();
Cmd.Connection = Conn;
Cmd.CommandTimeout =15;
Cmd.CommandType = System.Data.CommandType.Text;
Cmd.CommandText = SQLCmd;
Cmd.ExecuteNonQuery();
Conn.Close();
}
//执行SQL命令文本,重载2
privatevoidSQLExcute(string SQLCmd, MySqlCommand Cmd)
{
string ConnectionString ="server=localhost;user id=root;password= yourpassword;database=employees";
MySqlConnection Conn =newMySqlConnection(ConnectionString);
Conn.Open();
Cmd.Connection = Conn;
Cmd.CommandTimeout =15;
Cmd.CommandType = System.Data.CommandType.Text;
Cmd.CommandText = SQLCmd;
Cmd.ExecuteNonQuery();
}
}
}
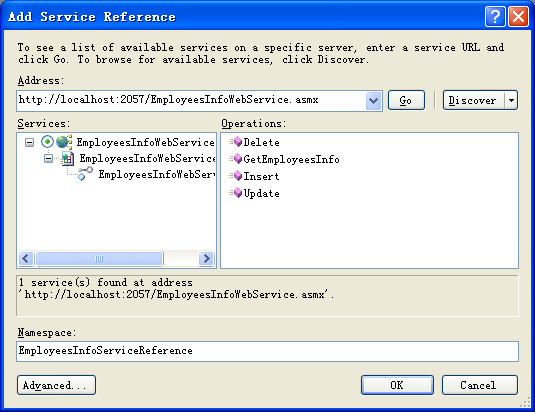
之后,在Silverlight客户端应用程序文件夹下,右击References文件夹,选择菜单选项Add Service Reference...。如下图所示,引入刚才我们创建的Web Service(别忘了按Discover按钮进行查找)。
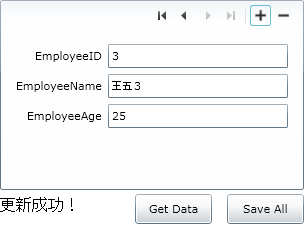
创建Silverlight客户端应用程序
Silverlight与MySQL数据库互操作最终效果图
原文标题:Silverlight与MySQL数据库的互操作(CURD完全解析)
链接:http://www.cnblogs.com/Kinglee/archive/2009/09/06/1561452.html
【编辑推荐】
【责任编辑:彭凡 TEL:(010)68476606】
点赞 0


 111
111


 被折叠的 条评论
为什么被折叠?
被折叠的 条评论
为什么被折叠?
 到【灌水乐园】发言


