


初学ssh框架,学得不深,所以对集成时的配置有一些疑惑,同时也很不熟练,所以将ssh的配置步骤记录下来,以便以后查漏补缺
SSH:即Spring、SpringMVC、Hibernate
在集成时,因为SpringMVC和Spring本来就是一家,所以主要是Spring和Hibernate的集成。
步骤:
1. 导入Spring和SpringMVC相关的jar包。

其中,Spring-orm包是Spring与Hibernate的整合包。Spring框架自带,不用单独下载。
接下来是Hibernate相关的jar包

因为要这里的数据库用的是MySQL,所以还要有数据库驱动包和连接池包
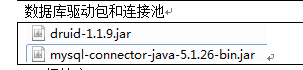
顺便也导入jstl标签库包(注:jstl1.2版本之前的jar包需要和standard一起导入使用)

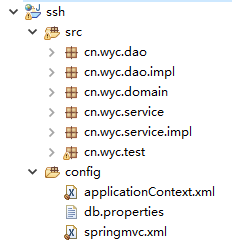
2.准备一下项目的基本分层
本次项目的分层基本如下:
(为了方便管理,新建了一个源文件夹将所有配置文件及properties文件放了进去)
展开后:
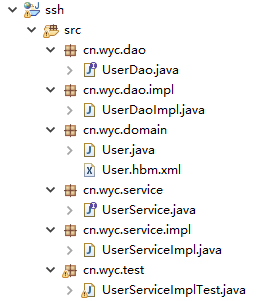
Hibernate框架要求在每一个domain建立映射文件以映射数据库中实际的表(即图中User.hbm.xml文件)
以上是ssh集成的前期工作,下面是重点:xml的配置
3.xml的配置
在框架中,通过xml文件去对java中的对象进行托管,映射,保存关系信息等。在ssh的集成中,主要有以下几种配置文件:
*.hbm.xml
applicationContext.xml
SpringMVC-config.xml
以及web.xml文件
*.hbm.xml是实体类的映射文件
<?xml version="1.0" encoding="UTF-8"?>
<!DOCTYPE hibernate-mapping PUBLIC
	"-//Hibernate/Hibernate Mapping DTD 3.0//EN"
	"http://www.hibernate.org/dtd/hibernate-mapping-3.0.dtd">
<!-- 配置映射信息 -->
<hibernate-mapping package="cn.wyc.domain">
	<class name="User" table="user">
		<id name="id">
		<!-- 主键生成策略 -->
			<generator class="native" />
		</id>
		<property name="username" length="50" />
		<property name="password" />
		<property name="email" />
	</class>
</hibernate-mapping>
applicationContext.xml是Spring的配置,一些与Hibernate集成相关的配置信息也写在这里
一般包含:
1.设置spring注解配置的包扫描的位置
2.读取properties文件
3.配置数据源
4.创建Hibernate的工厂对象
5.hibernate的一些其他配置
6.事务管理器配置
7.AOP相关配置
例:
<?xml version="1.0" encoding="UTF-8"?>
<beans xmlns="http://www.springframework.org/schema/beans"
	xmlns:p="http://www.springframework.org/schema/p"
	xmlns:context="http://www.springframework.org/schema/context"
	xmlns:aop="http://www.springframework.org/schema/aop"
	xmlns:tx="http://www.springframework.org/schema/tx"
	xmlns:xsi="http://www.w3.org/2001/XMLSchema-instance"
	xsi:schemaLocation="http://www.springframework.org/schema/beans
    http://www.springframework.org/schema/beans/spring-beans.xsd
    http://www.springframework.org/schema/context
    http://www.springframework.org/schema/context/spring-context.xsd
    http://www.springframework.org/schema/aop
    http://www.springframework.org/schema/aop/spring-aop.xsd
    http://www.springframework.org/schema/tx
    http://www.springframework.org/schema/tx/spring-tx.xsd
    ">

	<!-- 1.配置扫描的位置 -->
	<context:component-scan base-package="cn.yq.ssh"/>


	<!-- 读取配置文件 -->
	<context:property-placeholder location="classpath:db.properties"/>

	<!-- 配置阿里巴巴druid连接池对象 -->
	<bean id="dataSource" class="com.alibaba.druid.pool.DruidDataSource"
		 init-method="init" destroy-method="close">
		<property name="driverClassName" value="${jdbc.driverClassName}"/>
		<property name="url" value="${jdbc.url}"/>
		<property name="username" value="${jdbc.username}"/>
		<property name="password" value="${jdbc.password}"/>
		<property name="maxActive" value="${jdbc.maxActive}"/>
	</bean>


	<!-- 创建Hibernate的工厂对象 -->
	<bean id="sessionFactory" class="org.springframework.orm.hibernate5.LocalSessionFactoryBean">
		<!-- 注入数据源(连接池)对象 -->
		<property name="dataSource" ref="dataSource"/>

		<!-- 配置映射文件 -->
		<property name="mappingLocations">
			<array>
				<!--
					使用 * 通配符读取domian下面所有的映射文件
				 -->
				<value>classpath:cn/yq/ssh/domain/*.hbm.xml</value>
			</array>
		</property>


		<!-- 其他配置,方言,是否显示sql,格式化sql语句等等 -->
		<property name="hibernateProperties">
			<props>
				<!-- 方言 -->
				<prop key="hibernate.dialect">org.hibernate.dialect.MySQL5Dialect</prop>
				<prop key="hibernate.show_sql">true</prop>
				<prop key="hibernate.format_sql">true</prop>
				<prop key="hibernate.hbm2ddl.auto">create</prop>
			</props>
		</property>
	</bean>

	<!--
		AOP : www原则
			w : where
			w : when
			w : what
	 -->

	<!-- 配置事务管理器 : what? -->
	<bean id="transactionManager" class="org.springframework.orm.hibernate5.HibernateTransactionManager">
		<!-- 注入SessionFactory工厂 -->
		<property name="sessionFactory" ref="sessionFactory"/>
	</bean>


	<!-- 事务管理配置  -->
	<tx:advice id="txAdvice" transaction-manager="transactionManager">

		<tx:attributes>
			<!-- when : 时机?  -->
			<tx:method name="get*" read-only="true" propagation="REQUIRED"/>
			<tx:method name="list*" read-only="true" propagation="REQUIRED"/>
			<tx:method name="select*" read-only="true" propagation="REQUIRED"/>
			<tx:method name="find*" read-only="true" propagation="REQUIRED"/>
			<tx:method name="query*" read-only="true" propagation="REQUIRED"/>
			<tx:method name="*" read-only="false" propagation="REQUIRED"/>


		</tx:attributes>
	</tx:advice>
	<!-- 配置AOP -->
	<aop:config>
		<!-- 配置切入点 -->
		<aop:pointcut expression="execution(* cn.yq.ssh.service..*.*(..))" id="pt"/>

		<!-- 配置切面 = 切入点+通知 -->
		<aop:advisor advice-ref="txAdvice" pointcut-ref="pt"/>
	</aop:config>
</beans>
springmvc-config.xml配置:
1.开启注解配置
2.配置视图解析器
<?xml version="1.0" encoding="UTF-8"?>
<beans xmlns="http://www.springframework.org/schema/beans"
	xmlns:context="http://www.springframework.org/schema/context"
	xmlns:mvc="http://www.springframework.org/schema/mvc"
	xmlns:xsi="http://www.w3.org/2001/XMLSchema-instance"
	xsi:schemaLocation="
		http://www.springframework.org/schema/beans
        http://www.springframework.org/schema/beans/spring-beans.xsd
        http://www.springframework.org/schema/context
        http://www.springframework.org/schema/context/spring-context.xsd
        http://www.springframework.org/schema/mvc
        http://www.springframework.org/schema/mvc/spring-mvc.xsd
        ">

		<!-- 开启注解配置 -->
		<mvc:annotation-driven/>
		<!-- 配置视图解析器 -->
		<bean class="org.springframework.web.servlet.view.InternalResourceViewResolver">

			<property name="prefix" value="/WEB-INF/view/"/>

			<property name="suffix" value=".jsp"/>

		</bean>
</beans>
web.xml文件的配置:
1.SpringMVC前端控制器的配置
2.前端控制器拦截路径配置
3.字符编码过滤器配置
<?xml version="1.0" encoding="UTF-8"?>
<web-app xmlns:xsi="http://www.w3.org/2001/XMLSchema-instance" xmlns="http://java.sun.com/xml/ns/javaee" xsi:schemaLocation="http://java.sun.com/xml/ns/javaee http://java.sun.com/xml/ns/javaee/web-app_3_0.xsd" version="3.0">

  <!-- 配置SpringMVC的前端控制器 -->
  <servlet>
  	<servlet-name>MVC</servlet-name>
  	<servlet-class>org.springframework.web.servlet.DispatcherServlet</servlet-class>
  	<init-param>
  		<param-name>contextConfigLocation</param-name>
  		<!-- 因为spring.xml和springmvc.xml文件独立的,所以都需要配置
  			可以使用 * 号(通配符)配置
  		 -->
  		<param-value>classpath:spring*.xml</param-value>
  	</init-param>
  	<load-on-startup>1</load-on-startup>
  </servlet>
  <servlet-mapping>
  	<servlet-name>MVC</servlet-name>
  	<url-pattern>*.do</url-pattern>
  </servlet-mapping>

  <!-- 字符编码过滤器 -->
  <filter>
  	<filter-name>CharacterEncodingFilter</filter-name>
  	<filter-class>org.springframework.web.filter.CharacterEncodingFilter</filter-class>
  	<init-param>
  		<param-name>encoding</param-name>
  		<param-value>utf-8</param-value>
  	</init-param>
  </filter>
  <filter-mapping>
  	<filter-name>CharacterEncodingFilter</filter-name>
  	<url-pattern>/*</url-pattern>
  </filter-mapping>
</web-app>
到这里,配置结束。接下来就可以结合注解开发了


 720
720


 被折叠的 条评论
为什么被折叠?
被折叠的 条评论
为什么被折叠?
 到【灌水乐园】发言


