


完成状态
[ ] 编写中
[ ] 已完成
[x] 维护中
Redis
Redis是一个使用ANSI C编写的开源、支持网络、基于内存、可选持久性的键值对存储数据库 ------ 维基百科
Redis 是目前业界使用广泛的基于内存的 Key-Value数据库。 其提供了丰富的数据结构,不仅限于字符串类型,例如hash, lists ,sets等复杂数据结构,同时提供了数据持久化功能。其基于内存的特性以及丰富的数据结构使起非常使用用于缓存系统并且其也提供了一般关系型数据库所局域的事务,主从数据库等功能。并且可以方便的实现集群扩展。本文将针对 Redis 以及Spring Boot结合进行简单介绍
Redis 安装
redis 安装可以参照其他关于Docker 部分内容,实现基于Docker 的redis 服务。这里将不再单独介绍Redis 安装。如果想要单独安装Redis 服务,请自行查找
本文将包含以下内容:
Redis 与spring boot 整合
1.引入Redis 支持的包
org.springframework.boot
spring-boot-starter-redis
2.配置spring boot Redis支持
以下是基于Spring Boot 自动化的属性配置,其可以参照Spring Boot 配置篇进行单独配置
# Redis数据库索引(默认为0)
spring.redis.database=0
# Redis服务器地址
spring.redis.host=192.168.99.100
# Redis服务器连接端口
spring.redis.port=32769
# Redis服务器连接密码(默认为空)
spring.redis.password=
# 连接池最大连接数(使用负值表示没有限制)
spring.redis.pool.max-active=8
# 连接池最大阻塞等待时间(使用负值表示没有限制)
spring.redis.pool.max-wait=-1
# 连接池中的最大空闲连接
spring.redis.pool.max-idle=8
# 连接池中的最小空闲连接
spring.redis.pool.min-idle=0
# 连接超时时间(毫秒)
spring.redis.timeout=0
3.测试
通过以上方式已经完成了Redis 的配置,接下来通过实现测试用例的方式针对Redis进行测试,查看配置是否成功
@RunWith(SpringRunner.class)
@SpringBootTest
public class DemoApplicationTests {
@Autowired
private StringRedisTemplate stringRedisTemplate;
@Test
public void contextLoads() {
}
@Test
public void test(){
stringRedisTemplate.opsForValue().set("test","redis");
Assert.assertEquals("redis", stringRedisTemplate.opsForValue().get("test"));
}
}
注意: 通过以上方式测试,Spring Boot 的版本必须是1.5.x。 可以通过查看pom.xml文件中的内容确定版本
org.springframework.boot
spring-boot-starter-parent
1.5.8.RELEASE
Spring Boot 2.0 Redis 集成
Spring Boot 1.5.8.RELEASE 版本的默认的Redis 客户端操作采用的是Jedis 实现的,不过最新版本的Spring Boot 添加了lettuce 的实现方式,默认配置中心的Redis 配置进行了区别实现,并且默认采用lettuce 实现的。下面将针对最新版本的Spring Boot 进行两种不同方式配置测试
Spring Boot 1.5.x 版本Starter Redis pom.xml 内容
org.springframework.boot
spring-boot-starter
org.springframework.data
spring-data-redis
redis.clients
jedis
Spring Boot 2.x Redis pom.xml 内容
org.springframework.boot
spring-boot-starter
org.springframework.data
spring-data-redis
org.slf4j
jcl-over-slf4j
io.lettuce
lettuce-core
可以在Spring Boot下查看具体的Starter引用
Spring Boot 2.0 通过 Jedis 集成 Redis 服务
通过以上不同版本的Redis 集成引用可以发现,默认的2.x版本中,默认只引入了 Lettuce包,并没有引入Redis包支持,所以如果要实现此功能,必须手动引入具体的包
1.引入需要的jar包
org.springframework.boot
spring-boot-starter-data-redis
redis.clients
jedis
redis.clients
jedis
通过以上方式引入jedis,并且将spring-boot-starter-data-redis中自带的替换为 jedis
2.修改配置
前面提到了,默认最新版本的将配置进行了分离,所以以上的部分配置已经过期,下面将采用最新的配置
# Redis数据库索引(默认为0)
spring.redis.database=0
# Redis服务器地址
spring.redis.host=192.168.99.100
# Redis服务器连接端口
spring.redis.port=32770
# Redis服务器连接密码(默认为空)
spring.redis.password=
spring.redis.jedis.pool.max-active=8
spring.redis.jedis.pool.max-wait=-1
spring.redis.jedis.pool.min-idle=0
spring.redis.jedis.pool.max-idle=8
3.jedis 配置
通过以上配置实现的,在新的版本下是无法正常工作的,因为默认采用的Lettuce实现的,所以无法初始化出Jedis 的连接对象JedisConnectionFactory,需要自己创建并自行注入
public class JedisRedisConfig {
@Bean
JedisConnectionFactory jedisConnectionFactory() {
JedisConnectionFactory factory = new JedisConnectionFactory();
return factory;
}
通过以上方式,你会发现,还是无法测试通过,默认可能会报一下两个错误
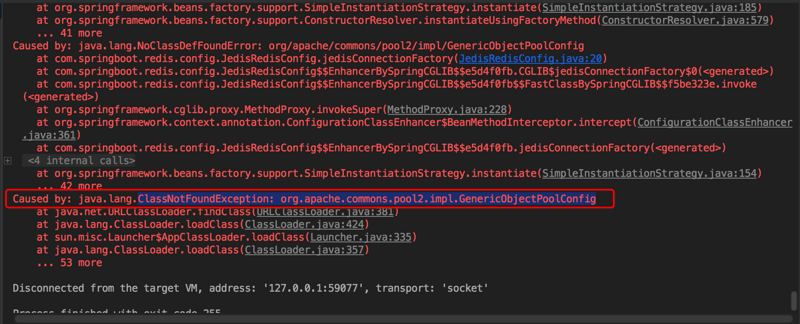
错误原因:commons-pool2库缺失
org.apache.commons
commons-pool2
2.4.2
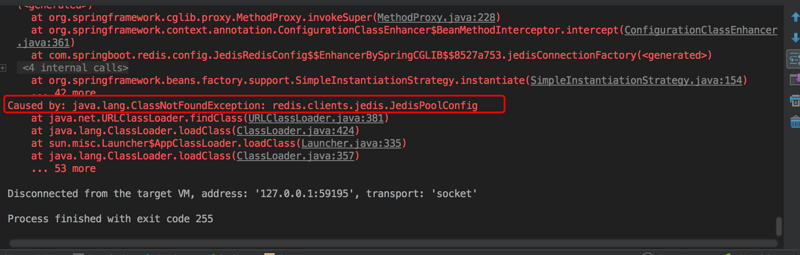
错误原因 : jedis 版本低或者maven导入失败
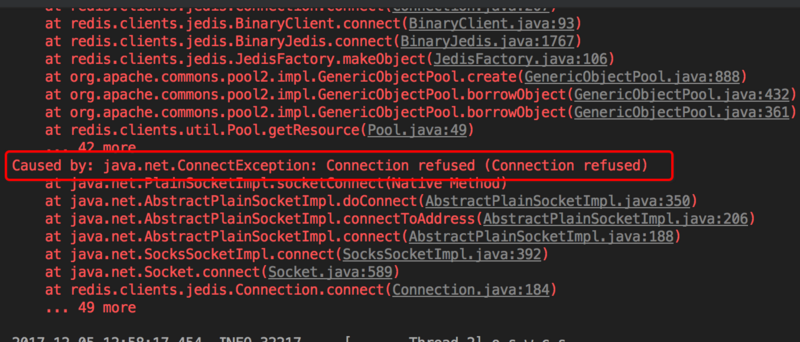
错误原因: redis 连接失败, 不止为何,spring boot 2.x 通过以上方式集成jedis,但是其不会读取配置文件中的spring.redis.host等这样的配置,需要自己手动设置
如果有人知道为什么,还请告知,感激不尽,或者我后续研究会补上具体的原因内容
虽然系统没有提供正确的支持,不过我们可以通过自己的配置实现具体的功能支持,通过添加以下配置内容
@Configuration
@PropertySource(value = "classpath:/application.properties")
public class JedisRedisConfig {
@Value("${spring.redis.host}")
private String host;
@Value("${spring.redis.password}")
private String password;
@Value("${spring.redis.port}")
private int port;
@Value("${spring.redis.timeout}")
private int timeout;
@Bean
JedisConnectionFactory jedisConnectionFactory() {
JedisConnectionFactory factory = new JedisConnectionFactory();
factory.setHostName(host);
factory.setPort(port);
factory.setTimeout(timeout); //设置连接超时时间
return factory;
}
}
将系统配置设置为以上形式,就可以连接正确的redis 服务了,如果不设置,将采用默认配置连接的是localhost 的redis服务
4.测试
ok, 通过以上配置,运行测试用例, jedis 测试是可以连通的
Spring Boot 2.0 通过 Lettuce 集成 Redis 服务
1.导入包
默认的 Spring Boot 2.x 已经采用Lettuce为默认实现,所以只需要导入默认的 Redis支持包就好
org.springframework.boot
spring-boot-starter-data-redis
org.apache.commons
commons-pool2
2.配置
spring.redis.database=0
# Redis服务器地址
spring.redis.host=192.168.99.100
# Redis服务器连接端口
spring.redis.port=32770
# Redis服务器连接密码(默认为空)
spring.redis.password=
spring.redis.lettuce.pool.max-active=8
spring.redis.lettuce.pool.max-wait=-1
spring.redis.lettuce.shutdown-timeout=100
spring.redis.lettuce.pool.max-idle=8
spring.redis.lettuce.pool.min-idle=0
3.测试连接
通过单元测试,测试是否连接通过
Redis应用场景一 ------ 基于Redis 缓存实现
由于Redis独特的基于内存设计,优越性能以及丰富的数据结构,非常适合用于作为缓存系统实现,下面将实现基于Spring Boot与Redis 的缓存系统实现
缓存
磁盘缓存(Disk Buffer)或磁盘快取(Disk Cache)实际上是将下载到的数据先保存于系统为软件分配的内存空间中(这个内存空间被称之为“内存池”),当保存到内存池中的数据达到一个程度时,便会将数据保存到硬盘中。这样可以减少实际的磁盘操作,有效的保护磁盘免于重复的读写操作而导致的损坏。
磁盘缓存是为了减少CPU透过I/O读取磁盘机的次数,提升磁盘I/O的效率,用一块内存来储存存取较频繁的磁盘内容;因为内存的存取是电子动作,而磁盘的存取是机械动作,感觉上磁盘I/O变得较为快速。
相同的技巧可用在写入动作,我们先将欲写入的内容放入内存中,等到系统有其它空闲的时间,再将这块内存的资料写入磁盘中。 ------ 维基百科
以上内容是维基百科中关于磁盘缓存的介绍,在大型网络应用程序中,缓存的应用和磁盘缓存一样,都是为了提高读写性能,网络应用中减少对数据库的访问就可以一定程度上很好的提高性能(数据库访问还是对磁盘I/O 访问,到最后还是磁盘读取的问题)
缓存实现
通过以上配置实现Redis 支持
首先先通过以上内容实现Redis的正确支持
开启缓存机制
Spring Boot 针对缓存支持比较完备,不需要更多的配置,只需要一个注解就可以开启缓存,通过@EnableCaching
@SpringBootApplication
@EnableCaching
public class DemoApplication {
public static void main(String[] args) {
SpringApplication.run(DemoApplication.class, args);
}
}
通过以上方式虽然可以开启缓存功能,不过还是推荐下面的方式,为缓存操作单独创建配置类,方便管理并且方便自定义缓存功能
@Configuration
@EnableCaching
public class CacheConfig extends CachingConfigurerSupport {
// cache 功能
@Override
public CacheManager cacheManager() {
return null;
}
@Override
public KeyGenerator keyGenerator() {
return null;
}
@Override
public CacheResolver cacheResolver() {
return null;
}
@Override
public CacheErrorHandler errorHandler() {
return null;
}
}
CachingConfigurerSupport 类是 Spring Cache 模块下的关于cache配置的支持类,其中默认定义了四个关于缓存配置的4个方法,默认都是返回 null 以使用系统默认的缓存设置
我们可以通过重写此方法,进行自定义的操作,比如自定义缓存key的生成策略等。默认的生成策略是看不懂的(乱码内容) 通过Spring 的依赖注入特性进行自定义的配置注入并且此类是一个配置类可以更多程度的自定义配置
@Override
@Bean
public KeyGenerator keyGenerator() {
return new KeyGenerator() {
@Override
public Object generate(Object target, Method method, Object... params) {
StringBuilder stringBuilder = new StringBuilder();
stringBuilder.append(target.getClass().getName());
stringBuilder.append(method.getName());
for (Object object : params){
stringBuilder.append(object.toString());
}
return stringBuilder.toString();
}
};
}
以上通过自定义key生成策略,通过自定义的策略规则,替换系统自动的策略规则(__Spring Cloud微服务部分会针对此处进行更加细致的配置,来确定来自哪个服务,如果感兴趣先看看如何实现__)
3.Spring Boot 缓存支持
Spring Boot 是通过注解来进行缓存操作的,通过输入 cache,可以看到,Spring Boot默认支持一下几个缓存相关注解
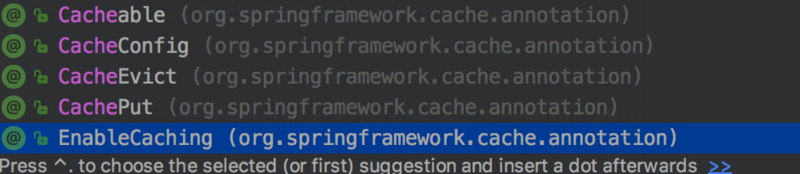
以上截图中只有5个 还是有一个没有@Caching注解
下面将针对每个注解进行详细的介绍:
@EnableCaching
此注解在上边已经使用过了,其目的就是为了开启缓存
次注解对应到XML配置中就是一下内容
xmlns:xsi="http://www.w3.org/2001/XMLSchema-instance"
xmlns:cache="http://www.springframework.org/schema/cache"
xsi:schemaLocation="
http://www.springframework.org/schema/beans http://www.springframework.org/schema/beans/spring-beans.xsd
http://www.springframework.org/schema/cache http://www.springframework.org/schema/cache/spring-cache.xsd">
@CacheConfig
通过名称就可以看出,次注解是对cache配置注解(是类级别的)
public @interface CacheConfig {
String[] cacheNames() default {};
String keyGenerator() default "";
String cacheManager() default "";
String cacheResolver() default "";
}
以上是此注解的内容,其中和CachingConfigurerSupport中部分相对应,设置关于注解的
cacheNames: 设置缓存存储的名称,允许提供多个
keyGenerator: 配置缓存key生成策略,默认采用的是系统自定义的(接下来对默认规则介绍),通过设置此属性给定自定义的key生成规则,此处需要给出一个bean名称实现(此处spring 默认生成bean名称是类名首字母小写,此处需要自己给出正确的bean名称,可以通过自定义实现key生成策略)
cacheManager: 给定义缓存管理器bean 名称,默认会根据使用的缓存策略的不同生成不同的管理器,比如Redis 生成的就是 RedisCacheManager类的实例,默认系统实现的是一个 SimpleCacheManager, 使用的和keyGenerator规则相同
cacheResolver:
@Cacheable
用于设置支持缓存,一般用于需要缓存的方法上进行数据缓存操作实现,访问此方法时先查询缓存是否存在对应的缓存值,没有执行具体查询操作,并将查询结果写入缓存中(方法级别)
@AliasFor("cacheNames")
String[] value() default {};
@AliasFor("value")
String[] cacheNames() default {};
String key() default "";
String keyGenerator() default "";
String cacheManager() default "";
String cacheResolver() default "";
String condition() default "";
String unless() default "";
boolean sync() default false;
以上是此注解的全部内容
value,cacheNames: 这两个注解功能相同,就是设置缓存的名称,允许设置多个,在方法执行之前,每个缓存都将被检测,只要一个检测到有内容那么就直接返回,不执行方法体。如果都没有那么执行过后每个缓存都将设置内容(一般情况下只用设置一个)
key: 设置缓存内容所对应的key
//给出了通过 SpEL表达式生成key 的实例
@Cacheable(cacheNames="books", key="#isbn")
public Book findBook(ISBN isbn, boolean checkWarehouse, boolean includeUsed)
@Cacheable(cacheNames="books", key="#isbn.rawNumber")
public Book findBook(ISBN isbn, boolean checkWarehouse, boolean includeUsed)
@Cacheable(cacheNames="books", key="T(someType).hash(#isbn)")
public Book findBook(ISBN isbn, boolean checkWarehouse, boolean includeUsed)
由于SpEL表达式的支持,其key 存在的可能性就很多,可以通过SpEL 表达式进行多种形式组合
keyGenerator:指定key 生成策略通过一定的操作自动生成唯一的key , 此参数和 key 参数是互斥的,所以不能同时使用
cacheManager: 用于指定使用哪个缓存管理器
condition: 条件,缓存需要的条件,可以通过设置此属性,对内容进行条件性缓存,只有满足条件了才进行缓存
unless: 此属性和condition一样都是设置条件的,不过此属性时针对执行后的判断,可以对执行结果进行判断
@CachePut
次注解用于对缓存的更新上, 使用此注解与@Cacheable不同之处在于方法会被执行,执行过后会更新缓存
@CacheEvict
用于清除缓存
boolean allEntries() default false;
boolean beforeInvocation() default false;
此注解相对以上注解添加了两个属性
allEntries: 删除所有缓存,默认是false,不删除的,只有设置Wie true后会在方法执行后删除所有缓存
beforeInvocation: 是否在方法执行前就清空,默认是在方法执行后删除缓存,如果方法执行抛出异常,那么缓存不会被删除
扩展
* Spring cache key 生成策略
* 默认系统给出的策略是根据方法参数来实现的,如果方法没有参数则key就为一个`SimpleKey.EMPTY`; 如果方法有一个参数,直接返回对象;如果有多个参数,那么返回的是一个包含所有参数的键。
* key 生成还支持 `SpEL`表达式生成,通过指定`SpEL`表达式指定key的生成策略
* key 还支持通过指定特定的`keyGenerator`属性,指定一个key 生成器来通过此生成器生成适合的key
* 由于项目的需求,可能存在多个需求缓存相同,不过由于参数的不同,可以通过 `SpEL` 实现将对结果无关的参数忽略的形式组合成一组通用的key 实现多个需求可以使用同一份缓存
@Caching
此注解是一个辅助性注解,为了解决在多个相同注解多个同时使用的情况下。此注解允许@Cacheable,@CachePut,@CacheEvict三个注解的操作
Cacheable[] cacheable() default {};
CachePut[] put() default {};
CacheEvict[] evict() default {};
以上是注解的具体内容
@Caching(evict = { @CacheEvict("primary"), @CacheEvict(cacheNames="secondary", key="#p0") })
public Book importBooks(String deposit, Date date)
具体的使用示例
如果需要了解详细的内容,请查询官方文档Spring Cache
缓存功能测试
1.实现controller 以及service 代码
@RestController
@RequestMapping("/cache")
public class CacheController {
@Autowired
private CacheService cacheService;
@GetMapping("/get_user_by_name/{name}")
public ResponseEntity findByName(@PathVariable String name)
{
return new ResponseEntity(cacheService.findByName(name), HttpStatus.OK);
}
@GetMapping("/get_user_by_age/{age}")
public ResponseEntity findByAge(@PathVariable String age)
{
return new ResponseEntity(cacheService.findByAge(Integer.parseInt(age)), HttpStatus.OK);
}
}
@Service
@CacheConfig(cacheNames = "cache")
public class CacheServiceImpl implements CacheService {
@Cacheable(keyGenerator = "keyGenerator")
@Override
public User findByName(String name) {
System.out.println("findByName没有加载缓存");
return new User((new Long(1)),"张三", 18);
}
@Cacheable(keyGenerator = "keyGenerator")
@Override
public List findByAge(int age) {
System.out.println("findByAge没有加载缓存");
return (List) new User(new Long(1),"李四", 18);
}
}
以上是测试需要的代码,代码很简单,不涉及到dao等数据库操作,只是为了测试缓存功能是否正常
2.测试
通过PostMan 等 REST Ful 等请求模拟测试软件进行测试 第一次请求单个方法会进打印,不过第二次请求就不会进行打印。以上代码只是测试了 @Cacheable 请求添加功能具体的其他几个功能请单独测试
可以通过debug跟踪到 CacheAspectSupport 类中的execute方法查看缓存值
// CacheAspectSupport 跟踪方法
private Object execute(final CacheOperationInvoker invoker, Method method, CacheOperationContexts contexts) {
// Special handling of synchronized invocation
if (contexts.isSynchronized()) {
CacheOperationContext context = contexts.get(CacheableOperation.class).iterator().next();
if (isConditionPassing(context, CacheOperationExpressionEvaluator.NO_RESULT)) {
Object key = generateKey(context, CacheOperationExpressionEvaluator.NO_RESULT);
Cache cache = context.getCaches().iterator().next();
try {
return wrapCacheValue(method, cache.get(key, new Callable() {
@Override
public Object call() throws Exception {
return unwrapReturnValue(invokeOperation(invoker));
}
}));
}
catch (Cache.ValueRetrievalException ex) {
// The invoker wraps any Throwable in a ThrowableWrapper instance so we
// can just make sure that one bubbles up the stack.
throw (CacheOperationInvoker.ThrowableWrapper) ex.getCause();
}
}
else {
// No caching required, only call the underlying method
return invokeOperation(invoker);
}
}
// Process any early evictions
processCacheEvicts(contexts.get(CacheEvictOperation.class), true,
CacheOperationExpressionEvaluator.NO_RESULT);
// Check if we have a cached item matching the conditions
Cache.ValueWrapper cacheHit = findCachedItem(contexts.get(CacheableOperation.class));
// Collect puts from any @Cacheable miss, if no cached item is found
List cachePutRequests = new LinkedList();
if (cacheHit == null) {
collectPutRequests(contexts.get(CacheableOperation.class),
CacheOperationExpressionEvaluator.NO_RESULT, cachePutRequests);
}
Object cacheValue;
Object returnValue;
if (cacheHit != null && cachePutRequests.isEmpty() && !hasCachePut(contexts)) {
// If there are no put requests, just use the cache hit
cacheValue = cacheHit.get();
returnValue = wrapCacheValue(method, cacheValue);
}
else {
// Invoke the method if we don't have a cache hit
returnValue = invokeOperation(invoker);
cacheValue = unwrapReturnValue(returnValue);
}
// Collect any explicit @CachePuts
collectPutRequests(contexts.get(CachePutOperation.class), cacheValue, cachePutRequests);
// Process any collected put requests, either from @CachePut or a @Cacheable miss
for (CachePutRequest cachePutRequest : cachePutRequests) {
cachePutRequest.apply(cacheValue);
}
// Process any late evictions
processCacheEvicts(contexts.get(CacheEvictOperation.class), false, cacheValue);
return returnValue;
}
说明 : 此处测试比较简单,只是测试cache功能是否正常,但更加详细的没有实现,需要自己实现,往后有时间我会补全更加详细的测试实现
Redis应用场景二 ------ 基于Redis 的共享 Session 实现
在大型分布式项目中,要保证项目的可伸缩型,带状态的 session 共享是越不过去的坎。针对Session 共享实现,业界有不同的实现方式,一种是将Session 直接持久化到数据库中,不过这种方式针对数据库的读写性能有很大要求,并且效率严重的受限于数据库性能;另一种方式就是直接将数据存储到Cookie中,但是这种方式由于Cookie的特性,存储的数据大小受限;相比较下,将Session 存储在 Redis 中是最好的选择。其Redis 基于内存的实现满足了高效性,访问速度快,并且 Redis 支持集群化,所以不会受限数据库的问题。下面将介绍基于Redis 实现的共享session
共享 Session 实现
1.引入 session支持包
org.springframework.session
spring-session-data-redis
org.springframework.session
spring-session-data-redis
org.springframework.boot
spring-boot-starter-data-jpa
com.h2database
h2
1.4.196
runtime
Spring Boot 针对 Redis 实现 Session 共享操作进行了封装实现,可以很方便的将Session对象直接存储在 Redis中
2.开启 Session 支持
Spring Boot 中Session 支持多种形式存储,包括Redis, Mongo,jdbc,hazelcast,hash_map等形式,此处需要指定为Redis,通过修改 application.properties配置文件,添加一下配置
spring.session.store-type=redis
通过以上方式指定session管理方式为redis,并通过一下方式开启session redis 支持
@Configuration
@EnableRedisHttpSession(maxInactiveIntervalInSeconds = 86400)
public class SessionConfig {
}
Spring Boot 通过注解开启 Redis 针对 Session 的支持, 此注解针对session进行配置,其内部是自动创建了Spring Bean对象,是一个过滤器bean--- springSessionRepositoryFilter。 关于此部分详细内容请查询官方文档HttpSession with Redis
public @interface EnableRedisHttpSession {
int maxInactiveIntervalInSeconds() default 1800;
String redisNamespace() default "";
RedisFlushMode redisFlushMode() default RedisFlushMode.ON_SAVE;
}
以上内容是此注解的源码,可以发现,次注解主要设置了三个功能:
* `maxInactiveIntervalInSeconds`: 对应的是session的过期时间,默认是1800秒后过期,用户可以通过自定义时间,如果设置了此属性,项目中的`server.session.timeout`属性将失效, __此处需要注意__
* `redisNamespace`: 设置redis 的命名空间,就是设置数据存储到哪里(相当于关系型数据库中的库)
* `redisFlushMode`: redis 操作模式,是否立即刷新到redis数据库中,默认的是不会的,系统并不是在刚设置就刷新,而是选择在某个时间点刷新到数据库中
3.测试
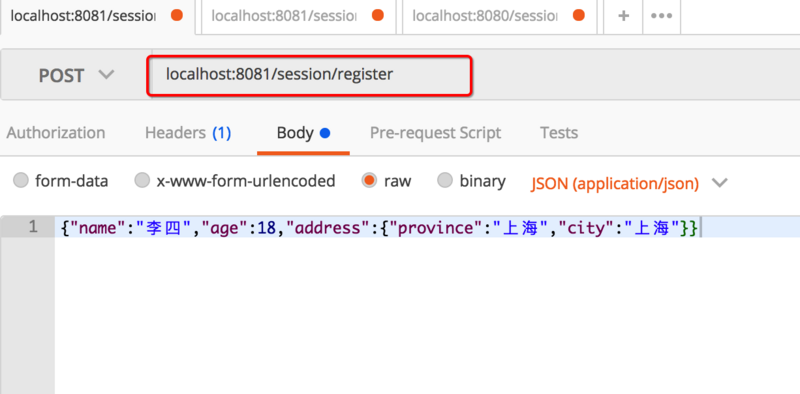
@PostMapping("/register")
public ResponseEntity register(@RequestBody User user, HttpServletRequest request)
{
request.getSession().setAttribute("user", user);
return new ResponseEntity(userRespository.save(user), HttpStatus.OK);
}
@GetMapping("/session")
public ResponseEntity getSessionMessage(HttpServletRequest request)
{
Map map = new HashMap<>();
map.put("sessionId", request.getSession().getId());
map.put("message",request.getSession().getAttribute("user")) ;
return new ResponseEntity(map, HttpStatus.OK);
}
以上代码为测试代码
测试过程:
启动项目,通过/register接口注册用户,系统会见用户信息写入session中
访问/session 查看session信息
同时在另一个端口上启动本项目
访问 /session接口,查看session信息
测试结果:
通过以上方式测试会发现,本地访问两个不同的项目,拿到的session是相同的
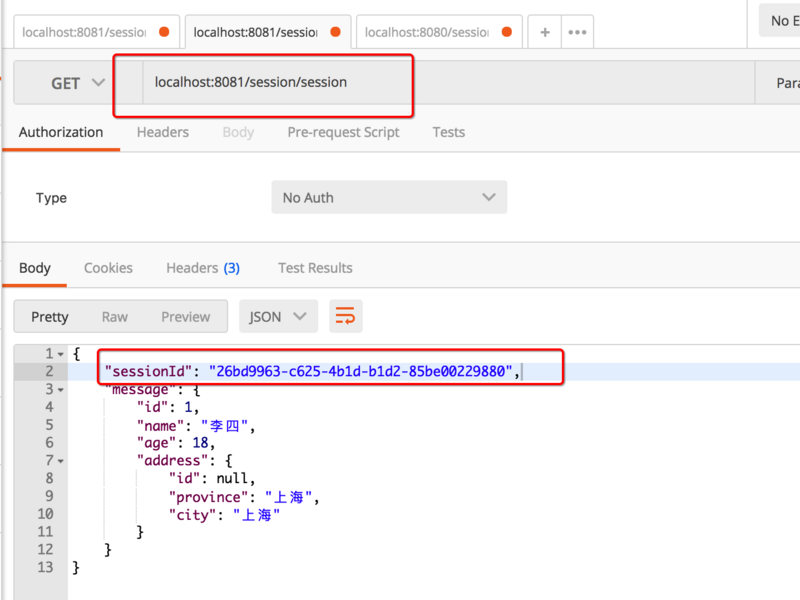
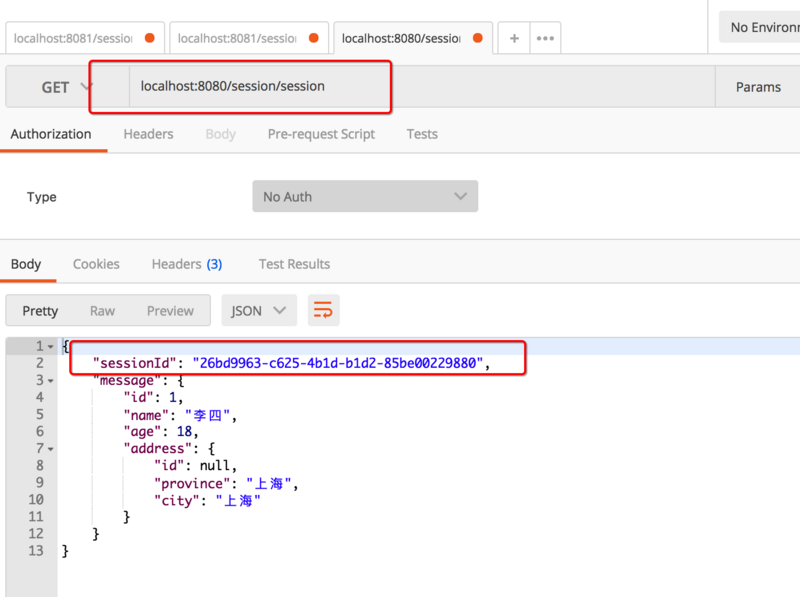
session 的内容以及 session ID 是相同的,达到了session共享的目的
总结
以上介绍了 Redis以及其在 Spring Boot 中的两种应用方式,缓存和 Session共享。 针对其具体的实现细节以及功能做了简单介绍,如果需要更加细致的了解。可以根据文中提到参考文章查找更加细致了讲解
由于本人知识水平有限,文章可能会存在错误等,如果您有发现还请通过评论等方式联系我将积极完善和改正,在此不胜感激
扩展
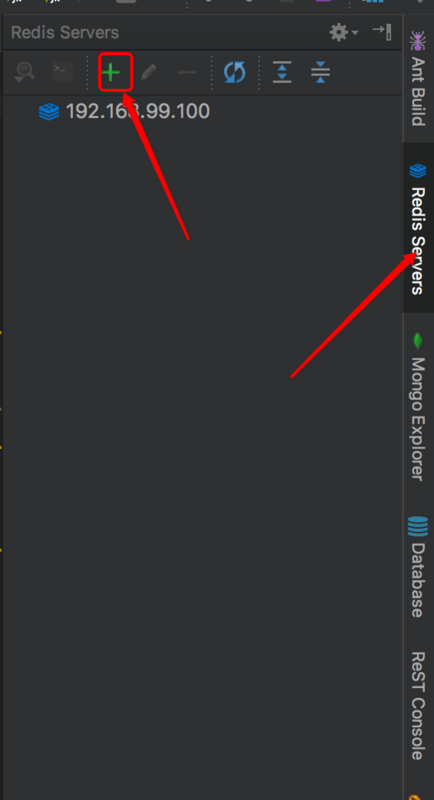
IDEA Redis 支持
IDEA 对通过插件的方式对 Redis 有很好的集成,通过插件可以实现Redis最基本的开发,下面将介绍如何实现
安装插件
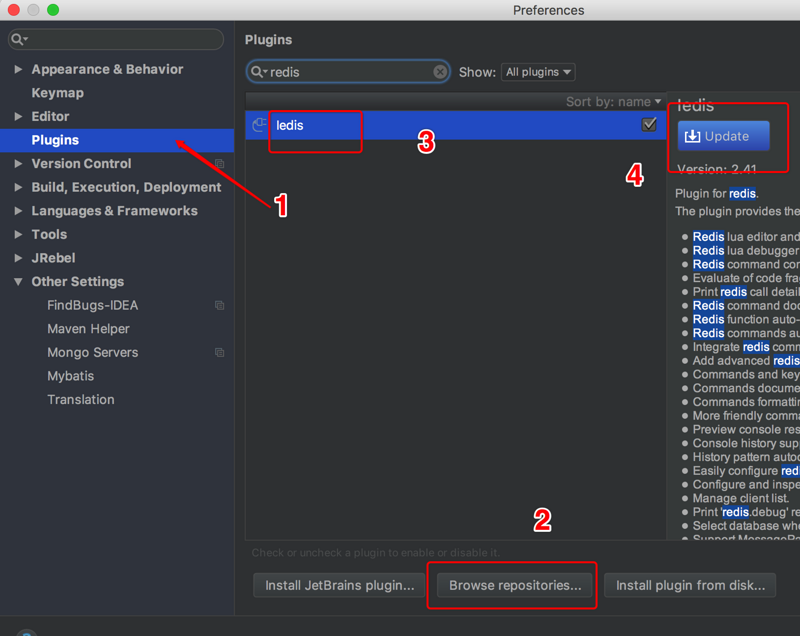
按照以上步骤安装插件,我这里已经安装,所有显示的是update,根据提示安装插件就好
连接Redis
安装完成需要重启IDEA
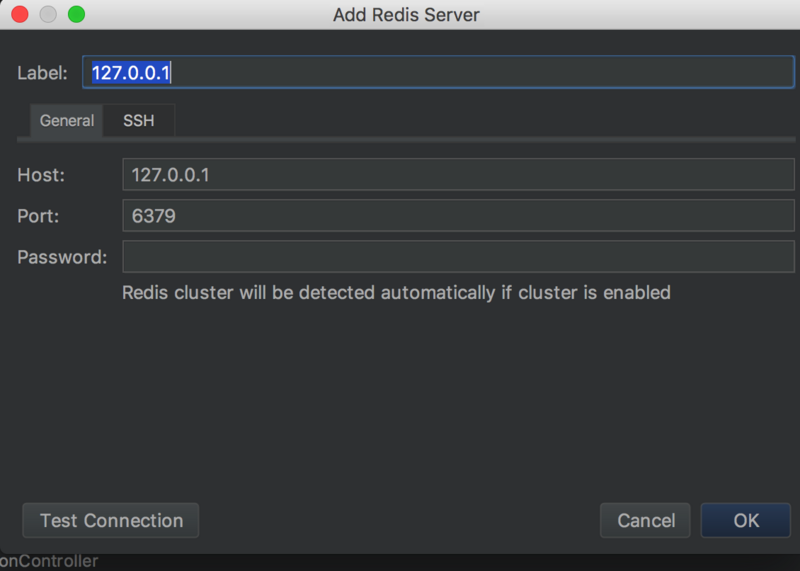
通过以上方式,填写对应的地址和端口以及密码等内容,测试连接是否成功
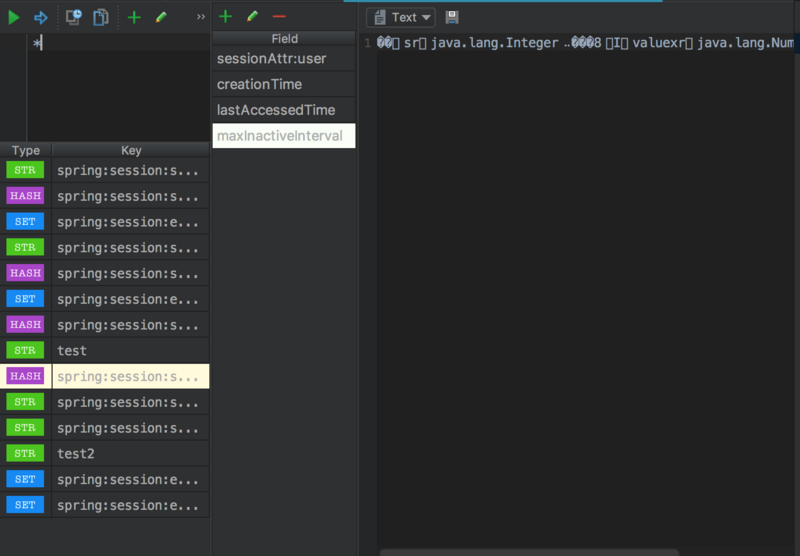
以上就是Redis支持的操作界面,可以通过此界面操作Redis
参考


 682
682


 被折叠的 条评论
为什么被折叠?
被折叠的 条评论
为什么被折叠?
 到【灌水乐园】发言


