


第259次(Spring Session)
学习主题:Spirng Session
学习目标:
对应视频:
Spring Session 阶段1 -25视频
对应文档:
无
对应作业
写出每节课对应的笔记,例如
1 spring session介绍
2 安装redis
3 创建项目 添加坐标依赖
……
1. 什么是HttpSession?
是javaWeb服务端提供的用来建立与客户端会话状态的对象
1.1 什么是session共享
是指一个浏览器对应多个Web服务时,服务端的Session数据需要共享给所有服务
例如 : 单点登录 Web 服务器集群之间的数据交互
1.2 Session共享常见的解决方案
1. Session复制 ,
在应用服务器的配置中开启服务器的Session复制功能 ,在集群中的几台服务器中同步Session的对象 实现了Session的共享
缺点:
因为Session需要实时同步,服务一多就要同步很多次,影响性能
2. Session绑定
利用hash 算法 ,将相同IP的请求分发到同一台服务器上,就不会出现Session同步的问题
3. 利用Cookie记录Session
将Session 记录在客户端 ,每次请求服务器时,将Session放在请求中发送给服务器
服务器处理完请求后再将修改后的Session 响应给客户端 ,这里的客户端就是Cookie
缺点:
Cookie 大小有限制,记录的信息有限 ,安全性低
4. Session服务器 (推荐使用)
由Session服务器保存所有的Session ,服务器每次读写Session,都访问Session服务器
利用Redis或者MongoDB 等内存数据库来保存Session中的数据 ,替换服务中HttopSession 达到Session共享的效果
2. 什么是Spring Session
Spring Session 是 Spring 的项目之一。Spring Session 提供了一套创建和管理 Servlet
HttpSession 的方案,默认采用外置的 Redis 来存储 Session 数据,以此来解决 Session 共享的
问题。
2.1 使用Spring Session 开发
编写 Session-service1
1. 导入依赖
<?xml version="1.0" encoding="UTF-8"?><project xmlns="http://maven.apache.org/POM/4.0.0"xmlns:xsi="http://www.w3.org/2001/XMLSchema-instance"xsi:schemaLocation="http://maven.apache.org/POM/4.0.0 http://maven.apache.org/xsd/maven-4.0.0.xsd"> <modelVersion>4.0.0</modelVersion> <groupId>com.bjsxt</groupId> <artifactId>Session-service2</artifactId> <version>1.0-SNAPSHOT</version> <parent> <groupId>org.springframework.boot</groupId> <artifactId>spring-boot-starter-parent</artifactId> <version>2.1.6.RELEASE</version> </parent> <dependencyManagement> <dependencies> <dependency> <groupId>org.springframework.session</groupId> <artifactId>spring-session-bom</artifactId> <version>Bean-SR3</version> <type>pom</type> <scope>import</scope> </dependency> </dependencies> </dependencyManagement> <dependencies><!--web Starter--><dependency> <groupId>org.springframework.boot</groupId> <artifactId>spring-boot-starter-web</artifactId> </dependency><!--Redis Starter--> <dependency> <groupId>org.springframework.boot</groupId> <artifactId>spring-boot-starter-redis</artifactId> <version>1.4.7.RELEASE</version> </dependency><!--Spring session data redis--><dependency> <groupId>org.springframework.session</groupId> <artifactId>spring-session-data-redis</artifactId> </dependency><!--Lettuce 是一个基于Netty的NIO方式处理Redis的技术--><dependency> <groupId>io.lettuce</groupId> <artifactId>lettuce-core</artifactId> </dependency> </dependencies></project>
2. 编写配置文件 application.yml
server:port: 8081spring:redis:host: 192.168.93.130port: 6379database: 0timeout: 6000
目录结构
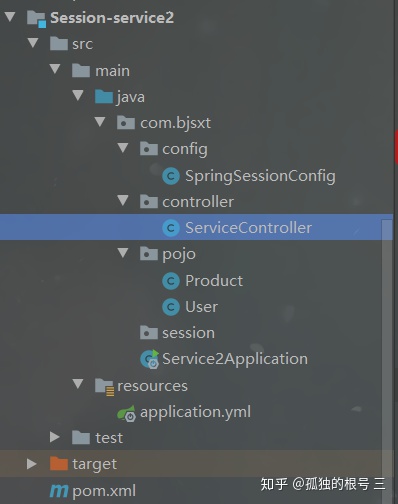
编写控制层 Controlelr
@RestController@RequestMapping("/service2")public class ServiceController {@RequestMapping("/getMsg")public String setMessage(HttpSession httpSession){ String msg = (String) httpSession.getAttribute("msg"); return msg;}
编写启动类
/** * @EnableRedisHttpSession 开启Spring Session共享* maxInactiveIntervalInSeconds : key的存活时间设置* redisNamespace : redis工作空间 ,只有相同工作空间的服务才能取到redis中对应的值*/@SpringBootApplication@EnableRedisHttpSession(maxInactiveIntervalInSeconds=1000,redisNamespace = "springredis")public class ServiceApplication {public static void main(String[] args) { SpringApplication.run(ServiceApplication.class,args);}}
编写 Session-service2
复制项目Session-service1
修改部分 Controller将 数据取出来
@RestController@RequestMapping("/service2")public class ServiceController {@RequestMapping("/getMsg")public String setMessage(HttpSession httpSession){ String msg = (String) httpSession.getAttribute("msg"); return msg;}
Redis数据属性解读

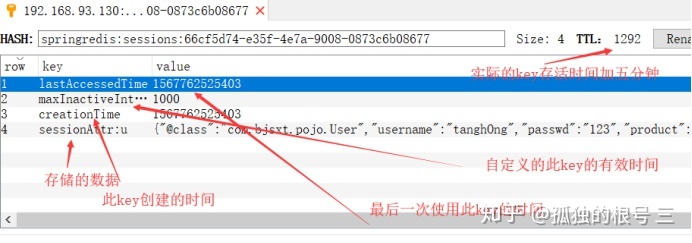
设置Session的失效时间

9.1maxInactiveIntervalInSeconds
设置 Session 的失效时间,单位为秒。默认(1800 秒)30 分钟。
9.2redisNamespace
为键定义唯一的命名空间。该值用于通过更改前缀与默认 spring:session 隔离会话
9.3redisFlushMode
Redis 会话的刷新模式。默认值为“保存”
9.4cleanupCron
过期会话清理作业的 cron 表达式。默认值("0 * * * * *")每分钟运行一次。
@SpringBootApplication@EnableRedisHttpSession(maxInactiveIntervalInSeconds = 1000,redisNamespace = "springredis")public class Service2Application {public static void main(String[] args) { SpringApplication.run(Service2Application.class,args);}}
3. 更换Spring Session 的序列化器

@Configurationpublic class SpringSessionConfig {/** * 更换默认的序列化器* */@Bean("springSessionDefaultRedisSerializer")//指定替换的keypublic RedisSerializer setDefaultSerializer(){return getSerializer();}/** * 定义序列化器*/private RedisSerializer getSerializer(){return new GenericJackson2JsonRedisSerializer();}}
测试结果

1. Spring Session MongoDB
Spring Session MongoDB 是Spring Session的二级项目,其功能与Spring Session 是相同的.Spring Session MongoDB提供了一个API和实现,用于通过利用SPring Data Mongo'DB
来管理存储在MongoDB中的用户会话信息
2. Spring Session MongoDB 和 Spring Session 的区别
Spring Session与 Spring Session MongoDB的作用是相同的,都是来解决Session共享问题,不同的是Spring Session默认的是依赖于Reduis作为数据缓存平台.
而Spring Session MongoDB 是依赖于MongoDB 来作为数据缓存平台的
3. 安装MongoDB
下载MongoDB
解压至 /usr/local
Tar -zxf mongodb-linus-x86_64-4.0.9.tgz
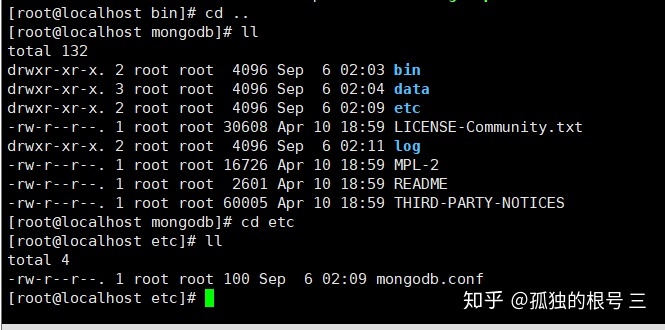
在mongo 解压文件下
创建 data/db目录
Mkdir -p data/db
创建日志目录和日志文件
Mkdir log
在log 下创建日志文件
Touch mongodb.log
创建配置文件 在 /etc目录下
Vim mongodb.conf

启动MongoDB
./mongod --config /usr/local/mongodb/etc/mongodb.conf
使用的方式与redis非常相似
配置文件application.yml
#配置服务的端口server:port: 8081#配置MOngoDB的连接信息spring:data:mongodb:host: 192.168.93.130port: 27017database: sxtsession:store-type: mongodb
* maxInactiveIntervalInSeconds : 设置失效时间
ColleectionName : 设置MongoDB的collections的名称*/@SpringBootApplication@EnableMongoHttpSession(maxInactiveIntervalInSeconds = 1000)public class Mongodb2Application {public static void main(String[] args) { SpringApplication.run(Mongodb2Application.class,args);}}
更换Spring Session MongoDB的序列化器
Spring Session MongoDB默认使用的是JDK反序列器
创建 jackson序列化器
@Configurationpublic class SessionMongoconfig {/** 更换Spring Session MongoDB的序列化器** */@BeanJacksonMongoSessionConverter mongoSessionConverter(){return new JacksonMongoSessionConverter();}}
修改实体类 ,添加@JsonAutoDetect注解
@JsonAutoDetect(fieldVisibility = JsonAutoDetect.Visibility.ANY)public class User implements Serializable {
分享/讲解/扩展思考
点名提问从第一节课到最后一节课分别学到了什么,直到同学们把所有的知识点都说出来并且保证无误。


 554
554


 被折叠的 条评论
为什么被折叠?
被折叠的 条评论
为什么被折叠?
 到【灌水乐园】发言


