


跟着lyhue1991/eat_tensorflow2_in_30_days学tensorflow
使用tf.Module来更好地构建Autograph
一,Autograph和tf.Module概述
构建Autograph时应该避免在@tf.function修饰的函数内部定义tf.Variable.但是如果在函数外部定义tf.Variable的话,又会显得这个函数有外部变量依赖,封装不够完美。TensorFlow提供了一个基类tf.Module,通过继承它构建子类,可以非常方便地管理变量,还可以非常方便地管理它引用的其它Module,最重要的是,能够利用tf.saved_model保存模型并实现跨平台部署使用。
实际上,tf.keras.models.Model,tf.keras.layers.Layer 都是继承自tf.Module的,提供了方便的变量管理和所引用的子模块管理的功能。
因此,利用tf.Module提供的封装,再结合TensoFlow丰富的低阶API,实际上我们能够基于TensorFlow开发任意机器学习模型(而非仅仅是神经网络模型),并实现跨平台部署使用。
二,应用tf.Module封装Autograph
定义一个简单的function。
import tensorflow as tf
x = tf.Variable(1.0,dtype=tf.float32)

#在tf.function中用input_signature限定输入张量的签名类型:shape和dtype
@tf.function(input_signature=[tf.TensorSpec(shape = [], dtype = tf.float32)])
def add_print(a):
    x.assign_add(a)
    tf.print(x)
    return(x)
add_print(tf.constant(3.0))
#add_print(tf.constant(3)) #输入不符合张量签名的参数将报错
4
注:如果不用 input_signature限定输入张量的签名类型:shape和dtype,一样会报错,报错类型一样,都是value error,但是报错内容是 in converted code, 目前认为, input_signature 只是做了输入参数的提前检查,而不是在创建计算图中用到了参数才做检查
下面利用tf.Module的子类化将其封装一下。
class DemoModule(tf.Module):
    def __init__(self,init_value = tf.constant(0.0),name=None):
        super(DemoModule, self).__init__(name=name)
        with self.name_scope:  #相当于with tf.name_scope("demo_module")
            self.x = tf.Variable(init_value,dtype = tf.float32,trainable=True)


    @tf.function(input_signature=[tf.TensorSpec(shape = [], dtype = tf.float32)])
    def addprint(self,a):
        with self.name_scope:
            self.x.assign_add(a)
            tf.print(self.x)
            return(self.x)

#执行
demo = DemoModule(init_value = tf.constant(1.0))
result = demo.addprint(tf.constant(5.0))
6

#查看模块中的全部变量和全部可训练变量
print(demo.variables)
print(demo.trainable_variables)
(<tf.Variable 'demo_module/Variable:0' shape=() dtype=float32, numpy=6.0>,)
(<tf.Variable 'demo_module/Variable:0' shape=() dtype=float32, numpy=6.0>,)

#查看模块中的全部子模块
demo.submodules

#使用tf.saved_model 保存模型,并指定需要跨平台部署的方法
tf.saved_model.save(demo,"./data/demo/1",signatures = {"serving_default":demo.addprint})

#加载模型
demo2 = tf.saved_model.load("./data/demo/1")
demo2.addprint(tf.constant(5.0))
11

# 查看模型文件相关信息,红框标出来的输出信息在模型部署和跨平台使用时有可能会用到
!saved_model_cli show --dir ./data/demo/1 --all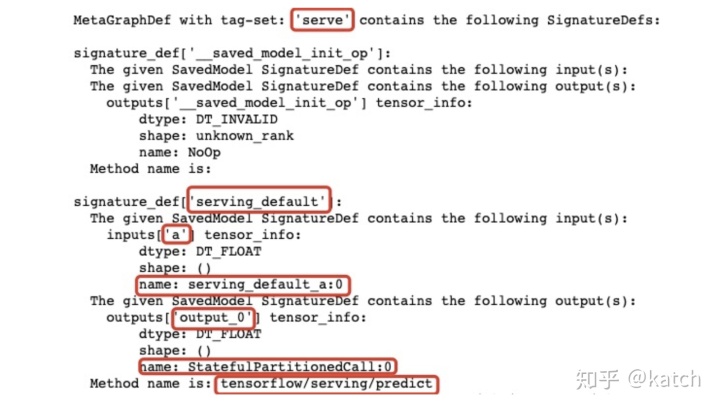
在tensorboard中查看计算图,模块会被添加模块名demo_module,方便层次化呈现计算图结构。
import datetime

# 创建日志
stamp = datetime.datetime.now().strftime("%Y%m%d-%H%M%S")
logdir = './data/demomodule/%s' % stamp
writer = tf.summary.create_file_writer(logdir)

#开启autograph跟踪
tf.summary.trace_on(graph=True, profiler=True)

#执行autograph
demo = DemoModule(init_value = tf.constant(0.0))
result = demo.addprint(tf.constant(5.0))

#将计算图信息写入日志
with writer.as_default():
    tf.summary.trace_export(
        name="demomodule",
        step=0,
        profiler_outdir=logdir)

#启动 tensorboard在jupyter中的魔法命令
%reload_ext tensorboard

from tensorboard import notebook
notebook.list()

notebook.start("--logdir ./data/demomodule/")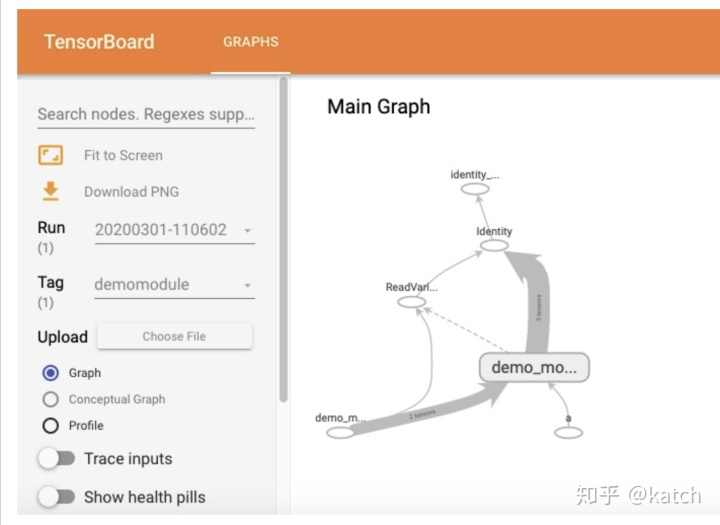
除了利用tf.Module的子类化实现封装,我们也可以通过给tf.Module添加属性的方法进行封装。
mymodule = tf.Module()
mymodule.x = tf.Variable(0.0)

@tf.function(input_signature=[tf.TensorSpec(shape = [], dtype = tf.float32)])
def addprint(a):
    mymodule.x.assign_add(a)
    tf.print(mymodule.x)
    return (mymodule.x)

mymodule.addprint = addprint
mymodule.addprint(tf.constant(1.0)).numpy()
1.0
print(mymodule.variables)
(<tf.Variable 'Variable:0' shape=() dtype=float32, numpy=0.0>,)
#使用tf.saved_model 保存模型
tf.saved_model.save(mymodule,"./data/mymodule",
    signatures = {"serving_default":mymodule.addprint})

#加载模型
mymodule2 = tf.saved_model.load("./data/mymodule")
mymodule2.addprint(tf.constant(5.0))
INFO:tensorflow:Assets written to: ./data/mymodule/assets
5
小结:使用tf.function可以将函数转为计算图,利用tf.Module的子类化实现封装或者添加属性,就可以查看变量、保存模型并移到其它地方加载使用
三,tf.Module和tf.keras.Model,tf.keras.layers.Layer
tf.keras中的模型和层都是继承tf.Module实现的,也具有变量管理和子模块管理功能。
import tensorflow as tf
from tensorflow.keras import models,layers,losses,metrics
print(issubclass(tf.keras.Model,tf.Module))
print(issubclass(tf.keras.layers.Layer,tf.Module))
print(issubclass(tf.keras.Model,tf.keras.layers.Layer))
True
True
True
tf.keras.backend.clear_session()
model = models.Sequential()
model.add(layers.Dense(4,input_shape = (10,)))
model.add(layers.Dense(2))
model.add(layers.Dense(1))
model.summary()
Model: "sequential"
_________________________________________________________________
Layer (type) Output Shape Param #
=================================================================
dense (Dense) (None, 4) 44
_________________________________________________________________
dense_1 (Dense) (None, 2) 10
_________________________________________________________________
dense_2 (Dense) (None, 1) 3
=================================================================
Total params: 57
Trainable params: 57
Non-trainable params: 0
_________________________________________________________________
model.variables
[<tf.Variable 'dense/kernel:0' shape=(10, 4) dtype=float32, numpy=
array([[-0.06741005, 0.45534766, 0.5190817 , -0.01806331],
[-0.14258742, -0.49711505, 0.26030976, 0.18607801],
[-0.62806034, 0.5327399 , 0.42206633, 0.29201728],
[-0.16602087, -0.18901917, 0.55159235, -0.01091868],
[ 0.04533798, 0.326845 , -0.582667 , 0.19431782],
[ 0.6494713 , -0.16174704, 0.4062966 , 0.48760796],
[ 0.58400524, -0.6280886 , -0.11265379, -0.6438277 ],
[ 0.26642334, 0.49275804, 0.20793378, -0.43889117],
[ 0.4092741 , 0.09871006, -0.2073121 , 0.26047975],
[ 0.43910992, 0.00199282, -0.07711256, -0.27966842]],
dtype=float32)>,
<tf.Variable 'dense/bias:0' shape=(4,) dtype=float32, numpy=array([0., 0., 0., 0.], dtype=float32)>,
<tf.Variable 'dense_1/kernel:0' shape=(4, 2) dtype=float32, numpy=
array([[ 0.5022683 , -0.0507431 ],
[-0.61540484, 0.9369011 ],
[-0.14412141, -0.54607415],
[ 0.2027781 , -0.4651153 ]], dtype=float32)>,
<tf.Variable 'dense_1/bias:0' shape=(2,) dtype=float32, numpy=array([0., 0.], dtype=float32)>,
<tf.Variable 'dense_2/kernel:0' shape=(2, 1) dtype=float32, numpy=
array([[-0.244825 ],
[-1.2101456]], dtype=float32)>,
<tf.Variable 'dense_2/bias:0' shape=(1,) dtype=float32, numpy=array([0.], dtype=float32)>]
model.layers[0].trainable = False #冻结第0层的变量,使其不可训练
model.trainable_variables
[<tf.Variable 'dense_1/kernel:0' shape=(4, 2) dtype=float32, numpy=
array([[ 0.5022683 , -0.0507431 ],
[-0.61540484, 0.9369011 ],
[-0.14412141, -0.54607415],
[ 0.2027781 , -0.4651153 ]], dtype=float32)>,
<tf.Variable 'dense_1/bias:0' shape=(2,) dtype=float32, numpy=array([0., 0.], dtype=float32)>,
<tf.Variable 'dense_2/kernel:0' shape=(2, 1) dtype=float32, numpy=
array([[-0.244825 ],
[-1.2101456]], dtype=float32)>,
<tf.Variable 'dense_2/bias:0' shape=(1,) dtype=float32, numpy=array([0.], dtype=float32)>]
model.submodules
(<tensorflow.python.keras.engine.input_layer.InputLayer at 0x144d8c080>,
<tensorflow.python.keras.layers.core.Dense at 0x144daada0>,
<tensorflow.python.keras.layers.core.Dense at 0x144d8c5c0>,
<tensorflow.python.keras.layers.core.Dense at 0x144d7aa20>)
model.layers
[<tensorflow.python.keras.layers.core.Dense at 0x144daada0>,
<tensorflow.python.keras.layers.core.Dense at 0x144d8c5c0>,
<tensorflow.python.keras.layers.core.Dense at 0x144d7aa20>]
print(model.name)
print(model.name_scope())
sequential
sequential小结:tf.keras.models的属性:variables trainvariables submodules layers name name_scope都是继续 tf.Module 来的
tensorflow中的“tf.name_scope()”有什么用?
--摘自:https://www.jianshu.com/p/635d95b34e14
1. tf.name_scope()命名空间的实际作用(1)在某个tf.name_scope()指定的区域中定义的所有对象及各种操作,他们的“name”属性上会增加该命名区的区域名,用以区别对象属于哪个区域;(2)将不同的对象及操作放在由tf.name_scope()指定的区域中,便于在tensorboard中展示清晰的逻辑关系图,这点在复杂关系图中特别重要。
2. name_scope()只决定“对象”属于哪个范围,并不会对“对象”的“作用域”产生任何影响。tf.name_scope()只是规定了对象和操作属于哪个区域,但这并不意味着他们的作用域也只限于该区域(with的这种写法很容易让人产生这种误会),不要将其和“全局变量、局部变量”的概念搞混淆,两者完全不是一回事。在name_scope中定义的对象,从被定义的位置开始,直到后来某个地方对该对象重新定义,中间任何地方都可以使用该对象。本质上name_scope只对对象的name属性进行圈定,并不会对其作用域产生任何影响
3. tf.name_scope('cgx_scope')语句重复执行几次,就会生成几个独立的命名空间,尽管表面上看起来都是“cgx_scope”,实际上tensorflow在每一次执行相同语句都会在后面加上“_序数”,加以区别。


 1万+
1万+


 被折叠的 条评论
为什么被折叠?
被折叠的 条评论
为什么被折叠?
 到【灌水乐园】发言


