


rc-trigger 集成了弹层显示隐藏的处理逻辑,以便在操作挂载元素时显示和隐藏弹层。简单的使用场景如:当鼠标移入帮助符号时,显示文本提示;当鼠标移出时,隐藏文本提示。rc-trigger 的组件层级如下:
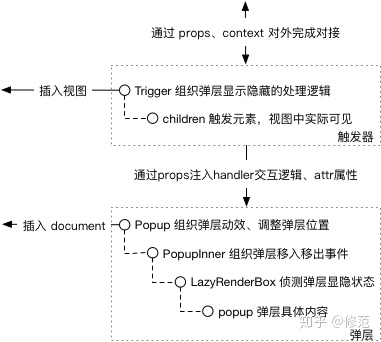
为适配弹层的多种处理逻辑,rc-trigger 统一在弹层触发元素外围以虚拟组件 Trigger 的形式组织弹层显示隐藏的处理逻辑。为使弹层不受触发元素位置及大小的影响,rc-trigger 统一将弹层插入到 document 根节点中:Popup 组件既用于绘制蒙层,又用于组织弹层的动效以及调整弹层的位置;PopupInner 对接 Trigger,弹层实际内容外围挂载鼠标移入移出事件对弹层的影响;LazyRenderBox 根据 props.visible 等属性,决定是否需要绘制弹层实际内容,还是绘制空的 div 元素;popup 用于渲染弹层的实际内容。
作为对外交互组件,Trigger 实现了系列方法管理着弹层的显示隐藏状态 state.popupVisible,该值即作为 LazyRenderBox 组件获得的 props.visible 属性。rc-trigger 针对弹层的显示隐藏状态,有两种事件处理逻辑:以指定的事件操纵触发元素时显示弹层;或者如鼠标移出弹层时隐藏弹层。因为这两种事件处理逻辑都与弹层的显示隐藏状态有关,所以都在 Trigger 组件内实现。Trigger 组件向下对接 PopupInner 组件,为其注入 props.onMouseLeave 等方法以操纵弹层的显隐。Trigger 组件内部实现 onClick 等方法,这样就可以在点击触发元素时显示弹层。最终,Trigger 组件对外透出可配置的 props 属性,以满足开发者的特定处理逻辑。同样的,为使 Popup 组件中实现的弹层动效处理逻辑、弹层调整方式可配置,Trigger 组件的 props 属性覆盖了弹层动效、位置相关的配置项。
这样的处理机制有其一般性,即在构造抽象组件时,在父组件中实现抽象组件层级的视图状态和状态管理方法,并将子组件中使用的状态管理方法透传到子组件中,以使透传的状态管理方法和子组件的渲染内容相互绑定;再由父组件对外提供可配置项,既可以定制父组件的处理逻辑,也可以定制子组件的处理逻辑,从而满足开发者的特定需求。
对于 Trigger 组件的处理逻辑,小结如下:
- 渲染时将弹层插入 document 根节点。
- 通过 props.action, props.showAction, props.hideAction 指定切换弹层显示隐藏状态的事件;在 Trigger 组件中实现诸如 onClick 等方法以切换弹层的显示隐藏状态。
- 在 Trigger 组件中实现 onPopupMouseLeave 等方法,透传到 PopupInner 组件中,以使鼠标移出弹层时隐藏弹层。
- Trigger 将弹层动效、位置调整相关属性传入 Popup 组件中。
1 弹层渲染
当使用 react16 框架,弹层渲染实际借助于 ReactDOM.createPortal 方法,由 rc-utils 提供 Protal 组件;当没有使用 react16 框架,弹层渲染通过 rc-utils 提供的 ContainerRender 组件完成。
// 没有指定 props.getPopupContainer 时,弹层在根节点中创建 div 元素并完成渲染
getContainer = () => {
  const { props } = this;
  const popupContainer = document.createElement('div');
  // Make sure default popup container will never cause scrollbar appearing
  // https://github.com/react-component/trigger/issues/41
  popupContainer.style.position = 'absolute';
  popupContainer.style.top = '0';
  popupContainer.style.left = '0';
  popupContainer.style.width = '100%';
  const mountNode = props.getPopupContainer ?
    props.getPopupContainer(findDOMNode(this)) : props.getDocument().body;
  mountNode.appendChild(popupContainer);
  return popupContainer;
}

render(){
  // ...

  // getComponent 渲染 Popup 等弹层组件
  if (!IS_REACT_16) {
    return (
      <ContainerRender
        parent={this}
        visible={popupVisible}
        autoMount={false}
        forceRender={forceRender}
        getComponent={this.getComponent}
        getContainer={this.getContainer}
      >
        {({ renderComponent }) => {
          this.renderComponent = renderComponent;
          return trigger;
        }}
      </ContainerRender>
    );
  }

  let portal;
  // prevent unmounting after it's rendered
  if (popupVisible || this._component || forceRender) {
    portal = (
      <Portal
        key="portal"
        getContainer={this.getContainer}
        didUpdate={this.handlePortalUpdate}
      >
        {this.getComponent()}
      </Portal>
    );
  }

  return [
    trigger,
    portal,
  ];
}
2 触发元素的绑定事件
触发元素上可绑定的事件包含 'onClick', 'onMouseDown', 'onTouchStart', 'onMouseEnter', 'onMouseLeave', 'onFocus', 'onBlur', 'onContextMenu'。props.action, props.showAction, props.hideAction 就允许开发者以数组形式指定触发元素上绑定的事件。同时,Trigger 组件中实现了 isClickToShow 等方法用于判断开发者指定在触发元素的绑定事件。若 isClickToShow 方法返回真值时,那么触发元素上绑定的 onClick 方法就可以调用 Trigger 组件的内置处理逻辑,以显示或隐藏弹层;否则,触发元素上绑定的 onClick 方法就只能调用开发者传给 Trigger 组件或触发元素 children 的 props.onClick。其他事件的处理机制与此类同。
在实现上,rc-trigger 有两层处理逻辑:若所处理的事件不影响弹层的显示隐藏状态,将 createTwoChains 创建的兜底函数作为绑定函数,直接调用外层 Trigger 元素或 children 触发元素的 props 同名方法;若影响,使用内置的 onClick 方法作为事件的绑定函数,以切换弹层的显示隐藏状态。下面就是兜底函数和内置绑定函数的实现,内置绑定函数仅以 onClick 作为示例:
// 1. 事件的兜底处理函数

// const ALL_HANDLERS = ['onClick', 'onMouseDown', 'onTouchStart', 'onMouseEnter',
// 'onMouseLeave', 'onFocus', 'onBlur', 'onContextMenu'];
componentWillMount() {
  ALL_HANDLERS.forEach((h) => {
    this[`fire${h}`] = (e) => {
      this.fireEvents(h, e);
    };
  });
}

// 先调用触发元素 children 的 props 方法,再调用 Trigger 元素的 props 方法
fireEvents(type, e) {
  const childCallback = this.props.children.props[type];
  if (childCallback) {
    childCallback(e);
  }
  const callback = this.props[type];
  if (callback) {
    callback(e);
  }
}

// 在 render 时作为触发元素 children 实际绑定的方法
createTwoChains(event) {
  const childPros = this.props.children.props;
  const props = this.props;
  if (childPros[event] && props[event]) {
    return this[`fire${event}`];
  }
  return childPros[event] || props[event];
}

// 2. 通过事件显隐弹层

// 实时或延迟显隐弹窗
delaySetPopupVisible(visible, delayS, event) {
  const delay = delayS * 1000;
  this.clearDelayTimer();
  if (delay) {
    const point = event ? { pageX: event.pageX, pageY: event.pageY } : null;
    this.delayTimer = setTimeout(() => {
      this.setPopupVisible(visible, point);
      this.clearDelayTimer();
    }, delay);
  } else {
    this.setPopupVisible(visible, event);
  }
}

onClick = (event) => {
  this.fireEvents('onClick', event);
  // focus will trigger click
  // 聚焦时快速点击,不必隐藏弹层
  if (this.focusTime) {
    let preTime;
    if (this.preClickTime && this.preTouchTime) {
      preTime = Math.min(this.preClickTime, this.preTouchTime);
    } else if (this.preClickTime) {
      preTime = this.preClickTime;
    } else if (this.preTouchTime) {
      preTime = this.preTouchTime;
    }
    if (Math.abs(preTime - this.focusTime) < 20) {
      return;
    }
    this.focusTime = 0;
  }
  this.preClickTime = 0;
  this.preTouchTime = 0;
  if (event && event.preventDefault) {
    event.preventDefault();
  }
  const nextVisible = !this.state.popupVisible;
  if (this.isClickToHide() && !nextVisible || nextVisible && this.isClickToShow()) {
    this.setPopupVisible(!this.state.popupVisible, event);
  }
}

onMouseDown = (e) => {
  this.fireEvents('onMouseDown', e);
  this.preClickTime = Date.now();
}

onTouchStart = (e) => {
  this.fireEvents('onTouchStart', e);
  this.preTouchTime = Date.now();
}

onFocus = (e) => {
  this.fireEvents('onFocus', e);
  // incase focusin and focusout
  this.clearDelayTimer();
  if (this.isFocusToShow()) {
    this.focusTime = Date.now();
    this.delaySetPopupVisible(true, this.props.focusDelay);
  }
}
3 弹层的绑定事件
当弹层已经显示时,rc-trigger 既支持在文档被点击时隐藏弹层,又支持在鼠标移出弹层时隐藏弹层。因此,Trigger 组件中有两种相关的处理逻辑:对于文档中挂载的事件,Trigger 组件在 componentDidUpdate 生命周期中对 document 节点绑定事件,所绑定的事件不限于点击,还包含文档滚动、窗口失焦;对于弹层挂载的事件,Trigger 组件实现了 onPopupMouseEnter, onPopupMouseLeave, onPopupMouseDown 方法,并透传给 PopupInner 组件,作为该组件渲染内容的绑定函数。其实现如下:
// 1. 文档绑定事件处理函数

// 根据可操控弹层显隐的事件,对 document 或 window 绑定事件处理函数
componentDidUpdate(_, prevState) {
  const props = this.props;
  const state = this.state;
  const triggerAfterPopupVisibleChange = () => {
    if (prevState.popupVisible !== state.popupVisible) {
      props.afterPopupVisibleChange(state.popupVisible);
    }
  };
  if (!IS_REACT_16) {
    this.renderComponent(null, triggerAfterPopupVisibleChange);
  }

  this.prevPopupVisible = prevState.popupVisible;

  // We must listen to `mousedown` or `touchstart`, edge case:
  // https://github.com/ant-design/ant-design/issues/5804
  // https://github.com/react-component/calendar/issues/250
  // https://github.com/react-component/trigger/issues/50
  if (state.popupVisible) {
    let currentDocument;
    if (!this.clickOutsideHandler && (this.isClickToHide() || this.isContextMenuToShow())) {
      currentDocument = props.getDocument();
      this.clickOutsideHandler = addEventListener(currentDocument,
        'mousedown', this.onDocumentClick);
    }
    // always hide on mobile
    if (!this.touchOutsideHandler) {
      currentDocument = currentDocument || props.getDocument();
      this.touchOutsideHandler = addEventListener(currentDocument,
        'touchstart', this.onDocumentClick);
    }
    // close popup when trigger type contains 'onContextMenu' and document is scrolling.
    if (!this.contextMenuOutsideHandler1 && this.isContextMenuToShow()) {
      currentDocument = currentDocument || props.getDocument();
      this.contextMenuOutsideHandler1 = addEventListener(currentDocument,
        'scroll', this.onContextMenuClose);
    }
    // close popup when trigger type contains 'onContextMenu' and window is blur.
    if (!this.contextMenuOutsideHandler2 && this.isContextMenuToShow()) {
      this.contextMenuOutsideHandler2 = addEventListener(window,
        'blur', this.onContextMenuClose);
    }
    return;
  }

  this.clearOutsideHandler();
}

// 当蒙层可关闭时,点击文档关闭弹层
onDocumentClick = (event) => {
  if (this.props.mask && !this.props.maskClosable) {
    return;
  }

  const target = event.target;
  const root = findDOMNode(this);
  if (!contains(root, target) && !this.hasPopupMouseDown) {
    this.close();
  }
}

// 鼠标右键可显示弹层时,通过文档滚动、窗口失焦可隐藏弹层
onContextMenuClose = () => {
  if (this.isContextMenuToShow()) {
    this.close();
  }
}

close() {
  this.setPopupVisible(false);
}

// 2. 弹层绑定事件处理函数

onPopupMouseEnter = () => {
  this.clearDelayTimer();
}

// 当鼠标移出弹层时,隐藏弹层
// this._component 即 Popup 组件实例
// this._component.getPopupDomNode 用于获取 PopupInner 组件绘制的节点内容
onPopupMouseLeave = (e) => {
  // https://github.com/react-component/trigger/pull/13
  // react bug?
  if (e.relatedTarget && !e.relatedTarget.setTimeout &&
    this._component &&
    this._component.getPopupDomNode &&
    contains(this._component.getPopupDomNode(), e.relatedTarget)) {
    return;
  }
  this.delaySetPopupVisible(false, this.props.mouseLeaveDelay);
}

// 点击弹层变更 Trigger 实例的 hasPopupMouseDown 属性,以指定文档点击区域不是弹层内部
// 当弹层相互嵌套时,向上递归调用 onPopupMouseDown 方法也用于阻止祖先弹层的隐藏
onPopupMouseDown = (...args) => {
  const { rcTrigger = {} } = this.context;
  this.hasPopupMouseDown = true;

  clearTimeout(this.mouseDownTimeout);
  this.mouseDownTimeout = setTimeout(() => {
    this.hasPopupMouseDown = false;
  }, 0);

  if (rcTrigger.onPopupMouseDown) {
    rcTrigger.onPopupMouseDown(...args);
  }
};
4 弹层位置调整及动效
4.1 位置调整
弹层的位置调整基于 rc-align 类库。在实现上,通过将 props.alignPoint 置为真值,弹层位置即可根据鼠标移动情况进行调整;默认情况下,弹层位置取决于触发元素的显示位置。Trigger 将动态计算鼠标的位置 state.point,随后将 props.align 注入到 Popup 组件。若 Popup 组件接受的 props.align 为否值,弹层位置即取决于触发元素的显示位置;否则,由鼠标位置决定。在位置调整过程中,Trigger 组件接受的 props.onPopupAlign 可用于监听弹层位置的调整状况,以便于动态微调。
// 获取实际注入 dom-align 类库的 alignConfig 配置,用于调整弹层位置
// 参见 https://github.com/yiminghe/dom-align
function getAlignFromPlacement(builtinPlacements, placementStr, align) {
  const baseAlign = builtinPlacements[placementStr] || {};
  return {
    ...baseAlign,
    ...align,
  };
}

class Trigger extends React.Component {
  // props.builtinPlacements 内置多种弹层放置策略,实际使用 props.popupPlacement 放置策略
  // props.popupAlign 作为 dom-align 库获得的 alignConfig 配置,用于调整位置
  getPopupAlign() {
    const props = this.props;
    const { popupPlacement, popupAlign, builtinPlacements } = props;
    if (popupPlacement && builtinPlacements) {
      return getAlignFromPlacement(builtinPlacements, popupPlacement, popupAlign);
    }
    return popupAlign;
  }

  // 当 props.alignPoint 为真值,Popup 组件获得的 props.align 即为 state.point
  // 意义是弹层的定位位置将根据鼠标位置进行调整
  setPoint = (point) => {
    const { alignPoint } = this.props;
    if (!alignPoint || !point) return;

    this.setState({
      point: {
        pageX: point.pageX,
        pageY: point.pageY,
      },
    });
  }
}

class Popup extends Component {
  // 位置调整时调用
  onAlign = (popupDomNode, align) => {
    const props = this.props;
    const currentAlignClassName = props.getClassNameFromAlign(align);
    // FIX: https://github.com/react-component/trigger/issues/56
    // FIX: https://github.com/react-component/tooltip/issues/79
    if (this.currentAlignClassName !== currentAlignClassName) {
      this.currentAlignClassName = currentAlignClassName;
      popupDomNode.className = this.getClassName(currentAlignClassName);
    }
    props.onAlign(popupDomNode, align);
  }

  // 获取弹层的定位位置,有两种可能:根据鼠标调整,或者触发元素的位置
  getAlignTarget = () => {
    const { point } = this.props;
    if (point) {
      return point;
    }

    // getTargetElement 方法由 Trigger 注入,用于获取 Trigger 元素
    return this.getTargetElement;
  }

  // 使用 Align 虚拟组件包裹实际渲染内容,调整弹层的显示位置
  getPopupElement() {
    // ...
    <Align target={this.getAlignTarget()} key="popup" ref={this.saveAlignRef}
      monitorWindowResize align={align} onAlign={this.onAlign}>
      <PopupInner visible {...popupInnerProps}>
        {children}
      </PopupInner>
    </Align>
    // ...
  }
}
4.2 动态伸缩
当指定 props.stretch 为真时,弹层大小可根据触发元素动态伸缩。这一机制在 Popup 组件中实现,即通过 setStretchSize 方法计算触发元素的宽高,在 render 阶段(getPopupElement 方法执行过程中)影响弹层的 style。
componentDidMount() {
  this.rootNode = this.getPopupDomNode();
  this.setStretchSize();
}

componentDidUpdate() {
  this.setStretchSize();
}

setStretchSize = () => {
  const { stretch, getRootDomNode, visible } = this.props;
  const { stretchChecked, targetHeight, targetWidth } = this.state;

  if (!stretch || !visible) {
    if (stretchChecked) {
      this.setState({ stretchChecked: false });
    }
    return;
  }

  const $ele = getRootDomNode();
  if (!$ele) return;

  const height = $ele.offsetHeight;
  const width = $ele.offsetWidth;

  if (targetHeight !== height || targetWidth !== width || !stretchChecked) {
    this.setState({
      stretchChecked: true,
      targetHeight: height,
      targetWidth: width,
    });
  }
};
4.3 弹层动效
弹层的动效基于 rc-animate 类库实现:包含蒙层和弹层实际内容的动效。动效可配置项都通过 Trigger 组件的 props.popupAnimation, props.popupTransitionName, props.maskAnimation, props.maskTransitionName 属性向外对接,又通过 Popup 组件的 getMaskTransitionName, getTransitionName 方法转化,然后完成渲染。
// rc-trigger 不支持 js 动效,将 animation 转化成 transitionName
// 以影响 rc-animate 类库输出的 Animate 组件
getMaskTransitionName() {
  const props = this.props;
  let transitionName = props.maskTransitionName;
  const animation = props.maskAnimation;
  if (!transitionName && animation) {
    transitionName = `${props.prefixCls}-${animation}`;
  }
  return transitionName;
}

getTransitionName() {
  const props = this.props;
  let transitionName = props.transitionName;
  if (!transitionName && props.animation) {
    transitionName = `${props.prefixCls}-${props.animation}`;
  }
  return transitionName;
}

// 渲染弹层内容
getPopupElement() {
  // ...
  if (destroyPopupOnHide) {
    return (
      <Animate component="" exclusive transitionAppear
        transitionName={this.getTransitionName()}>
        {visible ? (
          <Align target={this.getAlignTarget()} key="popup" ref={this.saveAlignRef}
            monitorWindowResize align={align} onAlign={this.onAlign}>
            <PopupInner visible {...popupInnerProps}>
              {children}
            </PopupInner>
          </Align>
        ) : null}
      </Animate>
    );
  }

  return (
    <Animate component="" exclusive transitionAppear
      transitionName={this.getTransitionName()} showProp="xVisible">
      <Align target={this.getAlignTarget()} key="popup" ref={this.saveAlignRef}
        monitorWindowResize xVisible={visible} childrenProps={{ visible: 'xVisible' }}
        disabled={!visible} align={align} onAlign={this.onAlign}>
        <PopupInner hiddenClassName={hiddenClassName} {...popupInnerProps}>
          {children}
        </PopupInner>
      </Align>
    </Animate>
  );
}

// 渲染弹层内容
getMaskElement() {
  const props = this.props;
  let maskElement;
  if (props.mask) {
    const maskTransition = this.getMaskTransitionName();
    // getZIndexStyle 方法用于获取用户配置的 zIndex
    maskElement = (
      <LazyRenderBox style={this.getZIndexStyle()} key="mask"
        className={`${props.prefixCls}-mask`}
        hiddenClassName={`${props.prefixCls}-mask-hidden`}
        visible={props.visible}/>
    );
    if (maskTransition) {
      maskElement = (
        <Animate key="mask" showProp="visible" transitionAppear
          component="" transitionName={maskTransition}>
          {maskElement}
        </Animate>
      );
    }
  }
  return maskElement;
}


 189
189

 被折叠的 条评论
为什么被折叠?
被折叠的 条评论
为什么被折叠?
 到【灌水乐园】发言


