


1 添加redis支持
在pom.xml中添加
Xml代码 
org.springframework.boot
spring-boot-starter-redis
2 redis配置
Java代码
package com.wisely.ij.config;
import com.fasterxml.jackson.annotation.JsonAutoDetect;
import com.fasterxml.jackson.annotation.PropertyAccessor;
import com.fasterxml.jackson.databind.ObjectMapper;
import org.springframework.cache.CacheManager;
import org.springframework.cache.annotation.CachingConfigurerSupport;
import org.springframework.cache.annotation.EnableCaching;
import org.springframework.cache.interceptor.KeyGenerator;
import org.springframework.context.annotation.Bean;
import org.springframework.context.annotation.Configuration;
import org.springframework.data.redis.cache.RedisCacheManager;
import org.springframework.data.redis.connection.RedisConnectionFactory;
import org.springframework.data.redis.core.RedisTemplate;
import org.springframework.data.redis.core.StringRedisTemplate;
import org.springframework.data.redis.serializer.Jackson2JsonRedisSerializer;
import java.lang.reflect.Method;
@Configuration
@EnableCaching
public class RedisConfig extends CachingConfigurerSupport{
@Bean
public KeyGenerator wiselyKeyGenerator(){
return new KeyGenerator() {
@Override
public Object generate(Object target, Method method, Object... params) {
StringBuilder sb = new StringBuilder();
sb.append(target.getClass().getName());
sb.append(method.getName());
for (Object obj : params) {
sb.append(obj.toString());
}
return sb.toString();
}
};
}
@Bean
public CacheManager cacheManager(
@SuppressWarnings("rawtypes") RedisTemplate redisTemplate) {
return new RedisCacheManager(redisTemplate);
}
@Bean
public RedisTemplate redisTemplate(
RedisConnectionFactory factory) {
StringRedisTemplate template = new StringRedisTemplate(factory);
Jackson2JsonRedisSerializer jackson2JsonRedisSerializer = new Jackson2JsonRedisSerializer(Object.class);
ObjectMapper om = new ObjectMapper();
om.setVisibility(PropertyAccessor.ALL, JsonAutoDetect.Visibility.ANY);
om.enableDefaultTyping(ObjectMapper.DefaultTyping.NON_FINAL);
jackson2JsonRedisSerializer.setObjectMapper(om);
template.setValueSerializer(jackson2JsonRedisSerializer);
template.afterPropertiesSet();
return template;
}
}
3 redis服务器配置
Properties代码
# REDIS (RedisProperties)
spring.redis.database= # database name
spring.redis.host=localhost # server host
spring.redis.password= # server password
spring.redis.port=6379 # connection port
spring.redis.pool.max-idle=8 # pool settings ...
spring.redis.pool.min-idle=0
spring.redis.pool.max-active=8
spring.redis.pool.max-wait=-1
spring.redis.sentinel.master= # name of Redis server
spring.redis.sentinel.nodes= # comma-separated list of host:port pairs
4 应用
测试两个实体类
Java代码
package com.wisely.ij.domain;
public class Address {
private Long id;
private String province;
private String city;
public Address(Long id,String province, String city) {
this.id = id;
this.province = province;
this.city = city;
}
public Address() {
}
public Long getId() {
return id;
}
public void setId(Long id) {
this.id = id;
}
public String getProvince() {
return province;
}
public void setProvince(String province) {
this.province = province;
}
public String getCity() {
return city;
}
public void setCity(String city) {
this.city = city;
}
}
Java代码
package com.wisely.ij.domain;
public class User {
private Long id;
private String firstName;
private String lastName;
public User(Long id,String firstName, String lastName) {
this.id = id ;
this.firstName = firstName;
this.lastName = lastName;
}
public User() {
}
public Long getId() {
return id;
}
public void setId(Long id) {
this.id = id;
}
public String getFirstName() {
return firstName;
}
public void setFirstName(String firstName) {
this.firstName = firstName;
}
public String getLastName() {
return lastName;
}
public void setLastName(String lastName) {
this.lastName = lastName;
}
}
使用演示
Java代码
package com.wisely.ij.service;
import com.wisely.ij.domain.Address;
import com.wisely.ij.domain.User;
import org.springframework.cache.annotation.Cacheable;
import org.springframework.stereotype.Service;
/**
* Created by wisely on 2015/5/25.
*/
@Service
public class DemoService {
@Cacheable(value = "usercache",keyGenerator = "wiselyKeyGenerator")
public User findUser(Long id,String firstName,String lastName){
System.out.println("无缓存的时候调用这里");
return new User(id,firstName,lastName);
}
@Cacheable(value = "addresscache",keyGenerator = "wiselyKeyGenerator")
public Address findAddress(Long id,String province,String city){
System.out.println("无缓存的时候调用这里");
return new Address(id,province,city);
}
}
Java代码
package com.wisely.ij.web;
import com.wisely.ij.domain.Address;
import com.wisely.ij.domain.User;
import com.wisely.ij.service.DemoService;
import org.springframework.beans.factory.annotation.Autowired;
import org.springframework.stereotype.Controller;
import org.springframework.web.bind.annotation.RequestMapping;
import org.springframework.web.bind.annotation.ResponseBody;
/**
* Created by wisely on 2015/5/25.
*/
@Controller
public class DemoController {
@Autowired
DemoService demoService;
@RequestMapping("/test")
@ResponseBody
public String putCache(){
demoService.findUser(1l,"wang","yunfei");
demoService.findAddress(1l,"anhui","hefei");
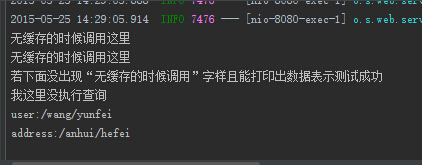
System.out.println("若下面没出现“无缓存的时候调用”字样且能打印出数据表示测试成功");
return "ok";
}
@RequestMapping("/test2")
@ResponseBody
public String testCache(){
User user = demoService.findUser(1l,"wang","yunfei");
Address address =demoService.findAddress(1l,"anhui","hefei");
System.out.println("我这里没执行查询");
System.out.println("user:"+"/"+user.getFirstName()+"/"+user.getLastName());
System.out.println("address:"+"/"+address.getProvince()+"/"+address.getCity());
return "ok";
}
}
5 检验
先访问http://localhost:8080/test 保存缓存
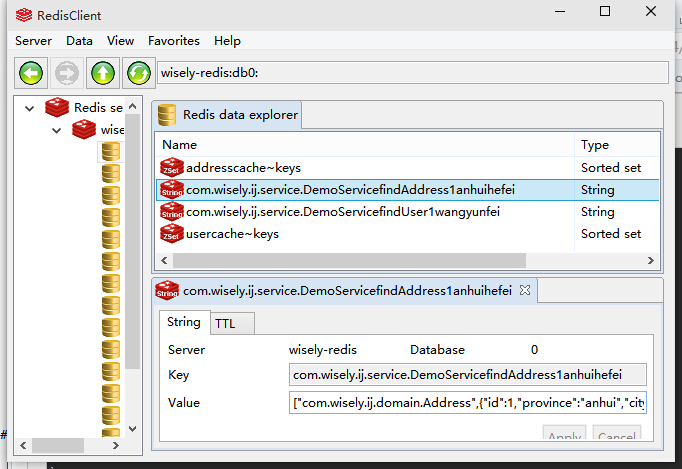
再访问http://localhost:8080/test2 调用缓存里的数据
http://wiselyman.iteye.com/blog/2184884
《整合 spring 4(包括mvc、context、orm) + mybatis 3 示例》一文简要介绍了最新版本的 Spring MVC、IOC、MyBatis ORM 三者的整合以及声明式事务处理。现在我们需要把缓存也整合进来,缓存我们选用的是 Redis,本文将在该文示例基础上介绍 Redis 缓存 + Spring 的集成。关于 Redis 服务器的搭建请参考博客《Redhat5.8 环境下编译安装 Redis 并将其注册为系统服务》。
1. 依赖包安装
pom.xml 加入:
org.springframework.data
spring-data-redis
1.6.0.RELEASE
redis.clients
jedis
2.7.3
2. Spring 项目集成进缓存支持
要启用缓存支持,我们需要创建一个新的 CacheManager bean。CacheManager 接口有很多实现,本文演示的是和 Redis 的集成,自然就是用 RedisCacheManager 了。Redis 不是应用的共享内存,它只是一个内存服务器,就像 MySql 似的,我们需要将应用连接到它并使用某种“语言”进行交互,因此我们还需要一个连接工厂以及一个 Spring 和 Redis 对话要用的 RedisTemplate,这些都是 Redis 缓存所必需的配置,把它们都放在自定义的 CachingConfigurerSupport 中:
/**
* File Name:RedisCacheConfig.java
*
* Copyright Defonds Corporation 2015
* All Rights Reserved
*
*/
package com.defonds.bdp.cache.redis;
import org.springframework.cache.CacheManager;
import org.springframework.cache.annotation.CachingConfigurerSupport;
import org.springframework.cache.annotation.EnableCaching;
import org.springframework.context.annotation.Bean;
import org.springframework.context.annotation.Configuration;
import org.springframework.data.redis.cache.RedisCacheManager;
import org.springframework.data.redis.connection.RedisConnectionFactory;
import org.springframework.data.redis.connection.jedis.JedisConnectionFactory;
import org.springframework.data.redis.core.RedisTemplate;
/**
*
* Project Name:bdp
* Type Name:RedisCacheConfig
* Type Description:
* Author:Defonds
* Create Date:2015-09-21
*
* @version
*
*/
@Configuration
@EnableCaching
public class RedisCacheConfig extends CachingConfigurerSupport {
@Bean
public JedisConnectionFactory redisConnectionFactory() {
JedisConnectionFactory redisConnectionFactory = new JedisConnectionFactory();
// Defaults
redisConnectionFactory.setHostName("192.168.1.166");
redisConnectionFactory.setPort(6379);
return redisConnectionFactory;
}
@Bean
public RedisTemplate redisTemplate(RedisConnectionFactory cf) {
RedisTemplate redisTemplate = new RedisTemplate();
redisTemplate.setConnectionFactory(cf);
return redisTemplate;
}
@Bean
public CacheManager cacheManager(RedisTemplate redisTemplate) {
RedisCacheManager cacheManager = new RedisCacheManager(redisTemplate);
// Number of seconds before expiration. Defaults to unlimited (0)
cacheManager.setDefaultExpiration(3000); // Sets the default expire time (in seconds)
return cacheManager;
}
}
当然也别忘了把这些 bean 注入 Spring,不然配置无效。在 applicationContext.xml 中加入以下:
3. 缓存某些方法的执行结果
设置好缓存配置之后我们就可以使用 @Cacheable 注解来缓存方法执行的结果了,比如根据省份名检索城市的 provinceCities 方法和根据 city_code 检索城市的 searchCity 方法:
// R
@Cacheable("provinceCities")
public List provinceCities(String province) {
logger.debug("province=" + province);
return this.cityMapper.provinceCities(province);
}
// R
@Cacheable("searchCity")
public City searchCity(String city_code){
logger.debug("city_code=" + city_code);
return this.cityMapper.searchCity(city_code);
}
4. 缓存数据一致性保证
CRUD (Create 创建,Retrieve 读取,Update 更新,Delete 删除) 操作中,除了 R 具备幂等性,其他三个发生的时候都可能会造成缓存结果和数据库不一致。为了保证缓存数据的一致性,在进行 CUD 操作的时候我们需要对可能影响到的缓存进行更新或者清除。
// C
@CacheEvict(value = { "provinceCities"}, allEntries = true)
public void insertCity(String city_code, String city_jb,
String province_code, String city_name,
String city, String province) {
City cityBean = new City();
cityBean.setCityCode(city_code);
cityBean.setCityJb(city_jb);
cityBean.setProvinceCode(province_code);
cityBean.setCityName(city_name);
cityBean.setCity(city);
cityBean.setProvince(province);
this.cityMapper.insertCity(cityBean);
}
// U
@CacheEvict(value = { "provinceCities", "searchCity" }, allEntries = true)
public int renameCity(String city_code, String city_name) {
City city = new City();
city.setCityCode(city_code);
city.setCityName(city_name);
this.cityMapper.renameCity(city);
return 1;
}
// D
@CacheEvict(value = { "provinceCities", "searchCity" }, allEntries = true)
public int deleteCity(String city_code) {
this.cityMapper.deleteCity(city_code);
return 1;
}
业务考虑,本示例用的都是 @CacheEvict 清除缓存。如果你的 CUD 能够返回 City 实例,也可以使用 @CachePut 更新缓存策略。笔者推荐能用 @CachePut 的地方就不要用 @CacheEvict,因为后者将所有相关方法的缓存都清理掉,比如上面三个方法中的任意一个被调用了的话,provinceCities 方法的所有缓存将被清除。
5. 自定义缓存数据 key 生成策略
对于使用 @Cacheable 注解的方法,每个缓存的 key 生成策略默认使用的是参数名+参数值,比如以下方法:
@Cacheable("users")
public User findByUsername(String username)
这个方法的缓存将保存于 key 为 users~keys 的缓存下,对于 username 取值为 "赵德芳" 的缓存,key 为 "username-赵德芳"。一般情况下没啥问题,二般情况如方法 key 取值相等然后参数名也一样的时候就出问题了,如:
@Cacheable("users")
public Integer getLoginCountByUsername(String username)
这个方法的缓存也将保存于 key 为 users~keys 的缓存下。对于 username 取值为 "赵德芳" 的缓存,key 也为 "username-赵德芳",将另外一个方法的缓存覆盖掉。
解决办法是使用自定义缓存策略,对于同一业务(同一业务逻辑处理的方法,哪怕是集群/分布式系统),生成的 key 始终一致,对于不同业务则不一致:
@Bean
public KeyGenerator customKeyGenerator() {
return new KeyGenerator() {
@Override
public Object generate(Object o, Method method, Object... objects) {
StringBuilder sb = new StringBuilder();
sb.append(o.getClass().getName());
sb.append(method.getName());
for (Object obj : objects) {
sb.append(obj.toString());
}
return sb.toString();
}
};
}
于是上述两个方法,对于 username 取值为 "赵德芳" 的缓存,虽然都还是存放在 key 为 users~keys 的缓存下,但由于 key 分别为 "类名-findByUsername-username-赵德芳" 和 "类名-getLoginCountByUsername-username-赵德芳",所以也不会有问题。
这对于集群系统、分布式系统之间共享缓存很重要,真正实现了分布式缓存。
笔者建议:缓存方法的 @Cacheable 最好使用方法名,避免不同的方法的 @Cacheable 值一致,然后再配以以上缓存策略。
6. 缓存的验证
6.1 缓存的验证
为了确定每个缓存方法到底有没有走缓存,我们打开了 MyBatis 的 SQL 日志输出,并且为了演示清楚,我们还清空了测试用 Redis 数据库。
先来验证 provinceCities 方法缓存,Eclipse 启动 tomcat 加载项目完毕,使用 JMeter 调用 /bdp/city/province/cities.json 接口:

Eclipse 控制台输出如下:

说明这一次请求没有命中缓存,走的是 db 查询。JMeter 再次请求,Eclipse 控制台输出:

标红部分以下是这一次请求的 log,没有访问 db 的 log,缓存命中。查看本次请求的 Redis 存储情况:

同样可以验证 city_code 为 1492 的 searchCity 方法的缓存是否有效:

图中标红部分是 searchCity 的缓存存储情况。
6.2 缓存一致性的验证
先来验证 insertCity 方法的缓存配置,JMeter 调用 /bdp/city/create.json 接口:

之后看 Redis 存储:

可以看出 provinceCities 方法的缓存已被清理掉,insertCity 方法的缓存奏效。
然后验证 renameCity 方法的缓存配置,JMeter 调用 /bdp/city/rename.json 接口:
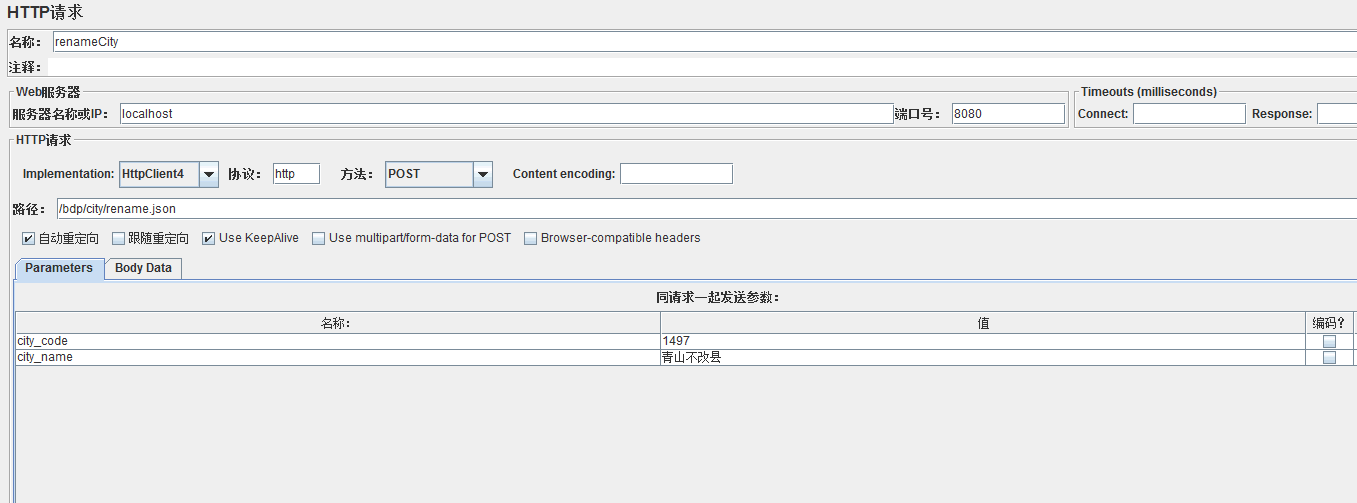
之后再看 Redis 存储:

searchCity 方法的缓存也已被清理,renameCity 方法的缓存也奏效。
7. 注意事项
要缓存的 Java 对象必须实现 Serializable 接口,因为 Spring 会将对象先序列化再存入 Redis,比如本文中的 com.defonds.bdp.city.bean.City 类,如果不实现 Serializable 的话将会遇到类似这种错误:nested exception is java.lang.IllegalArgumentException: DefaultSerializer requires a Serializable payload but received an object of type [com.defonds.bdp.city.bean.City]]。
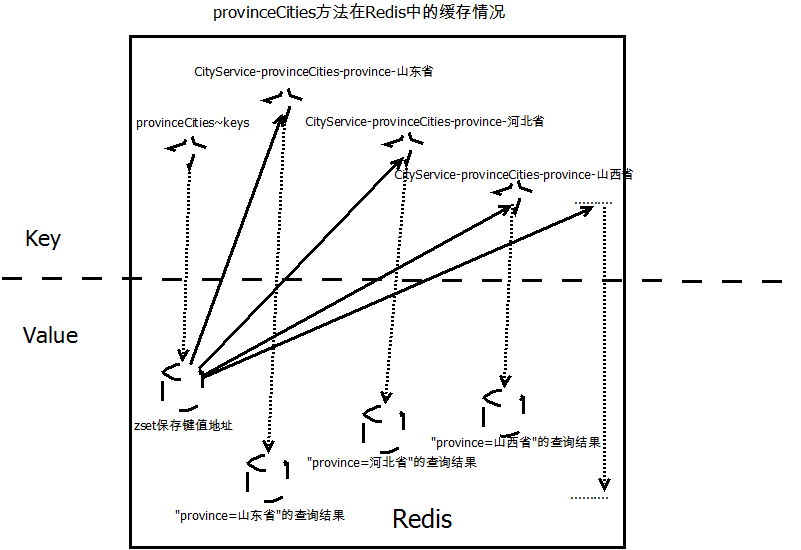
缓存的生命周期我们可以配置,然后托管 Spring CacheManager,不要试图通过 redis-cli 命令行去管理缓存。比如 provinceCities 方法的缓存,某个省份的查询结果会被以 key-value 的形式存放在 Redis,key 就是我们刚才自定义生成的 key,value 是序列化后的对象,这个 key 会被放在 key 名为 provinceCities~keys key-value 存储中,参考下图"provinceCities 方法在 Redis 中的缓存情况"。可以通过 redis-cli 使用 del 命令将 provinceCities~keys 删除,但每个省份的缓存却不会被清除。
CacheManager 必须设置缓存过期时间,否则缓存对象将永不过期,这样做的原因如上,避免一些野数据“永久保存”。此外,设置缓存过期时间也有助于资源利用最大化,因为缓存里保留的永远是热点数据。
缓存适用于读多写少的场合,查询时缓存命中率很低、写操作很频繁等场景不适宜用缓存。
后记
本文完整 Eclipse 下的开发项目示例已上传 CSDN 资源,有兴趣的朋友可以去下载下来参考:http://download.csdn.net/detail/defonds/9137505。
参考资料
http://blog.csdn.net/defonds/article/details/48716161
本文介绍了如何使用注解的方式,将Redis缓存整合到你的Spring项目。
首先我们将使用jedis驱动,进而开始配置我们的Gradle。
group 'com.gkatzioura.spring'
version '1.0-SNAPSHOT'
apply plugin: 'java'
apply plugin: 'eclipse'
apply plugin: 'idea'
apply plugin: 'spring-boot'
buildscript {
repositories {
mavenCentral()
}
dependencies {
classpath("org.springframework.boot:spring-boot-gradle-plugin:1.2.5.RELEASE")
}
}
jar {
baseName = 'gs-serving-web-content'
version = '0.1.0'
}
sourceCompatibility = 1.8
repositories {
mavenCentral()
}
dependencies {
compile "org.springframework.boot:spring-boot-starter-thymeleaf"
compile 'org.slf4j:slf4j-api:1.6.6'
compile 'ch.qos.logback:logback-classic:1.0.13'
compile 'redis.clients:jedis:2.7.0'
compile 'org.springframework.data:spring-data-redis:1.5.0.RELEASE'
testCompile group: 'junit', name: 'junit', version: '4.11'
}
task wrapper(type: Wrapper) {
gradleVersion = '2.3'
}
紧接着我们将使用Spring注解,继续执行Redis装载配置。
package com.gkatzioura.spring.config;
import org.springframework.cache.CacheManager;
import org.springframework.cache.annotation.CachingConfigurerSupport;
import org.springframework.cache.annotation.EnableCaching;
import org.springframework.context.annotation.Bean;
import org.springframework.context.annotation.Configuration;
import org.springframework.data.redis.cache.RedisCacheManager;
import org.springframework.data.redis.connection.RedisConnectionFactory;
import org.springframework.data.redis.connection.jedis.JedisConnectionFactory;
import org.springframework.data.redis.core.RedisTemplate;
import org.springframework.data.redis.serializer.RedisSerializer;
import org.springframework.data.redis.serializer.StringRedisSerializer;
@Configuration
@EnableCaching
public class RedisConfig extends CachingConfigurerSupport {
@Bean
public JedisConnectionFactory redisConnectionFactory() {
JedisConnectionFactory jedisConnectionFactory = new JedisConnectionFactory();
jedisConnectionFactory.setUsePool(true);
return jedisConnectionFactory;
}
@Bean
public RedisSerializer redisStringSerializer() {
StringRedisSerializer stringRedisSerializer = new StringRedisSerializer();
return stringRedisSerializer;
}
@Bean(name="redisTemplate")
public RedisTemplate redisTemplate(RedisConnectionFactory cf,RedisSerializer redisSerializer) {
RedisTemplate redisTemplate = new RedisTemplate();
redisTemplate.setConnectionFactory(cf);
redisTemplate.setDefaultSerializer(redisSerializer);
return redisTemplate;
}
@Bean
public CacheManager cacheManager() {
return new RedisCacheManager(redisTemplate(redisConnectionFactory(),redisStringSerializer()));
}
}
下一步将创建缓存接口CacheService。
package com.gkatzioura.spring.cache;
import java.util.Date;
import java.util.List;
public interface CacheService {
public void addMessage(String user,String message);
public List listMessages(String user);
}
当然用户既可以增加一条消息也能取回一条消息。因此,在实现过程中,用户相关信息的存在时间将默认设为一分钟。
我们用Redis来继承实现CacheService接口。
package com.gkatzioura.spring.cache.impl;
import com.gkatzioura.spring.cache.CacheService;
import org.springframework.data.redis.core.ListOperations;
import org.springframework.data.redis.core.RedisOperations;
import org.springframework.data.redis.core.SetOperations;
import org.springframework.stereotype.Service;
import javax.annotation.Resource;
import java.time.ZonedDateTime;
import java.time.temporal.ChronoUnit;
import java.util.Date;
import java.util.List;
@Service("cacheService")
public class RedisService implements CacheService {
@Resource(name = "redisTemplate")
private ListOperations messageList;
@Resource(name = "redisTemplate")
private RedisOperations latestMessageExpiration;
@Override
public void addMessage(String user,String message) {
messageList.leftPush(user,message);
ZonedDateTime zonedDateTime = ZonedDateTime.now();
Date date = Date.from(zonedDateTime.plus(1, ChronoUnit.MINUTES).toInstant());
latestMessageExpiration.expireAt(user,date);
}
@Override
public List listMessages(String user) {
return messageList.range(user,0,-1);
}
}
我们的缓存机制将保留每个用户发送的消息列表。为了实现这个功能我们将调用ListOperations接口,同时将每个user作为一个key键值。通过RedisOperations接口,我们可以为key设置特定存在时长。在本例中,主要使用的是 user key。
下一步我们将创建一个controller注入缓存服务。
package com.gkatzioura.spring.controller;
import com.gkatzioura.spring.cache.CacheService;
import org.springframework.beans.factory.annotation.Autowired;
import org.springframework.web.bind.annotation.*;
import java.util.List;
@RestController
public class MessageController {
@Autowired
private CacheService cacheService;
@RequestMapping(value = "/message",method = RequestMethod.GET)
@ResponseBody
public List greeting(String user) {
List messages = cacheService.listMessages(user);
return messages;
}
@RequestMapping(value = "/message",method = RequestMethod.POST)
@ResponseBody
public String saveGreeting(String user,String message) {
cacheService.addMessage(user,message);
return "OK";
}
}
最后完成类Application的创建。
package com.gkatzioura.spring;
import org.springframework.boot.SpringApplication;
import org.springframework.boot.autoconfigure.SpringBootApplication;
@SpringBootApplication
public class Application {
public static void main(String[] args) {
SpringApplication.run(Application.class, args);
}
}
经过如上步骤,接下来直接运行Application即可。
http://www.csdn.net/article/2015-09-01/2825600
使用Spring Cache + Redis + Jackson Serializer缓存数据库查询结果中序列化问题的解决
应用场景
我们希望通过缓存来减少对关系型数据库的查询次数,减轻数据库压力。在执行DAO类的select***(), query***()方法时,先从Redis中查询有没有缓存数据,如果有则直接从Redis拿到结果,如果没有再向数据库发起查询请求取数据。
序列化问题
要把domain object做为key-value对保存在redis中,就必须要解决对象的序列化问题。Spring Data Redis给我们提供了一些现成的方案:
JdkSerializationRedisSerializer. 使用JDK提供的序列化功能。 优点是反序列化时不需要提供类型信息(class),但缺点是序列化后的结果非常庞大,是JSON格式的5倍左右,这样就会消耗redis服务器的大量内存。
Jackson2JsonRedisSerializer. 使用Jackson库将对象序列化为JSON字符串。优点是速度快,序列化后的字符串短小精悍。
但缺点也非常致命,那就是此类的构造函数中有一个类型参数,必须提供要序列化对象的类型信息(.class对象)。 通过查看源代码,发现其只在反序列化过程中用到了类型信息。
如果用方案一,就必须付出缓存多占用4倍内存的代价,实在承受不起。如果用方案二,则必须给每一种domain对象都配置一个Serializer,即如果我的应用里有100种domain对象,那就必须在spring配置文件中配置100个Jackson2JsonRedisSerializer,这显然是不现实的。
通过google, 发现spring data redis项目中有一个#145 pull request, 而这个提交请求的内容正是解决Jackson必须提供类型信息的问题。然而不幸的是这个请求还没有被merge。但我们可以把代码copy一下放到自己的项目中:
/**
* @author Christoph Strobl
* @since 1.6
*/
public class GenericJackson2JsonRedisSerializer implements RedisSerializer {
private final ObjectMapper mapper;
/**
* Creates {@link GenericJackson2JsonRedisSerializer} and configures {@link ObjectMapper} for default typing.
*/
public GenericJackson2JsonRedisSerializer() {
this((String) null);
}
/**
* Creates {@link GenericJackson2JsonRedisSerializer} and configures {@link ObjectMapper} for default typing using the
* given {@literal name}. In case of an {@literal empty} or {@literal null} String the default
* {@link JsonTypeInfo.Id#CLASS} will be used.
*
* @param classPropertyTypeName Name of the JSON property holding type information. Can be {@literal null}.
*/
public GenericJackson2JsonRedisSerializer(String classPropertyTypeName) {
this(new ObjectMapper());
if (StringUtils.hasText(classPropertyTypeName)) {
mapper.enableDefaultTypingAsProperty(DefaultTyping.NON_FINAL, classPropertyTypeName);
} else {
mapper.enableDefaultTyping(DefaultTyping.NON_FINAL, As.PROPERTY);
}
}
/**
* Setting a custom-configured {@link ObjectMapper} is one way to take further control of the JSON serialization
* process. For example, an extended {@link SerializerFactory} can be configured that provides custom serializers for
* specific types.
*
* @param mapper must not be {@literal null}.
*/
public GenericJackson2JsonRedisSerializer(ObjectMapper mapper) {
Assert.notNull(mapper, "ObjectMapper must not be null!");
this.mapper = mapper;
}
/*
* (non-Javadoc)
* @see org.springframework.data.redis.serializer.RedisSerializer#serialize(java.lang.Object)
*/
@Override
public byte[] serialize(Object source) throws SerializationException {
if (source == null) {
return SerializationUtils.EMPTY_ARRAY;
}
try {
return mapper.writeValueAsBytes(source);
} catch (JsonProcessingException e) {
throw new SerializationException("Could not write JSON: " + e.getMessage(), e);
}
}
/*
* (non-Javadoc)
* @see org.springframework.data.redis.serializer.RedisSerializer#deserialize(byte[])
*/
@Override
public Object deserialize(byte[] source) throws SerializationException {
return deserialize(source, Object.class);
}
/**
* @param source can be {@literal null}.
* @param type must not be {@literal null}.
* @return {@literal null} for empty source.
* @throws SerializationException
*/
public T deserialize(byte[] source, Class type) throws SerializationException {
Assert.notNull(type,
"Deserialization type must not be null! Pleaes provide Object.class to make use of Jackson2 default typing.");
if (SerializationUtils.isEmpty(source)) {
return null;
}
try {
return mapper.readValue(source, type);
} catch (Exception ex) {
throw new SerializationException("Could not read JSON: " + ex.getMessage(), ex);
}
}
}
然后在配置文件中使用这个GenericJackson2JsonRedisSerializer:
重新构建部署,我们发现这个serializer可以同时支持多种不同类型的domain对象,问题解决。
http://www.myexception.cn/database/1958643.html
spring-data-redis提供了多种serializer策略,这对使用jedis的开发者而言,实在是非常便捷。sdr提供了4种内置的serializer:
JdkSerializationRedisSerializer:使用JDK的序列化手段(serializable接口,ObjectInputStrean,ObjectOutputStream),数据以字节流存储
StringRedisSerializer:字符串编码,数据以string存储
JacksonJsonRedisSerializer:json格式存储
OxmSerializer:xml格式存储
其中JdkSerializationRedisSerializer和StringRedisSerializer是最基础的序列化策略,其中“JacksonJsonRedisSerializer”与“OxmSerializer”都是基于stirng存储,因此它们是较为“高级”的序列化(最终还是使用string解析以及构建java对象)。
RedisTemplate中需要声明4种serializer,默认为“JdkSerializationRedisSerializer”:
1) keySerializer :对于普通K-V操作时,key采取的序列化策略
2) valueSerializer:value采取的序列化策略
3) hashKeySerializer: 在hash数据结构中,hash-key的序列化策略
4) hashValueSerializer:hash-value的序列化策略
无论如何,建议key/hashKey采用StringRedisSerializer。
接下来,通过实例描述如何使用它们,可以首先参考“spring-data-redis特性”:
http://shift-alt-ctrl.iteye.com/blog/1887370
http://www.cnblogs.com/google4y/p/3535106.html


 903
903


 被折叠的 条评论
为什么被折叠?
被折叠的 条评论
为什么被折叠?
 到【灌水乐园】发言


