


本文转载自【微信公众号:WalkingCloud,ID:WalkingCloud2018】经微信公众号授权转载,如需转载与原文作者联系
网卡绑定是通过把多张网卡绑定为一个逻辑网卡,实现本地网卡的冗余,带宽扩容和负载均衡。bond在实际网络应用部署中是一种常用的技术
下面介绍如何在CentOS服务器上实现网卡绑定
1、服务器ifconfig查看可以看到有两块网卡eth0,eth1
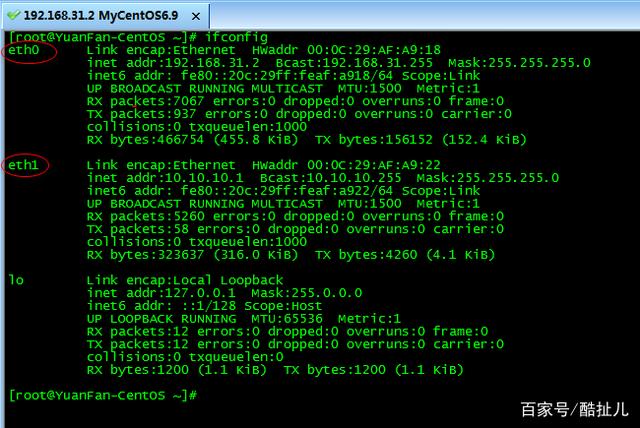
要实现物理网口eth0,eth1网卡绑定,绑定后的虚拟逻辑网口bond0 IP地址和原来的eth0的IP保持一致
2、modinfo bonding 检查自己的操作系统是否支持bonding
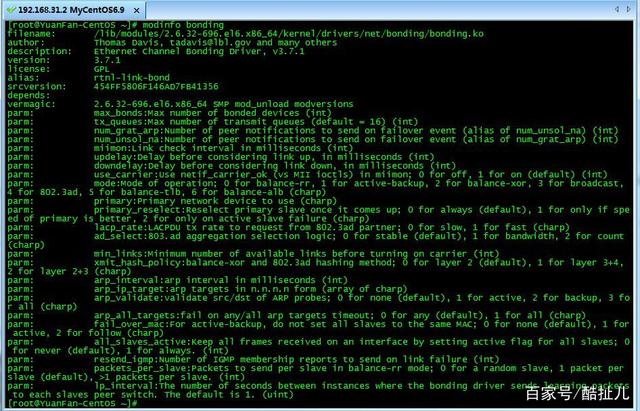
如果没有消息返回,说明内核不支持bonding,需要重新编译内核
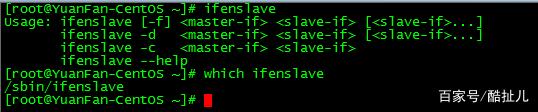
3、检查ifenslave,是否有这个命令
4、接下来进入正题
在cd /etc/sysconfig/network-scripts/下创建ifcfg-bond0配置文件
[root@YuanFan-CentOS ~]# cd /etc/sysconfig/network-scripts/
[root@YuanFan-CentOS network-scripts]# vi ifcfg-bond0
DEVICE=bond0
TYPE=Ethernet
ONBOOT=yes
BOOTPROTO=none
IPADDR=192.168.31.2
NETMASK=255.255.255.0
GATEWAY=192.168.31.1
DNS1=114.114.114.114
DNS2=1.1.1.1
USERCTL=no

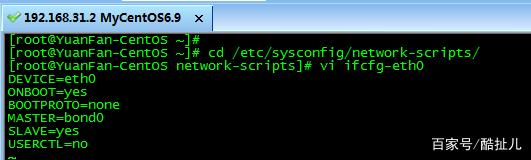
接下来修改ifcfg-eth0和ifcfg-eth1两块物理网卡的配置文件
将原有的IP、子网掩码、网关信息等信息全部删除,修改成如下格式
[root@YuanFan-CentOS ~]# cd /etc/sysconfig/network-scripts/
[root@YuanFan-CentOS network-scripts]# vi ifcfg-eth0
DEVICE=eth0
ONBOOT=yes
BOOTPROTO=none
MASTER=bond0
SLAVE=yes
USERCTL=no
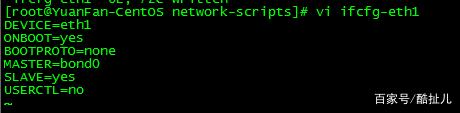
[root@YuanFan-CentOS network-scripts]# vi ifcfg-eth1
DEVICE=eth1
ONBOOT=yes
BOOTPROTO=none
MASTER=bond0
SLAVE=yes
USERCTL=no
5、修改modprobe相关设定文件,并加载bonding模块
[root@YuanFan-CentOS ~]#
vi /etc/modprobe.d/bonding.conf
alias bond0 bonding
options bonding mode=6 miimon=200

加载bonding模块
[root@YuanFan-CentOS ~]# modprobe bonding
如果这时是SecureCRT等SSH终端连接的服务器后台,会话可能会断开,在服务器上确认bonding模块是否加载,然后用service network restart或者/etc/init.d/network restart命令重启网络
[root@YuanFan-CentOS ~]# lsmod | grep bonding
bonding 132885 0
[root@YuanFan-CentOS ~]# service network restart
Shutting down interface bond0: [ OK ]
Shutting down loopback interface: [ OK ]
Bringing up loopback interface: [ OK ]
Bringing up interface bond0: Determining if ip address 192.168.31.2 is already in use for device bond0...
[ OK ]
[root@YuanFan-CentOS ~]#

查看bond网卡绑定后的模式
cat /proc/net/bonding/bond0
[root@YuanFan-CentOS ~]#cat /proc/net/bonding/bond0

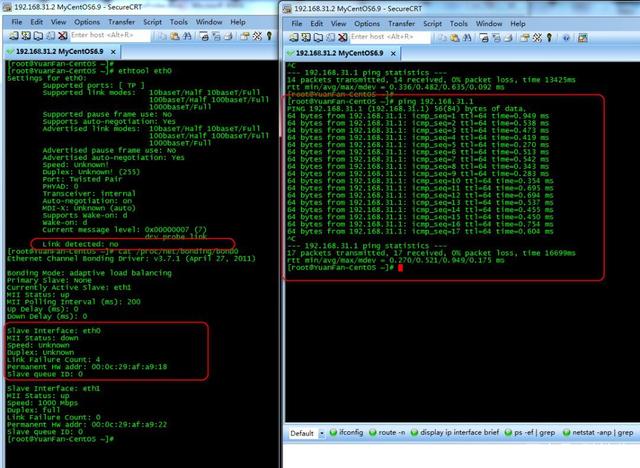
6、测试一下负载均衡功能
手动断开eth0链路的网线,看网络是否还通
如下图所示ethtool eth0 可以看到eth0网口已经断开,右侧可以看到ping 192.168.31.1网关一直可以ping通
注:mode bond网卡绑定的几种模式之前有介绍,请参见本公众号历史文章
mode:Mode of operation
0 for balance-rr,
1 for active-backup,
2 for balance-xor,
3 for broadcast,
4 for 802.3ad,
5 for balance-tlb,
6 for balance-alb (charp)
举报/反馈


 1407
1407


 被折叠的 条评论
为什么被折叠?
被折叠的 条评论
为什么被折叠?
 到【灌水乐园】发言


