


链接➡
vscode + wsl + windows terminal 美化和搭建linux开发环境
没钱买mac,windwos下命令行挺难用的,之前一直用cmder还不错,但后期卡卡的,改用了windows terminal,真香啊,速度和外观都不错,刚好最近在学linux,一直用的阿里云做测试,想着统一一下包管理和命令行,发现了wsl这个东西,就打算改造一下windows,个人电脑系统为windwos 10 1909,详细操作如下:
1. 开启wsl、安装linux
被这个坑惨了,windows版本更新不上,一直勾选不了,后来下了补丁,打开windows功能一片空白,我服了,唉,最后只有重装系统了
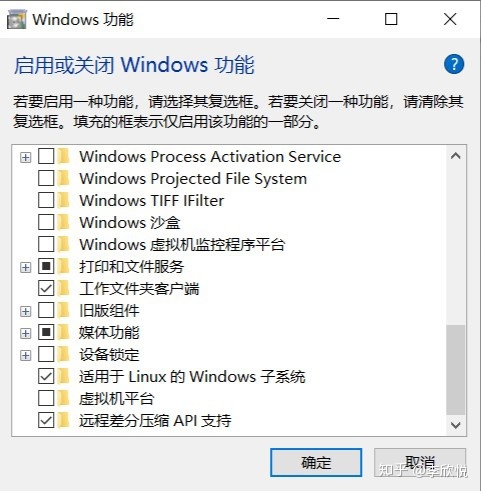
在windwos商店安装ubuntu或者其他liunx
2. 配置ubuntu
下载完ubuntu,会设置用户名和密码,输入密码时shell上并不可见,这里不用担心。
替换下载源为阿里源
sudo vim /etc/apt/sources.list
deb http://mirrors.aliyun.com/ubuntu/ bionic main restricted universe multiverse
deb http://mirrors.aliyun.com/ubuntu/ bionic-security main restricted universe multiverse
deb http://mirrors.aliyun.com/ubuntu/ bionic-updates main restricted universe multiverse
deb http://mirrors.aliyun.com/ubuntu/ bionic-proposed main restricted universe multiverse
deb http://mirrors.aliyun.com/ubuntu/ bionic-backports main restricted universe multiverse
deb-src http://mirrors.aliyun.com/ubuntu/ bionic main restricted universe multiverse
deb-src http://mirrors.aliyun.com/ubuntu/ bionic-security main restricted universe multiverse
deb-src http://mirrors.aliyun.com/ubuntu/ bionic-updates main restricted universe multiverse
deb-src http://mirrors.aliyun.com/ubuntu/ bionic-proposed main restricted universe multiverse
deb-src http://mirrors.aliyun.com/ubuntu/ bionic-backports main restricted universe multiverse
sudo apt-get update
sudo apt-get upgade
安装zsh、oh-my-zsh来美化bash
sudo apt install zsh

sh -c "$(curl -fsSL https://raw.github.com/ohmyzsh/ohmyzsh/master/tools/install.sh)"
下载node、n、git、yarn、nrm、yrm
略
配置windows terminal
打开windows terminal设置
- 设置defaultProfile即默认打开的terminal
{
    "$schema": "https://aka.ms/terminal-profiles-schema",
    // "defaultProfile": "{61c54bbd-c2c6-5271-96e7-009a87ff44bf}",
    "defaultProfile": "{2c4de342-38b7-51cf-b940-2309a097f518}",
    "copyOnSelect": true,

    "profiles": {
        "defaults": {
            // Put settings here that you want to apply to all profiles
            "startingDirectory": "./",
            "useAcrylic": true,
            "acrylicOpacity": 0.8
        },
        "list": [{
                // Make changes here to the powershell.exe profile
                "guid": "{61c54bbd-c2c6-5271-96e7-009a87ff44bf}",
                "name": "Windows PowerShell",
                "commandline": "powershell.exe",
                "hidden": false,
                "useAcrylic": true
            },
            {
                // Make changes here to the cmd.exe profile
                "guid": "{0caa0dad-35be-5f56-a8ff-afceeeaa6101}",
                "name": "cmd",
                "commandline": "cmd.exe",
                "hidden": false
            },
            {
                "guid": "{2c4de342-38b7-51cf-b940-2309a097f518}",
                "hidden": false,
                "name": "Ubuntu",
                "source": "Windows.Terminal.Wsl"
            },
            {
                "guid": "{b453ae62-4e3d-5e58-b989-0a998ec441b8}",
                "hidden": false,
                "name": "Azure Cloud Shell",
                "source": "Windows.Terminal.Azure"
            }
        ]
    },
    // Add custom color schemes to this array
    "schemes": [],
    // Add any keybinding overrides to this array.
    // To unbind a default keybinding, set the command to "unbound"
    "keybindings": []
}
系统级右键菜单,写入注册表
win+r输入regedit找到计算机HKEY_CLASSES_ROOTDirectoryBackgroundshell 新建项Terminal(名字随便取)
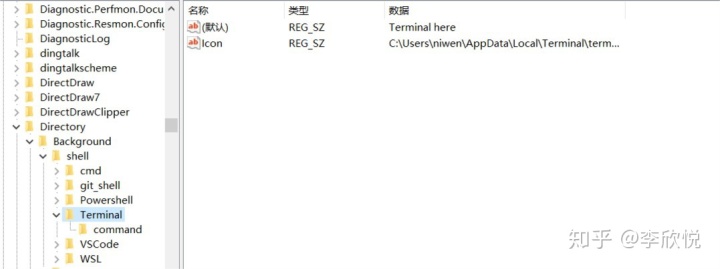
默认为右键文本
Icon为图标,值为图标地址,自己在官网找的ico- 新建项command,在默认下键入值
C:UsersniwenAppDataLocalMicrosoftWindowsAppswt.exe这里的niwen你要改为你自己电脑用户的名称 - 将同样配置写在计算机HKEY_CLASSES_ROOTDirectoryshell下
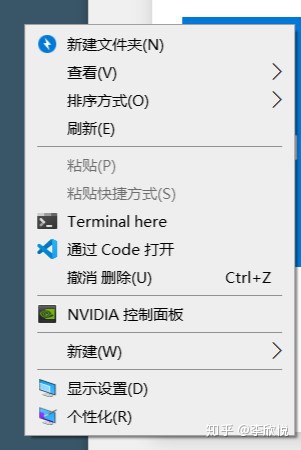
- 配置windows terminal的
"startingDirectory": "./"
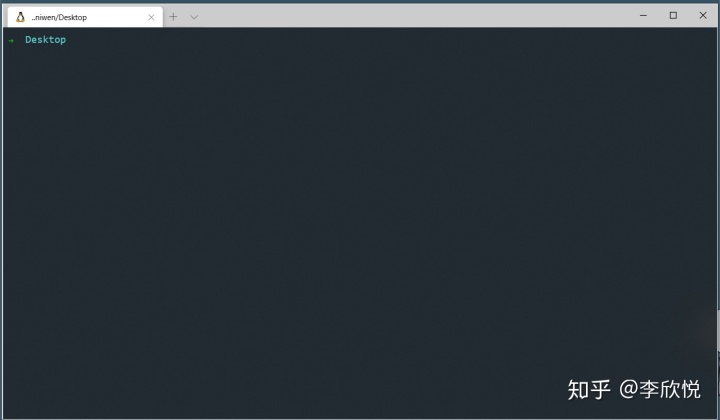
试一试右键点击Terminal here
接入vscode
下载插件Remote - WSL
打开setting.json配置terminal打开方式 "terminal.integrated.shell.windows": "C:WINDOWSSystem32wsl.exe" 现在试一试效果,舒服
接入code runner
现在你的所有包都放在wsl中,跑code runner是不行的,除非你自己又在windows上安装一遍
只需要在setting.json中配置
"code-runner.runInTerminal": true,
    "code-runner.terminalRoot": "/mnt/",
就完事了
终于结束了,我是这样配置的,如果有什么问题欢迎提出


 8708
8708


 被折叠的 条评论
为什么被折叠?
被折叠的 条评论
为什么被折叠?
 到【灌水乐园】发言


