


实践
提起Kubernetes相信具有多年开发经验的老司机对它并不陌生。Kubernetes是Google开源的一个容器编排引擎,它支持自动化部署、大规模可伸缩、应用容器化管理。在生产环境中部署一个应用程序时,通常要部署该应用的多个实例以便对应用请求进行负载均衡。
在Kubernetes中,我们可以创建多个容器,每个容器里面运行一个应用实例,然后通过内置的负载均衡策略,实现对这一组应用实例的管理、发现、访问,而这些细节都不需要运维人员去进行复杂的手工配置和处理。
Kubernetes的架构图如下:
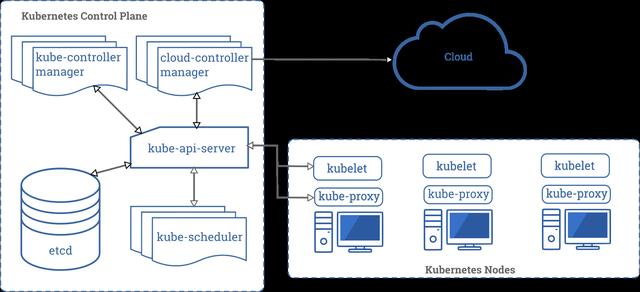
Kubernetes架构
Kubernetes的安装部署随着版本的迭代越来越容易上手,官网提供了多种部署安装方式,详细内容可以翻阅官方文档:
https://kubernetes.io/zh/docs/setup/
但是,根据Kubernetes官网提供的安装部署教程,Kubeadm应该是一种比较简单的部署方式,它支持单节点部署,以及多节点安装部署。Kubeadm是一键部署Kubernetes的最好工具。
笔者最近几天使用Kubeadm部署三节点的Kubernetes小的集群,部署过程中踩过一些坑也查阅了相关文档,同时也有一些感悟。希望通过笔记的形式记录下来,方便以后查阅。下面就将详细的部署过程记录下来:

笔记
环境准备:

三节点环境
- 采用三个节点部署,一个master节点,两个node节点;
- 三个节点分别绑定一个内网固定IP地址;
- Linux系统版本采用CentOS 8;
- Docker使用社区版19.03.12;
基本网络拓扑如下图:
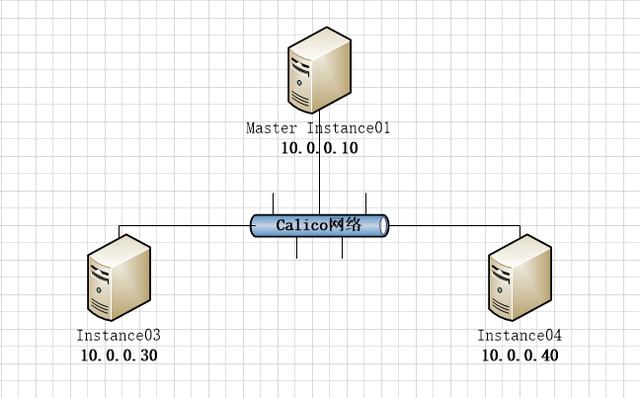
网络拓扑
前置条件准备:
官方文档是这样说的:
确保 iptables 工具不使用 nftables 后端
在 Linux 中,nftables 当前可以作为内核 iptables 子系统的替代品。 iptables 工具可以充当兼容性层,其行为类似于 iptables 但实际上是在配置 nftables。 nftables 后端与当前的 kubeadm 软件包不兼容:它会导致重复防火墙规则并破坏 kube-proxy
分别在三个节点上执行如下命令:
update-alternatives --set iptables /usr/sbin/iptables-legacy安装Docker容器:
yum remove docker docker-client docker-client-latest docker-common docker-latest docker-latest-logrotate docker-logrotate docker-engine这一步操作是确保删除系统预装的老版本Docker。
yum install -y yum-utilsyum-config-manager --add-repo https://download.docker.com/linux/centos/docker-ce.repoyum-config-manager --enable docker-ce-nightly安装Docker社区版的repo仓库。
yum install docker-ce docker-ce-cli containerd.io安装社区版最新的Docker。
安装Docker的过程中,可能会出现如下错误信息:
Error: Problem: package docker-ce-3:19.03.8-3.el7.x86_64 requires containerd.io >= 1.2.2-3, but none of the providers can be installed - cannot install the best candidate for the job - package containerd.io-1.2.10-3.2.el7.x86_64 is excluded - package containerd.io-1.2.13-3.1.el7.x86_64 is excluded - package containerd.io-1.2.2-3.3.el7.x86_64 is excluded - package containerd.io-1.2.2-3.el7.x86_64 is excluded - package containerd.io-1.2.4-3.1.el7.x86_64 is excluded - package containerd.io-1.2.5-3.1.el7.x86_64 is excluded - package containerd.io-1.2.6-3.3.el7.x86_64 is excluded(try to add '--skip-broken' to skip uninstallable packages or '--nobest' to use not only best candidate packages)解决办法是:
wget https://download.docker.com/linux/centos/7/x86_64/edge/Packages/containerd.io-1.2.6-3.3.el7.x86_64.rpmyum install containerd.io-1.2.6-3.3.el7.x86_64.rpm然后再安装docker-ce,应该就可以可成功了。
为了Docker能够加速下载Docker Image,我们需要给Docker设置加速镜像地址:
cat < /etc/docker/daemon.json{"registry-mirrors": ["https://gdziauy8.mirror.aliyuncs.com"]}EOFsystemctl daemon-reloadsystemctl restart dockerDocker的相信安装过程可以参考Docker官方文档:
https://docs.docker.com/engine/install/centos/
安装 kubeadm、kubelet 和 kubectl
分别在三个节点上执行如下命令:
cat < /etc/yum.repos.d/kubernetes.repo[kubernetes]name=Kubernetesbaseurl=https://mirrors.aliyun.com/kubernetes/yum/repos/kubernetes-el7-x86_64/enabled=1gpgcheck=1repo_gpgcheck=1gpgkey=https://mirrors.aliyun.com/kubernetes/yum/doc/yum-key.gpg https://mirrors.aliyun.com/kubernetes/yum/doc/rpm-package-key.gpgEOF# 将 SELinux 设置为 permissive 模式(相当于将其禁用)setenforce 0sed -i 's/^SELINUX=enforcing$/SELINUX=permissive/' /etc/selinux/configyum install -y kubelet kubeadm kubectl --disableexcludes=kubernetessystemctl enable --now kubelet- 为了加速rpm包下载,我们采用了阿里的镜像repo;
- 关闭SELinux,防止安装过程中出现一些未知的错误;
- 安装完毕后开启kubelet开机自启动;
最后我们还要执行如下命令:
cat < /etc/sysctl.d/k8s.confnet.bridge.bridge-nf-call-ip6tables = 1net.bridge.bridge-nf-call-iptables = 1EOFsysctl --system官方文档是这样解释的:
一些 RHEL/CentOS 7 的用户曾经遇到过问题:由于 iptables 被绕过而导致流量无法正确路由的问题。您应该确保 在 sysctl 配置中的 net.bridge.bridge-nf-call-iptables 被设置为 1
到此,所有的准备工作基本完成,接下来就是使用kubeadm初始化Kubernetes集群。
开始工作
kubeadm初始化master节点
kubeadm init --kubernetes-version=1.18.0 --apiserver-advertise-address=10.0.0.10 --image-repository registry.aliyuncs.com/google_containers --pod-network-cidr=10.122.0.0/16- kubernetes-version指定Kubernetes的版本,这里我们采用最新的1.18.0;
- apiserver-advertise-address指定API Server的IP地址,我们使用master节点的IP地址10.0.0.10;
- image-repository为了加速下载google的基础镜像,我们使用阿里的registry;
- pod-network-cidr指明 pod 网络可以使用的 IP 地址段,我们使用10.122.0.0/16这个地址段,这个地址段在后面也会用到;
[root@instance01 ~]# kubeadm init --kubernetes-version=1.18.0 > --apiserver-advertise-address=10.0.0.10 > --image-repository registry.aliyuncs.com/google_containers > --pod-network-cidr=10.122.0.0/16W0811 10:35:41.950979 5522 configset.go:202] WARNING: kubeadm cannot validate component configs for API groups [kubelet.config.k8s.io kubeproxy.config.k8s.io][init] Using Kubernetes version: v1.18.0[preflight] Running pre-flight checks [WARNING IsDockerSystemdCheck]: detected "cgroupfs" as the Docker cgroup driver. The recommended driver is "systemd". Please follow the guide at https://kubernetes.io/docs/setup/cri/ [WARNING FileExisting-tc]: tc not found in system path[preflight] Pulling images required for setting up a Kubernetes cluster[preflight] This might take a minute or two, depending on the speed of your internet connection[preflight] You can also perform this action in beforehand using 'kubeadm config images pull'[kubelet-start] Writing kubelet environment file with flags to file "/var/lib/kubelet/kubeadm-flags.env"[kubelet-start] Writing kubelet configuration to file "/var/lib/kubelet/config.yaml"[kubelet-start] Starting the kubelet[certs] Using certificateDir folder "/etc/kubernetes/pki"[certs] Generating "ca" certificate and key[certs] Generating "apiserver" certificate and key[certs] apiserver serving cert is signed for DNS names [instance01 kubernetes kubernetes.default kubernetes.default.svc kubernetes.default.svc.cluster.local] and IPs [10.96.0.1 10.0.0.10][certs] Generating "apiserver-kubelet-client" certificate and key[certs] Generating "front-proxy-ca" certificate and key[certs] Generating "front-proxy-client" certificate and key[certs] Generating "etcd/ca" certificate and key[certs] Generating "etcd/server" certificate and key[certs] etcd/server serving cert is signed for DNS names [instance01 localhost] and IPs [10.0.0.10 127.0.0.1 ::1][certs] Generating "etcd/peer" certificate and key[certs] etcd/peer serving cert is signed for DNS names [instance01 localhost] and IPs [10.0.0.10 127.0.0.1 ::1][certs] Generating "etcd/healthcheck-client" certificate and key[certs] Generating "apiserver-etcd-client" certificate and key[certs] Generating "sa" key and public key[kubeconfig] Using kubeconfig folder "/etc/kubernetes"[kubeconfig] Writing "admin.conf" kubeconfig file[kubeconfig] Writing "kubelet.conf" kubeconfig file[kubeconfig] Writing "controller-manager.conf" kubeconfig file[kubeconfig] Writing "scheduler.conf" kubeconfig file[control-plane] Using manifest folder "/etc/kubernetes/manifests"[control-plane] Creating static Pod manifest for "kube-apiserver"[control-plane] Creating static Pod manifest for "kube-controller-manager"W0811 10:35:45.747365 5522 manifests.go:225] the default kube-apiserver authorization-mode is "Node,RBAC"; using "Node,RBAC"[control-plane] Creating static Pod manifest for "kube-scheduler"W0811 10:35:45.748616 5522 manifests.go:225] the default kube-apiserver authorization-mode is "Node,RBAC"; using "Node,RBAC"[etcd] Creating static Pod manifest for local etcd in "/etc/kubernetes/manifests"[wait-control-plane] Waiting for the kubelet to boot up the control plane as static Pods from directory "/etc/kubernetes/manifests". This can take up to 4m0s[apiclient] All control plane components are healthy after 21.003165 seconds[upload-config] Storing the configuration used in ConfigMap "kubeadm-config" in the "kube-system" Namespace[kubelet] Creating a ConfigMap "kubelet-config-1.18" in namespace kube-system with the configuration for the kubelets in the cluster[upload-certs] Skipping phase. Please see --upload-certs[mark-control-plane] Marking the node instance01 as control-plane by adding the label "node-role.kubernetes.io/master=''"[mark-control-plane] Marking the node instance01 as control-plane by adding the taints [node-role.kubernetes.io/master:NoSchedule][bootstrap-token] Using token: 5mlkf9.ofhd9du86w4n5alp[bootstrap-token] Configuring bootstrap tokens, cluster-info ConfigMap, RBAC Roles[bootstrap-token] configured RBAC rules to allow Node Bootstrap tokens to get nodes[bootstrap-token] configured RBAC rules to allow Node Bootstrap tokens to post CSRs in order for nodes to get long term certificate credentials[bootstrap-token] configured RBAC rules to allow the csrapprover controller automatically approve CSRs from a Node Bootstrap Token[bootstrap-token] configured RBAC rules to allow certificate rotation for all node client certificates in the cluster[bootstrap-token] Creating the "cluster-info" ConfigMap in the "kube-public" namespace[kubelet-finalize] Updating "/etc/kubernetes/kubelet.conf" to point to a rotatable kubelet client certificate and key[addons] Applied essential addon: CoreDNS[addons] Applied essential addon: kube-proxyYour Kubernetes control-plane has initialized successfully!To start using your cluster, you need to run the following as a regular user: mkdir -p $HOME/.kube sudo cp -i /etc/kubernetes/admin.conf $HOME/.kube/config sudo chown $(id -u):$(id -g) $HOME/.kube/configYou should now deploy a pod network to the cluster.Run "kubectl apply -f [podnetwork].yaml" with one of the options listed at: https://kubernetes.io/docs/concepts/cluster-administration/addons/Then you can join any number of worker nodes by running the following on each as root:kubeadm join 10.0.0.10:6443 --token 5mlkf9.ofhd9du86w4n5alp --discovery-token-ca-cert-hash sha256:c401ca643111b710e03ecd19bf5fb257651689fd5e5cdf5efcf5739da9b14ade如果能够看到如上输出信息,则表示master节点初始化成功。
根据提示创建kubectl:
[root@instance01 ~]# mkdir -p $HOME/.kube[root@instance01 ~]# cp -i /etc/kubernetes/admin.conf $HOME/.kube/config[root@instance01 ~]# chown $(id -u):$(id -g) $HOME/.kube/config[root@instance01 ~]# source 查看master状态:
[root@instance01 ~]# kubectl get nodesNAME STATUS ROLES AGE VERSIONinstance01 Ready master 85s v1.18.6查看pod状态:

pod状态
可以看到coredns一直是ContainerCreating状态,原因是Kubernetes官网有这样一段话:
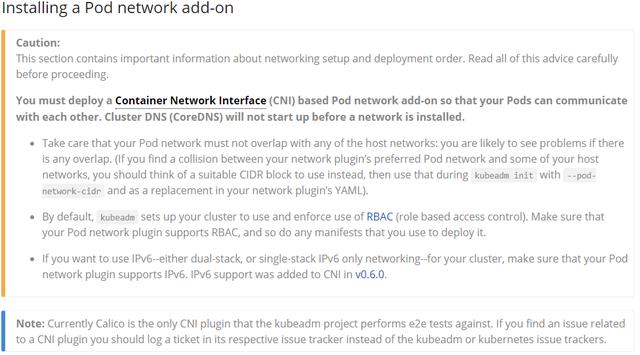
install network
大体意思是部署一个容器网络接口(CNI)基于Pod的网络插件,在安装网络之前,群集DNS(CoreDNS)将不会启动,Calico是kubeadm项目执行e2e测试的唯一CNI插件。
所以接下来,我们需要在Kubernetes集群中部署Calico插件:
wget https://docs.projectcalico.org/manifests/calico.yamlCalico官网有这样一句话:
If you are using pod CIDR 192.168.0.0/16, skip to the next step. If you are using a different pod CIDR with kubeadm, no changes are required - Calico will automatically detect the CIDR based on the running configuration. For other platforms, make sure you uncomment the CALICO_IPV4POOL_CIDR variable in the manifest and set it to the same value as your chosen pod CIDR.
意思是Calico插件默认使用的Pod是192.168.0.0/16这个IP地址段,如果我们的Kubernetes集群也是使用的这个地址段,则不用修改;否则,我们需要根据实际情况修改calico.yaml文件中的CALICO_IPV4POOL_CIDR这个变量。
上面我们在初始化master节点的时候,Pod使用的地址段是10.122.0.0/16,所以这一步我们需要修改CALICO_IPV4POOL_CIDR为10.122.0.0/16。
# The default IPv4 pool to create on startup if none exists. Pod IPs will be# chosen from this range. Changing this value after installation will have# no effect. This should fall within `--cluster-cidr`.- name: CALICO_IPV4POOL_CIDR value: "10.122.0.0/16"[root@instance01 ~]# kubectl apply -f calico.yamlconfigmap/calico-config createdcustomresourcedefinition.apiextensions.k8s.io/bgpconfigurations.crd.projectcalico.org createdcustomresourcedefinition.apiextensions.k8s.io/bgppeers.crd.projectcalico.org createdcustomresourcedefinition.apiextensions.k8s.io/blockaffinities.crd.projectcalico.org createdcustomresourcedefinition.apiextensions.k8s.io/clusterinformations.crd.projectcalico.org createdcustomresourcedefinition.apiextensions.k8s.io/felixconfigurations.crd.projectcalico.org createdcustomresourcedefinition.apiextensions.k8s.io/globalnetworkpolicies.crd.projectcalico.org createdcustomresourcedefinition.apiextensions.k8s.io/globalnetworksets.crd.projectcalico.org createdcustomresourcedefinition.apiextensions.k8s.io/hostendpoints.crd.projectcalico.org createdcustomresourcedefinition.apiextensions.k8s.io/ipamblocks.crd.projectcalico.org createdcustomresourcedefinition.apiextensions.k8s.io/ipamconfigs.crd.projectcalico.org createdcustomresourcedefinition.apiextensions.k8s.io/ipamhandles.crd.projectcalico.org createdcustomresourcedefinition.apiextensions.k8s.io/ippools.crd.projectcalico.org createdcustomresourcedefinition.apiextensions.k8s.io/kubecontrollersconfigurations.crd.projectcalico.org createdcustomresourcedefinition.apiextensions.k8s.io/networkpolicies.crd.projectcalico.org createdcustomresourcedefinition.apiextensions.k8s.io/networksets.crd.projectcalico.org createdclusterrole.rbac.authorization.k8s.io/calico-kube-controllers createdclusterrolebinding.rbac.authorization.k8s.io/calico-kube-controllers createdclusterrole.rbac.authorization.k8s.io/calico-node createdclusterrolebinding.rbac.authorization.k8s.io/calico-node createddaemonset.apps/calico-node createdserviceaccount/calico-node createddeployment.apps/calico-kube-controllers createdserviceaccount/calico-kube-controllers created[root@instance01 ~]#然后,再查看Pod的状态:

pod状态
经过大约2--3秒的时间,所有的Pod都处于Running状态。

接下来,我们需要安装Kubernetes的Dashboard Web管理界面。
下载yaml文件
wget https://raw.githubusercontent.com/kubernetes/dashboard/v2.0.0/aio/deploy/recommended.yaml为了方便快速看到效果,我们需要跳过Dashboard的登录验证过程,需要对yaml文件进行修改,修改内容如下:
apiVersion: rbac.authorization.k8s.io/v1kind: ClusterRoleBindingmetadata: name: kubernetes-dashboard namespace: kubernetes-dashboardroleRef: apiGroup: rbac.authorization.k8s.io kind: ClusterRole name: cluster-adminsubjects: - kind: ServiceAccount name: kubernetes-dashboard namespace: kubernetes-dashboard- 增加namespace: kubernetes-dashboard;
- 将roleRef.name:kubernetes-dashboard替换成roleRef.name:cluster-admin;
kind: DeploymentapiVersion: apps/v1metadata: labels: k8s-app: kubernetes-dashboard name: kubernetes-dashboard namespace: kubernetes-dashboardspec: replicas: 1 revisionHistoryLimit: 10 selector: matchLabels: k8s-app: kubernetes-dashboard template: metadata: labels: k8s-app: kubernetes-dashboard spec: nodeName: instance01 containers: - name: kubernetes-dashboard image: kubernetesui/dashboard:v2.0.3 imagePullPolicy: Always ports: - containerPort: 8443 protocol: TCP args: - --enable-skip-login - --disable-settings-authorizer - --enable-insecure-login=true增加--enable-skip-login,--disable-settings-authorizer,--enable-insecure-login=true三个参数可以跳过登录验证。我们的三节点集群是在内网测试环境部署,可以跳过这些安全登录验证;如果Kubernetes集群是部署在生产环境或者外网,强烈建议不要跳过这些安全登录验证,以免发生安全事故。
执行部署Dashboard命令:
[root@instance01 ~]# kubectl apply -f dashboard-admin.yamlnamespace/kubernetes-dashboard createdserviceaccount/kubernetes-dashboard createdservice/kubernetes-dashboard createdsecret/kubernetes-dashboard-certs createdsecret/kubernetes-dashboard-csrf createdsecret/kubernetes-dashboard-key-holder createdconfigmap/kubernetes-dashboard-settings createdrole.rbac.authorization.k8s.io/kubernetes-dashboard createdclusterrole.rbac.authorization.k8s.io/kubernetes-dashboard createdrolebinding.rbac.authorization.k8s.io/kubernetes-dashboard createdclusterrolebinding.rbac.authorization.k8s.io/kubernetes-dashboard createddeployment.apps/kubernetes-dashboard createdservice/dashboard-metrics-scraper createddeployment.apps/dashboard-metrics-scraper created查看Pod状态:
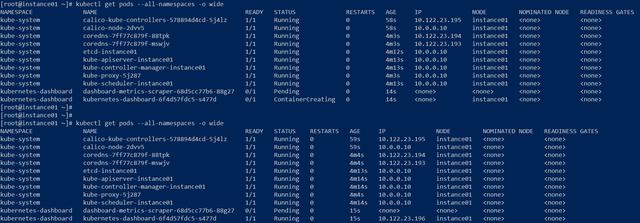
pod状态
经过大约5--10秒钟时间,kubernetes-dashboard已经处于Running状态。
我们通过proxy的形式访问我们的Dashboard Web界面:
kubectl proxy --address='0.0.0.0' --accept-hosts='^*$'浏览器地址栏中输入:http://10.0.0.10:8001/api/v1/namespaces/kubernetes-dashboard/services/https:kubernetes-dashboard:/proxy/

Dashboard Web
点击“跳过”就可以直接进入Dashboard
Dashboard Web
到处,Kubernetes Dashboard部署安装完毕。

下面我们将instance03和instance04节点加入到Kubernetes集群中,我们需要使用上面初始化master节点输出的token信息,分别在instance03和instance04上执行如下命令:
[root@instance03 ~]# kubeadm join 10.0.0.10:6443 --token 5mlkf9.ofhd9du86w4n5alp > --discovery-token-ca-cert-hash sha256:c401ca643111b710e03ecd19bf5fb257651689fd5e5cdf5efcf5739da9b14adeW0811 10:43:30.179615 5420 join.go:346] [preflight] WARNING: JoinControlPane.controlPlane settings will be ignored when control-plane flag is not set.[preflight] Running pre-flight checks [WARNING IsDockerSystemdCheck]: detected "cgroupfs" as the Docker cgroup driver. The recommended driver is "systemd". Please follow the guide at https://kubernetes.io/docs/setup/cri/ [WARNING FileExisting-tc]: tc not found in system path[preflight] Reading configuration from the cluster...[preflight] FYI: You can look at this config file with 'kubectl -n kube-system get cm kubeadm-config -oyaml'[kubelet-start] Downloading configuration for the kubelet from the "kubelet-config-1.18" ConfigMap in the kube-system namespace[kubelet-start] Writing kubelet configuration to file "/var/lib/kubelet/config.yaml"[kubelet-start] Writing kubelet environment file with flags to file "/var/lib/kubelet/kubeadm-flags.env"[kubelet-start] Starting the kubelet[kubelet-start] Waiting for the kubelet to perform the TLS Bootstrap...This node has joined the cluster:* Certificate signing request was sent to apiserver and a response was received.* The Kubelet was informed of the new secure connection details.Run 'kubectl get nodes' on the control-plane to see this node join the cluster.[root@instance04 ~]# kubeadm join 10.0.0.10:6443 --token 5mlkf9.ofhd9du86w4n5alp > --discovery-token-ca-cert-hash sha256:c401ca643111b710e03ecd19bf5fb257651689fd5e5cdf5efcf5739da9b14adeW0811 10:47:09.437293 5340 join.go:346] [preflight] WARNING: JoinControlPane.controlPlane settings will be ignored when control-plane flag is not set.[preflight] Running pre-flight checks [WARNING IsDockerSystemdCheck]: detected "cgroupfs" as the Docker cgroup driver. The recommended driver is "systemd". Please follow the guide at https://kubernetes.io/docs/setup/cri/ [WARNING FileExisting-tc]: tc not found in system path[preflight] Reading configuration from the cluster...[preflight] FYI: You can look at this config file with 'kubectl -n kube-system get cm kubeadm-config -oyaml'[kubelet-start] Downloading configuration for the kubelet from the "kubelet-config-1.18" ConfigMap in the kube-system namespace[kubelet-start] Writing kubelet configuration to file "/var/lib/kubelet/config.yaml"[kubelet-start] Writing kubelet environment file with flags to file "/var/lib/kubelet/kubeadm-flags.env"[kubelet-start] Starting the kubelet[kubelet-start] Waiting for the kubelet to perform the TLS Bootstrap...This node has joined the cluster:* Certificate signing request was sent to apiserver and a response was received.* The Kubelet was informed of the new secure connection details.Run 'kubectl get nodes' on the control-plane to see this node join the cluster.再次查看node和pod状态:
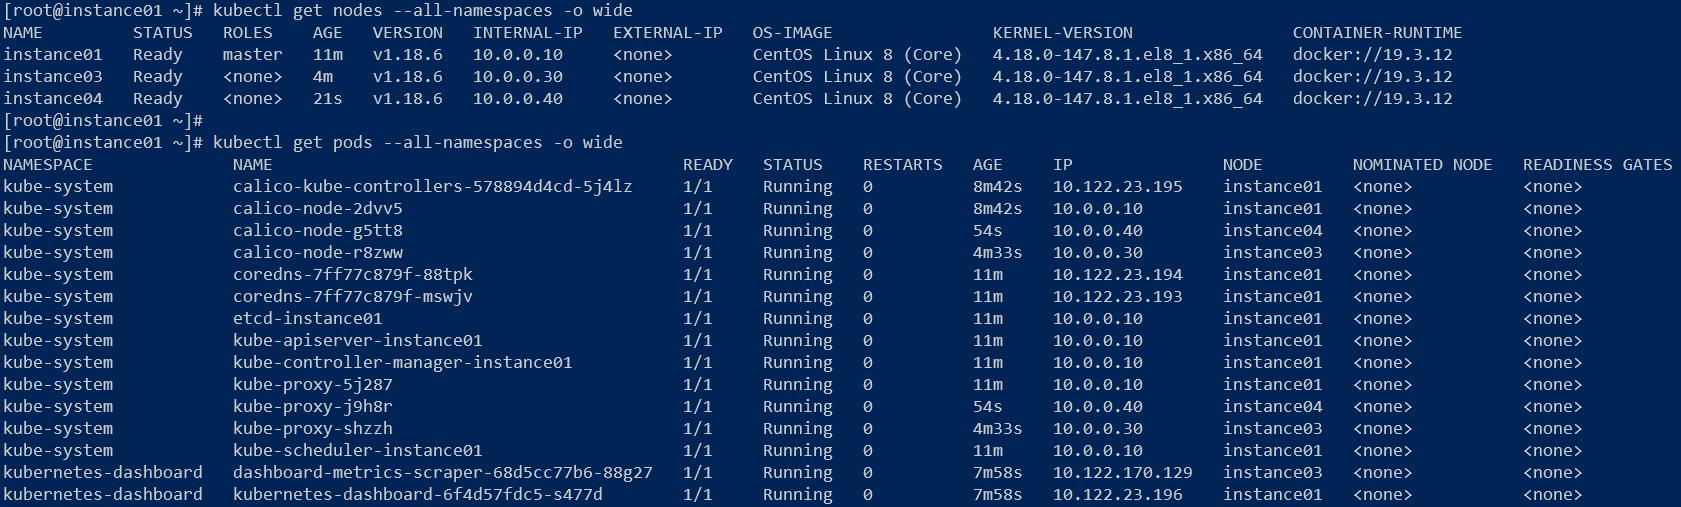
node状态
给instance03和instance04打上node标签,代表该节点是一个node角色。
[root@instance01 ~]# kubectl label node instance03 node-role.kubernetes.io/node=node/instance03 labeled[root@instance01 ~]# kubectl label node instance04 node-role.kubernetes.io/node=node/instance04 labeled
node信息
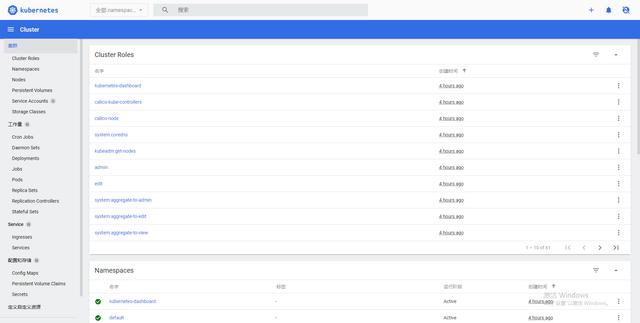
也可以通过Kubernetes的Dashboard Web界面查看节点的状态:
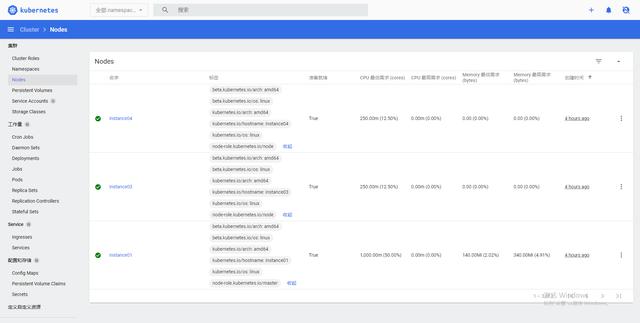
节点信息
按照上述步骤,一个三节点的Kubernetes v1.18.0集群已经部署完成。笔者在实践过程中也遇到了很多问题,大致总结下:
- 安装部署之前一定要仔细阅读Kubernetes官方的文档,一定要阅读第一手资料,特别是官方文档中提到要注意或者警告信息一定要理解透彻;
- 每一步执行命令后要仔细观察命令行的输出内容,输出的警告信息和错误信息必要的时候一定要收集下来,方便分析找原因;
- 当出现错误信息时,一定要仔细阅读错误日志输出内容,根据经验猜测可能问题的原因,然后查阅相关文档验证自己的猜测,这也是学习和知识储备的一个过程。
- Kubernetes的每一个概念和组件一定要有所理解,Node,Pod,Deployment,Service等;
- Kubernetes的计算,存储,网络每一个都是一大知识领域,可能需要更多的知识储备和实践经验才能对每一个知识领域阐述的更清楚;
不积跬步,无以至千里;不积小流,无以成江海!


 3960
3960


 被折叠的 条评论
为什么被折叠?
被折叠的 条评论
为什么被折叠?
 到【灌水乐园】发言


