


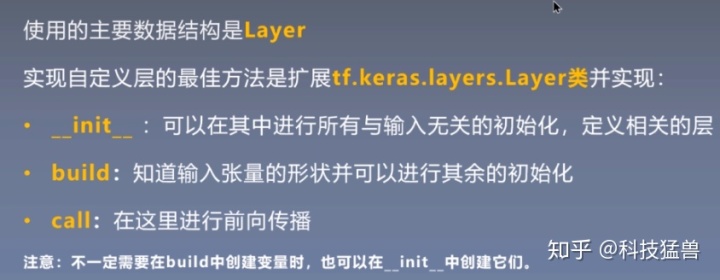

下面举个例子说明自定义层的构建方法:

from 构建自定义层方法1:
import tensorflow as tf
#自定义全连接层
class Linear(tf.keras.layers.Layer):

    def __init__(self, units=1, input_dim=4):
        super(Linear, self).__init__() #
        w_init = tf.random_normal_initializer()
        self.w = tf.Variable(initial_value=w_init(shape=(input_dim, units),
                                                  dtype='float32'),
                             trainable=True)
        b_init = tf.zeros_initializer()
        self.b = tf.Variable(initial_value=b_init(shape=(units,),dtype='float32'),trainable=True)

    def call(self, inputs):
        return tf.matmul(inputs, self.w) + self.b


x = tf.constant(data) #(150,4)
linear_layer = Linear(units = 1, input_dim=4) #()
y = linear_layer(x)
print(y.shape) #(150,1)
可以发现这种方法里面w和b是使用tf.Variable+w/b_init来定义的。
构建自定义层方法2:
class Linear(tf.keras.layers.Layer):

    def __init__(self, units=1, input_dim=4):
        super(Linear, self).__init__()
        self.w = self.add_weight(shape=(input_dim, units),
                                 initializer='random_normal',
                                 trainable=True)
        self.b = self.add_weight(shape=(units,),
                                 initializer='zeros',
                                 trainable=True)

    def call(self, inputs):
        return tf.matmul(inputs, self.w) + self.b


x = tf.constant(data)
linear_layer = Linear(units = 1, input_dim=4)
y = linear_layer(x)
print(y.shape)
可以发现这种方法里面w和b是使用self.add_weight来定义的。
构建自定义层方法3:
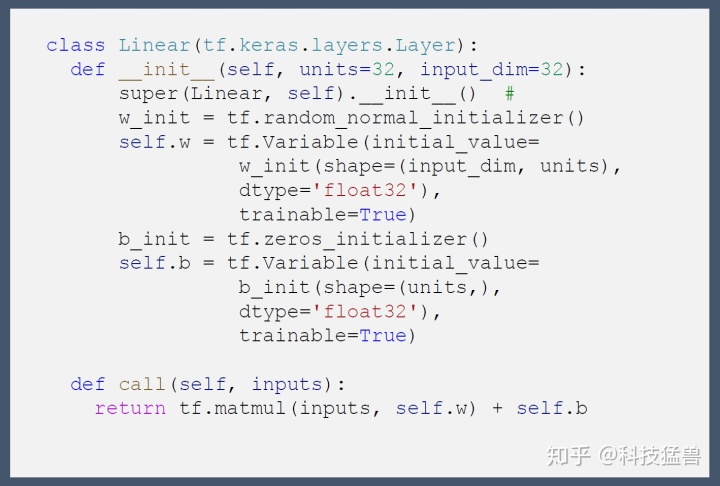
class Linear(tf.keras.layers.Layer):

    def __init__(self, units=32):
        super(Linear, self).__init__()
        self.units = units

    def build(self, input_shape): #(150,4)
        self.w = self.add_weight(shape=(input_shape[-1], self.units),
                                 initializer='random_normal',
                                 trainable=True)
        self.b = self.add_weight(shape=(self.units,),
                                 initializer='random_normal',
                                 trainable=True)
        super(Linear,self).build(input_shape)

    def call(self, inputs):
        return tf.matmul(inputs, self.w) + self.b


x = tf.constant(data) #150*4
linear_layer = Linear(units = 1)
y = linear_layer(x)
print(y.shape)
可以发现这种方法里面写成了3个函数。
注意事项:
我们自定义一个名为MyDense的Layer:
import tensorflow as tf
#Dense
class MyDense(tf.keras.layers.Layer):
def __init__(self, units=32, **kwargs):
self.units = units
super(MyDense, self).__init__(**kwargs)
#build方法一般定义Layer需要被训练的参数。
def build(self, input_shape):
self.w = self.add_weight(shape=(input_shape[-1], self.units),
initializer='random_normal',
trainable=True,
name='w')
self.b = self.add_weight(shape=(self.units,),
initializer='random_normal',
trainable=True,
name='b')
super(MyDense,self).build(input_shape) # 相当于设置self.built = True
#call方法一般定义正向传播运算逻辑,__call__方法调用了它。
def call(self, inputs):
return tf.matmul(inputs, self.w) + self.b
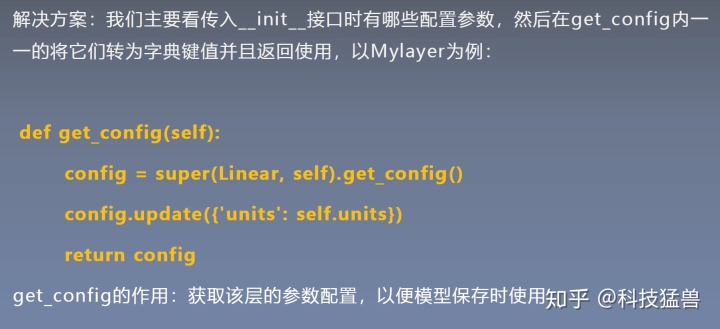
#如果要让自定义的Layer通过Functional API 组合成模型时可以序列化,需要自定义get_config方法。
def get_config(self):
config = super(MyDense, self).get_config()
config.update({'units': self.units})
return configinputs = tf.keras.Input(shape=(4,))
x = MyDense(units=16)(inputs)
x = tf.nn.tanh(x)
x = MyDense(units=3)(x) #0,1,2
# x= tf.keras.layers.Dense(16)(x)
predictions = tf.nn.softmax(x)
model = tf.keras.Model(inputs=inputs, outputs=predictions)
model.compile(optimizer=tf.keras.optimizers.Adam(),
loss=tf.keras.losses.SparseCategoricalCrossentropy(from_logits=True),
metrics=[tf.keras.metrics.SparseCategoricalAccuracy()])
#keras
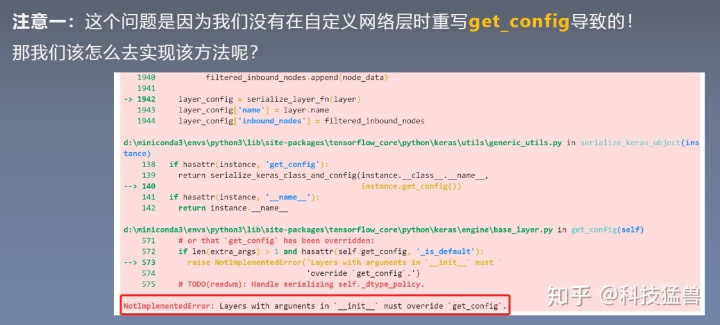
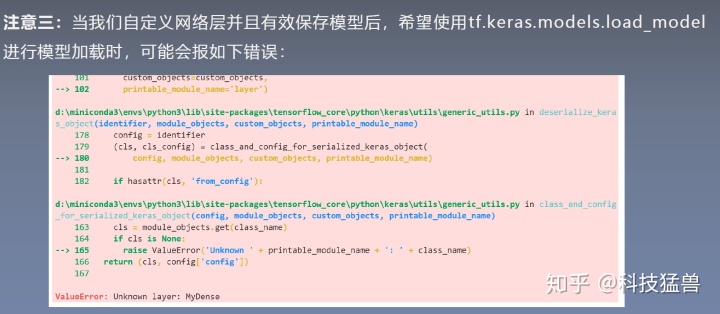
model.fit(data, labels, batch_size=32, epochs=100,shuffle=True)如果没有在自定义层时候重写get_config,那么就会在保存模型时候报错:
model.save('keras_model_tf_version.h5')
_custom_objects = {
    "MyDense" :  MyDense,

}
new_model = tf.keras.models.load_model("keras_model_tf_version.h5",custom_objects=_custom_objects)
y_pred = new_model.predict(data)
解决方法:

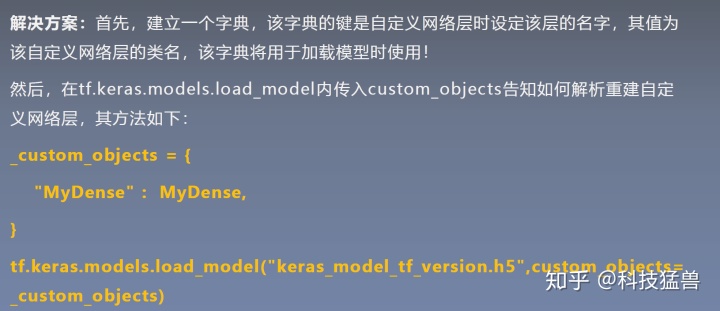
_custom_objects = {
    "MyDense" :  MyDense,

}

最后,放上完整的案例代码:
import tensorflow as tf
print(tf.__version__)
tf.test.is_gpu_available()

#Dense
class MyDense(tf.keras.layers.Layer):
    def __init__(self, units=32, **kwargs):
        self.units = units
        super(MyDense, self).__init__(**kwargs)

    #build方法一般定义Layer需要被训练的参数。
    def build(self, input_shape):
        self.w = self.add_weight(shape=(input_shape[-1], self.units),
                                 initializer='random_normal',
                                 trainable=True,
                                 name='w')
        self.b = self.add_weight(shape=(self.units,),
                                 initializer='random_normal',
                                 trainable=True,
                                 name='b')
        super(MyDense,self).build(input_shape) # 相当于设置self.built = True

    #call方法一般定义正向传播运算逻辑,__call__方法调用了它。
    def call(self, inputs):
        return tf.matmul(inputs, self.w) + self.b

    #如果要让自定义的Layer通过Functional API 组合成模型时可以序列化,需要自定义get_config方法。
    def get_config(self):
        config = super(MyDense, self).get_config()
        config.update({'units': self.units})
        return config

from sklearn import datasets
iris = datasets.load_iris()
data = iris.data
labels = iris.target
# from sklearn.preprocessing import MinMaxScaler
# data=MinMaxScaler().fit_transform(data)

#网络   函数式构建的网络
inputs = tf.keras.Input(shape=(4,))
x = MyDense(units=16)(inputs)
x = tf.nn.tanh(x)
x = MyDense(units=3)(x) #0,1,2
# x= tf.keras.layers.Dense(16)(x)
predictions = tf.nn.softmax(x)
model = tf.keras.Model(inputs=inputs, outputs=predictions)

data = np.concatenate((data,labels.reshape(150,1)),axis=-1)
np.random.shuffle(data)

labels = data[:,-1]
data = data[:,:4]

#优化器 Adam
#损失函数 交叉熵损失函数
#评估函数 #acc


model.compile(optimizer=tf.keras.optimizers.Adam(),
              loss=tf.keras.losses.SparseCategoricalCrossentropy(from_logits=True),
              metrics=[tf.keras.metrics.SparseCategoricalAccuracy()])

#keras
model.fit(data, labels, batch_size=32, epochs=100,shuffle=True)

model.summary()

model.save('keras_model_tf_version.h5')

_custom_objects = {
    "MyDense" :  MyDense,

}

new_model = tf.keras.models.load_model("keras_model_tf_version.h5",custom_objects=_custom_objects)
y_pred = new_model.predict(data)
np.argmax(y_pred,axis=1)


 2万+
2万+


 被折叠的 条评论
为什么被折叠?
被折叠的 条评论
为什么被折叠?
 到【灌水乐园】发言


