


1.先把tgz的包在本地解压,把里面的tar包传到 /opt目录
2.使用tar -xvf 解压tar包,解压出了xdebug-2.2.4、package.xml:
[root@centos1 opt]# tar -xvf xdebug-2.2.4.tar
3、进入xdebug,执行phpize (安装phpize : yum install php-devel)
4. 执行./configure --enable-xdebug (需安装gcc yum install gcc)
[root@centos1 xdebug-2.2.4]# ./configure --enable-xdebug ($ ./configure --with-php-config=/opt/lampp/bin/php-config)
5、make && make install
[root@centos1 xdebug-2.2.4]# make && make install
Build complete.
Don't forget to run 'make test'.
Installing shared extensions: /usr/lib/php/modules/
+----------------------------------------------------------------------+
| |
| INSTALLATION INSTRUCTIONS |
| ========================= |
| |
| See http://xdebug.org/install.php#configure-php for instructions |
| on how to enable Xdebug for PHP. |
| |
| Documentation is available online as well: |
| - A list of all settings: http://xdebug.org/docs-settings.php |
| - A list of all functions: http://xdebug.org/docs-functions.php |
| - Profiling instructions: http://xdebug.org/docs-profiling2.php |
| - Remote debugging: http://xdebug.org/docs-debugger.php |
| |
| |
| NOTE: Please disregard the message |
| You should add "extension=xdebug.so" to php.ini |
| that is emitted by the PECL installer. This does not work for |
| Xdebug. |
| |
+----------------------------------------------------------------------+
[root@centos1 xdebug-2.2.4]#
6.找到php.ini
[root@centos1 lampp]# find ./ -name php.ini
./etc/php.ini
7.修改php.int
[root@centos1 lampp]# vi ./etc/php.ini ##后面加入
[Xdebug]
zend_extension ="/usr/lib/php/modules/" ##不用要用;注释掉
xdebug.profiler_enable=on
xdebug.trace_output_dir="/tmp/xdebug"
xdebug.profiler_output_dir="/tmp/xdebug"
xdebug.remote_enable=on
xdebug.remote_handler=dbgp
7.建立log输出目录
[root@centos1 lampp]# mkdir -p /tmp/xdebug
8.给log输出目录赋权
[root@centos1 lampp]# chmod 777 -R /tmp/xdebug/
9.重启apache
xmapp下重启:
[root@centos1 lampp]# service apache start
[root@centos1 lampp]# service apache stop
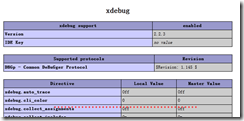
注:在页面输出 phpinfo();
10.访问网站后,在/tmp/xdebug中会有日志
11、将文件弄到本机:
[root@centos1 xdebug]# sz cachegrind.out.6478 (安装sz rz命令[root@centos1 xdebug]# yum -y install lrzsz)
11、打开wincachegrind,将日志文件拖进wincachegrind,进行查看日志。
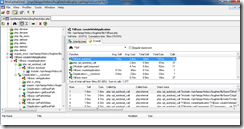
12、分析日志:overall中 call:调用次数;self 方法自己的时间;cum 方法总时间,包括了调用其他方法的
安装xhprof函数级别的性能分析()
1、1.先把tgz的包在本地解压,把里面的tar包传到 centos的/root目录,使用tar -xvf 解压tar包,解压出了xdebug-2.2.4、package.xml,
2。进入xhprof,再进入cd extension/,执行phpize
3、./configure --with-php-config=/usr/bin/php-config
4、make && make install
5.建立目录 mkdir -p /tmp/xhprof
6.给l目录赋权限 chmod 777 /tmp/xhprof
7.vi /etc/php.ini,后面加入
[xhprof]
extension=xhprof.so
; directory used by default implementation of the iXHProfRuns
; interface (namely, the XHProfRuns_Default class) for storing
; XHProf runs.
;xhprof.output_dir=
xhprof.output_dir=/tmp/xhprof
8.重启apache ,service httpd restart
9.在php文件打点
// cpu:XHPROF_FLAGS_CPU 内存:XHPROF_FLAGS_MEMORY
// 如果两个一起:XHPROF_FLAGS_CPU + XHPROF_FLAGS_MEMORY
xhprof_enable(XHPROF_FLAGS_CPU + XHPROF_FLAGS_MEMORY);
// 要测试的php代码
foo();
$data = xhprof_disable(); //返回运行数据
// xhprof_lib在下载的包里存在这个目录,记得将目录包含到运行的php代码中
include_once "xhprof_lib/utils/xhprof_lib.php";
include_once "xhprof_lib/utils/xhprof_runs.php";
$objXhprofRun = new XHProfRuns_Default();
// 第一个参数j是xhprof_disable()函数返回的运行信息
// 第二个参数是自定义的命名空间字符串(任意字符串),
// 返回运行ID,用这个ID查看相关的运行结果
$run_id = $objXhprofRun->save_run($data, "xhprof");
var_dump($run_id);
echo "\nhttp://192.168.0.99/xxx/xhprof_html/index.php?run={$run_id}&source=xhprof\n";
10、http://192.168.0.99/xhproftest/xhprof_html/index.php?run=54779d94bfa61&source=xhprof
查看统计报告
calls 调用次数
incl.wall time
excl.wall time自身时间
cpu毫秒
memuse字节
peakmemuse 内存峰值
图表中红色为瓶颈、黄色为路径和耗时。
MYSQL_general_log
1、查看general_log状态
mysql> show global variables like "%general%";
+------------------+----------------------------------+
| Variable_name | Value |
+------------------+----------------------------------+
| general_log | OFF |
| general_log_file | /opt/lampp/var/mysql/centos1.log |
+------------------+----------------------------------+
2 rows in set (0.00 sec)
2、打开general_log
mysql> set global general_log=ON;
Query OK, 0 rows affected (0.04 sec)
mysql> show global variables like "%general%";
+------------------+----------------------------------+
| Variable_name | Value |
+------------------+----------------------------------+
| general_log | ON |
| general_log_file | /opt/lampp/var/mysql/centos1.log |
+------------------+----------------------------------+
2 rows in set (0.04 sec)
3、打开对应的log文件,查看log
[root@centos1 mysql]# cat centos1.log |grep INSERT |tail -3
59 Query INSERT INTO `bf_user_log` (`created_by`, `created_at`, `ip`) VALUES (1, '2014-12-12 01:09:45', '192.168.0.1')
72 Query INSERT INTO `bf_test_user` (`lock_version`, `authmode`, `username`, `realname`, `password`, `email`, `is_dropped`, `email_flag`, `wangwang_flag`, `wangwang`, `created_at`, `updated_at`, `created_by`, `updated_by`, `full_pinyin`, `first_pinyin`) VALUES (1, 'internal', 'b0', 'b0', 'e10adc3949ba59abbe56e057f20f883e', 'b0@bf.cn', '0', '1', '0', '', '2014-12-12 01:10:59', '2014-12-12 01:10:59', 1, 1, 'b0', 'b0')
72 Query INSERT INTO `bf_admin_action` (`action_type`, `target_table`, `target_id`, `created_at`, `created_by`) VALUES ('Open', 'test_user', 16, '2014-12-12 01:10:59', 1)
[root@centos1 mysql]#
用完了记得关掉
mysql> set global general_log=OFF;
Query OK, 0 rows affected (0.01 sec)
mysql> show global variables like 'general%';
+------------------+----------------------------------+
| Variable_name | Value |
+------------------+----------------------------------+
| general_log | OFF |
| general_log_file | /opt/lampp/var/mysql/centos1.log |
+------------------+----------------------------------+
2 rows in set (0.00 sec)
使&&make install的


 2659
2659


 被折叠的 条评论
为什么被折叠?
被折叠的 条评论
为什么被折叠?
 到【灌水乐园】发言


