


Ecommerce Tracking
This guide describes how to collect ecommerce data using analytics.js.
Overview
Ecommerce tracking allows you to measure the number of transactions and revenue that your website generates. On a typical ecommerce site, once a user clicks the "purchase" button in the browser, the user's purchase information is sent to the web server, which carries out the transaction. If successful, the server redirects the user to a "Thank You" or receipt page with transaction details and a receipt of the purchase. You can use the analytics.js library to send the ecommerce data from the "Thank You" page to Google Analytics.
Important: The Ecommerce plug-in should not be used alongside the Enhanced Ecommerce (ec.js) plug-in.
There are two types of ecommerce data you can send using analytics.js: transaction and item data.
Transaction Data
A transaction represents the entire transaction that occurs on your site, and contains the following values:
| Key | Value Type | Required | Description |
|---|---|---|---|
id | text | Yes | The transaction ID. (e.g. 1234) |
affiliation | text | No | The store or affiliation from which this transaction occurred (e.g. Acme Clothing). |
revenue | currency | No | Specifies the total revenue or grand total associated with the transaction (e.g. 11.99). This value may include shipping, tax costs, or other adjustments to total revenue that you want to include as part of your revenue calculations. |
shipping | currency | No | Specifies the total shipping cost of the transaction. (e.g. 5) |
tax | currency | No | Specifies the total tax of the transaction. (e.g. 1.29) |
Item Data
An item represents the individual products that were in the shopping cart, and contains the following values:
| Key | Value Type | Required | Description |
|---|---|---|---|
id | text | Yes | The transaction ID. This ID is what links items to the transactions to which they belong. (e.g. 1234) |
name | text | Yes | The item name. (e.g. Fluffy Pink Bunnies) |
sku | text | No | Specifies the SKU or item code. (e.g. SKU47) |
category | text | No | The category to which the item belongs (e.g. Party Toys) |
price | currency | No | The individual, unit, price for each item. (e.g. 11.99) |
quantity | integer | No | The number of units purchased in the transaction. If a non-integer value is passed into this field (e.g. 1.5), it will be rounded to the closest integer value. |
Implementation
You typically implement ecommerce tracking once the user has completed the checkout process. This generally occurs on the "Thank You" page. Once you have, and are ready to send ecommerce data to Google Analytics, there are a couple of steps you need to go through:
Load the Ecommerce Plugin
To reduce the size of the analytics.js library, ecommerce tracking is not provided in the default library. Instead it is provided as a plugin module that must be loaded before being used.
To load the ecommerce plugin, use the following command:
ga('require', 'ecommerce');
This command must occur after you create your tracker object and before you use any of the ecommerce specific functionality.
Once loaded, a couple of new commands specific to ecommerce tracking will be added to the default tracker.
Adding a Transaction
Once the plugin has been loaded, it creates a transparent shopping cart object. You can add transaction and item data to the shopping cart, and once fully configured, you send all the data at once.
You add transaction data to the shopping cart using the ecommerce:addTransaction command:
ga('ecommerce:addTransaction', {
'id': '1234', // Transaction ID. Required.
'affiliation': 'Acme Clothing', // Affiliation or store name.
'revenue': '11.99', // Grand Total.
'shipping': '5', // Shipping.
'tax': '1.29' // Tax.
});
Adding Items
Next, to add items to the shopping cart, you use the ecommerce:addItem command:
ga('ecommerce:addItem', {
'id': '1234', // Transaction ID. Required.
'name': 'Fluffy Pink Bunnies', // Product name. Required.
'sku': 'DD23444', // SKU/code.
'category': 'Party Toys', // Category or variation.
'price': '11.99', // Unit price.
'quantity': '1' // Quantity.
});
Sending Data
Finally, once you have configured all your ecommerce data in the shopping cart, you send the data to Google Analytics using the ecommerce:send command:
ga('ecommerce:send');
This command will go through each transaction and item in the shopping cart and send the respective data to Google Analytics. Once complete, the shopping cart is cleared and ready to send data for a new transaction. If a previousecommerce:send command was issued, only new transaction and item data will be sent.
Note: While most implementations will send both transaction and item data, you can send transactions without items, and items without transactions. If you send an item hit without a transaction, a transaction hit with only the ID will be sent automatically.
Clearing Data
If you need to manually clear the shopping cart of all transactions and items, you use the following command:
ga('ecommerce:clear');
Specifying Local Currencies
By default, you can configure a common, global, currency for all transactions and items through the Google Analytics management web interface. By default, the global currency is used for all items and transactions. For websites that conduct transactions in multiple currencies, the ecommerce plugin allows you to specify the local currency of the transaction as well as individual products.
The local currency must be specified in the ISO 4217 standard. Read the Currency Codes Reference document for a complete list of supported conversion currencies.
To set the local currency of a particular transaction and all its items, you only need to specify the currency for the transaction:
ga('ecommerce:addTransaction', {
'id': '1234',
'affiliation': 'Acme Clothing',
'revenue': '11.99',
'shipping': '5',
'tax': '1.29',
'currency': 'EUR' // local currency code.
});
Finally, you can also specify the currency per item:
ga('ecommerce:addItem', {
'id': '1234',
'name': 'Fluffy Pink Bunnies',
'sku': 'DD23444',
'category': 'Party Toys',
'price': '11.99',
'quantity': '1',
'currency': 'GBP' // local currency code.
});
To learn more about how currency conversion works in Google Analytics, read the Multiple Currencies section in the ecommerce feature reference
Multiple Tracker Support
You can also use the ecommerce plugin if you have implemented multiple (named) trackers on your page. The plugin works exactly the same as the default tracker, except that the format is: trackerName.pluginName:method. For example if you created a tracker named myTracker:
ga('create', 'UA-XXXXX-Y', 'auto', {'name': 'myTracker'});
You would then load the ecommerce plugin for that named tracker using:
ga('myTracker.require', 'ecommerce');
The to send a transaction, you can create a transaction object and pass it to the named tracker as follows:
var transaction = {
'id': '1234', // Transaction ID.
'affiliation': 'Acme Clothing', // Affiliation or store name.
'revenue': '11.99', // Grand Total.
'shipping': '5' , // Shipping.
'tax': '1.29' // Tax.
};
ga('myTracker.ecommerce:addTransaction', transaction);
Using this syntax, the transaction object can be used on multiple trackers.
Finally you would send the transaction data as follows:
ga('myTracker.ecommerce:send');
Example
Most ecommerce sites perform transactions on the server, while the analytics.js library sends data to Google Analytics from the browser. So a little bit of coordination is required between server and client to properly send ecommerce data to Google Analytics.
Most ecommerce sites render their "Thank You" page using a server-side templating engine. In this case, you would add the ecommerce tracking code to the server-side template, and use server logic to dynamically write the ecommerce data values to the final page. Here is an example of how this would look in PHP.
In PHP, you typically would have some representation of the ecommerce data. In this example, the data is stored in an associative array:
<?php
// Transaction Data
$trans = array('id'=>'1234', 'affiliation'=>'Acme Clothing',
'revenue'=>'11.99', 'shipping'=>'5', 'tax'=>'1.29');
// List of Items Purchased.
$items = array(
array('sku'=>'SDFSDF', 'name'=>'Shoes', 'category'=>'Footwear', 'price'=>'100', 'quantity'=>'1'),
array('sku'=>'123DSW', 'name'=>'Sandals', 'category'=>'Footwear', 'price'=>'87', 'quantity'=>'1'),
array('sku'=>'UHDF93', 'name'=>'Socks', 'category'=>'Footwear', 'price'=>'5.99', 'quantity'=>'2')
);
?>
The first step is to write some logic to transform the ecommerce data into the JavaScript string required by analytics.js:
<?php
// Function to return the JavaScript representation of a TransactionData object.
function getTransactionJs(&$trans) {
return <<<HTML
ga('ecommerce:addTransaction', {
'id': '{$trans['id']}',
'affiliation': '{$trans['affiliation']}',
'revenue': '{$trans['revenue']}',
'shipping': '{$trans['shipping']}',
'tax': '{$trans['tax']}'
});
HTML;
}
// Function to return the JavaScript representation of an ItemData object.
function getItemJs(&$transId, &$item) {
return <<<HTML
ga('ecommerce:addItem', {
'id': '$transId',
'name': '{$item['name']}',
'sku': '{$item['sku']}',
'category': '{$item['category']}',
'price': '{$item['price']}',
'quantity': '{$item['quantity']}'
});
HTML;
}
?>
Then in the <script> tag you would add the additional PHP logic to dynamically output the transaction and item data:
<!-- Begin HTML -->
<script>
ga('require', 'ecommerce');
<?php
echo getTransactionJs($trans);
foreach ($items as &$item) {
echo getItemJs($trans['id'], $item);
}
?>
ga('ecommerce:send');
</script>
Once the PHP script is done executing, the transaction and item data required by analytics.js will be printed to the page. Once the JavaScript on the page is rendered in the browser, all the ecommerce data will be sent to Google Analytics.
Currency Types
The default currency type can be configured through the Management Interface. When you send currency values using analytics.js, the value represents the total value of a currency.
A decimal point can be used as a delimiter between the whole and fractional portion of the currency. The precision is up to 6 decimal places. The following is valid for a currency field:
1000.000001
Once the value is sent to Google Analytics, all text is removed up until the first digit, the - character or the . (decimal) character. So:
$-55.00
will become:
-55.00
Enhanced Ecommerce
This guide describes how to collect enhanced ecommerce data using analytics.js.
Overview
The enhanced ecommerce plug-in for analytics.js enables the measurement of user interactions with products on ecommerce websites across the user's shopping experience, including: product impressions, product clicks, viewing product details, adding a product to a shopping cart, initiating the checkout process, transactions, and refunds.
Migration and Compatibility with Ecommerce Plug-in (ecommerce.js)
Important: The Enhanced Ecommerce plug-in should not be used alongside the Ecommerce (ecommerce.js) plug-in for the same property.
If you've already implemented Ecommerce tracking and want to start using Enhanced Ecommerce tracking there are two main options:
Use a new property
You can add an additional tracker for a newly created property and tag/enable Enhanced Ecommerce for the new property. See Working with Multiple Tracking Objects for details on how to send data to multiple properties from a single page.
Migrate an existing property
To migrate from the ecommerce plug-in to the enhanced ecommerce plug-in, current analytics.js users should remove and replace references with enhanced ecommerce code.
If you are currently using ga.js, you will need to first migrate to analytics.js before using the enhanced ecommerce plug-in.
Transaction and item data previously collected using the ecommerce.js plug-in will not be affected by the migration and will remain available in the properties and profiles to which they were originally sent.
Enhanced Ecommerce Data Types and Actions
There are multiple types of ecommerce data you can send using analytics.js: impression data, product data, promotion data, and action data.
Impression Data
Represents information about a product that has been viewed. It is referred to as an impressionFieldObject and contains the following values:
| Key | Value Type | Required | Description |
|---|---|---|---|
id | text | Yes* | The product ID or SKU (e.g. P67890). *Either this field or name must be set. |
name | text | Yes* | The name of the product (e.g. Android T-Shirt). *Either this field or id must be set. |
list | text | No | The list or collection to which the product belongs (e.g. Search Results) |
brand | text | No | The brand associated with the product (e.g. Google). |
category | text | No | The category to which the product belongs (e.g. Apparel). Use / as a delimiter to specify up to 5-levels of hierarchy (e.g. Apparel/Men/T-Shirts). |
variant | text | No | The variant of the product (e.g. Black). |
position | integer | No | The product's position in a list or collection (e.g. 2). |
price | currency | No | The price of a product (e.g. 29.20). |
Product Data
Product data represents individual products that were viewed, added to the shopping cart, etc. It is referred to as a productFieldObject and contains the following values:
| Key | Value Type | Required | Description |
|---|---|---|---|
id | text | Yes* | The product ID or SKU (e.g. P67890). *Either this field or name must be set. |
name | text | Yes* | The name of the product (e.g. Android T-Shirt). *Either this field or id must be set. |
brand | text | No | The brand associated with the product (e.g. Google). |
category | text | No | The category to which the product belongs (e.g. Apparel). Use / as a delimiter to specify up to 5-levels of hierarchy (e.g. Apparel/Men/T-Shirts). |
variant | text | No | The variant of the product (e.g. Black). |
price | currency | No | The price of a product (e.g. 29.20). |
quantity | integer | No | The quantity of a product (e.g. 2). |
coupon | text | No | The coupon code associated with a product (e.g. SUMMER_SALE13). |
position | integer | No | The product's position in a list or collection (e.g. 2). |
Promotion Data
Represents information about a promotion that has been viewed. It is referred to a promoFieldObject and contains the following values:
| Key | Value Type | Required | Description |
|---|---|---|---|
id | text | Yes* | The promotion ID (e.g. PROMO_1234). *Either this field or name must be set. |
name | text | Yes* | The name of the promotion (e.g. Summer Sale). *Either this field or id must be set. |
creative | text | No | The creative associated with the promotion (e.g. summer_banner2). |
position | text | No | The position of the creative (e.g. banner_slot_1). |
Action Data
Represents information about an ecommerce related action that has taken place. It is referred to as an actionFieldObject and contains the following values:
| Key | Value Type | Required | Description |
|---|---|---|---|
id | text | Yes* | The transaction ID (e.g. T1234). *Required if the action type is purchase or refund. |
affiliation | text | No | The store or affiliation from which this transaction occurred (e.g. Google Store). |
revenue | currency | No | Specifies the total revenue or grand total associated with the transaction (e.g. 11.99). This value may include shipping, tax costs, or other adjustments to total revenue that you want to include as part of your revenue calculations. Note: if revenue is not set, its value will be automatically calculated using the product quantity and price fields of all products in the same hit. |
tax | currency | No | The total tax associated with the transaction. |
shipping | currency | No | The shipping cost associated with the transaction. |
coupon | text | No | The transaction coupon redeemed with the transaction. |
list | text | No | The list that the associated products belong to. Optional. |
step | integer | No | A number representing a step in the checkout process. Optional on checkout actions. |
option | text | No | Additional field for checkout and checkout_option actions that can describe option information on the checkout page, like selected payment method. |
Product and Promotion Actions
Actions specify how to interpret product and promotion data that you send to Google Analytics.
| Action | Description |
|---|---|
click | A click on a product or product link for one or more products. |
detail | A view of product details. |
add | Adding one or more products to a shopping cart. |
remove | Remove one or more products from a shopping cart. |
checkout | Initiating the checkout process for one or more products. |
checkout_option | Sending the option value for a given checkout step. |
purchase | The sale of one or more products. |
refund | The refund of one or more products. |
promo_click | A click on an internal promotion. |
Implementation
The following sections describe how to implement the enhanced ecommerce plug-in to measure ecommerce activity on a website with the analytics.js library.
Load the Ecommerce Plugin
To reduce the size of the analytics.js library, enhanced ecommerce tracking is not provided in the default library. Instead it is provided as a plugin module that must be loaded before being used.
To load the enhanced ecommerce plugin, use the following command:
ga('require', 'ec');
This command must occur after you create your tracker object and before you use any of the enhanced ecommerce specific functionality.
Sending Enhanced Ecommerce Data
Once loaded, a couple of new commands specific to enhanced ecommerce tracking will be added to the default tracker and you can begin sending ecommerce data.
- Measuring Ecommerce Activities
- Measuring Transactions
- Measuring Refunds
- Measuring the Checkout Process
- Measuring Internal Promotions
Note: Ecommerce data can only be sent with an existing hit, for example a pageview or event. If you use ecommerce commands but do not send any hits, or the hit is sent before the ecommerce command then the ecommerce data will not be sent.
Measuring Ecommerce Activities
A typical enhanced ecommerce implementation will measure product impressions, and any of the following actions:
- Clicks on a product link.
- Viewing product details.
- Impressions and clicks of internal promotions.
- Adding / removing a product from a shopping cart.
- Initiating the checkout process for a product.
- Purchases and refunds.
Measuring Impressions
Product impressions are measured using the ec:addImpression command. Details about the product are added in an impressionFieldObject.
For example, the following code measures the impression of a product in a list of search results:
ga('ec:addImpression', { // Provide product details in an impressionFieldObject.
'id': 'P12345', // Product ID (string).
'name': 'Android Warhol T-Shirt', // Product name (string).
'category': 'Apparel/T-Shirts', // Product category (string).
'brand': 'Google', // Product brand (string).
'variant': 'Black', // Product variant (string).
'list': 'Search Results', // Product list (string).
'position': 1, // Product position (number).
'dimension1': 'Member' // Custom dimension (string).
});
An impressionFieldObject must have a name or id value. All other values are optional and don't need to be set.
Measuring Actions
Actions are measured by using the ec:addProduct command with a productFieldObject to add product details, and the ec:setAction command to specify the action being performed.
For example, the following code measures a click on a product link displayed in a list of search results:
ga('ec:addProduct', { // Provide product details in a productFieldObject.
'id': 'P12345', // Product ID (string).
'name': 'Android Warhol T-Shirt', // Product name (string).
'category': 'Apparel', // Product category (string).
'brand': 'Google', // Product brand (string).
'variant': 'Black', // Product variant (string).
'position': 1, // Product position (number).
'dimension1': 'Member' // Custom dimension (string).
});
ga('ec:setAction', 'click', { // click action.
'list': 'Search Results' // Product list (string).
});
A productFieldObject must have a name or id value. All other values are optional and don't need to be set.
Combining Impressions and Actions
In cases where you have both product impressions and an action, it is possible to combine and measure this in a single hit.
The example below shows how to measure a product detail view with a related products section:
// The impression from a Related Products section.
ga('ec:addImpression', { // Provide product details in an impressionFieldObject.
'id': 'P12345', // Product ID (string).
'name': 'Android Warhol T-Shirt', // Product name (string).
'category': 'Apparel/T-Shirts', // Product category (string).
'brand': 'Google', // Product brand (string).
'variant': 'Black', // Product variant (string).
'list': 'Related Products', // Product list (string).
'position': 1 // Product position (number).
});
// The product being viewed.
ga('ec:addProduct', { // Provide product details in an productFieldObject.
'id': 'P67890', // Product ID (string).
'name': 'YouTube Organic T-Shirt', // Product name (string).
'category': 'Apparel/T-Shirts', // Product category (string).
'brand': 'YouTube', // Product brand (string).
'variant': 'gray', // Product variant (string).
'position': 2 // Product position (number).
});
ga('ec:setAction', 'detail'); // Detail action.
Measuring Transactions
Measure a transaction by using the ec:setAction command and setting the action type to purchase. Transaction level details like total revenue, tax, and shipping are provided in an actionFieldObject:
ga('ec:addProduct', { // Provide product details in an productFieldObject.
'id': 'P12345', // Product ID (string).
'name': 'Android Warhol T-Shirt', // Product name (string).
'category': 'Apparel', // Product category (string).
'brand': 'Google', // Product brand (string).
'variant': 'black', // Product variant (string).
'price': '29.20', // Product price (currency).
'coupon': 'APPARELSALE', // Product coupon (string).
'quantity': 1 // Product quantity (number).
});
ga('ec:setAction', 'purchase', { // Transaction details are provided in an actionFieldObject.
'id': 'T12345', // (Required) Transaction id (string).
'affiliation': 'Google Store - Online', // Affiliation (string).
'revenue': '37.39', // Revenue (currency).
'tax': '2.85', // Tax (currency).
'shipping': '5.34', // Shipping (currency).
'coupon': 'SUMMER2013' // Transaction coupon (string).
});
An actionFieldObject must have an id value if the action type is purchase or refund. All other values are optional and don't need to be set.
Measuring Refunds
To refund an entire transaction, set a refund action and provide the transaction ID:
// Refund an entire transaction.
ga('ec:setAction', 'refund', {
'id': 'T12345' // Transaction ID is only required field for full refund.
});
If a matching transaction is not found, the refund hit will not be processed.
To measure a partial refund, set a refund action and specify the transaction ID, product ID(s), and product quantities to be refunded:
// Refund a single product.
ga('ec:addProduct', {
'id': 'P12345', // Product ID is required for partial refund.
'quantity': 1 // Quantity is required for partial refund.
});
ga('ec:setAction', 'refund', {
'id': 'T12345', // Transaction ID is required for partial refund.
});
Important: Transactions may only be refunded in Google Analytics within 6 months of the original reported transaction date. Transactions must have been sent in the new Enhanced Ecommerce format. If you are using filters to modify the transaction ID, send the refund with the original unfiltered transaction ID.
Using Non-Interaction Events for Refunds
If you need to send refund data using an event and the event is not part of normally measured onsite behavior (i.e. not user initiated), then it’s recommended that you send a non-interaction event. This will prevent metrics such as bounce rate, time on site, etc. from being affected by the event. For example:
ga('send', 'event', 'Ecommerce', 'Refund', {'nonInteraction': 1});
You can measure refunds in only views (profiles) that have enabled Enhanced Ecommerce. You can't measure refunds in traditional Ecommerce.
Measuring the Checkout Process
To measure each step in a checkout process:
- Add tracking code to measure each step of the checkout process.
- If applicable, add tracking code to measure checkout options.
- Optionally set user-friendly step names for the checkout funnel report by configuring Ecommerce Settings in the admin section of the web interface.
1. Measuring Checkout Steps
For each step in your checkout process, you’ll need to implement the corresponding tracking code to send data to Google Analytics.
Step Field
For each checkout step that you measure you should include a step value. This value is used to map your checkout actions to the labels you configured for each step in Ecommerce Settings.
Note: If you have a single step checkout process or if you have not configured a checkout-funnel in Ecommerce Settingsthen the step field is optional.
Option Field
If you have additional information about the given checkout step at the time the step is measured, you can set the option field with a checkout action to capture this information. For example, the default payment type for the user (e.g. ‘Visa’).
Measuring a Checkout Step
To measure a checkout step, use ec:addProduct for each product, and ec:setAction indicate a checkout. If applicable, ec:setAction can take an additional actionFieldObject to describe the checkout step with a step and an option.
The following example shows how to measure the first step of a checkout process, with a single product, and some additional information about the payment type:
ga('ec:addProduct', { // Provide product details in an productFieldObject.
'id': 'P12345', // Product ID (string).
'name': 'Android Warhol T-Shirt', // Product name (string).
'category': 'Apparel', // Product category (string).
'brand': 'Google', // Product brand (string).
'variant': 'black', // Product variant (string).
'price': '29.20', // Product price (currency).
'quantity': 1 // Product quantity (number).
});
// Add the step number and additional info about the checkout to the action.
ga('ec:setAction','checkout', {
'step': 1,
'option': 'Visa'
});
2. Measuring Checkout Options
Checkout options allow you to measure additional information about the state of the checkout. This is useful in cases where you’ve measured a checkout step during the initial pageview but additional information about the same checkout step is available after a user selected option has been set. For example, the user selects a shipping method.
To measure a checkout option, use ec:setAction to indicate a checkout_option and include the step number, and the option description.
Note: You should not set any product or impression data.
You’ll likely want to measure this action once the user has clicked to move on to the next step in the checkout process. For example:
// (On "Next" button click)
ga('ec:setAction', 'checkout_option', {'step': 2, 'option': 'FedEx'});
ga('send', 'event', 'Checkout', 'Option', {
hitCallback: function() {
// advance to next page
},
});
3. Checkout Funnel Configuration
Each step in your checkout process can be given a descriptive name that will be used in reports. To configure these names, visit the Admin section of the Google Analytics Web Interface, select the view (profile) and click on Ecommerce Settings. Follow the Ecommerce set-up instructions to label each checkout step you intend to track.
Note: If you do not configure check step names, they will appear simply as Step 1, 2, 3, etc.
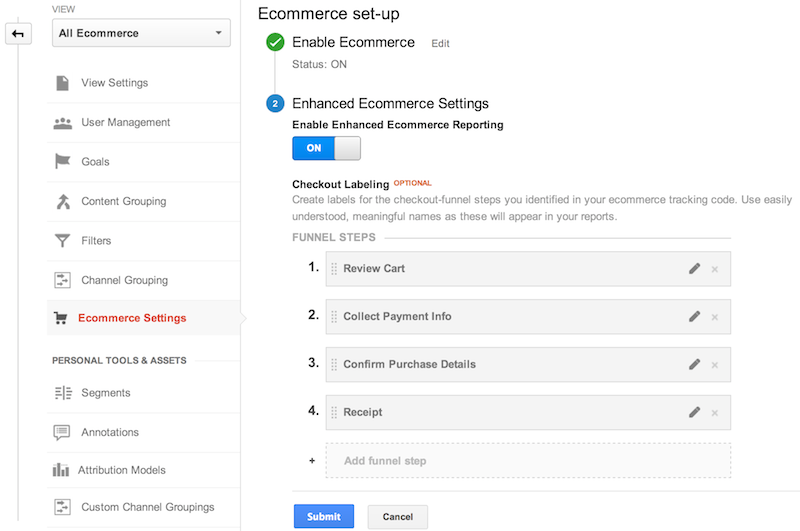
Figure 1: Ecommerce Setup - Checkout Funnel
Measuring Internal Promotions
The enhanced ecommerce plug-in includes support for measuring impressions and clicks of internal promotions, such as banners displayed to promote a sale on another section of a website.
Promotion Impressions
Internal promotion impressions are generally measured when the page loads and are sent with the initial pageview using the ec:addPromo command. For example:
ga('ec:addPromo', { // Promo details provided in a promoFieldObject.
'id': 'PROMO_1234', // Promotion ID. Required (string).
'name': 'Summer Sale', // Promotion name (string).
'creative': 'summer_banner2', // Creative (string).
'position': 'banner_slot1' // Position (string).
});
Important: Although it is acceptable to set an action with a promotion impression, the action cannot be a promo_click. If you intend to measure a promo_click action it should be done in a separate hit, after the promotion impression.
Promotion Clicks
Clicks on internal promotions can be measured by setting the promo_click action. For example:
// Identify the promotion that was clicked.
ga('ec:addPromo', {
'id': 'PROMO_1234',
'name': 'Summer Sale',
'creative': 'summer_banner2',
'position': 'banner_slot1'
});
// Send the promo_click action with an event.
ga('ec:setAction', 'promo_click');
ga('send', 'event', 'Internal Promotions', 'click', 'Summer Sale');
Important: You should not send product data with promo clicks. If you need to send product data it should be done with a separate hit.
For example, to measure a product detail page with an impression and a promo click, first send product and impression data with the initial pageview, then send promo click data in a separate event:
// 1. Send product and impression data with pageview.
ga('ec:addProduct', {
'id': 'P12345', // Product ID (string).
'name': 'Android Warhol T-Shirt', // Product name (string).
'category': 'Apparel', // Product category (string).
'brand': 'Google', // Product brand (string).
'variant': 'Black', // Product variant (string).
'position': 1, // Product position (number).
});
// The impression from the Related Products section.
ga('ec:addImpression', {
'id': 'P12345', // Product ID (string).
'name': 'Android Warhol T-Shirt', // Product name (string).
'category': 'Apparel/T-Shirts', // Product category (string).
'brand': 'Google', // Product brand (string).
'variant': 'Black', // Product variant (string).
'list': 'Related Products', // Product list (string).
'position': 1, // Product position (number).
});
ga('ec:setAction', 'detail'); // Detail action.
ga('send', 'pageview'); // Send the product data with initial pageview.
// 2. Send the promo click data when the promo click occurs.
// Call this function when promo click occurs.
function onPromoClick() {
ga('ec:addPromo', {
'id': 'PROMO_1234',
'name': 'Summer Sale',
'creative': 'summer_banner2',
'position': 'banner_slot1'
});
// Send the promo_click action with an event.
ga('ec:setAction', 'promo_click');
ga('send', 'event', 'Internal Promotions', 'click', 'Summer Sale');
}
A promoFieldObject must have a name or id value. All other values are optional and don't need to be set.
Complete Example
The code snippets below show how the ecommerce lifecycle of a single product can be measured from initial impression to transaction using the enhanced ecommerce plug-in.
Measuring a Product Impression
In this example, a user first views the product in a list of search results. To measure this product impression, use the ec:addImpression command and provide the product details in an impressionFieldObject:
ga('create', 'UA-XXXXX-Y');
ga('require', 'ec');
ga('ec:addImpression', {
'id': 'P12345', // Product details are provided in an impressionFieldObject.
'name': 'Android Warhol T-Shirt',
'category': 'Apparel/T-Shirts',
'brand': 'Google',
'variant': 'black',
'list': 'Search Results',
'position': 1 // 'position' indicates the product position in the list.
});
ga('ec:addImpression', {
'id': 'P67890',
'name': 'YouTube Organic T-Shirt',
'category': 'Apparel/T-Shirts',
'brand': 'YouTube',
'variant': 'gray',
'list': 'Search Results',
'position': 2
});
ga('send', 'pageview'); // Send product impressions with initial pageview.
Measuring a Product Click
Next, a user expresses interest in this particular product by clicking on the product listing to view more details.
To measure that product click, use ec:addProduct and ec:setAction:
// Called when a link to a product is clicked.
function onProductClick() {
ga('ec:addProduct', {
'id': 'P12345',
'name': 'Android Warhol T-Shirt',
'category': 'Apparel',
'brand': 'Google',
'variant': 'black',
'position': 1
});
ga('ec:setAction', 'click', {list: 'Search Results'});
// Send click with an event, then send user to product page.
ga('send', 'event', 'UX', 'click', 'Results', {
hitCallback: function() {
document.location = '/product_details?id=P12345';
}
});
}
The product link could then be implemented like this:
<a href="/next-page.html"
οnclick="onProductClick(); return !ga.loaded;">Android Warhol T-Shirt</a>
Measuring a Product Details View
After clicking on the product listing, a user views the product details page.
To measure this product details view, use ec:addProduct and ec:setAction to specify a detail action:
ga('create', 'UA-XXXXX-Y');
ga('require', 'ec');
ga('ec:addProduct', {
'id': 'P12345',
'name': 'Android Warhol T-Shirt',
'category': 'Apparel',
'brand': 'Google',
'variant': 'black'
});
ga('ec:setAction', 'detail');
ga('send', 'pageview'); // Send product details view with the initial pageview.
Measuring an Addition or Removal from Cart
The user expresses intent to buy the item by adding it to a shopping cart.
To measure the addition or removal of a product from a shopping cart, use ec:addProduct and set the type add orremove:
// Called when a product is added to a shopping cart.
function addToCart(product) {
ga('ec:addProduct', {
'id': product.id,
'name': product.name,
'category': product.category,
'brand': product.brand,
'variant': product.variant,
'price': product.price,
'quantity': product.qty
});
ga('ec:setAction', 'add');
ga('send', 'event', 'UX', 'click', 'add to cart'); // Send data using an event.
}
Measuring Checkout Process
Now the user is ready to begin the checkout process, which in this example includes two steps, each on separate pages:
- Add payment details (payment.html).
- Add shipping details (shipping.html).
If applicable, ensure you have properly configured a checkout-funnel in the Web Interface Admin, under Ecommerce Settings. For example:
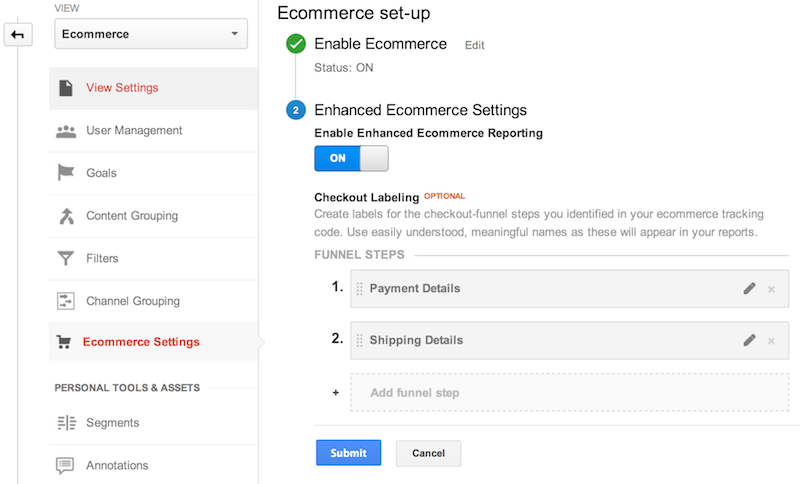
Figure 2: Ecommerce Setup - Checkout Funnel
Step 1 - Payment
To measure the first step of the checkout, use ec:addProduct for each product in the shopping cart, and ec:setAction to indicate a checkout. ec:setAction takes an actionFieldObject to describe the checkout step with a number and additional information about the default payment type for this user has been included using the option field:
ga('create', 'UA-XXXXX-Y');
ga('require', 'ec');
/**
* Called when the user begins the checkout process.
* @param {Array} cart An array representing the user's shopping cart.
*/
function checkout(cart) {
for(var i = 0; i < cart.length; i++) {
var product = cart[i];
ga('ec:addProduct', {
'id': product.id,
'name': product.name,
'category': product.category,
'brand': product.brand,
'variant': product.variant,
'price': product.price,
'quantity': product.qty
});
}
}
// In the case of checkout actions, an additional actionFieldObject can
// specify a checkout step and option.
ga('ec:setAction','checkout', {
'step': 1, // A value of 1 indicates this action is first checkout step.
'option': 'Visa' // Used to specify additional info about a checkout stage, e.g. payment method.
});
ga('send', 'pageview'); // Pageview for payment.html
Step 2 - Shipping
To measure the second step of the checkout, use ec:addProduct for each product in the shopping cart, and ec:setAction to indicate a checkout. In this case we don’t have additional information about the shipping option selected when the initial pageview is sent so this will be handled separately using the ec:setAction to indicate acheckout_option.
Measure checkout step 2:
ga('create', 'UA-XXXXX-Y');
ga('require', 'ec');
/**
* Called when the user begins the checkout process.
* @param {Array} cart An array representing the user's shopping cart.
*/
function checkout(cart) {
for(var i = 0; i < cart.length; i++) {
var product = cart[i];
ga('ec:addProduct', {
'id': product.id,
'name': product.name,
'category': product.category,
'brand': product.brand,
'variant': product.variant,
'price': product.price,
'quantity': product.qty
});
}
}
ga('ec:setAction','checkout', {'step': 2});
ga('send', 'pageview'); // Pageview for shipping.html
// Called when user has completed shipping options.
function onShippingComplete(stepNumber, shippingOption) {
ga('ec:setAction', 'checkout_option', {
'step': stepNumber,
'option': shippingOption
});
ga('send', 'event', 'Checkout', 'Option', {
hitCallback: function() {
// Advance to next page.
}
});
}
The form could then be implemented like this:
<a href="/next-page.html"
οnclick="onShippingComplete(2, 'FedEx'); return !ga.loaded;">Continue</a>
Measuring a Transaction
Lastly, the user completes the checkout process and submits their purchase.
To measure the sale of one or more products, use ec:addProduct to add each product, then ec:setAction to specify a purchase. Transaction level information like total revenue, tax, etc. can be specified via an actionFieldObject. For example:
ga('create', 'UA-XXXXX-Y');
ga('require', 'ec');
ga('ec:addProduct', {
'id': 'P12345',
'name': 'Android Warhol T-Shirt',
'category': 'Apparel',
'brand': 'Google',
'variant': 'black',
'price': '29.20',
'quantity': 1
});
// Transaction level information is provided via an actionFieldObject.
ga('ec:setAction', 'purchase', {
'id': 'T12345',
'affiliation': 'Google Store - Online',
'revenue': '37.39',
'tax': '2.85',
'shipping': '5.34',
'coupon': 'SUMMER2013' // User added a coupon at checkout.
});
ga('send', 'pageview'); // Send transaction data with initial pageview.
Specifying Local Currencies
By default, you can configure a common, global, currency for all transactions and items through the Google Analytics management web interface. By default, the global currency is used for all items and transactions. For websites that conduct transactions in multiple currencies, the ecommerce plugin allows you to specify the local currency of the transaction.
The local currency must be specified in the ISO 4217 standard. Read the Currency Codes Reference document for a complete list of supported conversion currencies.
Local currencies are specified using the currencyCode tracker property. For example, this tracker will send currency values as Euros:
ga('create', 'UA-XXXXX-Y');
ga('require', 'ec');
ga('set', 'currencyCode', 'EUR'); // Set tracker currency to Euros.
ga('ec:addProduct', {
'id': 'P12345',
'name': 'Android Warhol T-Shirt',
'category': 'Apparel',
'brand': 'Google',
'variant': 'black',
'price': '21.89',
'quantity': 1
});
ga('ec:setAction', 'purchase', {
id: 'T12345',
affiliation: 'Google Store - Online',
revenue: '28.03',
tax: '2.14',
shipping: '4.00',
coupon: 'SUMMER2013'
});
ga('send', 'pageview');
To learn more about how currency conversion works in Google Analytics, read the Multiple Currencies section in the ecommerce feature reference.
Enhanced Link Attribution
Enhanced Link Attribution improves the accuracy of your In-Page Analytics report by automatically differentiating between multiple links to the same URL on a single page by using link element IDs.
Usage
To use the enhanced link attribution feature:
- Enable enhanced link attribution in the Admin UI of your Google Analytics account.
- Update your tracking code on each page to load the enhanced link attribution plug-in (called "linkid").
The following code shows how to load the enhanced link attribution plugin:
ga('create', 'UA-XXXXX-Y', 'auto');
ga('require', 'linkid');
ga('send', 'pageview');
Note: for the most accurate link attribution, each of the links on your page should have a unique element ID.
Customizing enhanced link attribution
The enhanced link attribution plug-in differentiates between links to the same URL using the element IDs of a link or a parent element, as well as a cookie. You can customize how far up the DOM the plug-in will look for an element ID, as well as the behavior of this cookie, by providing configuration options when loading the plug-in.
Here are the available options and their defaults:
| Option | Value Type | Default | Description |
|---|---|---|---|
cookieName | string | _gali | The name of the cookie |
duration | number | 30 | The maximum duration (in seconds) the cookie should be save for |
levels | number | 3 | The maximum number of levels in the DOM to look to find an existing ID. For example, the following links do not contain ID attributes, but the <ul id="sidebar"> <li><a href="/">Home</a></li> <li><a href="/about">About</a></li> <li><a href="/contact">Contact Us</a></li> </ul> If the |
The following example shows how to specify custom configuration options when using the enhanced link attribution plugin:
ga('create', 'UA-XXXXX-Y', 'auto');
ga('require', 'linkid', {
'cookieName': '_ela',
'duration': 45,
'levels': 5
});
ga('send', 'pageview');
Linker
The linker plugin simplifies the process of implementing cross-domain tracking as described in the Cross-domain Tracking guide for analytics.js.
Important: for cross-domain tracking to work properly, you must ensure all domains are included in the Referral Exclusion list as described in the cross-domain tracking guide.
Overview
Cross-domain tracking works by sharing a unique client ID between a source domain and a destination domain. This is a two step process:
- The source domain needs to ensure all URLs pointing to the destination domain contain the client ID of the source domain.
- The destination domain needs to know to check for the presence of a client ID in the URL once a user navigates there.
The linker plugin accomplishes this by adding a linker parameter to URLs that point to the destination domain. The linker parameter contains the client ID as well as the current timestamp and browser metadata encoded within it. The timestamp and metadata are used to avoid problems with URL sharing.
The linker parameter will look something like this:
_ga=1.199239214.1624002396.1440697407
On the destination domain, the allowLinker field is provided, which when true instructs analytics.js to check for a linker parameters in the URL. If the linker parameter is found and is valid, it extracts the client ID from the parameter and stores it.
The Linker plugin allows both automatic and manual adding of the linker parameter to URLs in links and forms on the page. In most cases, the automatic way is recommended.
Automatically adding linker parameters
To set up cross-domain auto linking on the source domain for URLs pointing to the destination domain you must requirethe linker plugin and call its autoLink method.
autoLink
The autoLink method can be called via the command queue.
Once run, analytics.js will listen for clicks on links that point to the destination domain (or domains) and add the linker parameter to those links immediately prior to navigation starting. Waiting until a user clicks a link to add the linker parameter is necessary because linker parameters expire after two minutes.
The optional decorateForms parameter should be specified and set to true if you have forms on your site that point to the destination domain.
Usage
ga('[trackerName.]linker:autoLink', domains, [useAnchor], [decorateForms]);
Parameters
| Name | Type | Required | Description |
|---|---|---|---|
domains | Array[RexExp|string] | yes | An array of strings or regular expressions to match against a URL's hostnameindicating which domains auto linking should apply to. If a string is passed, analytics.js will perform a substring match, meaning example.com will match links pointing to blog.example.com. |
useAnchor | boolean | no | When true, the linker parameter will be added to the anchor portion of the URL rather than the query portion. |
decorateForms | boolean | no | When true, the linker plugin will add a linker parameter to form submissions that point to destinations matching the domain parameter. |
Note: useAnchor is not supported for forms because IE v6 to v11 and Edge strip off anchors in forms.
Example
// Loads the Linker plugin
 ga('require', 'linker');

 // Instructs the Linker plugin to automatically add linker parameters
 // to all links and forms pointing to the domain "destination.com".
 ga('linker:autoLink', ['destination.com'], false, true);
Note: The autoLink method does not add linker parameters to iframes. For strategies to implement cross-domain tracking in iframes, see the Cross-domain tracking guide.
Manually adding linker parameters
You can manually add the linker parameter to a particular <a> or <form> element via the decorate method. This method is only needed when not using the autoLink method described above.
decorate
The decorate method can be called via the command queue.
It's important to make sure the decorate method is called as close to when the navigation will occur as possible because linker parameters expire after two minutes. Most of the time this method should be called in an event handler.
Usage
ga('[trackerName.]linker:decorate', element, [useAnchor]);
Parameters
| Name | Type | Required | Description |
|---|---|---|---|
element | HTMLElement | yes | The <a> or <form> element to append the linker parameter to. |
useAnchor | boolean | no | When true, the linker parameter will be added to the anchor portion of the URL rather than the query portion. |
Example
// Loads the Linker plugin
 ga('require', 'linker');

 // Gets a reference to a link pointing to an external domain.
 var destinationLink = document.getElementById('destination-link');

 // Adds click handler that decorates `destinationLink`.
 destinationLink.addEventListener('click', function() {
   ga('linker:decorate', destinationLink);
 });
linkerParam
In addition to the decorate method, you can manually get the linker parameter that a tracker will use via the linkerParam field.
ga(function(tracker) {
   var linkerParam = tracker.get('linkerParam');
 });
Configuring a site to accept linker parameters
Once a user arrives at a page on the destination domain with a linker parameter in the URL, analytics.js needs to know to look for that parameter.
You can instruct the destination page to look for linker parameters by setting the allowLinker field to true when creating the tracker:
ga('create', 'UA-XXXXXX-X', 'auto', {
   allowLinker: true
 });
Bi-directional cross-domain tracking
A user flow where users always start on the source domain and only afterward move to the destination domain in considered single-directional cross-domain tracking. The instructions above assume this type of user flow.
In cases where it's not known which domain your users will visit first, you must implement bi-directional cross-domain tracking, where each domain is configured to work as the source or the destination.
To implement bi-directional cross-domain tracking, you enable auto linking on both domains and configure them both to accept linker parameters.
On source.com:
ga('create', 'UA-XXXXX-Y', 'auto', {allowLinker: true});
 ga('require', 'linker');
 ga('linker:autoLink', ['destination.com']);
On destination.com:
ga('create', 'UA-XXXXX-Y', 'auto', {allowLinker: true});
 ga('require', 'linker');
 ga('linker:autoLink', ['source.com']);
Using a single snippet on all domains
To simplify this further, you can list all possible domains you want to track in the autoLink method, allowing you to use the same snippet of code on every domain:
ga('create', 'UA-XXXXX-Y', 'auto', {allowLinker: true});
 ga('require', 'linker');
 ga('linker:autoLink', ['source.com', 'destination.com']);
Experiments
This guide describes how to use content experiments with analytics.js.
Overview
The Google Analytics Content Experiments Framework enables you to test almost any change or variation to a property to see how it performs in optimizing a specific goal. For example, increasing goal completions or decreasing bounce rates. This allows you to identify changes worth implementing based on the direct impact they have on the performance of your website.
This document is intended for users with advanced requirements and developers that want to integrate Google Analytics experiments into their service as described in the Experiments Feature Reference.
Standard Implementation
If you're just getting started with Content Experiments then you should consider using the standard implementation for your website. Most of the implementation steps can be completed with the Google Analytics web interface and it will provide the necessary JavaScript code that will work with the analytics.js library.
This implementation uses client-side redirects to show users the variation chosen for them. Visit the Google Analytics help center to learn about the benefits of experiments and how to implement experiments on your website. To learn more read:
- Benefits of Experiments (Help Center) — an overview of content experiments and what you can do with them.
- Run an Experiment (Help Center) — learn how to prepare, configure, and track the progress of experiments.
Browser-only Implementation
For implementations where variation choices are made client-side in the browser, the Content Experiments JavaScript API can be used to perform most of the work associated with selecting a variation and storing experiment values for a user when using the analytics.js library.
This type of implementation is often used when you are testing changes by altering the DOM/CSS of a page using JavaScript. In other words, all variation decisions and changes per user are made client-side in the browser. For example, you might run an experiment to test variations of:
- Images on the page.
- Button colors.
- Font size.
- Page content.
To choose a variation for a user, the following steps need to be executed each time a user is exposed to an experiment:
- Load the Content Experiments JavaScript API client using the
experimentquery parameter to specify the ID of the experiment running on the page - Call the
chooseVariationmethod. - Evaluate the return value from the
chooseVariationmethod and take the appropriate action. (e.g. change the image, button color, etc.) - Load the analytics.js library and send at least one hit to Google Analytics (e.g. pageview, event, etc.).
Caution: Choosing a variation does not actually send any data to Google Analytics. You will need to ensure that after choosing a variation, at least one hit is sent to Google Analytics, such as a pageview, event, etc.
Example
The following is a simple example that will choose a variation for each user and show the corresponding image.
<html>
<head>
<!-- 1. Load the Content Experiments JavaScript Client -->
<script src="//www.google-analytics.com/cx/api.js?experiment=YByMKfprRCStcMvK8zh1yw"></script>
<script>
var image_variations = [
'original.png',
'variation1.png',
'variation2.png'
]
// 2. Choose the Variation for the User
var variation = cxApi.chooseVariation();
window.onload = function(){
// 3. Evaluate the result and update the image
exp_image = document.getElementById('hero_image');
exp_image.src = image_variations[variation];
}
</script>
<!-- 4. Load analytics.js and send a hit to Google Analytics -->
<script>
(function(i,s,o,g,r,a,m){i['GoogleAnalyticsObject']=r;i[r]=i[r]||function(){
(i[r].q=i[r].q||[]).push(arguments)},i[r].l=1*new Date();a=s.createElement(o),
m=s.getElementsByTagName(o)[0];a.async=1;a.src=g;m.parentNode.insertBefore(a,m)
})(window,document,'script','https://www.google-analytics.com/analytics.js','ga');
ga('create', 'UA-XXXXX-Y', 'auto');
ga('send', 'pageview');
</script>
</head>
<body>
<h1>Welcome</h1>
<img id="hero_image"/>
<p>Welcome to my experiment!</p>
</body>
</html>
Server-side Implementation
This type of implementation is often used to:
- Run experiments for websites with dynamic content.
- Test non-UI changes that still have an affect on your objective. For example, a database query result set that is returned to a user.
- Integrate Google Analytics experiments with your service (e.g. Content Management provider).
- Manage experiments using your own optimization platform.
In this case the variation choice is performed on the server, but the browser is ultimately where the variation is displayed to the user, and this is also from where the analytics.js library sends data to Google Analytics. So coordination is required between server and client to properly send experiment data to Google Analytics for users that are exposed to an experiment.
The values to send to Google Analytics are:
- Experiment ID — the ID of the experiment the user has been exposed to.
- Chosen Variation — The index of the variation shown to the user.
For details on how to determine the experiment ID and chosen variation, see the Experiments feature reference.
You can use the analytics.js set method to report to Google Analytics which variation was shown to the user.
To set the experiment values, the following steps need to be executed each time a user is exposed to an experiment and shown a variation:
- Load the analytics.js library.
- Set the Experiment ID
expId. - Set the Experiment Variant
expVarto the chosen variation. - Send at least one hit to Google Analytics (e.g. pageview, event, etc.).
You should use server logic to dynamically write the required JavaScript to set the experiment ID and variation number to the final page shown to the user. This will ensure that when the variation page is rendered in the user's browser, the experiment values for the user are set and then sent to Google Analytics with the hit from analytics.js.
Example
Typically for each user you would determine on the server if there is an experiment running on the page and if so which variation to show the user. However, in the PHP example below, the experiment id and variation number are defined at the start of the page for simplicity.
<?php
// The Id of the experiment running on the page
$experimentId = 'YByMKfprRCStcMvK8zh1yw';
// The variation chosen for the user
$chosenVariation= 2;
?>
With the experiment ID and variation chosen for the user, the next step is to include some logic to dynamically write the experiment data into the JavaScript string required to set experiment values:
<html>
<head>
<script>
// 1. Load analytics.js -->
(function(i,s,o,g,r,a,m){i['GoogleAnalyticsObject']=r;i[r]=i[r]||function(){
(i[r].q=i[r].q||[]).push(arguments)},i[r].l=1*new Date();a=s.createElement(o),
m=s.getElementsByTagName(o)[0];a.async=1;a.src=g;m.parentNode.insertBefore(a,m)
})(window,document,'script','https://www.google-analytics.com/analytics.js','ga');
ga('create', 'UA-XXXXX-Y', 'auto');
// 2. Set the chosen variation for the User (Dynamically in this case) -->
<?php
<<<HTML
ga('set', 'expId', '$experimentId'); // The id of the experiment the user has been exposed to.
ga('set', 'expVar', '$chosenVariation'); // The index of the variation shown to the user.
HTML;
?>
// 3. Send a pageview hit to Google Analytics.
ga('send', 'pageview');
</script>
</head>
<!-- Begin body -->
Once the PHP script is done executing, the experiment values will be printed to the page. Once the JavaScript on the page is rendered in the browser, all the experiment values will be set and then sent with the pageview hit from the analytics.js library.
Note: Setting the experiment values does not actually send any data to Google Analytics. You will need to ensure that after setting the experiment values, at least one hit is sent to Google Analytics, such as a pageview, event, etc.
Content Experiments JavaScript API Reference
The Content Experiments JavaScript API can be used to:
- Choose a variation for a user — For client-side implementations, this API provides an easy way to select an experiment variation for a new user or get the variation for which the user has already been exposed.
- Set the chosen variation for a user — This is useful when handling experiment choices server-side and you want to report the chosen variation to Google Analytics from the client.
- Get the chosen variation for a user — Retrieve a previously stored chosen variation for a user.
Loading the API Client
To load the Content Experiments JavaScript API client on an experiment page, you add a snippet of JavaScript to the page:
<script src="//www.google-analytics.com/cx/api.js"></script>
or you can use an experiment query parameter to specify an experiment ID and load information for that experiment.
<script src="//www.google-analytics.com/cx/api.js?experiment=YByMKfprRCStcMvK8zh1yw"></script>
You should specify the experiment id when loading the client if you plan to use the chooseVariation method. If you choose variations server-side and do not plan to use the chooseVariation method, then you should load the client without specifying an experiment ID to take advantage of the performance gain due to browser caching of the script.
The client loads synchronously and creates a global object named cxApi. Developers use the cxApi object to choose variations, and set and get experiment values.
cxApi Object Constants
There are three constants used to define common variations:
cxApi.ORIGINAL_VARIATION– To indicate the original content of an experiment.cxApi.NO_CHOSEN_VARIATION– To indicate that no variation has been chosen for the user.cxApi.NOT_PARTICIPATING– To indicate the user is not participating in the experiment.
cxApi Object Methods
chooseVariation
Chooses a variation for the user.
If the user is already part of the experiment, chooseVariation will return the variation number to which the user has already been exposed (unless the experiment is over or that variation is disabled, in which case, it'll returncxApi.ORIGINAL_VARIATION, specifying the original). If the user is new to the experiment, it will determine whether to include the user in the experiment based on the configured participation rate. If the user is included then it'll use the experiment weights to randomly select a variation for the user and write the value to a cookie.
chooseVariation simplifies the process of determining which variation to show a user. It will always return a variation even if the user isn't included in the experiment, in which case it will return cxApi.ORIGINAL_VARIATION. In comparison, the getChosenVariation tells you which variation was previously chosen for a user, including whether no variation has been chosen for the user or if the user is excluded from the experiment
Note: To use the chooseVariation method requires that you specify the ID of the experiment when loading the client.
cxApi.chooseVariation();
Returns
Integer– The index of the chosen variation.
Examples
Choose the variation to show the user:
variationNumber = cxApi.chooseVariation();
setChosenVariation
Sets the variation that has been chosen for the user exposed to an experiment and writes the values to a cookie.
cxApi.setChosenVariation(chosenVariation, opt_experimentId);
Parameters
Integer chosenVariation– The index of the variation shown to the user, orcxApi.NOT_PARTICIPATING.String opt_experimentId– The experiment id for which to set the chosen variation. If not provided, uses the first experiment specified when loading the client.
Examples
Set the chosen variation for the user:
cxApi.setChosenVariation(2, ‘YByMKfprRCStcMvK8zh1yw’);
Set the chosen variation for the user when the experiment ID is specified during client load:
cxApi.setChosenVariation(2);
getChosenVariation
If it is available, gets the previously chosen variation for the user.
cxApi.getChosenVariation(opt_experimentId);
Parameters
String opt_experimentId– The experiment id for which to get the chosen variation. If not provided, uses the first experiment specified when loading the client.
Returns
Integer– The index of the chosen variation for the user. IfcxApi.NO_CHOSEN_VARIATIONis returned, this indicates that the user is new to the new experiment and you will need to determine what to do with the user (e.g. choose a variation). IfcxApi.NOT_PARTICIPATINGis returned, this indicates a returning user that was not chosen to be included in the experiment.
Examples
Get the chosen variation for the user:
variationNumber = cxApi.getChosenVariation(‘YByMKfprRCStcMvK8zh1yw’);
Get the chosen variation for the user when the experiment ID is specified during client load:
variationNumber = cxApi.getChosenVariation();
Experiment Cookies
The API includes some optional calls that customize how the cookie is saved.
setDomainName
Sets the domain name to be used when writing experiment cookies. This should be set to the same value specified for the analytics.js tracking code.
cxApi.setDomainName(domainName);
Parameters
String domainName– The domain name to use.
setCookiePath
Sets the cookie path to use when writing the experiments cookie. This should be set to the same value specified for the analytics.js tracking code.
cxApi.setCookiePath(cookiePath);
Parameters
String cookiePath– The cookie path to use.
setAllowHash
Sets the cookie domain hash setting to use when writing the experiments cookie. This should be set to the same value specified for the analytics.js tracking code.
cxApi.setAllowHash(allowHash);
Parameters
Boolean allowHash– Whether to allow domain hashing.


 2620
2620


 被折叠的 条评论
为什么被折叠?
被折叠的 条评论
为什么被折叠?
 到【灌水乐园】发言


