


目标ROI提取案例
背景
⛳️ 最近看到一个小伙伴询问一个图片roi提取的问题,我觉得这个案例虽然不难,但是可以很好的结合此前opencv基础知识的分享,因此分享给大家一起学习探讨。
问题:
✔️ 需要在下面的图片中提取出圆形的内容,并且单独保存roi截图。
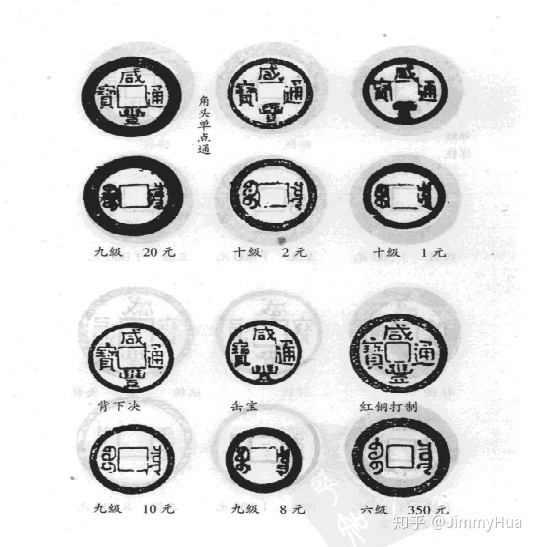
☝️ 想法:
✔️ 看到这个问题时,当时有3个想法,分别是:
- 霍夫曼圆检测
- 轮廓筛选提取
- 连通组件提取
✔️ 认真看图时,发现图片的圆并不是很圆,这样使用霍夫曼检测,在画外接矩形的时候会产生大量的非roi区域,这样效果就不是很好,因此,下面针对轮廓和连通组件方法进行分析。
方案
轮廓检测提取
基础储备:
轮廓相关的基础知识可以参考: OpenCV图像处理-轮廓和轮廓特征。
方案构想:
- 读取图像,转灰度;
- 二值化,高斯模糊,开运算+闭运算,减少噪点影响;
- Canny 算子提取边缘;
- 使用
cv2.findContours提取轮廓; - 分析轮廓的Area,设置阈值,提取出目标轮廓
- 根据轮廓找到外接矩形,保存矩形 x,y,w,h,提取ROI
连通组件提取
基础储备:
连通相关的基础知识可以参考: OpenCV图像处理-连通组件。
方案构想:
- 读取图像,转灰度;
- 二值化,反转binary, 让前景为白色,背景为黑色;
- 使用 floodFill 填充前景图,让这些圆形饱和;
- 使用
cv2.connectedComponentsWithStats提取连通域; - 根据提取的连通域,分析,面积,筛选出符合条件的连通域;
- 针对筛选后的连通区,找到外接矩形,保存矩形 x,y,w,h,提取ROI。
Opencv的区域填充
✔️ 其实,方案二的难点在于如何填充图片中的圆形区域,这里需要采用opencv的 cv2.floodFill()方法去实现。
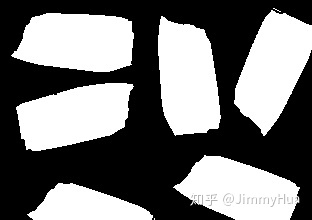
这里先用一个小例子来分析填充问题:
如下图,需要把实线区域填充。
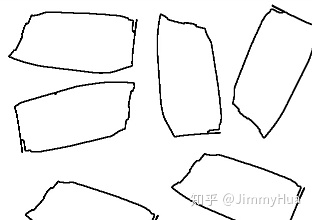
填充代码:
import cv2

# 填充函数
def fillHole(srcBw):
    temp = srcBw.copy()
    cv2.floodFill(temp, None, (0,0), 255)
    cv2.imshow('temp', temp)
    temp = cv2.bitwise_not(temp)

    return temp

img = cv2.imread("fill.png")
gray = cv2.cvtColor(img, cv2.COLOR_BGR2GRAY)
ret, th1 = cv2.threshold(gray, 0, 255, cv2.THRESH_BINARY | cv2.THRESH_OTSU )
# 反转th1, 让前景为白色,背景为黑色
th2 = cv2.bitwise_not(th1)
out = fillHole(th2)

cv2.imshow('gray', th2)
cv2.imshow('out', out)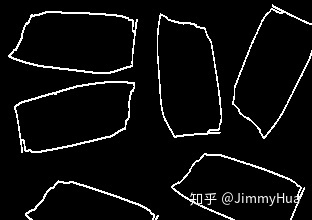
代码
连通组件提取
import cv2;
import numpy as np;
# get the front image
def fillHole(srcBw):
'''
srcBw: 二值图,前景为白色
'''
temp = srcBw.copy()
# Floodfill from point (0, 0)
cv2.floodFill(temp, None, (0,0), 255)
# Invert floodfilled image
temp = cv2.bitwise_not(temp)
cv2.imshow('temp', temp)
# Invert floodfilled image
out = srcBw | temp
return out
def getRoi(im_out, img):
'''
im_out: 预处理好的二值图
img : 原图,Type, BGR
'''
num_labels, labels, stats, centers = cv2.connectedComponentsWithStats(im_out, connectivity=8, ltype=cv2.CV_32S)
image = np.copy(img)
roi_list = []
for t in range(1, num_labels, 1):
x, y, w, h, area = stats[t]
if area < 500:
continue
cx, cy = centers[t]
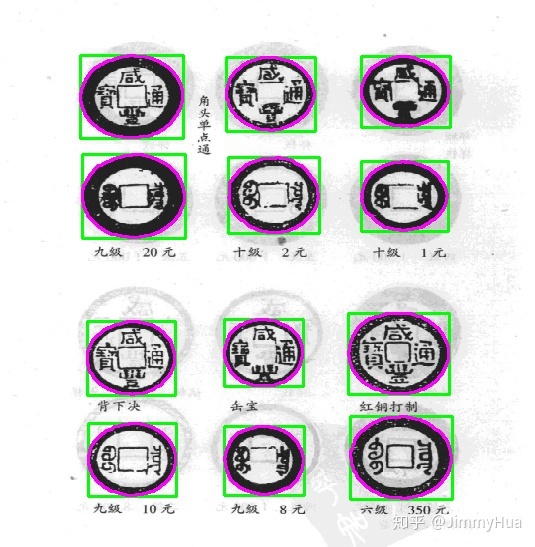
# 标出中心位置
cv2.circle(image, (np.int32(cx), np.int32(cy)), 2, (0, 255, 0), 2, 8, 0)
# 画出外接矩形
cv2.rectangle(image, (x, y), (x+w, y+h), (0, 255, 0), 2, 8, 0)
# 保存roi的坐标和长宽
roi_list.append((x, y, w, h))
return num_labels, labels, image, roi_list
# show the colorful components
def colorImgShow(im_out, num_labels, labels):
'''
im_out: 填充后的二值图
num_labels: 连通组件的个数
labels: 连通组件的输出标记图像,背景index=0
'''
# make the colors
colors = []
for i in range(num_labels):
b = np.random.randint(0, 256)
g = np.random.randint(0, 256)
r = np.random.randint(0, 256)
colors.append((b, g, r))
colors[0] = (0, 0, 0)
# draw the image
h, w = im_out.shape
image = np.zeros((h, w, 3), dtype=np.uint8)
for row in range(h):
for col in range(w):
image[row, col] = (colors[labels[row, col]])
return image
# Save the roi
def saveRoi(src, roi_list):
'''
src: 原图的copy
roi_list: List,保存的roi位置信息
'''
for i in range(len(roi_list)):
x, y, w, h = roi_list[i]
roi = src[y:y+h, x:x+w]
cv2.imwrite("money_roi/roi_%d.jpg"%i, roi)
print("No.%02d Finished! "%i)
if __name__ == '__main__':
# 预处理
img = cv2.imread("money.png");
im_in = cv2.cvtColor(img, cv2.COLOR_BGR2GRAY)
ret, im_th = cv2.threshold(im_in, 0, 255, cv2.THRESH_BINARY | cv2.THRESH_OTSU )
# 前景设置为白色,背景设置为黑色
im_th = cv2.bitwise_not(im_th)
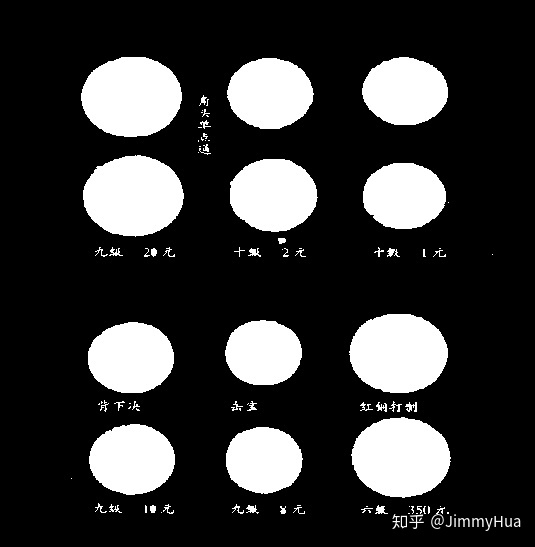
# 调用填充函数
im_out = fillHole(im_th)
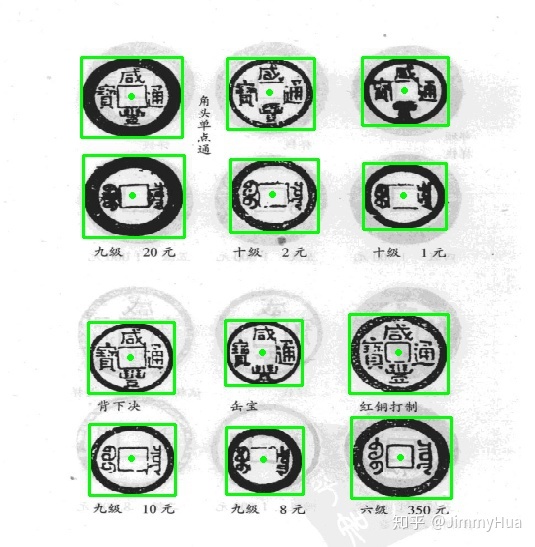
# 利用连通器寻找到需要提取的 roi
num_labels, labels, image, roi_list = getRoi(im_th, img)
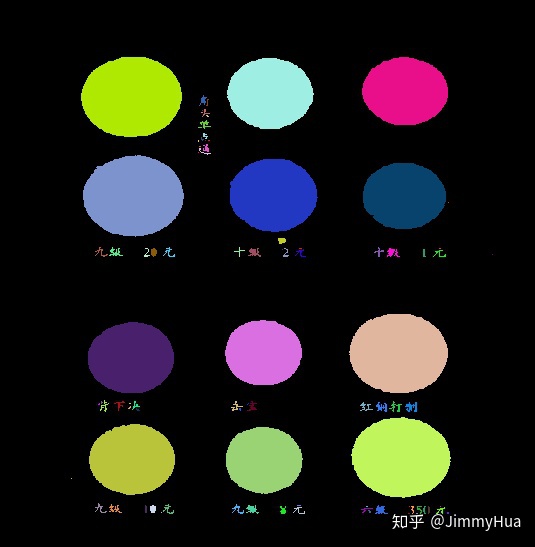
# 可视化连通域
color_image = colorImgShow(im_out, num_labels, labels)
# 保存roi
saveRoi(img, roi_list)
# Display images.
cv2.imshow("Thresholded Image", im_th)
cv2.imwrite("money_connect_binary.jpg", im_th)
cv2.imshow("Colorful Image", color_image)
cv2.imwrite("money_connect_color.jpg", color_image)
cv2.imshow("Foreground", image)
cv2.imwrite("money_connect_out.jpg", image)
cv2.waitKey(0)
cv2.destroyAllWindows()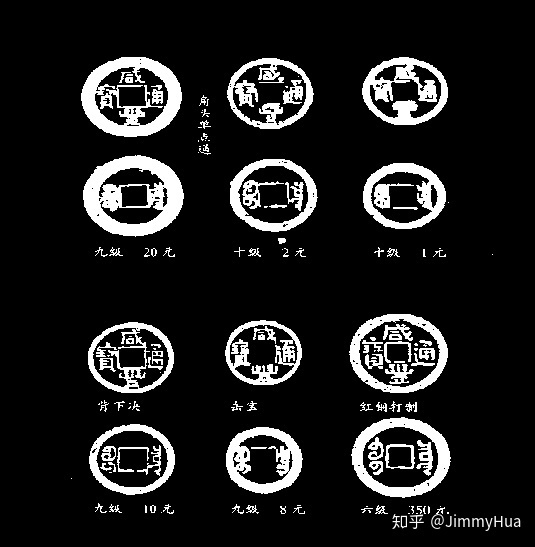
轮廓检测提取
import cv2
import numpy as np

# 读取图片并且进行预处理
def processImg(path):
    '''
    path: 图片路径
    '''
    img = cv2.imread(path)
    gray = cv2.cvtColor(img, cv2.COLOR_BGR2GRAY)
    gray = cv2.GaussianBlur(gray, (3, 3), 1)
    ret, th1 = cv2.threshold(gray, 0, 255, cv2.THRESH_BINARY | cv2.THRESH_OTSU )
    # 开闭运算去除噪点
    kernel = cv2.getStructuringElement(cv2.MORPH_ELLIPSE, (3,3))
    th1 = cv2.morphologyEx(th1, cv2.MORPH_OPEN, kernel)
    th1 = cv2.morphologyEx(th1, cv2.MORPH_CLOSE, kernel)
    edge = cv2.Canny(th1, 50, 100)

    return th1, img, edge

# 利用轮廓处理获取roi
def getRoi(img, binary):
    '''
    img: 原图
    binary: 预处理后得到的canny边缘
    '''
    # 寻找轮廓
    _, contours, _ = cv2.findContours(
        binary, cv2.RETR_TREE, cv2.CHAIN_APPROX_SIMPLE)

    roi_list = []

    # 判断出圆形区域
    for cnt in range(len(contours)):
        area = cv2.contourArea(contours[cnt])
        # 判断提取所需的轮廓,经验值需要调试获取
        if 4000 < area < 10000:
            # 获取外接矩形的值
            x,y,w,h = cv2.boundingRect(contours[cnt])
            roi_list.append((x,y,w,h))
            cv2.rectangle(img, (x,y),(x+w, y+h),(0,255,0),2)
            cv2.drawContours(img, [contours[cnt]], 0, (255, 0, 255), 2)

    return img, roi_list

# Save the roi
def saveRoi(src, roi_list):
    '''
    src: 原图的copy
    roi_list: List,保存的roi位置信息
    '''
    for i in range(len(roi_list)):
        x, y, w, h = roi_list[i]
        roi = src[y:y+h, x:x+w]
        cv2.imwrite("money_roi/roi_%d.jpg"%i, roi)
        print("No.%02d Finished! "%i)

if __name__ == '__main__':

    th1, img, edge = processImg("money.png")
    # copy img
    src = img.copy()
    # 获取roi
    img, roi_list = getRoi(img, edge)

    # 保存roi
    saveRoi(src, roi_list)

    # Display images.
    cv2.imshow("Thresholded Image", th1)
    cv2.imwrite("money_contour_binary.jpg", th1)

    cv2.imshow("edge", edge)
    cv2.imwrite("money_contour_edge.jpg", edge)

    cv2.imshow("roi image", img)
    cv2.imwrite("money_contour_out.jpg", img)

    cv2.waitKey(0)
    cv2.destroyAllWindows()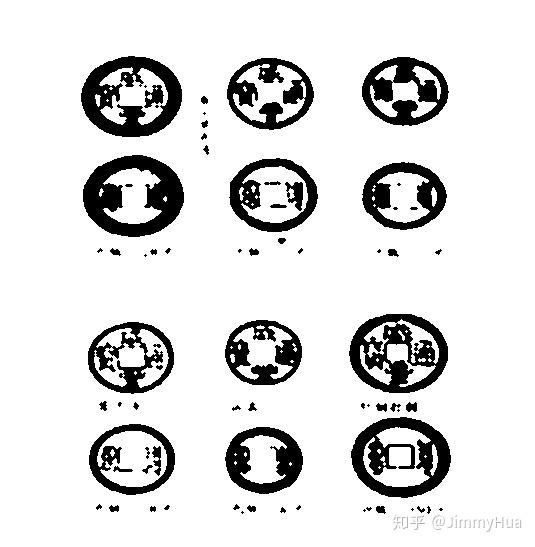

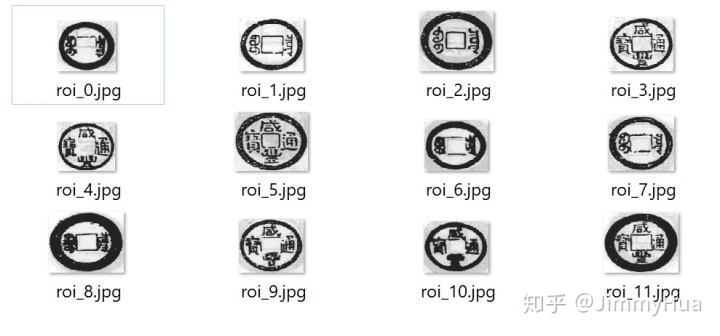
⛳️⛳️⛳️ 最后处理后得到的roi截图如下:
后记
✔️ 通过简单的轮廓处理和连通组件的方法能够合理的解决这个案例,截取出我们所需要的 ROI 区域,当然可能还有别的方法去解决,希望大家也能够集思广益,一起学习进步!
------------------------------------------可爱の分割线------------------------------------------
更多Opencv教程可以 Follow github的opencv教程,中文&English 欢迎Star❤️❤️❤️
JimmyHHua/opencv_tutorialsgithub.com


 683
683

 被折叠的 条评论
为什么被折叠?
被折叠的 条评论
为什么被折叠?
 到【灌水乐园】发言


