


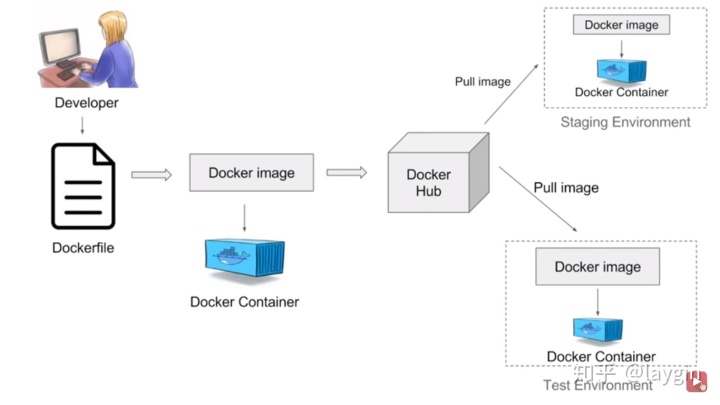
本文记录下如何使用docker部署pytorch文本检测模型到服务器,便于终端调用API。 镜像文件也上传到docker hub了,可以一步步运行起来,不过需要先安装好docker。 docker的安装可参考官方文档。
搭建服务端API
为了便于测试,可以先使用Flask搭建一个简易版本文本检测服务器,服务端创建接口部分代码如下:
PAGE = '''<!doctype html>
    <title>Chinese Text Detector</title>
    <h1>Chinese Text Detector</h1>
    <form action="" method=post enctype=multipart/form-data>
        <p>
         <label for="image">image</label>
         <input type=file name=file required>
         <input type=submit value=detect>
    </form>
    '''

app = Flask('Detector')

@app.route('/', methods=['GET'])
def index():
    return redirect(url_for('detector'))


@app.route('/detector', methods=['GET', 'POST'])
def detector():
    if request.method !='POST':
        return PAGE
    img = request.files['file']
    data = img.read()

    arr = np.frombuffer(data, dtype=np.uint8)
    img = cv2.imdecode(arr, cv2.IMREAD_COLOR)

    bboxes = detection(img=img)
    bboxes = bboxes.reshape(-1, 8).tolist()
    # print('inference time: ', time.time()-tic)

    return jsonify(msg='success', data={'bboxes': bboxes})


if __name__ == '__main__':
app.run(host='0.0.0.0', port=5000)- 其中主要的是detection函数,接收的图像为numpy array格式,通道为BGR;输出为检测的文本框,shape为(#boxes, 8),8代表四个点的横纵坐标,从左上角开始顺时针排序。
- PAGE是一个简单的网页,创建表单。可在浏览器中进行验证,也可以通过脚本验证,后面详述。
创建镜像
需要先编写Dockerfile文件:
FROM gaolijun/pytorch:1.2-cuda10.0-cudnn7-cv-flask-py3.6

ENV LISTEN_PORT 5000
EXPOSE 5000

COPY ./daemons.py /daemons.py
COPY ./detection_api.py /detection_api.py
COPY ./weight.pth /weight.pth
RUN pip install Shapely
RUN pip install pyclipper

CMD python /detection_api.py- gaolijun/pytorch:1.2-cuda10.0-cudnn7-cv-flask-py3.6 是另一个自定义创建的镜像,安装的Python版本为3.6,pytorch版本为1.2,cuda版本为10.0;并且已经安装好了opencv和flask,以及其他一些常用库,比如numpy等等,该镜像做了许多精简,保证了搭建pytorch和flask服务所需的功能,文件并不很大。为了省事儿,直接在这上面搭建几层。
- 设置docker开放的端口为5000,后面可以在运行的主机上进行映射。
- 然后将需要的文本拷贝进去,其中detection_api提供上面的detection函数,可以看成黑盒子,输入是图像,输出为该图像上检测得到的所有文本框。
- 安装额外的依赖包:Shapely和pyclipper,这在 gaolijun/pytorch:1.2-cuda10.0-cudnn7-cv-flask-py3.6 中没有安装,so...
- 在容器中运行镜像的时候就运行检测api脚本。
写好了Dockerfile,在DockerFile所在目录运行:
docker build -t detector:v1.0 .
镜像名称为detector,给个标签:v1.0,便于跟踪管理。
拉取镜像
我已经将创建的镜像上传到docker hub了,可以拉取下来:
docker pull laygin/detector
然后查看下全部的镜像:

运行docker
docker run -p 3223:5000 -d --name detector detector:v1.0
- -p: 主机端口到docker容器端口的映射。所以,只要愿意,主机上可以运行多个docker容器,指定不同的端口即可。
- -d: docker容器在后台运行
- --name: docker 容器名称
- 后面跟上创建的镜像,即在容器detector中运行的镜像detector:v1.0
- 或许需要
docker container ls来查看它 - 或许还需要
docker stop detector来停止它 - 或许也需要
docker rm detector来移除它,。。。。。如果没有停掉而想直接移除或许还不行,那就加上 --force/-f 强制操作吧
验证
文本检测服务已经运行起来了,要怎样才知道有没有运行成功呢?这里通过两种方式来验证一下。
1. 浏览器
提供了简易的web page,直接在浏览器中输入http://serverIP:3223/detector,其中serverIP为运行docker的服务器IP地址。
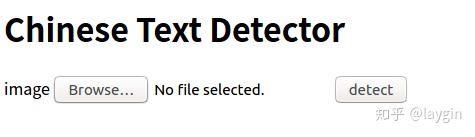
点击Browse选择图像,然后点击detect进行检测,得到如下结果:

2. python脚本
通过脚本验证是最常用的方式了,这里写了一个简单的demo脚本
import requests
import cv2
import numpy as np
from nicelogger import ColorLogger

logger = ColorLogger()
api = 'http://serverIP:3223/detector'


def plot_boxes(img, bboxes):
    cv2.drawContours(img, bboxes.astype(int), -1, (0, 0, 255), 2)
    cv2.imshow('img', img)
    if cv2.waitKey(0) == 'q':
        cv2.destroyAllWindows()
    return img


img_path = 'path/to/image.jpg'
img_ori = cv2.imread(img_path)

img = cv2.imencode('.jpg', img_ori)[-1]
files = {'file': img}

res = requests.request("POST", api, files=files).json()

if res['msg'] == 'success':
    bboxes = res['data']['bboxes']
    bboxes = np.asarray(bboxes, dtype=np.int32)
    logger.info(bboxes.shape)

    plot_boxes(img_ori, bboxes.reshape((-1, 4, 2)))
结果如图所示:

参考
- Docker官方文档


 2万+
2万+


 被折叠的 条评论
为什么被折叠?
被折叠的 条评论
为什么被折叠?
 到【灌水乐园】发言


