


5.1 Bootstrap概述
5.1.1 什么是bootstrap?
Bootstrap,来自 Twitter,是目前最受欢迎的前端框架。Bootstrap 是基于 HTML、CSS、JAVASCRIPT 的,它简洁 灵活,使得 Web 开发更加快捷。
bootstrap 主要用于 CSS的页面效果美化
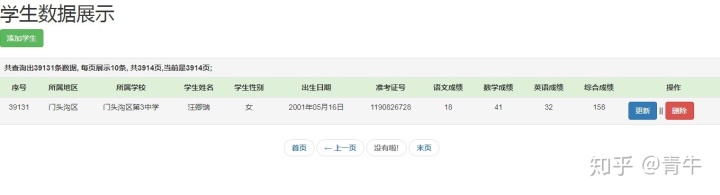
这个表格就是在bootstrap的基础上构建的一个表格;所以使用bootstrap来构建我们以后用到的简单页面效果还是不 错的
5.1.2 为什么使用bootstrap?
移动设备优先:自 Bootstrap 3 起,框架包含了贯穿于整个库的移动设备优先的样式。
浏览器支持:所有的主流浏览器都支持 Bootstrap。

容易上手:只要您具备 HTML 和 CSS 的基础知识,您就可以开始学习 Bootstrap。 响应式设计:Bootstrap 的响应式 CSS 能够自适应于台式机、平板电脑和手机。更多有关响应式设计的内容详 见 Bootstrap 响应式设计

它为开发人员创建接口提供了一个简洁统一的解决方案。
它包含了功能强大的内置组件,易于定制。
它还提供了基于 Web 的定制。
它是开源的。
说白了就是人家已经写好了一套CSS样式,而我们只需要掌握一点点的CSS技巧就能应用bootstrap构建一套非常漂亮的页面效果
5.1.3 Bootstrap 包的内容
基本结构:Bootstrap 提供了一个带有网格系统、链接样式、背景的基本结构。CSS:Bootstrap 自带以下特性:全局的 CSS 设置、定义基本的 HTML 元素样式、可扩展的 class,以及一个先 进的网格系统。 组件:Bootstrap 包含了十几个可重用的组件,用于创建图像、下拉菜单、导航、警告框、弹出框等等。 JavaScript 插件:Bootstrap 包含了十几个自定义的 jQuery 插件。您可以直接包含所有的插件,也可以逐个包 含这些插件。
5.2 Bootstrap使用
5.2.1 下载Bootstrap
使用bootstrap跟使用jquery一样十分简单,去官网下载人家写好的项目引入到我们的项目中,美滋滋
bootstrap官网:

官网已经更新到bootstrap4这种新版了,我们的系统中只是简单使用bootstrap,所以我们不需要用这么新的版本,我们 选用的是bootstrap3.3.7这个稳定版
下载地址: Getting started · Bootstrap
为啥不用新版?
1) 可能存在兼容性问题
2) 可以还含有未知BUG没有解决
3) 稳定比新颖更重要
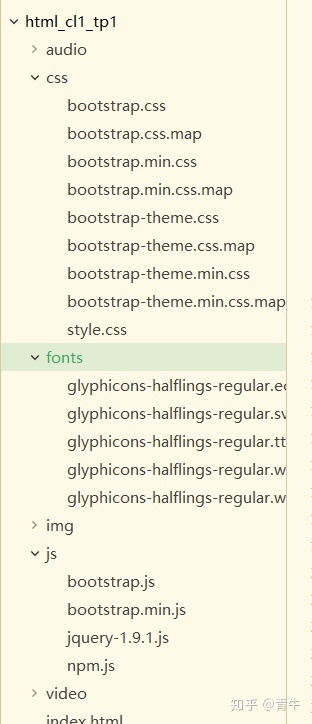
选择好bootstrap之后就可以导入到我们的项目中,bootstrap是一个压缩包,解压好之后是这样的
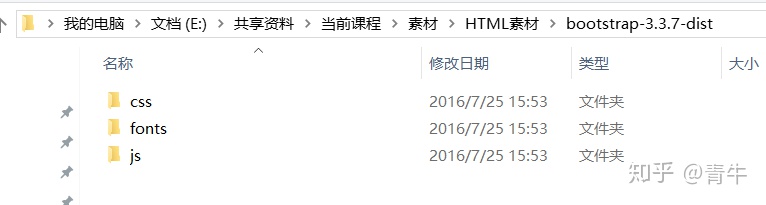
其中css 是其样式文件 fonts 是字体文件 js是JavaScript脚本,我们可以分别引入项目中
5.2.2 Bootstrap入门
使用bootstrap也非常简单,一共就分两步操作即可
5.2.2.1 : 引入相关文件
        <!-- 引入CSS文件 -->
        <link rel="stylesheet" type="text/css" href="css/bootstrap.css"/>
        <!-- 引入jquery -->
        <script src="js/jquery-1.9.1.js" type="text/javascript" charset="utf-8"></script>
        <!-- 引入bootstrap的JS -->
        <script src="js/bootstrap.js" type="text/javascript" charset="utf-8"></script>
bootstrap有些功能是依赖于jquery实现的,所以要引入文件的话 CSS文件 和 JS文件都需要引入,并且包括jQuery文件
5.2.2.2 修改样式
样式的修改可以借助菜鸟教程,上面有很多bootstrap的现成案例我们拿过来用就可以了
菜鸟教程bootstrap地址
Bootstrap 教程 | 菜鸟教程
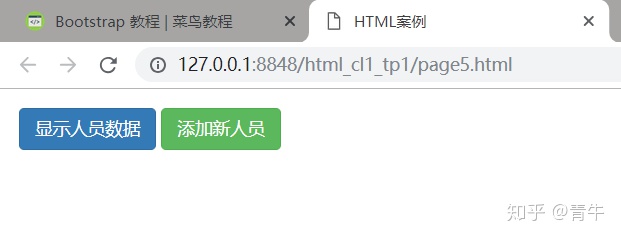
举个例子,比如我们现在有两个按钮
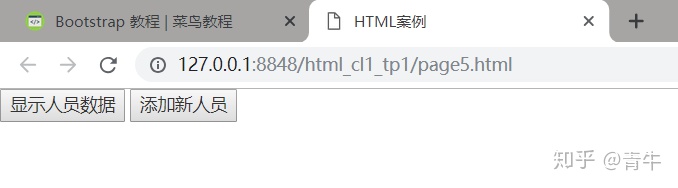
不是很好看,我们来美化一下这两个按钮
        <div style="margin: 15px;">
            <button type="button" class="btn btn-primary" onclick="showPersons();">显示人员数据</button>
            <button type="button" class="btn btn-success" onclick="showAddForm();">添加新人员</button>
        </div>
效果:
根据上面的案例启示不难发现,我们原来的代码什么也不用改,只需要添加我们向添加的class样式就可以了,下面就给大 家提供一个bootstrap按钮的样式表:
Bootstrap 按钮
本章将通过实例讲解如何使用 Bootstrap 按钮。任何带有 class .btn 的元素都会继承圆角灰色按钮的默认外观。但是 Bootstrap 提供了一些选 项来定义按钮的样式,具体如下表所示:
以下样式可用于<a>, <button>, 或 <input> 元素上:
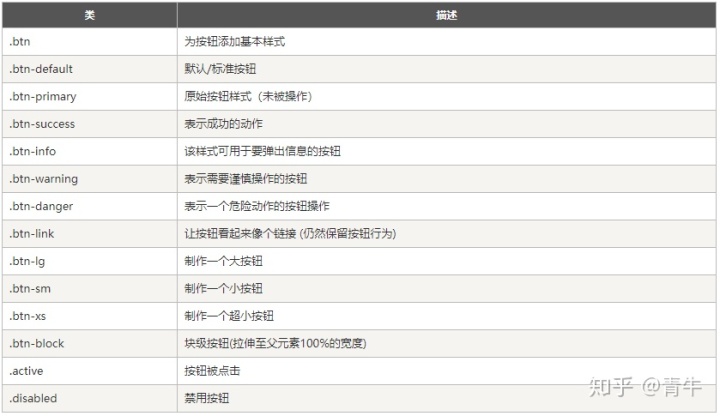
常用按钮代码:
        <div style="margin: 15px;">
            <!-- 标准的按钮 -->
            <button type="button" class="btn btn-default">默认按钮</button>
            <!-- 提供额外的视觉效果,标识一组按钮中的原始动作 -->
            <button type="button" class="btn btn-primary">原始按钮</button>
            <!-- 表示一个成功的或积极的动作 -->
            <button type="button" class="btn btn-success">成功按钮</button>
            <!-- 信息警告消息的上下文按钮 -->
            <button type="button" class="btn btn-info">信息按钮</button>
            <!-- 表示应谨慎采取的动作 -->
            <button type="button" class="btn btn-warning">警告按钮</button>
            <!-- 表示一个危险的或潜在的负面动作 -->
            <button type="button" class="btn btn-danger">危险按钮</button>
            <!-- 并不强调是一个按钮,看起来像一个链接,但同时保持按钮的行为 -->
            <button type="button" class="btn btn-link">链接按钮</button>
        </div>
效果

5.2.3 Bootstrap字体图标
字体图标是在 Web 项目中使用的图标字体
在 fonts 文件夹内可以找到字体图标,它包含了下列这些文件:
glyphicons-halflings-regular.eot
glyphicons-halflings-regular.svg
glyphicons-halflings-regular.ttf
glyphicons-halflings-regular.woff
相关的 CSS 规则写在 dist 文件夹内的 css 文件夹内的 bootstrap.css 和 bootstrap-min.css 文件上。 字体支持来自于https://www.glyphicons.com/
虽然,Glyphicons Halflings 需要商业许可,但是您可以通过基于项目的 Bootstrap 来免费使用这些图标。 为了表示对图标作者的感谢,希望您在使用时加上 GLYPHICONS 网站的链接。
5.2.3.1 如何使用字体图标
如需使用图标,只需要简单地使用下面的代码即可。请在图标和文本之间保留适当的空间。
代码:
<span class="glyphicon glyphicon-search"></span>我们刚才写的按钮加上字体图表的样子
代码:
        <div style="margin: 15px;">
            <button type="button" class="btn btn-primary" onclick="showPersons();"><span class="glyphicon glyphicon-th-list"></span> 显示人员数据</button>
            <button type="button" class="btn btn-success" onclick="showAddForm();"><span class="glyphicon glyphicon-plus"></span> 添加新人员</button>
        </div>
效果:
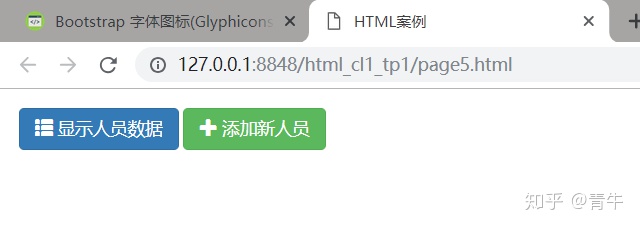
当然有按钮的地方都可以这么优化,而且还有很多图表可以供大家设置,我们一会再设置,先继续往下优化
5.2.4 表格类
下表样式可用于表格中:
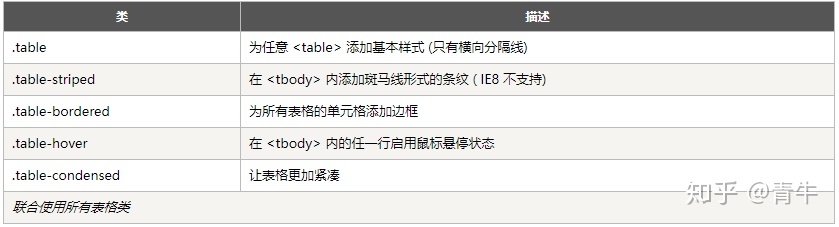
<tr>, <th> 和 <td> 类
下表的类可用于表格的行或者单元格:
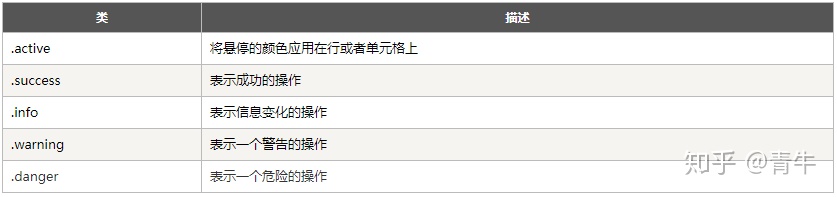
根据上面的样式我们可以给我们的表格加上一个class,给我们的表头也加一个css
代码
        <div>
            <table class="table table-hover" id="tb1" >

            </table>
        </div>
效果
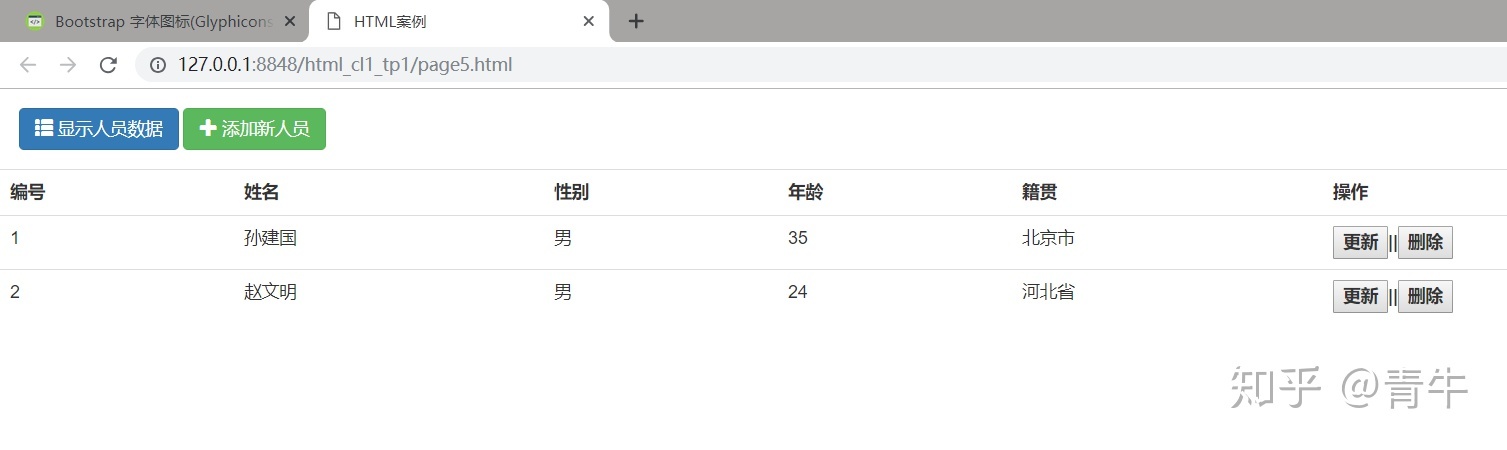
一个基础表格就优化好了,但是不太好看,没关系稍微调试就好看了 第一步 : 表头价格淡蓝色背景
代码
// 给tb1拼接元素
var str = "<tr class='info'><th>编号</th><th>姓名</th><th>性别</th><th>年龄</th><th>籍贯</th><th>操作</th></tr>";
效果:
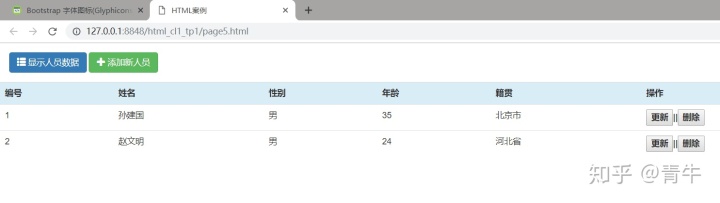
怎么样这个表格是不是好看多了呢,但是里面有两个按钮不好看,我们也来美化一下吧
代码 :
// 编写显示人员方法
function showPersons(){
// 按ID获取table
var tb1 = $("#tb1");
// 给tb1拼接元素
var str = "<tr class='info'><th>编号</th><th>姓名</th><th>性别</th><th>年龄</th><th>籍贯</th><th>操作</th></tr>";
// 遍历JSON数组继续拼接
for (var i = 0; i < persons.length; i++) {
var p = persons[i];
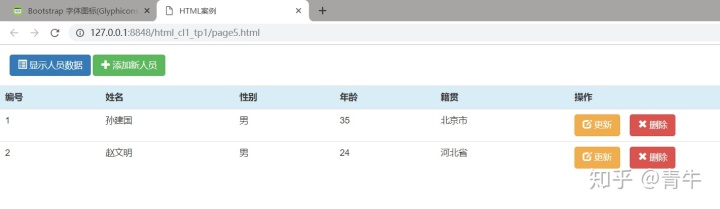
var buttonstr = "<th><button type='button' class='btn btn-warning' onclick='showUpdateForm("+p.id+");' ><span class='glyphicon glyphicon-edit'></span> 更新</button> <button type='button' class='btn btn-danger' onclick='deletePerson("+p.id+")'><span class='glyphicon glyphicon-remove'></span> 删除</button></th>";
str += "<tr><td>"+p.id+"</td><td>"+p.name+"</td><td>"+p.sex+"</td><td>"+p.age+"</td><td>"+p.from+"</td>"+buttonstr+"</tr>";
}
// 最后把拼接好的字符串放入table中
tb1.html(str);
}效果 :
5.2.5 form表单的优化
这回 就好看多了吧,美滋滋,那么我们再继续优化,比如再优化我们的form表单
我们对表单的优化可能就要麻烦一些了,bootstrap并没有成型的太好看的表单,所以我们要借助table来优化我们的添 加个修改页面
第一步 : table加css
<table class="table table-hover">第二步 : 每个添加项都以一行两列展开,完成数据的接收
<input class="form-control" type="text" id="upname" required="required" placeholder="请输入人员姓名......" />大家此处要注意优化输入框的CSS是 form-control
第三步 优化最下面的两个按钮
<button type="submit" class="btn btn-success btn-lg"><span class="glyphicon glyphicon-floppy-saved"></span> 确定</button>
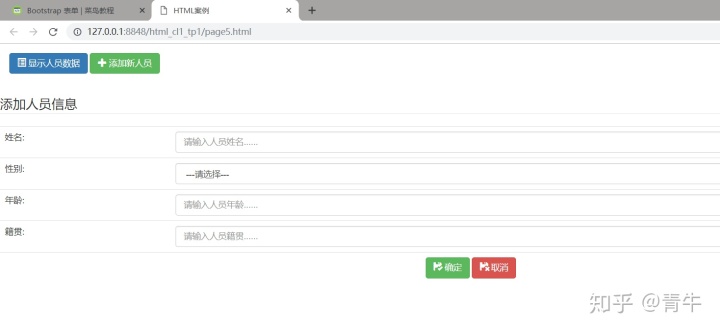
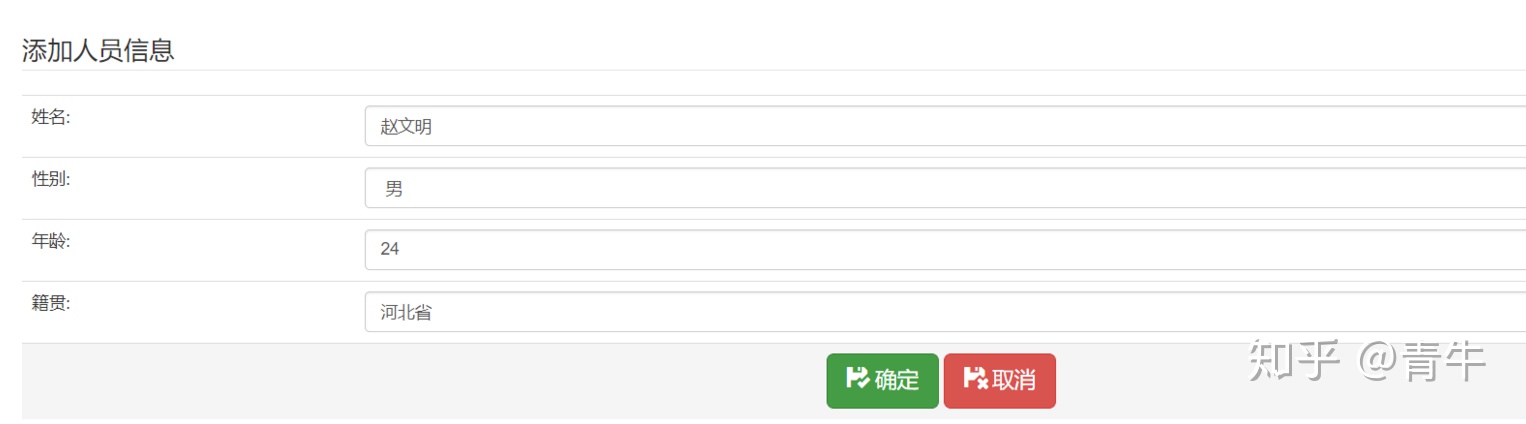
<button type="reset" class="btn btn-danger btn-lg" onclick="hideForm('form1');"><span class="glyphicon glyphicon-floppy-remove"></span> 取消</button>三步优化好之后我们的添加界面现在是这样的
代码 :
        <div id="form1" style="display: none;">
            <form method="post" action="#" onsubmit="addPerson();return false;" >
                <fieldset>
                    <legend>添加人员信息</legend>
                    <table class="table table-hover">
                        <tr>
                            <td>姓名:</td>
                            <td>
                                <input class="form-control" type="text" id="pname" required="required" placeholder="请输入人员姓名......" />
                            </td>
                        </tr>
                        <tr>
                            <td>性别:</td>
                            <td>
                                <select class="form-control" id="sex" required="required">
                                    <option value="">---请选择---</option>
                                    <option value="男">男</option>
                                    <option value="女">女</option>
                                </select>
                            </td>
                        </tr>
                        <tr>
                            <td>年龄:</td>
                            <td>
                                <input class="form-control" type="number" id="age" required="required" placeholder="请输入人员年龄......" />
                            </td>
                        </tr>
                        <tr>
                            <td>籍贯:</td>
                            <td>
                                <input class="form-control" type="text" id="pfrom" required="required" placeholder="请输入人员籍贯......" />
                            </td>
                        </tr>
                        <tr>
                            <td colspan="2" style="text-align: center;">
                                <button type="submit" class="btn btn-success"><span class="glyphicon glyphicon-floppy-saved"></span> 确定</button>
                                <button type="reset" class="btn btn-danger" onclick="hideForm('form1');"><span class="glyphicon glyphicon-floppy-remove"></span> 取消</button>
                            </td>
                        </tr>
                    </table>
                </fieldset>
            </form>
        </div>
效果 :
怎么样是不是有点效果了呢,好吧,那我们继续完成最后的优化吧,把更新的form表单也变成添加这样的
代码 :
        <div id="form2" style="display: none;">
            <form method="post" action="#" onsubmit="updatePerson();return false;">
                <input type="hidden" id="upid" />
                <fieldset>
                    <legend>添加人员信息</legend>
                    <table class="table table-hover">
                        <tr>
                            <td>姓名:</td>
                            <td>
                                <input class="form-control" type="text" id="upname" required="required" placeholder="请输入人员姓名......" />
                            </td>
                        </tr>
                        <tr>
                            <td>性别:</td>
                            <td>
                                <select class="form-control" id="usex" required="required">
                                    <option value="">---请选择---</option>
                                    <option value="男">男</option>
                                    <option value="女">女</option>
                                </select>
                            </td>
                        </tr>
                        <tr>
                            <td>年龄:</td>
                            <td>
                                <input class="form-control" type="number" id="uage" required="required" placeholder="请输入人员年龄......" />
                            </td>
                        </tr>
                        <tr>
                            <td>籍贯:</td>
                            <td>
                                <input class="form-control" type="text" id="upfrom" required="required" placeholder="请输入人员籍贯......" />
                            </td>
                        </tr>
                        <tr>
                            <td colspan="2" style="text-align: center;">
                                <button type="submit" class="btn btn-success btn-lg"><span class="glyphicon glyphicon-floppy-saved"></span> 确定</button>
                                <button type="reset" class="btn btn-danger btn-lg" onclick="hideForm('form2');"><span class="glyphicon glyphicon-floppy-remove"></span> 取消</button>
                            </td>
                        </tr>
                    </table>
                </fieldset>
            </form>
        </div>
修改完后的更新:
到此页面美化工作结束
版权声明:原创作品,允许转载,转载时务必以超链接的形式表明出处和作者信息。否则将追究法律责任。来自海牛学院-青牛


 1018
1018


 被折叠的 条评论
为什么被折叠?
被折叠的 条评论
为什么被折叠?
 到【灌水乐园】发言


