


今天和大家分享的是 3D 系列之 3D 预定义模型。
HT for Web 提供了多种基础类型供用户建模使用,不同于传统的 3D 建模方式,HT 的建模核心都是基于 API 的接口方式,通过 HT 预定义的图元类型和参数接口,进行设置达到三维模型的构建。接下来我们就来谈谈预定义的 3D 模型及参数设置。
HT 预定义的 3D 模型有:box、sphere、cone、torus、cylinder、star、rect、roundRect、triangle、tightTriangle、parallelogram 和 trapezoid 这十二种,那么这十二种类型又是怎么设置的呢?
在网络拓扑图 GraphView 的 2D 图形上,呈现各种图形是通过 style 中的 shape 属性决定的,HT 在 3D 上提供了 shape3d 属性预定义多种 3D 形体。shape3d 属性的默认值为 undefined,图元显示为六面立方图形,当 shape3d 指定值时,则显示为 shape3d 指定的形体,接下来我们来一一介绍 3D 模型的各个形体。
1. box:立方体,不同于默认的六面体,立方体类型的六个面颜色和贴图只能相同,绘制性能比默认六面体高;
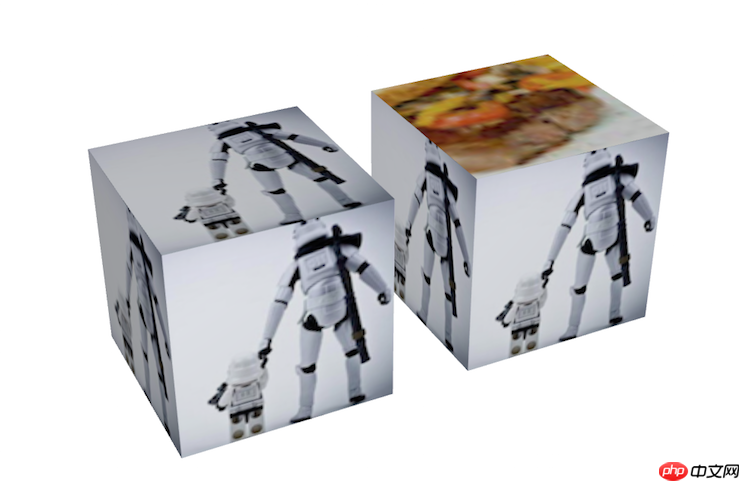
就如上图所示,左边是 shape3d 设置为 box,右边是默认的六面体,两个节点都对上表面设置了贴图,但是从效果上看 shape3d 设置为 box 的节点直接无视了上表面的贴图设置,这也应证了上面描述的,box 类型六个面的颜色和贴图只能相同,只对 shape3d.image 和 shape3d.color 起效,下面是具体的设置代码:node = new ht.Node();
node.s3(80, 80, 80);
node.s({
'shape3d': 'box',
'shape3d.image': 'img11',
'shape3d.top.image': 'img10'});
dm.add(node);
node = new ht.Node();
node.s3(80, 80, 80);
node.p3(100, 0, 0);
node.s({
'all.image': 'img11',
'top.image': 'img10'});
dm.add(node);
2. sphere:球体,可通过 shape3d.side 分成多片,结合 shape3d.side.from 和 shape3d.side.to 可形成半球体等
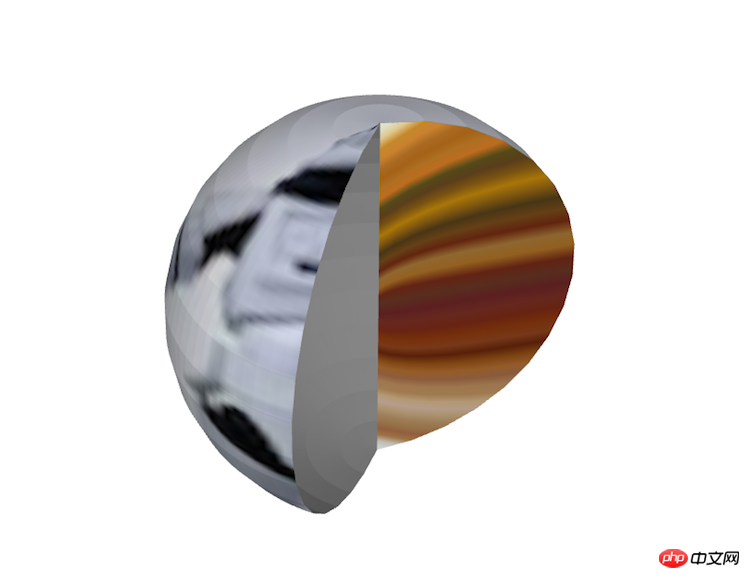
就如上图所示,球被裁切掉了一部分,被裁切的两个面可以单独控制,通过 shape3d.from.* 和 shape3d.to.* 两组参数就可以单独控制两面的显示效果,在上图中,我通过 shape3d.to.visible 将 to 的面隐藏了,将 from 面通过 shape3d.from.image 设置了新的贴图,具体代码如下:node.s({
'shape3d': 'sphere',
'shape3d.image': 'img11',
'shape3d.side': 100,
'shape3d.side.from': 0,
'shape3d.side.to': 65,
'shape3d.from.image': 'img10',
'shape3d.to.visible': false});
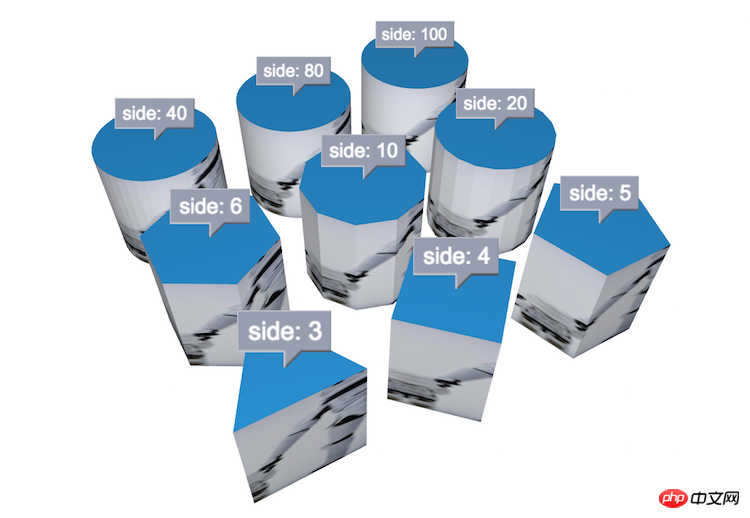
3. cone:锥体,可通过 shape3d.side 形成三角锥、四角锥等形状
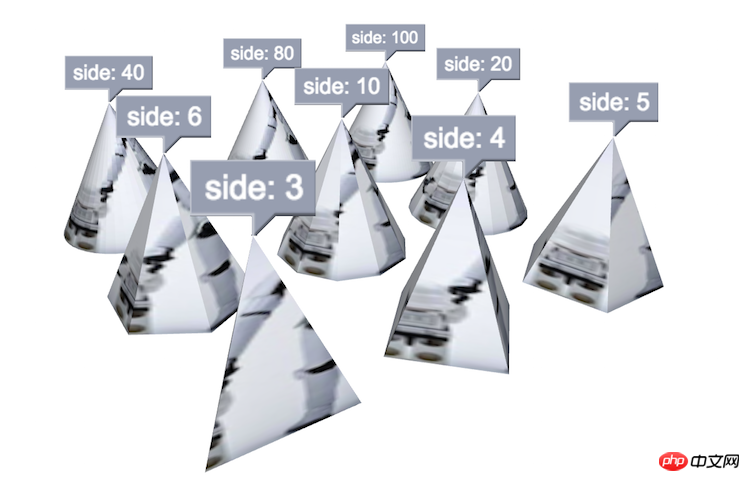
从上图可以看到,side 值越大,椎体就越圆滑,完全可以比拟圆锥。具体如何设置的,我们来看看代码:[3, 4, 5, 6, 10, 20, 40, 80, 100].forEach(function(side, index) {
var x = ((index / 3) >> 0) * 100 - 100,
y = index % 3 * 100 - 100;
node = new ht.Node();
node.p3(x, 40, y);
node.s3(80, 80, 80);
node.s({
'shape3d': 'cone',
'shape3d.image': 'img11',
'shape3d.side': side,
'note': 'side: ' + side,
'note.autorotate': true,
'note.position': 17,
'note.face': 'top',
'note.background': '#979EAF'
});
dm.add(node);
});
当然,椎体也可以和球体一样,可以设置 shape3d.side.from 和 shape3d.side.to 参数来控制裁切;还可以通过 shape3d.from.* 和 shape3d.to.* 参数来控制两个面的表现效果;还可以通过 shape3d.bottom.* 样式来控制椎体地面的表现效果。
在上面的代码中,可以看到 note 相关的设置,在这边也顺带介绍下,note.autorotate 样式是用来控制 note 的朝向,如果设置为 true,那么这个 note 永远是朝向眼睛的方向,不管场景如何旋转。
4. torus:圆环,可通过 shape3d.side 分成多片,结合 shape3d.side.from 和 shape3d.side.to 可形成半圆环等
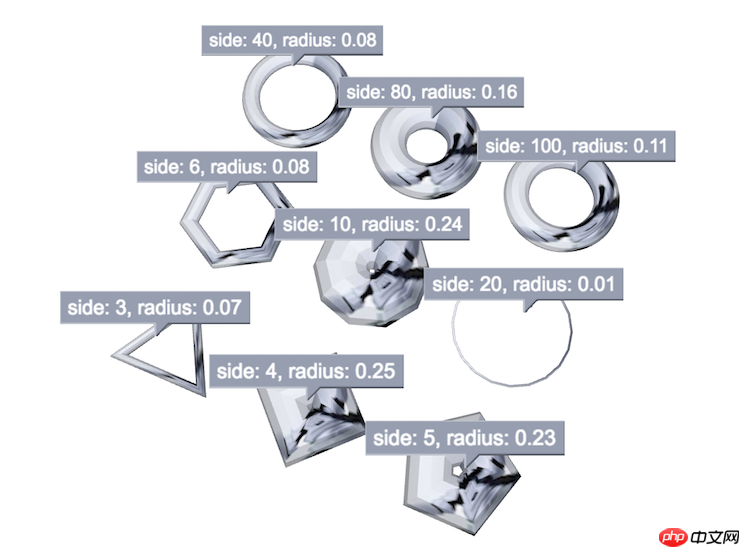
在上图中可以看出,圆环其实和圆锥是一样的,也是可以设置边数,构成三角环,四角环等形状,当边数达到一定的程度,边数越多,圆环就越平滑。
在上图中可以看到 note 中多加了一个 radius 值的打印,这个值对应的是样式中的 shape3d.torus.radius,那么这个值的作用是什么呢,我想从上图也可以看得出来,radius 值是用来控制圆环的半径,但是为什么 radius 为 0.25 的时候圆环中间就被填上了,没有像其他的圆环中间都漏空呢?我们可以这样理解,一个圆环的切面有两个圆环直径,那就有四个圆环半径,那按百分比去计算的话,一个半径就是占整个图元宽的 1/4,也就是 0.25,所以这个 shape3d.torus.radius 样式的取值范围为 0~0.25。[3, 4, 5, 6, 10, 20, 40, 80, 100].forEach(function(side, index) {
var x = ((index / 3) >> 0) * 100 - 100,
y = index % 3 * 100 - 100;
radius = (Math.random() * 0.25).toFixed(2);
node = new ht.Node();
node.p3(x, 40, y);
node.s3(80, 80, 80);
node.s({
'shape3d': 'torus',
'shape3d.image': 'img11',
'shape3d.side': side,
'shape3d.torus.radius': radius,
'note': 'side: ' + side + ', radius: ' + radius,
'note.autorotate': true,
'note.position': 17,
'note.face': 'top',
'note.background': '#979EAF'
});
dm.add(node);
});
5. cylinder:圆柱,可通过 shape3d.top.* 和 shape3d.bottom.* 可控制顶面和底面的参数
圆柱的参数除了 shape3d.top.* 之外,其他的都和前面提到的圆锥的参数一样,因为圆柱体其实就是比圆锥体多了一个面。[3, 4, 5, 6, 10, 20, 40, 80, 100].forEach(function(side, index) {
var x = ((index / 3) >> 0) * 100 - 100,
y = index % 3 * 100 - 100;
node = new ht.Node();
node.p3(x, 40, y);
node.s3(80, 80, 80);
node.s({
'shape3d': 'cylinder',
'shape3d.image': 'img11',
'shape3d.side': side,
'note': 'side: ' + side,
'note.autorotate': true,
'note.position': 17,
'note.face': 'top',
'note.background': '#979EAF'
});
dm.add(node);
});
到这里所有的可裁切的基本模型都介绍完了,下面要介绍的几个基本模型就没有 side 的相关属性了,也就意味着,它们将没有 from 和 to 的相关参数,没有裁切的功能。
如果想让不能裁切的基本图元达到裁切的效果,还是有其他方案和方法的,这些,我们就在后续的章节中介绍,还望耐心等待。
6. star:星形体,可通过 shape3d.top.* 和 shape3d.bottom.* 可控制顶面和底面的参数
7. rect:矩形体,可通过 shape3d.top.* 和 shape3d.bottom.* 可控制顶面和底面的参数
8. roundRect:圆矩形体,可通过 shape3d.top.* 和 shape3d.bottom.* 可控制顶面和底面的参数
9. triangle:三角形体,可通过 shape3d.top.* 和 shape3d.bottom.* 可控制顶面和底面的参数
10. rightTriangle:直角三角形体,可通过 shape3d.top.* 和 shape3d.bottom.* 可控制顶面和底面的参数
11. parallelogram:平行四边形体,可通过 shape3d.top.* 和 shape3d.bottom.* 可控制顶面和底面的参数
12. trapezoid:梯形体,可通过 shape3d.top.* 和 shape3d.bottom.* 可控制顶面和底面的参数
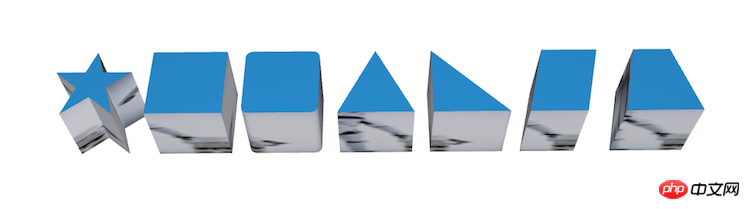
上图就是几个还未介绍的基本模型。[ 'star', 'rect', 'roundRect', 'triangle',
'rightTriangle', 'parallelogram', 'trapezoid'].forEach(function(shape, index) {
var x = index * 100 - 300;
node = new ht.Node();
node.p3(x, 40, 0);
node.s3(80, 80, 80);
node.s({
'shape3d': shape,
'shape3d.image': 'img11'
});
dm.add(node);
});
仔细观察上图,你会发现,从左算起,第二个和第四个好像在前面的例子中有见过。没错,在形状上是一样的,但是在表现上却是有些差异,到底存在什么差异呢,我们通过图来瞧瞧。
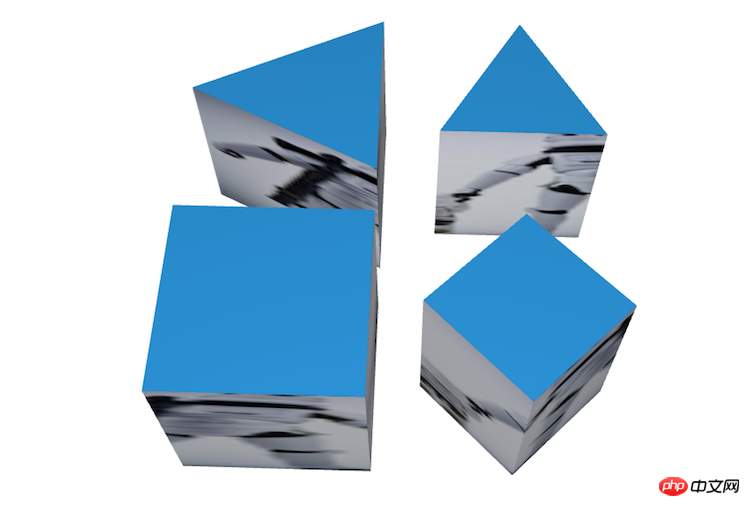
左边是基本模型 rect 和 triangle,右边是通过基本模型 cylinder 模拟出来的 rect 和 triangle,四个图元设置的大小都是一样的,边长都是 80,可以发现基本模型 rect 和 triangle 在表现上会比通过 cylinder 模拟出来的 rect 和 triangle 来的大些,原因很简单,通过 cylinder 模拟出来的 rect 和 triangle 因为其本质还是圆柱体,side 参数是是让图形能够更接近圆形而已,所以绘制出来的图形将会是在一个圆柱体内,也就是 rect 基本模型上表面的内切圆范围内,也就是说通过 cylinder 模拟出来的 rect 上表面的对角线才是图元的变成 80。
以下是相关代码,大家可以尝试下,通过不同角度的观察,可能会更好理解一些。node = new ht.Node();
node.s3(80, 80, 80);
node.p3(-50, 40, 50);
node.s({
'shape3d':
'cylinder',
'shape3d.side': 4,
'shape3d.image': 'img11'});
dm.add(node);
node = new ht.Node();
node.s3(80, 80, 80);
node.p3(50, 40, 50);
node.s({
'shape3d':
'cylinder',
'shape3d.side': 3,
'shape3d.image': 'img11'});
dm.add(node);
node = new ht.Node();
node.s3(80, 80, 80);
node.p3(-50, 40, -50);
node.s({
'shape3d': 'rect',
'shape3d.image': 'img11'});
dm.add(node);
node = new ht.Node();
node.s3(80, 80, 80);
node.p3(50, 40, -50);
node.s({
'shape3d': 'triangle',
'shape3d.image': 'img11'});
dm.add(node);


 76
76


 被折叠的 条评论
为什么被折叠?
被折叠的 条评论
为什么被折叠?
 到【灌水乐园】发言


