


1.1 Namespace 和 Cgroups
1.1.1 Namespace
步骤 1 运行一个 centos 容器,并设置容器的 hostname=hwhost。
[root@k8s-master ~]# docker run -h hwhost -it centos
[root@hwhost /]#
步骤 2 在容器中添加一个用户 hwusera。
[root@hwhost /]# useradd hwusera
[root@hwhost /]# su hwusera
[hwusera@hwhost /]$
步骤 3 打开另一个宿主机终端,设置宿主机 hostname=HUAWEI。
[root@k8s-master ~]# hostname HUAWEI
[root@k8s-master ~]# hostname
HUAWEI
[root@k8s-master ~]#
[root@k8s-master ~]#
[root@k8s-master ~]#
[root@k8s-master ~]# su hwusera
su: user hwusera does not exist
通过以上可知,容器进程的 user 空间和 hostname 空间分别由 user namespace 和 UTS namespace 隔离,独立于宿主机。
步骤 4 在容器中查看 PID,/bin/bash 的 PID=1。
[hwusera@hwhost /]$ ps axf
  PID TTY      STAT   TIME COMMAND
    1 pts/0    Ss     0:00 /bin/bash
   23 pts/0    S      0:00 su hwusera
   24 pts/0    S      0:00  \_ bash
   37 pts/0    R+     0:00      \_ ps axf
步骤 5 在宿主机上查看该容器的 PID,/bin/bash 的 PID=6128
[root@k8s-master ~]# docker ps -a | head -n 2
CONTAINER ID        IMAGE                  COMMAND                  CREATED             STATUS                       PORTS                    NAMES
b5dc2c98f769        centos                 "/bin/bash"              12 minutes ago      Up 12 minutes                                         frosty_hypatia
[root@k8s-master ~]# docker inspect b5dc2c98f769 | grep -i PID
            "Pid": 6128,
            "PidMode": "",
            "PidsLimit": 0,
通过以上可知,容器进程的 PID 空间由 PID namespace 隔离,独立于宿主机。
步骤 6 为方便后续实验,删除本小节中的容器。
[root@k8s-master ~]# docker ps -q -a | head -n 1 | xargs docker rm
b5dc2c98f769
1.1.2 CPU 资源限制
步骤 1 启动一个名为 huawei1 的压力测试容器,CPU 权重设置为 512。
[root@k8s-master ~]# docker run --name huawei1 -it --cpu-shares 512 progrium/stress --cpu 2
stress: info: [1] dispatching hogs: 2 cpu, 0 io, 0 vm, 0 hdd
stress: dbug: [1] using backoff sleep of 6000us
stress: dbug: [1] --> hogcpu worker 2 [6] forked
stress: dbug: [1] using backoff sleep of 3000us
stress: dbug: [1] --> hogcpu worker 1 [7] forked
步骤 2 打开第二个宿主机终端,TOP 查看 CPU 使用率,已将近 100%。
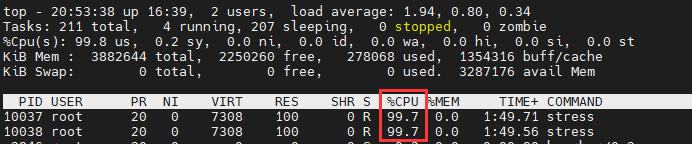
虽然设置了权重值,但 CPU 已经到 100%。
步骤 3 打开第三个宿主机终端,启动第二个压力测试容器 huawei2,权重指设置为 2048。
[root@HUAWEI ~]# docker run --name huawei2 -it --cpu-shares 2048 progrium/stress --cpu 2
stress: info: [1] dispatching hogs: 2 cpu, 0 io, 0 vm, 0 hdd
stress: dbug: [1] using backoff sleep of 6000us
stress: dbug: [1] --> hogcpu worker 2 [6] forked
stress: dbug: [1] using backoff sleep of 3000us
stress: dbug: [1] --> hogcpu worker 1 [7] forked
步骤 4 再次查看 CPU 使用率。huawei2 的 CPU 占用将近是 huawei1 的 4 倍。

步骤 5 查看 CONTAINER ID。
[root@k8s-master ~]# docker ps | head -n 3
CONTAINER ID        IMAGE               COMMAND                  CREATED             STATUS              PORTS                    NAMES
48fbaf9ce168        progrium/stress     "/usr/bin/stress --v…"   2 minutes ago       Up 2 minutes                                 huawei2
e0f4052f8dbc        progrium/stress     "/usr/bin/stress --v…"   6 minutes ago       Up 6 minutes                                 huawei1
步骤 6 根据 CONTAINER ID,查找 cgroup 下相应的 CPU 配置文件。此处以 huawei2 为例。
cd /sys/fs/cgroup/cpu/docker/
[root@k8s-master docker]# cd 48fbaf9ce16889acc0fa50235643b98bf9a0aa6a4781876112927270ac2b8caf/
[root@k8s-master 48fbaf9ce16889acc0fa50235643b98bf9a0aa6a4781876112927270ac2b8caf]# ll
total 0
-rw-r--r--. 1 root root 0 Feb 18 20:55 cgroup.clone_children
--w--w--w-. 1 root root 0 Feb 18 20:55 cgroup.event_control
-rw-r--r--. 1 root root 0 Feb 18 20:55 cgroup.procs
-r--r--r--. 1 root root 0 Feb 18 20:55 cpuacct.stat
-rw-r--r--. 1 root root 0 Feb 18 20:55 cpuacct.usage
-r--r--r--. 1 root root 0 Feb 18 20:55 cpuacct.usage_percpu
-rw-r--r--. 1 root root 0 Feb 18 20:55 cpu.cfs_period_us
-rw-r--r--. 1 root root 0 Feb 18 20:55 cpu.cfs_quota_us
-rw-r--r--. 1 root root 0 Feb 18 20:55 cpu.rt_period_us
-rw-r--r--. 1 root root 0 Feb 18 20:55 cpu.rt_runtime_us
-rw-r--r--. 1 root root 0 Feb 18 20:55 cpu.shares
-r--r--r--. 1 root root 0 Feb 18 20:55 cpu.stat
-rw-r--r--. 1 root root 0 Feb 18 20:55 notify_on_release
-rw-r--r--. 1 root root 0 Feb 18 20:55 tasks
目录 cd /sys/fs/cgroup/cpu/docker/
步骤 7 查看 cpu.shares 值和 tasks 值。cpu.shares=2048,tasks 值即 huawei2 在宿主机上的PID。
[root@k8s-master 48fbaf9ce16889acc0fa50235643b98bf9a0aa6a4781876112927270ac2b8caf]# cat cpu.shares
2048
[root@k8s-master 48fbaf9ce16889acc0fa50235643b98bf9a0aa6a4781876112927270ac2b8caf]# cat tasks
10522
10569
10570
步骤 8 为方便后续实验,删除本小节中的容器。
[root@k8s-master ~]# docker ps -a -q  | head -n 2 | xargs docker kill
48fbaf9ce168
e0f4052f8dbc
[root@k8s-master ~]# docker ps -a -q  | head -n 2 | xargs docker rm
48fbaf9ce168
e0f4052f8dbc
1.1.3 内存资源限制
步骤 1 在后台启动一个 centos 容器,并限制其最多使用 400M 内存和 100M swap。
[root@k8s-master ~]# docker run -m 400m --memory-swap=500m -dit centos /bin/bash
53bc7a75231a6a9501c47db15f69cb11ad07d8f248b1e1fd83cc0f4bcfca75e9
步骤 2 找到该容器在 cgroup 下内存配置目录。
[root@k8s-master ~]# cd /sys/fs/cgroup/memory/docker/53bc7a75231a6a9501c47db15f69cb11ad07d8f248b1e1fd83cc0f4bcfca75e9/步骤 3 进入该容器的内存配置目录,查看内存配置文件。查看到内存使用限制为 400M,内存和SWAP 资源为 500M。
[root@k8s-master 53bc7a75231a6a9501c47db15f69cb11ad07d8f248b1e1fd83cc0f4bcfca75e9]# cat memory.limit_in_bytes
419430400
[root@k8s-master 53bc7a75231a6a9501c47db15f69cb11ad07d8f248b1e1fd83cc0f4bcfca75e9]#
[root@k8s-master 53bc7a75231a6a9501c47db15f69cb11ad07d8f248b1e1fd83cc0f4bcfca75e9]# cat memory.memsw.limit_in_bytes
524288000
步骤 4 为方便后续实验,删除本小节中的容器。
[root@k8s-master 53bc7a75231a6a9501c47db15f69cb11ad07d8f248b1e1fd83cc0f4bcfca75e9]# docker ps -a -q | head -n 1 | xargs docker kill
53bc7a75231a
[root@k8s-master 53bc7a75231a6a9501c47db15f69cb11ad07d8f248b1e1fd83cc0f4bcfca75e9]# docker ps -a -q | head -n 1 | xargs docker rm
53bc7a75231a
[root@k8s-master 53bc7a75231a6a9501c47db15f69cb11ad07d8f248b1e1fd83cc0f4bcfca75e9]#


 325
325


 被折叠的 条评论
为什么被折叠?
被折叠的 条评论
为什么被折叠?
 到【灌水乐园】发言


