


为什么要用 markdown 来生成页面
对于展示型网站,例如官网这种场景,会有很多小的页面,运营会根据市场时刻有增删修改类似页面的需求,如果每次都响应运营的需求,不断地迭代增删页面,这个工作是很难终结的,运营不能及时看到页面,而开发会深陷在重复繁杂的工作中。
对于某些项目的详情页面,排版固定,可以提前制定样式,运营人员只需关注内容,而 markdown 的出现的目的就是让用户只关注内容而非排版。
市面上供用户使用,能生成 html 的编辑器多为富文本编辑器,富文本编辑器优点是样式可以自由定制,但在我们的官网场景中,样式的不可控反而成了其缺点,我们不可能让官网的展示凭用户喜好随意改动。
把页面的控制权交给运营,解放其他人员,是这个方案最大的出发点。
实现思路
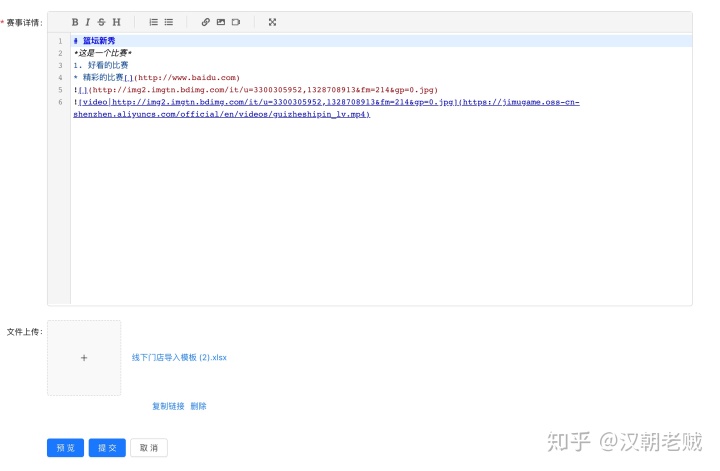
运营人员后台通过 markdown 编辑器输出内容,通过预览或者保存后,在前台编译成 html,而 html 相关样式则是提前定制好的。
技术选型和实现流程
markdown 只是一种语法规则,可以按照一定标记编译成 html。 对于开发人员来说这最熟悉不过了,很多文档都是基于 markdown 直接生成的。
用户的输入需要在编辑器上展开,我们可以通过 code-mirror 来自己手撸一个,但是那样会耗费不少精力,投入产出比不高,而 markdown 编辑器的实现市面上有很多,经与产品确认,我们选择了一个比较小而精美的库 promarkdown。
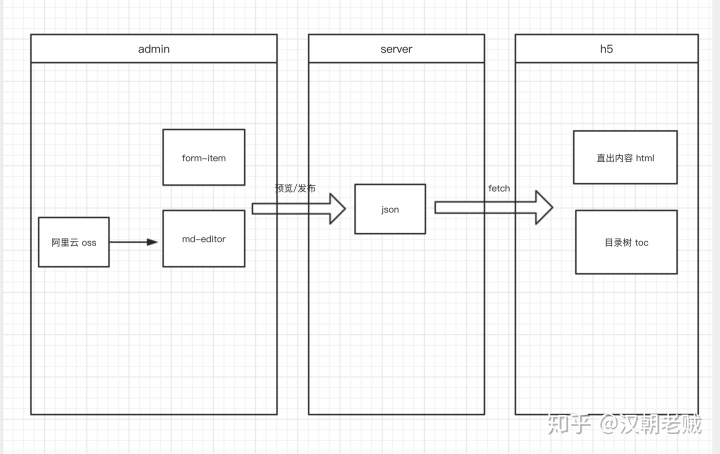
用户根据 md 语法规则在编辑器上输入内容后,点击预览/发布,会将整个表单内容以 json 的形式保存到后台,然后 h5 通过获取信息展示效果。
h5 拿到 json 数据后,利用 marked.js 会将 md 解析成 html, 再通过 html-to-react 转成 react node。
至于为什么要通过要转成 react node, 而不是直接用 HTML, 主要是因为有些 markdown 标签是需要解析成 react 组件的,并不全是 html。
而渲染这些 html 的 css 则是预先定好的
article {
  article {
    border-top: 1px solid transparent;

    section {
      // margin-bottom: 60px;

      // &:first-child {
      //   margin-top: 60px;
      // }

      &:last-child {
        margin-bottom: 60px;
      }

      & > *:not(img):not(.videoPlayer, h1) {
        margin: 0 20px;
      }

      & > *:not(:last-child, h1) {
        margin-bottom: 10px !important;
      }

      h1 {
        font-size: 28px;
        font-weight: 700;
        color: #333333;
        line-height: 40px;
        margin-top: 60px;
      }

      p {
        font-size: 16px;
        color: #333333;
        line-height: 28px;
      }

      img {
        display: block;
        margin: 0 auto;
        width: 100%;
      }

      .video-js {
        padding-top: 56.53vw !important;
      }

      em {
        font-style:italic;
      }

      table {
        font-size: 16px;
        color: #333;
        line-height: 28px;

        tr {
          height: 28px;

          td {
            vertical-align: top;
          }

          td:first-child {
            margin-right: 1em;
            padding-right: 1em;
            white-space: nowrap;
            font-weight: 500;

            &::after {
              content: ':';
            }
          }
        }
      }

      ol, ul {
        font-size: 16px;
        color: #333333;
        line-height: 28px;
      }

      ol {
        counter-reset: item 0;

        li {
          counter-increment: item 1;

          &::before {
            content: counter(item) '. ';
          }
        }
      }

      ul {
        li {
          &::before {
            content: '• ';
            font-weight: bold;
          }
        }
      }
    }
  }
}
这样就能得到我们想要得到的效果。
admin 端:
展示端:

流程如下:
遇到的问题及解决方法
如何扩展 markdown 不支持的标签,如视频
markdown 语法编译为 html 只支持部分标签,而视频并不支持,而且如果我们需要使用我们自己封装的组件,就需要做一些处理,比如我们需要在 markdown 中插入视频,就是在原有的 image 的解析方式来完成的
这个规则默认会解析成 img 标签,但是我们可以这样自定义渲染方式:
import React from 'react'
import marked from 'marked'
import HtmlToReact from 'html-to-react'
import { VideoPlayer } from '@/components'

const imageParse = (href, title, text) => {
    if (text.indexOf('video') > -1) {
        const poster = text.substr(6)
        return `<%video poster='${poster}' src='${href}' />`
    }
    return `</p><img src="${href}" alt=""/><p>`
}


function formatVideo(source) {
    if (!source.match(/poster=/)) return htmlToReactParser.parse(source)
    else {
        const poster = source.match(/poster='(.*)' src=.*'/)[1]
        const src = source.match(/poster='.*' src='(.*)'/)[1]
        return <VideoPlayer poster={poster} src={src} key={src} />
    }
}

renderer.image = imageParse

export default (content) => {
    // ....
    try {
        const outputs = html.split(/<%video(.*)/>/)
        formatted = outputs.map(o => formatVideo(o))
    } catch (error) {
        console.log(error)
    }
    // 返回解析内容
    return { formattedNode: formatted, toc }
}
如何生成目录树
拦截 marked 对标题的解析,并且将标题保存到一个数组里,即可实现目录树,并且实现锚点跳转。
// 生成目录树
const toc = defaultToc
const headingParse = (text, level, raw) => {
    const anchor = raw.toLowerCase().replace(/[^w]+/g, '-')
    if (level >= 2) return `<h${level} id="${anchor}">${text}</h${level}>n`
    toc.push({
        level,
        text,
    })
    return `<h${level} id="${text}">${text}</h${level}>n`
}
如何让编辑器更好用
- 接入阿里云 oss 上传,无需到阿里云管理端上传文件再获取链接
- 实现预览功能
预览和发布的区别是,两个操作对应前端的两个不同路由,而预览的路由是只暴露给管理员,发布则是暴露给所有人,这样就实现了预览功能并且在前端共用了一套样式代码和 md 解析逻辑。
- 离开页面提示保存
限制及相关取舍
- 页面仅限于无特殊交互的纯展示页面,类似于 html 加上定制的 css,而无法加入 js 的控制
- 如果要扩展 markdown 以外的标签,需要使用一些 hack 的方式去实现,比较麻烦


 913
913


 被折叠的 条评论
为什么被折叠?
被折叠的 条评论
为什么被折叠?
 到【灌水乐园】发言


