


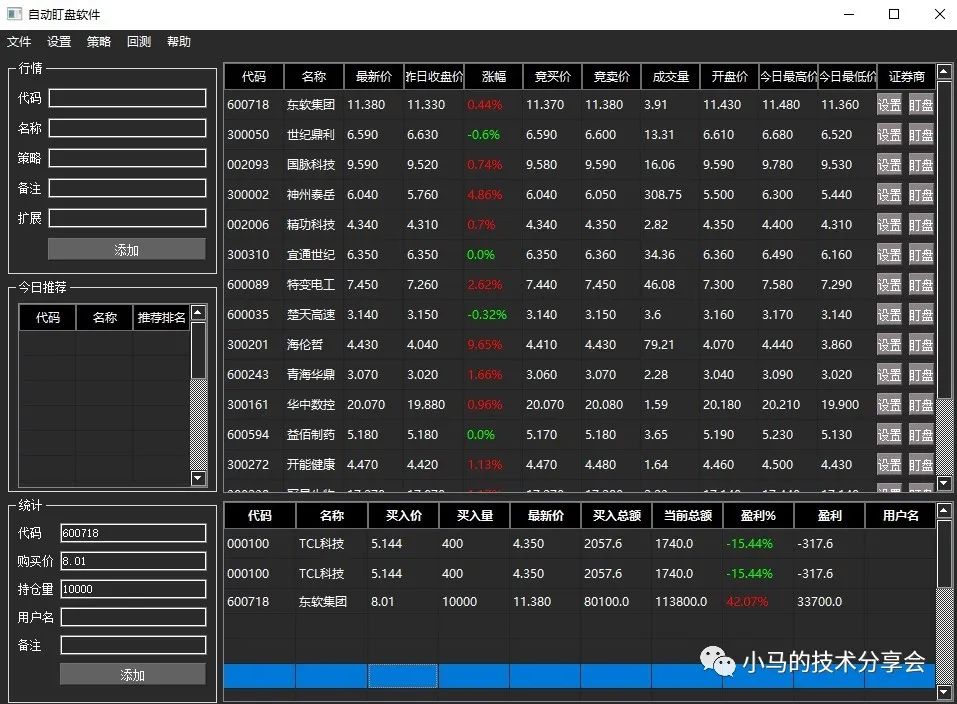
今天教大家基于Python+pyqt5开发一款股票盯盘小软件,里面含有微信推送、策略分析、回测、实时统计持仓盈亏等功能,其实我们也可以把它叫做股票量化小软件。开发这么一款小软件首先得具备Python的基本编程知识以及pyqt5模块的应用能力。我们最终完成的股票盯盘小软件的界面如下:
一.开发环境搭建
1.Python环境搭建
1)下载python3.7
2)安装Python 3.7.6
2.Pycharm 环境搭建
1)下载Pycharm
2)安装Community版本Pycharm
3.Pyqt5安装
1)安装pyqt5
2)配置pycharm
二.量化概述
1.数据源
2.策略
三.软件介绍
1.设置策略
2.微信实时盯盘
3.新闻关键字云图
4.持仓亏盈统计
四.代码源文件
一.开发环境搭建
1.Python环境搭建
Python是目前为止较为主流的开发语言,它的应用无处不在,可以这么说无论在科学研究或工程技术中,只要你想用Python来实现功能,它都满足你的需求;python只是一个解决问题的比较方便的工具,针对某一问题和需求,首先我们要有一个明确的解决思路,也就是所谓的算法,其次我们菜利用python这个强大的工具来实现。比如我们要做金融领域的量化,我们要明白我们量化系统最终需要哪些必要的功能和策略。怎么去得到股票数据,怎么去计算,怎么展现结果等。咱们就从零开始学习基于python搭建一个量化的交易软件,正确的来说他是一款具有实时盯盘、统计盈亏‘、新闻关键字排序、股票打分等功能的一款软件。我们这里采用的是windos平台下的python3.7,具体下载和安装步骤如下: 1)下载python3.7官网的下载地址:https://www.python.org/,进入后点击Python官网的Downloads,然后在下拉菜单中点Windows,直接进入版本选择页面如下图所示,这里我选择的3.7.6版本,可根据自己电脑选择64或32位的下载即可。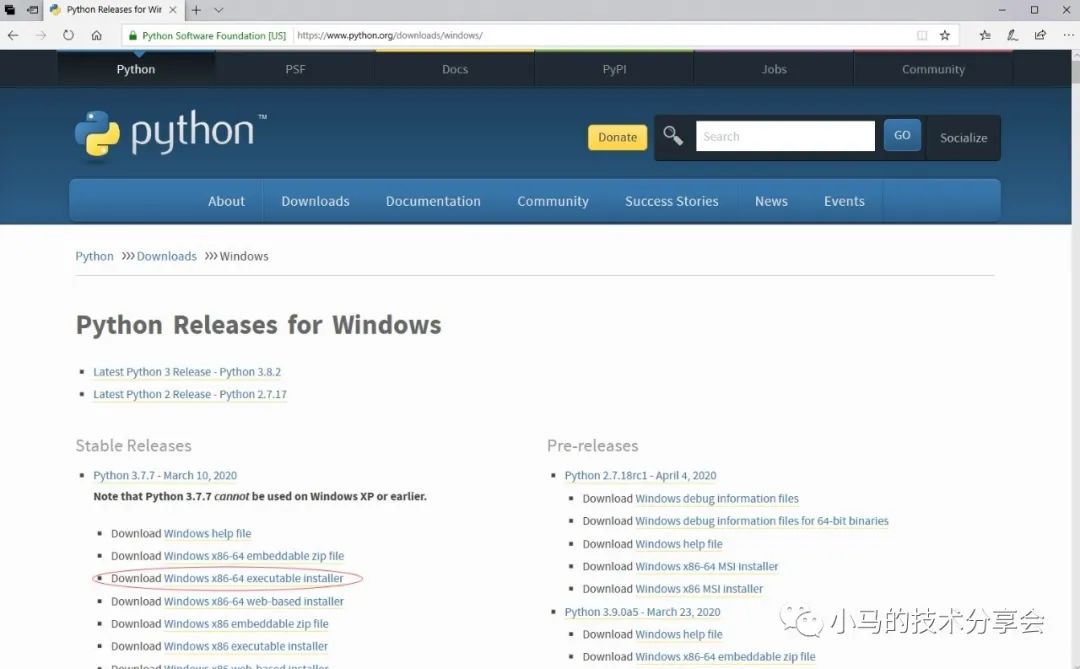
2)安装Python 3.7.6
①双击下载的Python3.7.6安装文件,然后将下方的两个选项框都打钩上,(下图装第二遍可能没有);
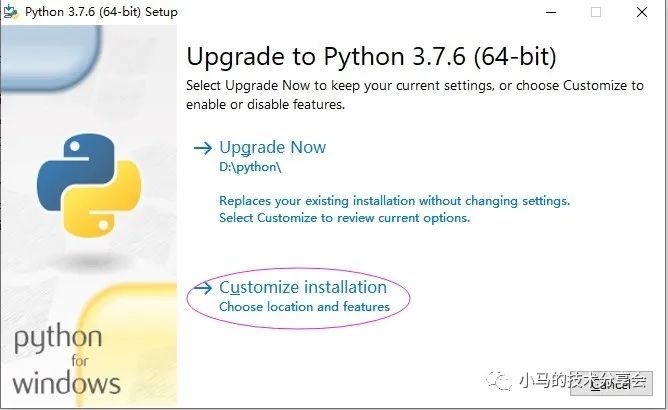
②再点击Customize installation进入下一步;
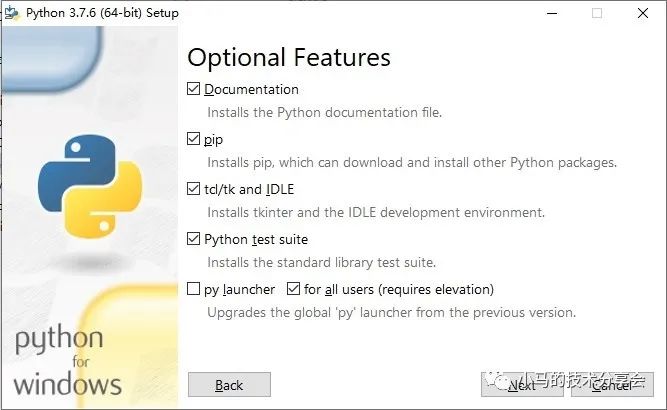
③OptionalFeatures界面默认所有选项都是打钩的,保持默认即可,点击Next进入下一步;
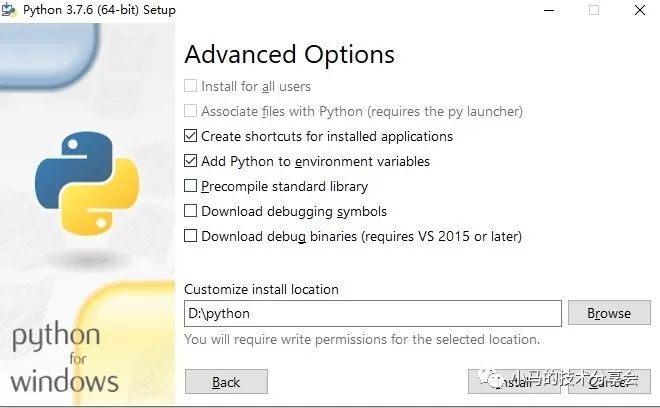
④将Install for all users选项打钩,其他的选项保持默认,默认安装路径不变,点击Install进行安装;
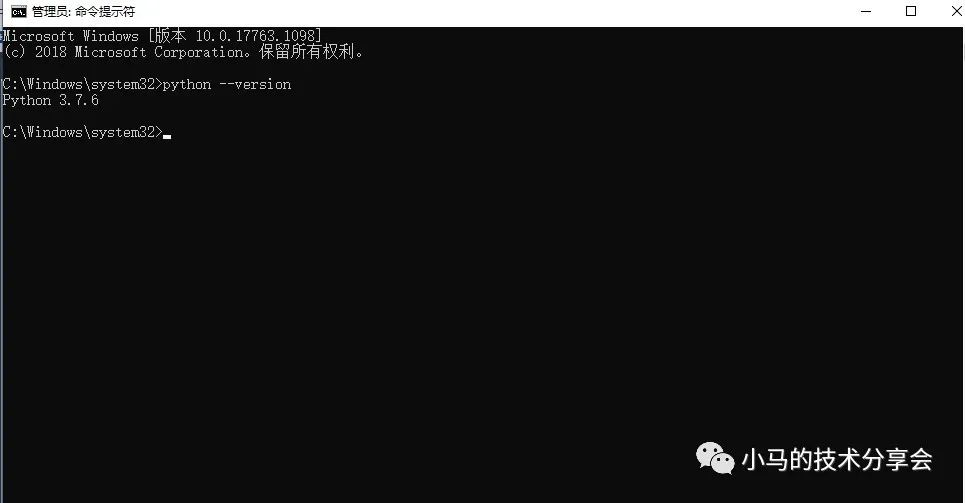
⑤验证是否安装python,已管理员身份进入cmd 命令框,输入python --version,查询python安装版本,输出python版本号,表明已安装。
 2.Pycharm 环境搭建
基于python的开发环境有很多,在这里我们选择了Pycharm,PyCharm 是 JetBrains 开发的 Python IDE。PyCharm开发环境风格比较大气,本人比较喜欢,具有语法点亮,自动补全,错误提示,以及程序结构显示等功能,比较容易上手。1)下载Pycharm
推荐官方下载地址:https://www.jetbrains.com/pycharm/download/#section=windows
选择Community版本下载;

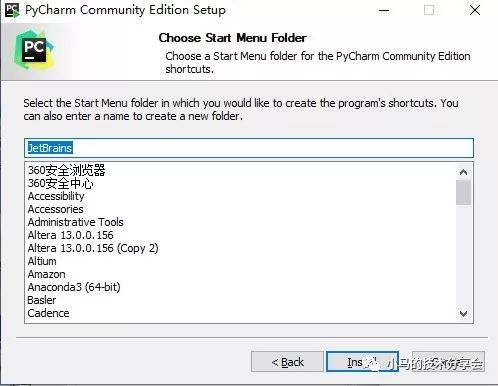
2)安装Community版本Pycharm
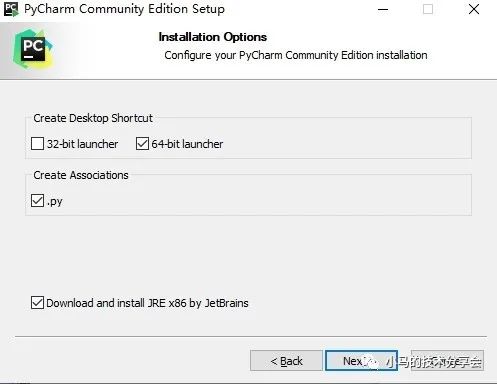
①双击下载的安装包,然后会弹出来以下界面,点击next下一步;
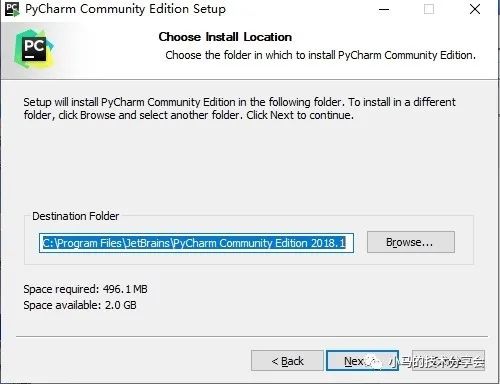
②选择安装目录,将其安装在默认C盘目录,或可更改安装目录到其它盘
Python GUI(用户界面)工具包有许多,这里我们选择Qt版本中的PyQt5,PyQt5是QT在Python中的一个开发包,有较强的跨平台性能,可运行再主流的操作系统(Window,Linux,Mac)。
在Windows系统下,搭建PyCharm +Python + PyQt5,其中PyQt5有两种应用方式来设计GUI界面。1.直接使用Python代码设计界面,这种方式效率略显低些,但适合开发小界面;2. 使用QtDesigner进行可视化设计,然后将生成的.ui文件转换成.py文件,通过调用.py文件实现用户界面,这种方式能够大大提高开发效率。针对此项目,我们这两种方式都有所应用。1)安装pyqt5
以管理员身份打开cmd,输入以下命令安装:
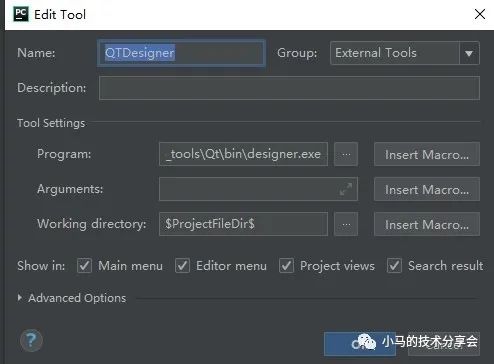
Pip install pyqt5Pip install pyqt5-tools2)配置pycharm
File->seting->tools->external toolsQTDesigner:
Program: ..Python\Python37\Lib\site-packages\pyqt5_tools\Qt\bin\designer.exe
Argyments: 空
Working directory: $ProjectFileDir$
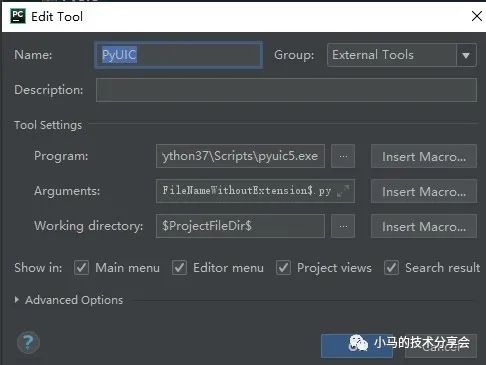
PyUIC:
Program: …………………\Python\Python37\Scripts\pyuic5.exe
Argyments: $FileName$ -o $FileNameWithoutExtension$.py
Working directory: $ProjectFileDir$
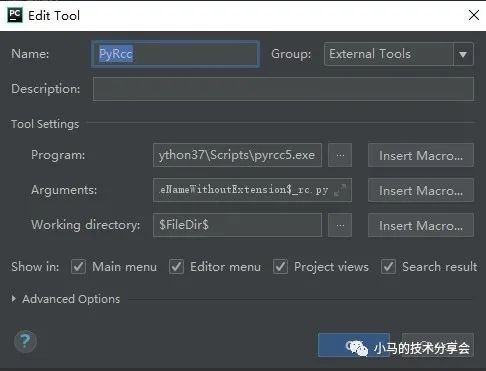
PyRcc:
Program: ………\Python\Python37\Scripts\pyrcc5.exe
Argyments: $FileName$ -o $FileNameWithoutExtension$_rc.py
Working directory: $FileDir$
在股票量化中,首先我们要获取数据,目前能够提供股票数据的网站有:www.baostock.com/ 和http://tushare.org/,以及还有新浪网,各自的网站都有各自的优缺点,具体可进入相关网站进行查看,我们在应用这些数据库时首先要将其导入到库中:import tushare 或者import baostock,然后通过查看相应库中的函数进行调用,实现数据的获取和分析。有了数据源我们在后续的策略研究和回测中就如鱼得水了。2.策略
所谓策略,就比如你现在有一个这样的想法:在每天收盘后,找出当天涨停的股票,并分析其前5日的成交量和价格以及涨停时刻。这个想法只是一个定性的模糊描述,我们并不确定涨停多少,成交量涨幅多少以及价格涨幅多少等参数,作为我们判定的依据。此时,我们将给这些模糊不确定的量赋予一定的值,然后转化为计算机程序来实现这个想法,这就是一个策略。那我们在执行这个策略的过程其实就是一种量化。当然我们实现这个策略有以下两种方式。
1)我们可以根据经验或者观察数据总结出参数来赋值给这些模糊不确定的变量,通过对历史数据进行验证,并筛选合适的参数作为此策略的参数来应用。
2)我们通过利用机器学习算法或者神经网络算法对历史数据进行算法学习,获取此模型的参数,即可利用此模型进行预测处理。
三.软件介绍
软件实现的功能主要有:设置策略、微信盯盘、在线盯盘、盈亏统计、历史回测等功能,具体实现如下图所示:
1.设置策略
当然此模块可扩展性还很大,通过以下功能首先可熟悉下对python在量化中的应用。1)可统计分析出每个历史时间段的交易量和交易量的增长比,并能够通过曲线展现出来;
2)可计算统计出近几天的涨停股票的类型,并对类型股进行排名;
3)可通过选择的概念股类型,计算出所关注的概念股的最优股。
class SencondStrategyTest(QWidget): InputCore=" " InputData=" " InputTime1=" " InputTime2=" " inputcodetype10=[] def __init__(self, parent=None): # super().__init__ super(SencondStrategyTest, self).__init__(parent) # self.newWindowUI AllType = {2:'所有',3: '5G概念', 4:'物联网',5:'云计算',6:'机器人概念',7:'生物疫苗',8:'基因测序',9: '免疫治疗', 10:'新能源',11:'央企50',12:'生物燃料',13:'充电桩'} AllType2 = {2: '量价齐增', 3: '量价齐降', 4: '量增价降',5:''} layout = QFormLayout() self.comboBox=QComboBox() self.comboBox2 = QComboBox() self.edita3 = QLineEdit() self.edita5 = QLineEdit() self.edita6 = QLineEdit() self.pushbt1=QPushButton() self.pushbt1.setText('同步数据') self.pushbt2 = QPushButton() self.pushbt2.setText('计算') layout.addRow("股票类型:", self.comboBox) layout.addRow("选择策略:", self.comboBox2) layout.addRow("起始日期:", self.edita5) layout.addRow("截至日期:", self.edita6) # layout.addWidget(self.pushbt1) # layout.addWidget(self.pushbt2) layout.addRow(self.pushbt1,self.pushbt2) # self.edita3.setGeometry(80,30,960,480) # print(self.edita3.size()) self.setLayout(layout) self.resize(200, 150) self.move(200, 200) self.setStyleSheet("background-color: #BDBDBD") self.setWindowTitle('选股') self.setMaximumSize(200, 150) self.setMinimumSize(200, 150) self.edita3.setText("5G概念") self.edita5.setText("2020-03-06") self.edita6.setText("2020-03-12") self.comboBox.clear() # 清空items self.comboBox.addItem('请选择') self.comboBox2.clear() # 清空items self.comboBox2.addItem('请选择') for k, v in AllType.items(): self.comboBox.addItem(v, k) # 键、值反转 for k2, v2 in AllType2.items(): self.comboBox2.addItem(v2, k2) # 键、值反转 self.pushbt1.clicked.connect(self.DatanewWindowUI) self.pushbt2.clicked.connect(self.newWindowUI) def newWindowUI(self): Typecode_index = self.comboBox.currentIndex() Typecode_name = self.comboBox.itemText(Typecode_index) SencondStrategyTest.InputCore=Typecode_name # SencondStrategyTest.InputCore=self.edita3.text() SencondStrategyTest.InputTime1=self.edita5.text() SencondStrategyTest.InputTime2=self.edita6.text() self.CompuerDay() def DatanewWindowUI(self): Typecode_index = self.comboBox.currentIndex() Typecode_name = self.comboBox.itemText(Typecode_index) SencondStrategyTest.InputCore = Typecode_name SencondStrategyTest.InputTime1 = self.edita5.text() SencondStrategyTest.InputTime2 = self.edita6.text() if SencondStrategyTest.InputCore =='所有': readText = pd.read_csv('stockdata.csv', converters={'code': str}) codearry = readText['code'] codearry = list(codearry) print("all") else: ArryCode = self.findtypeCode(SencondStrategyTest.InputCore) ArryCode = ArryCode['code'] codearry = ArryCode.values print("code") self.getdate(codearry, SencondStrategyTest.InputTime1, SencondStrategyTest.InputTime2)2.微信实时盯盘
此功能可以设置每个股票的上下限,然后通过点击灯盘,当目标股票超过设置的上下范围时,可向绑定的微信推送消息,同时可设置30只股票同时盯盘。 def gettoken(self,corpid, corpsecret): gettoken_url = 'https://qyapi.weixin.qq.com/cgi-bin/gettoken?corpid=' + corpid + '&corpsecret=' + corpsecret try: token_file = urllib.request.urlopen(gettoken_url) except urllib.request.URLError as e: print(e.code) print(e.read().decode("utf8")) sys.exit() token_data = token_file.read().decode('utf-8') token_json = json.loads(token_data) token_json.keys() token = token_json['access_token'] return token def senddata(self,access_token, user, party, agent, subject, content): send_url = 'https://qyapi.weixin.qq.com/cgi-bin/message/send?access_token=' + access_token send_values = "{\"touser\":\"" + user + "\",\"toparty\":\"" + party + "\",\"totag\":\"\",\"msgtype\":\"text\",\"agentid\":\"" + agent + "\",\"text\":{\"content\":\"" + subject + "\n" + content + "\"},\"safe\":\"0\"}" send_request = urllib.request.Request(send_url, send_values.encode("utf-8")) response = json.loads(urllib.request.urlopen(send_request).read()) # print(str(response)) def printTime(self,subject,content): # data = ts.get_realtime_quotes('002230') user=ThreeWindow.InputUSER # user = "yaoxuexi" # 参数1:发送给用户的账号,必须关注企业号,并对企业号有发消息权 # party = "2" # 参数2:发送给组的id号,必须对企业号有权限 party=ThreeWindow.InputID agent = " " # 参数3:企业号中的应用id # subject = " " # 参数4:标题【消息内容的一部分】 # content = str(float(data['price'])) # 参数5:文本具体内容 corpid = " " # CorpID是企业号的标识 corpsecret = " " # corpsecretSecret是管理组凭证密钥 # if float(data['price']) > 39.5: try: accesstoken = self.gettoken(corpid, corpsecret) self.senddata(accesstoken, user, party, agent, subject, content) except Exception as err: print("Error Please Check \"corpid\" or \"corpsecret\" Config", err)3.新闻关键字云图
可实现对当天财经网站新闻的分析处理,提炼出出现频率最高的词语,并通过绘制成云图显示,即最大字体的词语就是出现频率最高。def wordsYun(self, mylist): word_list = [" ".join(jieba.cut(sentence)) for sentence in mylist] new_text = ' '.join(word_list) img = plt.imread("maj.jpg") wc = WordCloud(background_color="white", mask=img, # 设置背景图片 max_font_size=120, # 字体最大值 random_state=42, # 颜色随机性 font_path="C:/Windows/Fonts/simfang.ttf") # font_path显示中文字体,这里使用黑体#生成词云 wc.generate(new_text) image_colors = ImageColorGenerator(img) # 设置图片大小 now = datetime.datetime.now() plt.figure(figsize=(14, 12)) plt.imshow(wc) plt.title(now.strftime('%Y-%m-%d'), fontsize=18) plt.axis("off") plt.show()4.持仓亏盈统计
此功能可实现实时计算出所购买股票的价格变化,盈亏变化等,这对我来说应用十分方便,大家可以试一下。class SecondWindow(QWidget): PPHight=[] PPLow=[] TxtreadHight=[] TxtreadLow = [] for i in range(30): PPHight.append("10") PPLow.append("-10") # TxtreadHight.append("10") # TxtreadLow.append("-10") def __init__(self, parent=None): # super().__init__ super(SecondWindow, self).__init__(parent) # self.newWindowUI layout = QFormLayout() self.edita3 = QLineEdit() self.edita4 = QLineEdit() self.edita5 = QLineEdit() self.pushbt1=QPushButton() self.pushbt2 = QPushButton() self.pushbt1.setText('重置') self.pushbt2.setText('读取') layout.addRow("上限(%)", self.edita3) layout.addRow("下限(%)", self.edita4) layout.addRow("策略", self.edita5) layout.addWidget(self.pushbt2) layout.addWidget(self.pushbt1) self.setLayout(layout) self.resize(200, 160) self.move(200, 200) self.setStyleSheet("background-color: #BDBDBD") self.setWindowTitle('设置') self.setMaximumSize(200, 160) self.setMinimumSize(200, 160) # self.edita3.setText("10") # self.edita4.setText("-10") # self.textSet_read("SetPara") self.pushbt1.clicked.connect(self.newWindowUI) self.pushbt2.clicked.connect(self.newWindowUI2) def newWindowUI(self): Pnum = MyButtonDelegate.num # self.textSet_read("SetPara") # self.edita3.setText(str(SecondWindow.TxtreadHight[int(Pnum[0])])) # self.edita4.setText(str(SecondWindow.TxtreadLow[int(Pnum[0])])) PHight=self.edita3.text() PLow=self.edita4.text() # SecondWindow.PPHight.insert(int(Pnum[0]), 2009) SecondWindow.PPHight[int(Pnum[0])]=PHight SecondWindow.PPLow[int(Pnum[0])] = PLow self.saveSet_txt(SecondWindow.PPHight,SecondWindow.PPLow,"SetPara.txt") def newWindowUI2(self): Pnum = MyButtonDelegate.num self.textSet_read("SetPara") # print(Pnum) # print(SecondWindow.TxtreadHight) self.edita3.setText(str(SecondWindow.TxtreadHight[int(Pnum[0])])) self.edita4.setText(str(SecondWindow.TxtreadLow[int(Pnum[0])])) def saveSet_txt(self,list1, list2, save_path): if os.path.isfile(save_path): os.remove(save_path) with open(save_path, "a") as f: for i in range(len(list1)): f.write('{:},{:}\n'.format(list1[i], list2[i])) f.close() def textSet_read(self,filename): # f = open(filename + ".txt", "r") SecondWindow.TxtreadHight=[] SecondWindow.TxtreadLow=[] file = f.readlines() for namecore in file: namecore = namecore.strip(']') namecore = namecore.strip('[') namecore = namecore.strip('\n') # SecondWindow.Txtread.append(namecore) kl=namecore.split(',') SecondWindow.TxtreadHight.append(kl[0]) SecondWindow.TxtreadLow.append(kl[1]) f.close()四.下载源码
关注公众号:xiaomaIOT 小马的技术分享会,获得更多详细的知识,同时添加qq:823172641可获得源码的下载地址。


 507
507


 被折叠的 条评论
为什么被折叠?
被折叠的 条评论
为什么被折叠?
 到【灌水乐园】发言


