webpack中html相关配置
如何让我们的文件优雅运行
- 很多时候我们不希望直接本地打开文件进行访问,而是通过
localhost进行访问。这时候就需要我们配置一下就可以实现。
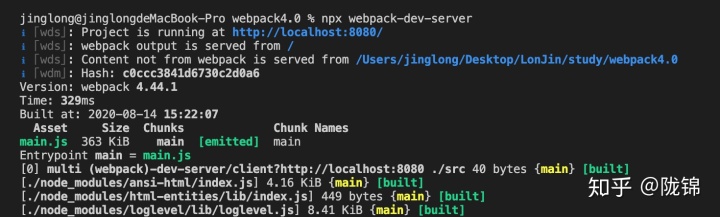
开启我们的server
npm add webpack-dev-server -D
- 会发现生成了
http://localhost:8080/,打开发现目前是在根目录下了。 - 这时候新需求来了:如何直接进入
dist文件夹?
配置devServer
- 首先在
package.json文件中配置一个脚本: - 在
scripts下增加一行"dev":"webpack-dev-server",完整代码如下:
{
        "name": "webpackdemo",
        "version": "1.0.0",
        "description": "",
        "main": "index.js",
        "scripts": {
            "test": "echo "Error: no test specified" && exit 1",
            "build": "webpack --config webpack.config.js",
            "dev":"webpack-dev-server",
        },
        "keywords": [],
        "author": "",
        "license": "ISC",
        "devDependencies": {
            "webpack": "^4.44.1",
            "webpack-cli": "^3.3.12",
            "webpack-dev-server": "^3.11.0"
        }
    }
- 然后打开
webpack.config.js在module.exports里面进行配置:
devServer:{//开发服务器配置
        port:'3002',//端口
        progress:true,//打包进度
        contentBase:'./dist',//访问到dist目录
        compress:true,//开启压缩
    },
let path=require('path');

    module.exports={
        devServer:{//开发服务器配置
            port:'3002',//端口
            progress:true,//进度
            contentBase:'./dist',
            compress:true,//压缩
        },
        mode:'development',//模式 默认两种 production(生产环境) development(开发环境)
        entry:'./src/index.js',//入口文件
        //output 出口文件
        output:{
            filename:'index.js',//打包后文件名
            path:path.resolve(__dirname,'dist')//必须为绝对路径
        }
    }
- 这时候再执行
npm run dev,我们就会发现开启了http://localhost:3002/端口,并且指向了dist文件夹中的index.html。
html文件处理
- 我们一开始
在dist文件夹中是没有index.html文件的,平时写代码index.html可能在src目录下,我们需要webpack帮我们顺便把index.html也放到dist目录下。 - 首先我们需要安装一个插件:
npm add html-webpack-plugin -D
- 安装完成后在
webpack.config.js中引用:
let HtmlWebpackPlugin=require('html-webpack-plugin')
plugins:[//数组,里面放着所有的webpack插件
        new HtmlWebpackPlugin({
            template:'./src/index.html',//指定文件
            filename:'index.html'//输出文件名字
        })
    ]
let path=require('path');

    let HtmlWebpackPlugin=require('html-webpack-plugin')
    module.exports={
        devServer:{//开发服务器配置
            port:'3002',//端口
            progress:true,//进度
            contentBase:'./dist',
            compress:true,//压缩
        },
        mode:'development',//模式 默认两种 production(生产环境) development(开发环境)
        entry:'./src/index.js',//入口文件
        //output 出口文件
        output:{
            filename:'index.js',//打包后文件名
            path:path.resolve(__dirname,'dist')//必须为绝对路径
        },
        plugins:[//数组,里面放着所有的webpack插件
            new HtmlWebpackPlugin({
                template:'./src/index.html',//指定文件
                filename:'index.html'//输出文件名字
            })
        ]
    }
- 配置完成后执行
npm run dev,项目也跑起来了。
压缩html
minify:{
    removeAttributeQuotes:true,//删除双引号
    collapseWhitespace:true,//折叠空行
}
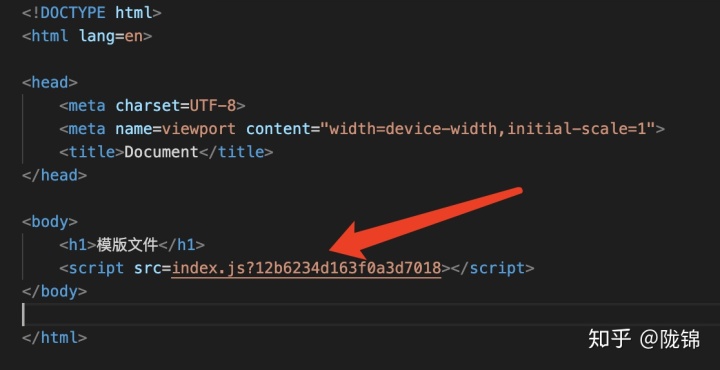
- 同时可以配置一下
hash:true,避免缓存,目前完整代码如下:
let path=require('path');

    let HtmlWebpackPlugin=require('html-webpack-plugin')
    module.exports={
        devServer:{//开发服务器配置
            port:'3002',//端口
            progress:true,//进度
            contentBase:'./dist',
            compress:true,//压缩
        },
        mode:'production',//模式 默认两种 production(生产环境) development(开发环境)
        entry:'./src/index.js',//入口文件
        //output 出口文件
        output:{
            filename:'index.js',//打包后文件名
            path:path.resolve(__dirname,'dist')//必须为绝对路径
        },
        plugins:[//数组,里面放着所有的webpack插件
            new HtmlWebpackPlugin({
                template:'./src/index.html',//指定文件
                filename:'index.html',//输出文件名字
                minify:{
                    removeAttributeQuotes:true,//删除双引号
                    collapseWhitespace:true,//折叠空行
                },
                hash:true//避免缓存
            })
        ]
    }
- 这时候可以打开
dist目录下的index.html,格式化一下,看一下js文件后面已经加了hash:
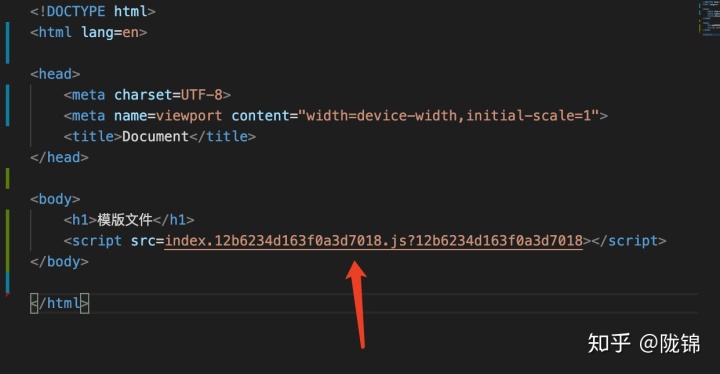
- 如果想给输出的index.js文件名字加
hash来避免缓存,同样在filename后面给输出文件中使用[hash]
filename:'index.[hash].js',//打包后文件名
- 执行打包命令
npm run build,看一下index.js文件名字已经修改。
总结
我们平时希望项目通过
localhost访问,我们就可以安装
webpack-dev-server,进行项目启动,通过配置
devServer实现项目启动时候直接指向
dist目录。平时写的html可能在src文件夹下,这时候可以通过插件让webpack帮我们吧html也顺带处理一下,以及通过配置
hash来避免缓存问题。
- 如果你想看之前的文件,可以关注我的知乎专栏:LonJin的知乎专栏。
- 欢迎点赞收藏!


 671
671


 被折叠的 条评论
为什么被折叠?
被折叠的 条评论
为什么被折叠?
 到【灌水乐园】发言


