


序言
- 硬件环境:Virtualbox内建虚拟机
- OS环境:ubuntu18.04
- K8s集群环境:单节点的all-in-one环境
这儿我采用的是Helm安装的方式。
1. NFS服务器的搭建
# nfs软件包安装
apt-get update
apt-get install nfs-common nfs-kernel-server -y

# 创建共享目录且设置权限
mkdir -p /data/k8s
chmod -R 777 /data/k8s

# 挂载配置
cat << EOF >> /etc/exports
>/data/k8s *(rw,sync,no_root_squash)
>EOF

# nfs-server设置开机启动并开启服务
systemctl enable nfs-kernel-server
systemctl start nfs-kernel-server
2. 安装K8s NFS后端存储驱动插件
下文的安装的Harbor采用NFS作为后端存储,所以首先需要在K8s集群安装对应的驱动的插件nfs-client-provisioner,这儿采用helm安装。
# 添加NFS helm仓库
helm repo add github https://kubernetes-charts.storage.googleapis.com/

# 安装nfs-client-provisioner
helm install github/nfs-client-provisioner --set nfs.server=10.0.2.15 --set nfs.path=/data/k8s

# 确认安装
helm list
kubectl get pod | grep nfs-client-provisioner
3. Helm安装Harbor
3.1 下载Harbor Helm安装包
# 这里下载的版本是1.0.0
git clone -b 1.0.0 https://github.com/goharbor/harbor-helm.git
3.2 修改values.yaml
首先进入到harbor-helm目录修改values.yaml文件。
修改主要涉及到两块: 服务暴露的类型,这里我选用nodePort类型; 持久化配置,这里采用基于NFS作为后端存储的动态创建PV的方式;
expose:
  # Set the way how to expose the service. Set the type as "ingress",
  # "clusterIP" or "nodePort" and fill the information in the corresponding
  # section
  type: nodePort
  tls:
    # Enable the tls or not. Note: if the type is "ingress" and the tls
    # is disabled, the port must be included in the command when pull/push
    # images. Refer to https://github.com/goharbor/harbor/issues/5291
    # for the detail.
    enabled: false
    # Fill the name of secret if you want to use your own TLS certificate
    # and private key. The secret must contain keys named tls.crt and
    # tls.key that contain the certificate and private key to use for TLS
    # The certificate and private key will be generated automatically if
    # it is not set
    secretName: ""
    # By default, the Notary service will use the same cert and key as
    # described above. Fill the name of secret if you want to use a
    # separated one. Only needed when the type is "ingress".
    notarySecretName: ""
    # The commmon name used to generate the certificate, it's necessary
    # when the type is "clusterIP" or "nodePort" and "secretName" is null
    commonName: ""
...
# The external URL for Harbor core service. It is used to
# 1) populate the docker/helm commands showed on portal
# 2) populate the token service URL returned to docker/notary client
#
# Format: protocol://domain[:port]. Usually:
# 1) if "expose.type" is "ingress", the "domain" should be
# the value of "expose.ingress.hosts.core"
# 2) if "expose.type" is "clusterIP", the "domain" should be
# the value of "expose.clusterIP.name"
# 3) if "expose.type" is "nodePort", the "domain" should be
# the IP address of k8s node
#
# If Harbor is deployed behind the proxy, set it as the URL of proxy
externalURL: http://10.0.2.15:30002
...
# The persistence is enabled by default and a default StorageClass
# is needed in the k8s cluster to provision volumes dynamicly.
# Specify another StorageClass in the "storageClass" or set "existingClaim"
# if you have already existing persistent volumes to use
#
# For storing images and charts, you can also use "azure", "gcs", "s3",
# "swift" or "oss". Set it in the "imageChartStorage" section
persistence:
  enabled: true
  # Setting it to "keep" to avoid removing PVCs during a helm delete
  # operation. Leaving it empty will delete PVCs after the chart deleted
  resourcePolicy: "keep"
  persistentVolumeClaim:
    registry:
      # Use the existing PVC which must be created manually before bound
      existingClaim: ""
      # Specify the "storageClass" used to provision the volume. Or the default
      # StorageClass will be used(the default).
      # Set it to "-" to disable dynamic provisioning
      storageClass: "nfs-client"
      subPath: ""
      accessMode: ReadWriteOnce
      size: 5Gi
    chartmuseum:
      existingClaim: ""
      storageClass: "nfs-client"
      subPath: ""
      accessMode: ReadWriteOnce
      size: 5Gi
    jobservice:
      existingClaim: ""
      storageClass: "nfs-client"
      subPath: ""
      accessMode: ReadWriteOnce
      size: 1Gi
    # If external database is used, the following settings for database will
    # be ignored
    database:
      existingClaim: ""
      storageClass: "nfs-client"
      subPath: ""
      accessMode: ReadWriteOnce
      size: 1Gi
    # If external Redis is used, the following settings for Redis will
    # be ignored
    redis:
      existingClaim: ""
      storageClass: "nfs-client"
      subPath: ""
      accessMode: ReadWriteOnce
      size: 1Gi
...
几点说明
- 其中
externalURL设置时必须标注协议名称比如http、https等,IP地址是节点的IP,端口可设可不设,默认端口号30002。 - 持久化配置只需写入对应的storageClassName名称,而实际的sc在安装nfs-client-provisioner插件时已经创建好了,可通过如下命令来查看填入即可:
kebectl get sc
3.3 安装Harbor
安装之前不妨检查下配置及相关模板是否有效:
cd harbor-helm
helm install --dry-run --debug .
检查没问题后开始安装Harbor:
helm install --name my-harbor .需要等待一会儿,因为要下载docker镜像,或者我们可以通过命令watch "kubectl get pod"来随时监看harbor pod的创建状态,出现如下结果基本上就代表安装成功了。
root@vinefu-dev:~/harbor-helm# kubectl get pod | grep harbor
my-harbor-harbor-adminserver-dd6c47cd4-h7lvg            1/1     Running     0          3h35m
my-harbor-harbor-chartmuseum-78dd845fbd-dmvl6           1/1     Running     0          3h35m
my-harbor-harbor-clair-85cbd7d6bd-8p8kg                 1/1     Running     2          3h35m
my-harbor-harbor-core-566d4655f5-dbntl                  1/1     Running     0          3h35m
my-harbor-harbor-database-0                             1/1     Running     0          3h35m
my-harbor-harbor-jobservice-ffb4b5859-6zh66             1/1     Running     1          3h35m
my-harbor-harbor-nginx-6cf87f6787-pwlnx                 1/1     Running     0          3h35m
my-harbor-harbor-notary-server-65749ddc8d-rsrwz         1/1     Running     0          3h35m
my-harbor-harbor-notary-signer-676b895677-z6ncj         1/1     Running     0          3h35m
my-harbor-harbor-portal-69f6f6cd76-dm6wf                1/1     Running     0          3h35m
my-harbor-harbor-redis-0                                1/1     Running     0          3h35m
my-harbor-harbor-registry-58f4d56b5c-v2xwh              2/2     Running     0          3h35m
root@vinefu-dev:~/harbor-helm#
root@vinefu-dev:~/harbor-helm# kubectl get svc | grep harbor
harbor                           NodePort    10.99.15.249     <none>        80:30002/TCP,4443:30004/TCP   3h39m
my-harbor-harbor-adminserver     ClusterIP   10.103.68.151    <none>        80/TCP                        3h39m
my-harbor-harbor-chartmuseum     ClusterIP   10.102.192.58    <none>        80/TCP                        3h39m
my-harbor-harbor-clair           ClusterIP   10.100.0.197     <none>        6060/TCP                      3h39m
my-harbor-harbor-core            ClusterIP   10.101.122.30    <none>        80/TCP                        3h39m
my-harbor-harbor-database        ClusterIP   10.101.75.97     <none>        5432/TCP                      3h39m
my-harbor-harbor-jobservice      ClusterIP   10.99.153.78     <none>        80/TCP                        3h39m
my-harbor-harbor-notary-server   ClusterIP   10.108.250.157   <none>        4443/TCP                      3h39m
my-harbor-harbor-notary-signer   ClusterIP   10.110.38.62     <none>        7899/TCP                      3h39m
my-harbor-harbor-portal          ClusterIP   10.110.83.54     <none>        80/TCP                        3h39m
my-harbor-harbor-redis           ClusterIP   10.107.51.162    <none>        6379/TCP                      3h39m
my-harbor-harbor-registry        ClusterIP   10.99.48.247     <none>        5000/TCP,8080/TCP             3h39m
root@vinefu-dev:~/harbor-helm#然后我们就可以在浏览器输入http://10.0.2.15:30002来访问Harbor UI了,其中用户名及密码分别是默认的admin和Harbor12345。
因为我在VirtualBox网络设置做了NAT本地转发,所以我在本地浏览器就能通过127.0.0.1:30002访问啦。
4. Harbor的简单使用
4.1 上传docker镜像
大家也许已经注意到,在更改values.yaml文件配置时我设置了tls.enabled=false,如此的话在上传镜像时就无须证书形式的了,不过还是更新一下docker的设置(因为docker上传镜像默认走https,这儿需要不安全访问的设置):
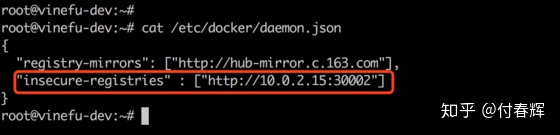
其中,上图中红色标记区域就是要添加的配置,之后重启docker,运行如下命令即可:
systemctl restart docker首次上传镜像还需要harbor镜像仓库的登记:
docker login http://10.0.2.15:30002
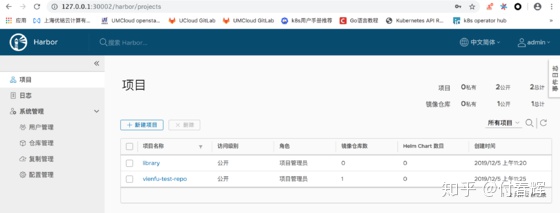
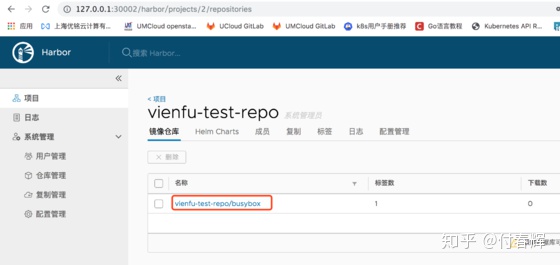
# 根据提示输入对应的用户名和密码:admin和Harbor12345然后回到Harbor UI,新建一个项目,假设名称为vienfu-test-repo,其中访问级别设置成public,下面我们就可以在后台上传镜像了:
# 假设上传本地的docker镜像:busybox
docker tag busybox http://10.0.2.15:30002/vienfu-test-repo/busybox
docker push http://10.0.2.15:30002/vienfu-test-repo/busybox
在Harbor UI的操作界面,点开项目vienfu-test-repo即可看到之前上传的镜像。
4.2 上传Chart
本身Harbor操作界面是提供上传Helm Chart的功能的:
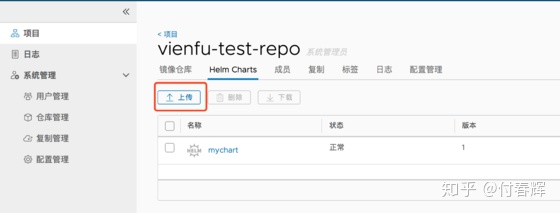
但是对于开发者或者操作人员直接操作界面可能不是很方便,下面提供一种后台CLI命令上传Helm Chart的方法。
首先需要安装Helm push插件:
helm plugin install https://github.com/chartmuseum/helm-push然后就可以上传啦
# 添加helm仓库
helm repo add my-repo http://10.0.2.15:30002/chartrepo/vienfu-test-repo
helm repo list
# 把提前新建好的helm chart上传至harbor
helm push mychart-0.1.0.tgz my-repo --username admin --password Harbor12345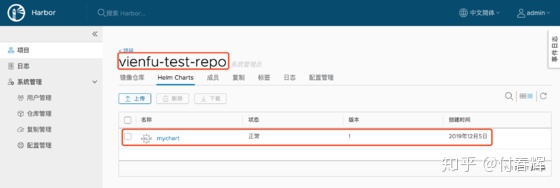


 344
344


 被折叠的 条评论
为什么被折叠?
被折叠的 条评论
为什么被折叠?
 到【灌水乐园】发言


