


写在前面
最近几年,直播行业比较火,无论是传统行业的直播,还是购物、游戏、教育,都在涉及直播。作为在互联网行业奋斗了多年的小伙伴,你有没有想过如果使用Nginx搭建一套直播环境,那我们该如何搭建呢?别急,接下来,我们就一起使用Nginx来搭建一套直播环境。
安装Nginx
注意:这里以CentOS 6.8服务器为例,以root用户身份来安装Nginx。
1.安装依赖环境
yum -y install wget gcc-c++ ncurses ncurses-devel cmake make perl bison openssl openssl-devel gcc* libxml2 libxml2-devel curl-devel libjpeg* libpng* freetype* autoconf automake zlib* fiex* libxml* libmcrypt* libtool-ltdl-devel* libaio libaio-devel bzr libtool2.安装openssl
wget https://www.openssl.org/source/openssl-1.0.2s.tar.gztar -zxvf openssl-1.0.2s.tar.gzcd /usr/local/src/openssl-1.0.2s./config --prefix=/usr/local/openssl-1.0.2smakemake install3.安装pcre
wget https://ftp.pcre.org/pub/pcre/pcre-8.43.tar.gztar -zxvf pcre-8.43.tar.gzcd /usr/local/src/pcre-8.43./configure --prefix=/usr/local/pcre-8.43makemake install4.安装zlib
wget https://sourceforge.net/projects/libpng/files/zlib/1.2.11/zlib-1.2.11.tar.gztar -zxvf zlib-1.2.11.tar.gzcd /usr/local/src/zlib-1.2.11./configure --prefix=/usr/local/zlib-1.2.11makemake5.下载nginx-rtmp-module
nginx-rtmp-module的官方github地址:https://github.com/arut/nginx-rtmp-module
使用命令:
git clone https://github.com/arut/nginx-rtmp-module.git 6.安装Nginx
wget http://nginx.org/download/nginx-1.19.1.tar.gztar -zxvf nginx-1.19.1.tar.gzcd /usr/local/src/nginx-1.19.1./configure --prefix=/usr/local/nginx-1.19.1 --with-openssl=/usr/local/src/openssl-1.0.2s --with-pcre=/usr/local/src/pcre-8.43 --with-zlib=/usr/local/src/zlib-1.2.11 --add-module=/usr/local/src/nginx-rtmp-module --with-http_ssl_modulemakemake install这里需要注意的是:安装Nginx时,指定的是openssl、pcre和zlib的源码解压目录,安装完成后Nginx配置文件的完整路径为:/usr/local/nginx-1.19.1/conf/nginx.conf。
配置Nginx
配置Nginx主要是对Nginx的nginx.conf文件进行配置,我们可以在命令行输入如下命令编辑nginx.conf文件。
vim /usr/local/nginx-1.19.1/conf/nginx.conf在文件中添加如下内容。
rtmp { server { listen 1935; #监听的端口 chunk_size 4096; application hls { #rtmp推流请求路径 live on; hls on; hls_path /usr/share/nginx/html/hls; hls_fragment 5s; } } } 其中,hls_path需要可读可写的权限。接下来,我们创建/usr/share/nginx/html/hls 目录。
mkdir -p /usr/share/nginx/html/hlschmod -R 777 /usr/share/nginx/html/hls接下来,修改http中的server模块:
server { listen 81; server_name localhost; #charset koi8-r; #access_log logs/host.access.log main; location / { root /usr/share/nginx/html; index index.html index.htm; } #error_page 404 /404.html; # redirect server error pages to the static page /50x.html # error_page 500 502 503 504 /50x.html; location = /50x.html { root html; }}然后启动Nginx:
/usr/local/nginx-1.19.1/sbin/nginx -c /usr/local/nginx-1.19.1/conf/nginx.conf 使OBS推流
OBS(Open Broadcaster Software) 是以互联网流媒体直播内容为目的免费和开放源码软件。需要下载这个软件,借助这个软件进行推流(电脑没有摄像头的貌似安装不了。。。)
OBS的下载链接为:https://obsproject.com/zh-cn/download。
安装后,桌面上会有一个如下所示的图表。

打开后我们需要有一个场景,并且在这个场景下有一个流的来源(可以是窗口,如果选的是视频则会自动识别摄像头),接下来就是设置了。

在配置中最需要关注的就是流的配置,由于是自建的流媒体服务器所以我们按照如下所示的方式进行配置。
rtmp://你的服务器ip:端口(1935)/live #URL填写流的地址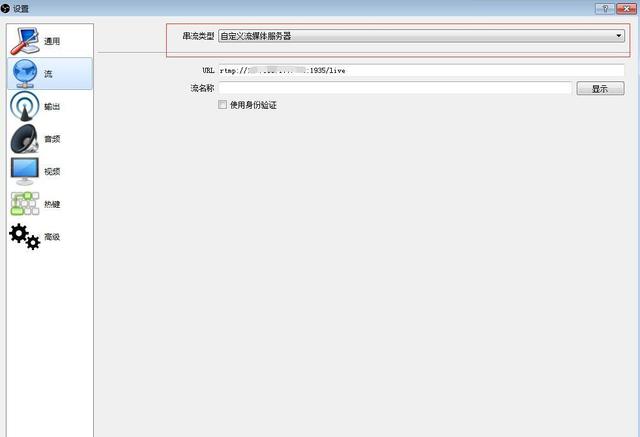
设置完成我们就可以 开始推流了。
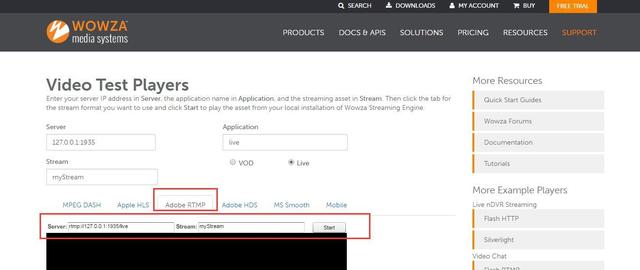
拉流测试地址
推荐一个拉流的测试地址,里面针对各种协议都能测试拉流测试,需要注意图中几个地方,由于我们使用的rtmp协议,我们选择这一栏,底下填写我们推流的地址和我们在上面obs的设置里面配置的流的名称,start, ok搞定!!!
好了,今天就聊到这儿吧!别忘了转发+关注,让更多的人看到,一起学习,一起进步!!
推荐阅读
膜拜!Github上8.5K赞的Nginx从安装、配置、使用、实战文档


 1088
1088

 被折叠的 条评论
为什么被折叠?
被折叠的 条评论
为什么被折叠?
 到【灌水乐园】发言


