


GitHub第三方授权登录
有许多文章都讲过GitHub第三方授权登录,但就是没有.NET Core配合前后端分离的项目(Vue,React)的实践。所以本文以前后端分离项目中如何在授权登录后,生成Token的过程。
后端 .NET Core,使用类库AspNet.Security.OAuth.GitHub
前端技术栈如下:VUE+Vue-Router+axios
AspNet.Security.OAuth.GitHub
GitHub https://github.com/aspnet-contrib/AspNet.Security.OAuth.Providers
GitHub授权登录
什么配置的过程不说了,有许多文章都讲过,这里不详细展开。直接看配置的内容。
可参考如下网站
GitHub 第三方登录 https://www.jianshu.com/p/78d186aeb526
给你的网站添加第三方登录以及短信验证功能 https://juejin.im/post/5dfb04cee51d45583a66c2f3
配置后,我们能得到一个client_id,client_secret,这里是我创建的一个应用test。配置如下。
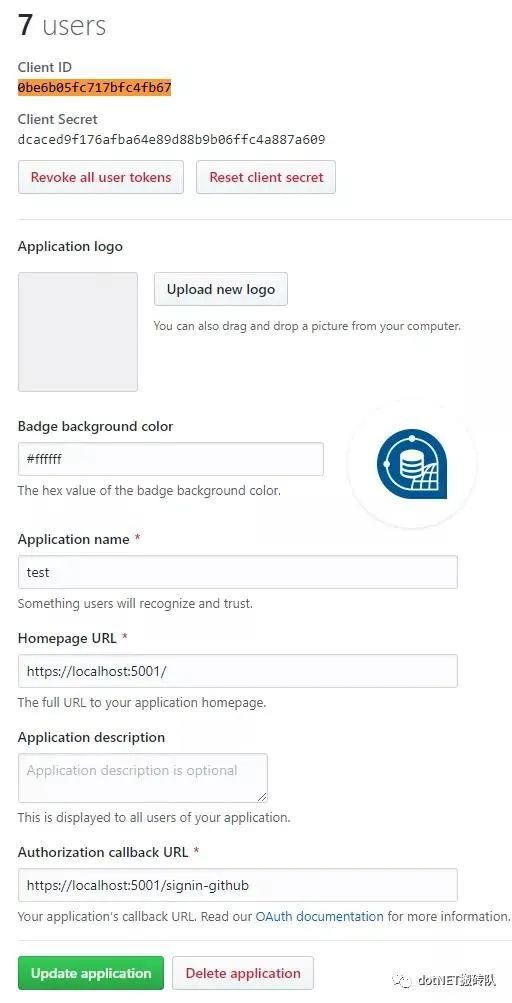
得到的client_id,client_secret在下面会用到。
client_id:0be6b05fc717bfc4fb67
client_secret:dcaced9f176afba64e89d88b9b06ffc4a887a609
浏览器打开下面地址,Get请求,替换自己的client_id
https://github.com/login/oauth/authorize?client_id=0be6b05fc717bfc4fb67&redirect_uri=https://localhost:5001/signin-github
会重定向到
https://localhost:5001/signin-github?code=07537a84d12bbae08361
这个code放到下面的请求中,会得到一个获取access_token
以POST方式(PostMan去请求)
https://localhost:5001/signin-github?code=07537a84d12bbae08361
这个code放到下面的请求中,获取access_token POST方式(PostMan去请求)
https://github.com/login/oauth/access_token?client_id=0be6b05fc717bfc4fb67&client_secret=dcaced9f176afba64e89d88b9b06ffc4a887a609&code=07537a84d12bbae08361
Get方式请求如下地址,携带上一个POST的access_token值。
https://api.github.com/user?access_token=787506afa3271d077b98f18af56d7cfdc8db43b4
然后就能获取用户信息
{
"login": "luoyunchong",
"id": 18613266,
"node_id": "MDQ6VXNlcjE4NjEzMjY2",
"avatar_url": "https://avatars1.githubusercontent.com/u/18613266?v=4",
"gravatar_id": "",
"url": "https://api.github.com/users/luoyunchong",
"html_url": "https://github.com/luoyunchong",
"followers_url": "https://api.github.com/users/luoyunchong/followers",
"following_url": "https://api.github.com/users/luoyunchong/following{/other_user}",
"gists_url": "https://api.github.com/users/luoyunchong/gists{/gist_id}",
"starred_url": "https://api.github.com/users/luoyunchong/starred{/owner}{/repo}",
"subscriptions_url": "https://api.github.com/users/luoyunchong/subscriptions",
"organizations_url": "https://api.github.com/users/luoyunchong/orgs",
"repos_url": "https://api.github.com/users/luoyunchong/repos",
"events_url": "https://api.github.com/users/luoyunchong/events{/privacy}",
"received_events_url": "https://api.github.com/users/luoyunchong/received_events",
"type": "User",
"site_admin": false,
"name": "IGeekFan",
"company": null,
"blog": "https://blog.igeekfan.cn",
"location": null,
"email": "luoyunchong@foxmail.com",
"hireable": null,
"bio": "学习之路漫漫无期。",
"public_repos": 14,
"public_gists": 0,
"followers": 16,
"following": 11,
"created_at": "2016-04-22T10:33:44Z",
"updated_at": "2019-12-21T14:49:33Z"
}
.NET Core3.1
讲完了GitHub授权登录的过程,我们来说一个在.NET Core下的实践。以下代码为主要代码,完整代码请看查看最下面的链接。
前端运行在:http://localhost:8081
后端运行在:https://localhost:5001
本地测试时GitHub回调地址设置: https://localhost:5001/signin-github。
GitHub回调地址设置 http(s)://ip:端口/signin-github
1. Github授权登录回调地址明明填写的是后端的地址,那后端怎么把结果通知前端呢?
我们先来了解一些登录的流程。
GitHub登录流程:前端放一个GitHub登录的按钮,点击后,调用signin方法,然后调用后台接口signin方法。
提供参数provider为GitHub,
redirectUrl为GitHub授权登录后,回调signin-github后,后端要重定向的地址,这里填前端的一个路由。
type="primary" @click="signin">GitHub登录
<script>export default {name: "app",components: {},methods: {
    signin() {window.open("https://localhost:5001/signin?provider=GitHub&redirectUrl=http://localhost:8080/login-result"
      );
    }
  }
};script>
2. 后端只提供了signin,signin-callback路由,没有signin-github,那github上配置的路由是怎么回调回来呢?
google-登录,微软文档,在这个文档中有详细的关于外部登录设置,其中有一个更改默认回调 URI,通过 AddGitHub中的CallbackPath属性配置。
介绍了回调地址应配置signin-google,所以这里应该是signin-github,他是可以配置的,不需要自己写程序处理signin-google这个路由,内部有中间件已经处理了。
3. 回调到signin-github后,后端怎么处理,才能让前端刷新。获取登录后的信息呢。
具体上面的根据code获取access_token,根据access_token获取用户的信息的过程,这些处理的过程,都不需要我们自己处理。我们可以用直接获取用户信息。
一个方法SignIn,只要return Challenge(properties, provider);,
provider 为 GitHub,
properties 是对象 var properties = new AuthenticationProperties { RedirectUri = url };
url:https://localhost:5001/signin-callback?provider=GitHub&redirectUrl=http://localhost:8080/login-result
前台传的参数为GitHub和redirectUrl.这个url是回调sigin-github后,这个类库帮我们重定向的地址。我们只要拼接好地址,让他回调到signin-callback方法即可。
var request = _contextAccessor.HttpContext.Request;
var url = $"{request.Scheme}://{request.Host}{request.PathBase}{request.Path}-callback?provider={provider}&redirectUrl={redirectUrl}";
需要注入
 public void ConfigureServices(IServiceCollection services)
{
    services.AddSingleton();
}
private readonly IHttpContextAccessor _contextAccessor;
public AuthenticationController( IHttpContextAccessor contextAccessor)
{
_contextAccessor = contextAccessor;
}
signin-callback方法,我们可通过如下方法获取到授权登录的email值,name值。
var authenticateResult = await _contextAccessor.HttpContext.AuthenticateAsync(provider);
string email = authenticateResult.Principal.FindFirst(ClaimTypes.Email)?.Value;
string name = authenticateResult.Principal.FindFirst(ClaimTypes.Name)?.Value;
代码实现
打开NuGet包管理,安装包
Install-Package AspNet.Security.OAuth.GitHub
appSettings.json
"Authentication": {
"GitHub": {
"ClientId": "0be6b05fc717bfc4fb67",
"ClientSecret": "dcaced9f176afba64e89d88b9b06ffc4a887a609"
    }
}
add扩展方法 因为我们要生成一个Token值,所以我们需要配置Jwt, 这里增加一个扩展方法。
public static class JwtConfiguration
{
public static void AddJwtConfiguration(this IServiceCollection services, IConfiguration configuration)
    {

        services.AddAuthentication(opts =>
            {
                opts.DefaultScheme = CookieAuthenticationDefaults.AuthenticationScheme;
                opts.DefaultAuthenticateScheme = JwtBearerDefaults.AuthenticationScheme;
            }).AddCookie().AddGitHub(options =>
        {
            options.ClientId = configuration["Authentication:GitHub:ClientId"];
            options.ClientSecret = configuration["Authentication:GitHub:ClientSecret"];
        });
    }
}
默认情况下,如头像,email,是没有获取的。
.AddGitHub(options =>
{
options.ClientId = configuration["Authentication:GitHub:ClientId"];
options.ClientSecret = configuration["Authentication:GitHub:ClientSecret"];
    //options.CallbackPath = new PathString("~/signin-github");//与GitHub上的回调地址相同,默认即是/signin-github
options.Scope.Add("user:email");
    //authenticateResult.Principal.FindFirst(LinConsts.Claims.AvatarUrl)?.Value;  得到GitHub头像
options.ClaimActions.MapJsonKey(LinConsts.Claims.AvatarUrl, "avatar_url");
options.ClaimActions.MapJsonKey(LinConsts.Claims.BIO, "bio");
options.ClaimActions.MapJsonKey(LinConsts.Claims.BlogAddress, "blog");
});

#其中LinConsts类为静态常量
public static class LinConsts
{
public static class Claims
    {
public const string BIO = "urn:github:bio";
public const string AvatarUrl = "urn:github:avatar_url";
public const string BlogAddress = "urn:github:blog";
    }
}
startup.cs
ConfigureServices中配置此服务
    services.AddSingletonHttpContextAccessor>();
    services.AddJwtConfiguration(Configuration);
创建AuthenticationController.cs 增加SignIn,用于处理用户授权成功后,重定回signin-callback,并将参数带回。
        private readonly IHttpContextAccessor _contextAccessor;
private readonly IConfiguration _configuration;

public AuthenticationController(IHttpContextAccessor contextAccessor, IConfiguration configuration)
        {
            _contextAccessor = contextAccessor;
            _configuration = configuration;
        }

        [HttpGet("~/signin")]
public async TaskSignIn(string provider, string redirectUrl)
        {
var request = _contextAccessor.HttpContext.Request;
var url =
$"{request.Scheme}://{request.Host}{request.PathBase}{request.Path}-callback?provider={provider}&redirectUrl={redirectUrl}";
var properties = new AuthenticationProperties { RedirectUri = url };
            properties.Items["LoginProviderKey"] = provider;
return Challenge(properties, provider);

        }
在signin方法中,用户点击授权后(第一次),会根据其传递的URL,重定向到这个地址,signin-callback,参数也会一同携带。provider为GitHub,redirectUrl为:http://localhost:8081/login-result.
[HttpGet("~/signin-callback")]
public async TaskHome(string provider = null, string redirectUrl = "")
{
    var authenticateResult = await _contextAccessor.HttpContext.AuthenticateAsync(provider);if (!authenticateResult.Succeeded) return Redirect(redirectUrl);
    var openIdClaim = authenticateResult.Principal.FindFirst(ClaimTypes.NameIdentifier);if (openIdClaim == null || string.IsNullOrWhiteSpace(openIdClaim.Value))
        return Redirect(redirectUrl);//TODO 记录授权成功后的信息 string email = authenticateResult.Principal.FindFirst(ClaimTypes.Email)?.Value;string name = authenticateResult.Principal.FindFirst(ClaimTypes.Name)?.Value;string gitHubName = authenticateResult.Principal.FindFirst(GitHubAuthenticationConstants.Claims.Name)?.Value;string gitHubUrl = authenticateResult.Principal.FindFirst(GitHubAuthenticationConstants.Claims.Url)?.Value;//startup 中 AddGitHub配置项  options.ClaimActions.MapJsonKey(LinConsts.Claims.AvatarUrl, "avatar_url");string avatarUrl = authenticateResult.Principal.FindFirst(LinConsts.Claims.AvatarUrl)?.Value;
    return Redirect($"{redirectUrl}?openId={openIdClaim.Value}");
}
这时候我们能获取用户信息了。那么前端怎么办呢。我们写个方法,获取用户信息,看看效果。
浏览器直接打开能得到github的id。
axios GET请求 https://localhost:5001/OpenId 得到null
[HttpGet("~/OpenId")]
public async Task<string> OpenId(string provider = null)
{
var authenticateResult = await _contextAccessor.HttpContext.AuthenticateAsync(provider);
if (!authenticateResult.Succeeded) return null;
var openIdClaim = authenticateResult.Principal.FindFirst(ClaimTypes.NameIdentifier);
return openIdClaim?.Value;
}
我记得之前传Token时,后台是可以这样获取的。
[HttpGet("~/GetOpenIdByToken")]
public string GetOpenIdByToken()
{
return User.FindFirst(ClaimTypes.NameIdentifier)?.Value;
}
LoginResult.vue在created生命周期中。都是得到null
axios({
  methods: "get",
  url: "https://localhost:5001/OpenId?provider=GitHub"
})
  .then(function(response) {
// handle success
    console.log(response);
  })

axios({
  methods: "get",
  url: "https://localhost:5001/GetOpenIdByToken"
})
  .then(function(response) {
// handle success
    console.log(response);
  })
为什么呢???
因为前后端分离,不是基于Cookies的。http是无状态的。每次请求无法区分用户的。我们可以根据当前的ClaimsPrincipal,根据JWT生成相应的Token,axios请求时,放到headers中。
安装包
Install-Package Microsoft.AspNetCore.Authentication.JwtBearer
AppSettings.json配置改成
"Authentication": {
"JwtBearer": {
"SecurityKey": "JWTStudyWebsite_DI20DXU3",
"Issuer": "JWTStudy",
"Audience": "JWTStudyWebsite"
},
"GitHub": {
"ClientId": "0be6b05fc717bfc4fb67",
"ClientSecret": "dcaced9f176afba64e89d88b9b06ffc4a887a609"
}
}
在signin-callback路由中,得到authenticateResult.Principal,其中默认包含了(id,login,name,url),授权得到eamil,另外MapJsonKey扩展了以下字段(avatar_url、bio、blog)
var authenticateResult = await _contextAccessor.HttpContext.AuthenticateAsync(provider);
string token = this.CreateToken(authenticateResult.Principal);
根据ClaimsPrincipal值生成token值。
private string CreateToken(ClaimsPrincipal claimsPrincipal)
{

var handler = new JwtSecurityTokenHandler();
var key = new SymmetricSecurityKey(
        Encoding.UTF8.GetBytes(_configuration["Authentication:JwtBearer:SecurityKey"]));
var credentials = new SigningCredentials(key, SecurityAlgorithms.HmacSha256);
var token = new JwtSecurityToken(
        _configuration["Authentication:JwtBearer:Issuer"],
        _configuration["Authentication:JwtBearer:Audience"],
        claimsPrincipal.Claims,
        expires: DateTime.Now.AddMinutes(30),
        signingCredentials: credentials
    );

return handler.WriteToken(token);
}
这里的claimsPrincipal是什么呢。简单的说就是一个存有github授权信息的对象,可以解析出对应的Clamis,这里其实就是用了Clamis的属性值。
| Claim | ClaimsIdentity | ClaimsPrincipal |
|---|---|---|
| id、name,url,email,avatar_url等 | 由多组Claim组成,这里可指GitHub授权登录后得到的那个对象。 | ClaimsIdentity的持有者 |
具体Jwt的生成与配置项。这里不详细说明。可以看这个示例(.NET Core2.2)https://github.com/luoyunchong/BasicTemplate
AddJwtConfiguration改成如下内容
public static void AddJwtConfiguration(this IServiceCollection services, IConfiguration configuration)
{

    services.AddAuthentication(opts =>
        {
            opts.DefaultScheme = CookieAuthenticationDefaults.AuthenticationScheme;
            opts.DefaultAuthenticateScheme = JwtBearerDefaults.AuthenticationScheme;
        }).AddCookie(options =>
    {
options.LoginPath = "/signin";
options.LogoutPath = "/signout";
    }).AddJwtBearer(JwtBearerDefaults.AuthenticationScheme, options =>
    {
options.Audience = configuration["Authentication:JwtBearer:Audience"];

options.TokenValidationParameters = new TokenValidationParameters
        {
            // The signing key must match!
            ValidateIssuerSigningKey = true,
            IssuerSigningKey = new SymmetricSecurityKey(
Encoding.ASCII.GetBytes(configuration["Authentication:JwtBearer:SecurityKey"])),

            // Validate the JWT Issuer (iss) claim
            ValidateIssuer = true,
            ValidIssuer = configuration["Authentication:JwtBearer:Issuer"],

            // Validate the JWT Audience (aud) claim
            ValidateAudience = true,
            ValidAudience = configuration["Authentication:JwtBearer:Audience"],

            // Validate the token expiry
            ValidateLifetime = true,

            // If you want to allow a certain amount of clock drift, set that here
            //ClockSkew = TimeSpan.Zero
        };
    }).AddGitHub(options =>
    {
options.ClientId = configuration["Authentication:GitHub:ClientId"];
options.ClientSecret = configuration["Authentication:GitHub:ClientSecret"];
        //options.CallbackPath = new PathString("~/signin-github");//与GitHub上的回调地址相同,默认即是/signin-github
options.Scope.Add("user:email");
        //authenticateResult.Principal.FindFirst(LinConsts.Claims.AvatarUrl)?.Value;  得到GitHub头像
options.ClaimActions.MapJsonKey(LinConsts.Claims.AvatarUrl, "avatar_url");
options.ClaimActions.MapJsonKey(LinConsts.Claims.BIO, "bio");
options.ClaimActions.MapJsonKey(LinConsts.Claims.BlogAddress, "blog");
    });
}
前端完整的LoginResult.vue代码
即 localhost:8080/login-result
<template><div class="main"><h2>Login-Resulth2><p>OpenId:{{OpenId1}}p><p>GetOpenIdByToken{{OpenId2}}p>div>template><script>const axios = require("axios");function parseUrlParams() {if (window.location.search.length <= 0) return false;var info = window.location.search.slice(1);var result = {};
  info.split("&").forEach(item => {
    result[decodeURIComponent(item.split("=")[0])] = decodeURIComponent(
      item.split("=")[1]
    );
  });return result;
}export default {name: "LoginResult",props: {},
  data() {return {OpenId1: "",OpenId2: ""
    };
  },
  created() {var result = parseUrlParams();if (!(result && result.token)) {
      alert("无效的登录");return;
    }var that = this;
    axios({methods: "get",url: "https://localhost:5001/OpenId?provider=GitHub",headers: {Authorization: "Bearer " + result.token
      }
    }).then(function(response) {console.log(response);
      that.OpenId1 = response.data;
    });
    axios({methods: "get",url: "https://localhost:5001/GetOpenIdByToken",headers: {Authorization: "Bearer " + result.token
      }
    }).then(function(response) {console.log(response);
      that.OpenId2 = response.data;
    });
  }
};script>
前端运行
yarn install
yarn serve
点击GitHub登录,第一次,我们会跳到github的网站,然后登录成功,重定向我们的后端,可以看到GetOpenIdByToken方法根据生成的token值,解析出了用户id,这样前端在login-result这个组件中,把token保存好,并重定向自己的主页,获取用户所有信息即可。
data: 18613266
status: 200
config: {url: "https://localhost:5001/GetOpenIdByToken"}
OpenId?provider=GitHub则得不到数据,只能浏览器直接请求https://localhost:5001/OpenId?provider=GitHub,才能到github 的id。这个适应于前后端不分离,或者属于之前我们经常使用MVC结构,同一域名下,同一端口,基于Cookies登录的判断。
参考
.net Core2.2 WebApi通过OAuth2.0实现微信登录
AspNetCore3.0 和 JWT
用户系统设计:第三方授权、账号绑定及解绑(下)
Demo 示例
GitHub https://github.com/luoyunchong/dotnetcore-examples/blob/master/aspnetcore-oatuth2


 9338
9338


 被折叠的 条评论
为什么被折叠?
被折叠的 条评论
为什么被折叠?
 到【灌水乐园】发言


