


一、准备两台MySQL服务器
操作系统:CentOS Linux release 7.7.1908 (Core)
MySQL:mysql8.0版本
CPU:4vCPU
内存:8GB
分区:系统自动分区,实际生产中,请注意,硬盘空间大小要与数据库数据相关联。
[root@mysql-00 ~]# df -lh文件系统 容量 已用 可用 已用% 挂载点devtmpfs 3.9G 0 3.9G 0% /devtmpfs 3.9G 0 3.9G 0% /dev/shmtmpfs 3.9G 8.8M 3.9G 1% /runtmpfs 3.9G 0 3.9G 0% /sys/fs/cgroup/dev/mapper/centos-root 50G 1.2G 49G 3% //dev/sda1 1014M 149M 866M 15% /boot/dev/mapper/centos-home 40G 33M 40G 1% /hometmpfs 783M 0 783M 0% /run/user/0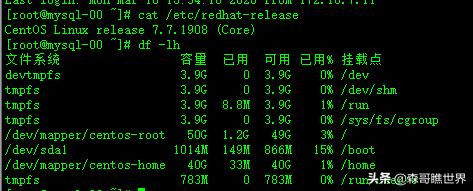
IP地址(两台服务器必须能互通互联):
MySQL-00:172.16.3.101
MySQL-01:172.16.3.102
两台服务器的SSH使用证书实现root直接登陆。
再分配一个VIP的IP地址。
VIP:172.16.3.100
VIP:即为:virtual ipaddress,虚拟IP的意思。这里而不是会员级别的那个VIP概念。用户直接面向的就是这个VIP,而后面的物理机的IP,对用户来说,是不需要知道的,这也就是集群中运用的概念。
为了方便,将只创建一对证书,然后两台服务器共用。
证书创建:
在mysql-00上执行创建。
[root@mysql-00 ~]# ssh-keygen -t rsa -C "mysqldata"Generating public/private rsa key pair.Enter file in which to save the key (/root/.ssh/id_rsa): Created directory '/root/.ssh'.Enter passphrase (empty for no passphrase): Enter same passphrase again: Your identification has been saved in /root/.ssh/id_rsa.Your public key has been saved in /root/.ssh/id_rsa.pub.The key fingerprint is:SHA256:5cGoFTXPGNM+vzPaq2Y2PBRxDNBuz9YyBadq36ViTHE mysqldataThe key's randomart image is:+---[RSA 2048]----+| ..*+.o || + B+ + .|| o =ooo + || o o .B E .|| . S .. X o || = B o|| * o *.|| @.* .|| =o*o+ |+----[SHA256]-----+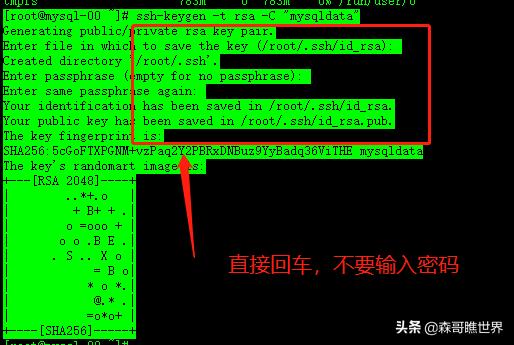
在/root/.ssh/下,会生成一对:id_rsa与id_rsa.pub公私钥,将公钥的内容,写入authorized_keys
authorized_keys也放在/root/.ssh/目录下。
[root@mysql-00 .ssh]# cat id_rsa.pub > authorized_keys[root@mysql-00 .ssh]# cat authorized_keys ssh-rsa AAAAB3NzaC1yc2EAAAADAQABAAABAQC5EFgEzNvCzANXVYS23atvOrx6EpdNlL8ts6lqHEHHi3n9U2t8b+FduMsG6J0Iwg0aDBMRjD4To/OgEJSxrmdUcDRacbTUJBe+9AntdFbHaak7dz/SE+Nflcd5OIeBgYe1Vo10IAM5HVJvXYbyzvIOzkHiQC98QWrhLmQLuvZC8tgDenrd54aOPOS+VFEPuDM+Qy4IbecNXlqSgLGEznx8r+7xd2DGHeIDExzHEruFJ4DN+gquYE1eKF/OQY9xNMcJQoj/7VNVS4aXr9f3JBdpFsKo0jSq2DBnmv9vFAAsgx2rpFMKLGcGDQIId73Vl3lCz6BO8PQORIc59pEubWDD mysqldata将这三个文件,打包一份,传到MySQL-01服务器上的/root/.ssh下。若是没有.ssh则手工创建。
这里需要注意的是,在复制相关证书到另一台服务器,注意文件的所属与权限。否则会出现无法登陆的错误。这个森哥我就不多说了,能来玩mysql的高可用的,那这些都是小意思。
测试一下是否能正常登陆
[root@mysql-00 ~]# ssh root@172.16.3.102Last login: Mon Mar 16 15:43:01 2020 from 172.16.7.11[root@mysql-01 ~]# [root@mysql-01 .ssh]# ssh root@172.16.3.101The authenticity of host '172.16.3.101 (172.16.3.101)' can't be established.ECDSA key fingerprint is SHA256:ucZtMHPrHKqc3/sZJ/Z0PFAaslQX81dG7dSB/46dPSM.ECDSA key fingerprint is MD5:6a:3c:50:9a:f9:c8:bf:e9:69:0b:b0:e1:20:3e:8a:5f.Are you sure you want to continue connecting (yes/no)? yesWarning: Permanently added '172.16.3.101' (ECDSA) to the list of known hosts.Last login: Mon Mar 16 15:34:35 2020 from 172.16.7.11[root@mysql-00 ~]# OK了,两台可以免密互登了。下面进入环境预置及mysql的安装。
二、基本环境配置
2.1、关闭SeLinux
sed -i "s/SELINUX=enforcing/SELINUX=disabled/" /etc/selinux/configsetenforce 02.2、关闭系统自带的防火墙
systemctl stop firewalld //停止系统默认的防火墙systemctl mask firewalld //屏蔽服务(让它不能启动)yum remove -y firewalld //卸载自带防火墙
2.3、系统管理工具
此举是为了今后方便运维管理使用。可根据情况而定。
yum install -y chkconfig net-tools ntsysv mlocate lrzsz wget lsof setuptool tcpdump2.4、更新yum源
yum install -y epel-releasewget https://repo.mysql.com//mysql80-community-release-el7-3.noarch.rpm //Mysql8.0yum源yum localinstall -y mysql80-community-release-el7-3.noarch.rpmyum repolist enabled | grep "mysql.*-community.*" //检查mysql源是否安装成功由于mysql-server文件在yum安装的时候,文件较大,下载很慢,故森哥是先使用境外的服务器下载后,再从境外服务器拉回本地。
https://cdn.mysql.com//Downloads/MySQL-8.0/mysql-8.0.19-1.el7.x86_64.rpm-bundle.tar2.5、清理并更新yum源
yum clean allyum makecache2.6、编译等环境预装(根据自己需求而定,不用全装)
yum install -y make cmake gcc gcc-c++ autoconf libjpeg libjpeg-devel libpng libpng-devel freetype freetype-devel libxml2 libxml2-devel zlib zlib-devel glibc glibc-devel glib2 glib2-devel bzip2 bzip2-devel ncurses ncurses-devel curl curl-devel e2fsprogs e2fsprogs-devel krb5 krb5-devel libidn libidn-devel openssl openssl-devel openldap openldap-devel nss_ldap openldap-clients openldap-servers gd gd-devel perl expat expat-devel nss_ldap unixODBC-devel libxslt-devel libevent-devel libtool-ltdl bison libtool zip unzip gmp-devel python-devel perl-devel perl-ExtUtils-Embed //安装各种环境所需要的插件yum update -y //升级补丁三、MySQL安装
yum install -y bison-devel libaio-devel perl-Data-Dumper //预装mysql环境yum install -y mysql-server //安装mysqldservice mysqld start //启动mysqlsystemctl enable mysqld.service //开机自启动由于森哥已把相关的安装包直接下载下来。所以,在yum install -y mysql-server这一步就不一样了。如下:
yum install -y bison-devel libaio-devel perl-Data-Dumpertar -xvf mysql-8.0.19-1.el7.x86_64.rpm-bundle.taryum localinstall -y mysql-community-* //在安装本地包的时候,若遇到需要安装依赖包会自动网上下载service mysqld start //启动mysqlsystemctl enable mysqld.service //开机自启动修改及设置初始密码
grep 'temporary password' /var/log/mysqld.log //mysql5.7版本后,初始密码不再为空,默认随机生成,可通过该命令查询mysql -u root -p //进入mysqlalter user root@localhost identified by 'Fixes.cn.888'; 默认需要先修改密码,才能其他操作exit; //退出mysql管理请在两台的服务器上,都进程同样的安装与配置。设置的数据库密码,先建议设置为一样的:Fixes.cn.888
致此,两台MySQL基础环境都配置好了。现在开始下面同步的设置。
四、数据库同步
4.1、在mysql-00中的my.cnf内容添加:
log-bin = mysql-binbinlog_format = mixedserver-id = 1relay-log = relay-binrelay-log-index = slave-relay-bin.indexauto-increment-increment = 2auto-increment-offset = 14.2、在mysql-01中的my.cnf内容添加:
log-bin = mysql-binbinlog_format = mixedserver-id = 2relay-log = relay-binrelay-log-index = slave-relay-bin.indexauto-increment-increment = 2auto-increment-offset = 2添加完后,两台mysql服务都要重启。
systemctl restart mysqld4.3、创建数据库同步账户。
4.3.1、在MySQL主服务器(mysql-00)上执行如下操作。
create user 'syn'@'172.16.3.102' identified with mysql_native_password by 'Fixes.cn.888'; //创建用户 mysql.0中密码需要填写mysql_native_passwordgrant replication slave on *.* to 'syn'@'172.16.3.102'; //分配权限flush privileges; //刷新权限查看权限是否正确分配
mysql> show grants for 'syn'@'172.16.3.102';+--------------------------------------------------------+| Grants for syn@172.16.3.102 |+--------------------------------------------------------+| GRANT REPLICATION SLAVE ON *.* TO `syn`@`172.16.3.102` |+--------------------------------------------------------+1 row in set (0.00 sec)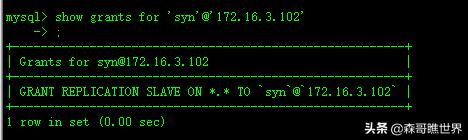
查看MySQL-00状态,记录二进制文件名和位置
mysql> show master status;+------------------+----------+--------------+------------------+-------------------+| File | Position | Binlog_Do_DB | Binlog_Ignore_DB | Executed_Gtid_Set |+------------------+----------+--------------+------------------+-------------------+| mysql-bin.000001 | 860 | | | |+------------------+----------+--------------+------------------+-------------------+1 row in set (0.00 sec)
请将上面的File与Position的值记下来。等下做同步的时候,需要用到。
4.3.2、登陆MySQL-01服务器(MySQL从服务器)
进入MySQL中,执行同步语句:
[root@mysql-01 ~]# mysql -u root -pEnter password: Welcome to the MySQL monitor. Commands end with ; or g.Your MySQL connection id is 8Server version: 8.0.19 MySQL Community Server - GPLCopyright (c) 2000, 2020, Oracle and/or its affiliates. All rights reserved.Oracle is a registered trademark of Oracle Corporation and/or itsaffiliates. Other names may be trademarks of their respectiveowners.Type 'help;' or 'h' for help. Type 'c' to clear the current input statement.mysql> change master to -> master_host='172.16.3.101', -> master_user='syn', -> master_password='Fixes.cn.888', -> master_log_file='mysql-bin.000001', -> master_log_pos=860;Query OK, 0 rows affected, 2 warnings (0.01 sec)接着启动slave同步进程
mysql> start slave;Query OK, 0 rows affected (0.00 sec)
检查slave状态,若在error没有看到配置错误信息,且Slave状态为YES,则说明配置成功。
Slave_IO_Running: Yes Slave_SQL_Running: Yesmysql> show slave statusG;*************************** 1. row *************************** Slave_IO_State: Waiting for master to send event Master_Host: 172.16.3.101 Master_User: syn Master_Port: 3306 Connect_Retry: 60 Master_Log_File: mysql-bin.000001 Read_Master_Log_Pos: 860 Relay_Log_File: relay-bin.000002 Relay_Log_Pos: 322 Relay_Master_Log_File: mysql-bin.000001 Slave_IO_Running: Yes Slave_SQL_Running: Yes Replicate_Do_DB: Replicate_Ignore_DB: Replicate_Do_Table: Replicate_Ignore_Table: Replicate_Wild_Do_Table: Replicate_Wild_Ignore_Table: Last_Errno: 0 Last_Error: Skip_Counter: 0 Exec_Master_Log_Pos: 860 Relay_Log_Space: 524 Until_Condition: None Until_Log_File: Until_Log_Pos: 0 Master_SSL_Allowed: No Master_SSL_CA_File: Master_SSL_CA_Path: Master_SSL_Cert: Master_SSL_Cipher: Master_SSL_Key: Seconds_Behind_Master: 0Master_SSL_Verify_Server_Cert: No Last_IO_Errno: 0 Last_IO_Error: Last_SQL_Errno: 0 Last_SQL_Error: Replicate_Ignore_Server_Ids: Master_Server_Id: 1 Master_UUID: 1b8eae14-6765-11ea-a3ec-005056aee901 Master_Info_File: mysql.slave_master_info SQL_Delay: 0 SQL_Remaining_Delay: NULL Slave_SQL_Running_State: Slave has read all relay log; waiting for more updates Master_Retry_Count: 86400 Master_Bind: Last_IO_Error_Timestamp: Last_SQL_Error_Timestamp: Master_SSL_Crl: Master_SSL_Crlpath: Retrieved_Gtid_Set: Executed_Gtid_Set: Auto_Position: 0 Replicate_Rewrite_DB: Channel_Name: Master_TLS_Version: Master_public_key_path: Get_master_public_key: 0 Network_Namespace: 1 row in set (0.00 sec)ERROR: No query specified
4.3.3、从库MySQL-01至MySQL-00主从配置
设置上,基本上与主库MySQL-00配置方式一样,在从库(MySQL-01)上执行
create user 'syn'@'172.16.3.101' identified with mysql_native_password by 'Fixes.cn.888'; //创建用户 mysql.0中密码需要填写mysql_native_passwordgrant replication slave on *.* to 'syn'@'172.16.3.101'; //分配权限flush privileges; //刷新权限查看从库(MySQL-01)的状态
mysql> show master status;+------------------+----------+--------------+------------------+-------------------+| File | Position | Binlog_Do_DB | Binlog_Ignore_DB | Executed_Gtid_Set |+------------------+----------+--------------+------------------+-------------------+| mysql-bin.000001 | 860 | | | |+------------------+----------+--------------+------------------+-------------------+1 row in set (0.01 sec)
一样的,请将上面的File与Position的值记下来。等下做同步的时候,需要用到。
4.3.4、登陆主库(MySQL-00),进入MySQL中,执行同步语句:
[root@mysql-00 ~]# mysql -u root -pEnter password: Welcome to the MySQL monitor. Commands end with ; or g.Your MySQL connection id is 12Server version: 8.0.19 MySQL Community Server - GPLCopyright (c) 2000, 2020, Oracle and/or its affiliates. All rights reserved.Oracle is a registered trademark of Oracle Corporation and/or itsaffiliates. Other names may be trademarks of their respectiveowners.Type 'help;' or 'h' for help. Type 'c' to clear the current input statement.mysql> change master to -> master_host='172.16.3.102', -> master_user='syn', -> master_password='Fixes.cn.888', -> master_log_file='mysql-bin.000001', -> master_log_pos=860;Query OK, 0 rows affected, 2 warnings (0.00 sec)然后呢,一样的,启动slave同步进程。
mysql> start slave;Query OK, 0 rows affected (0.00 sec)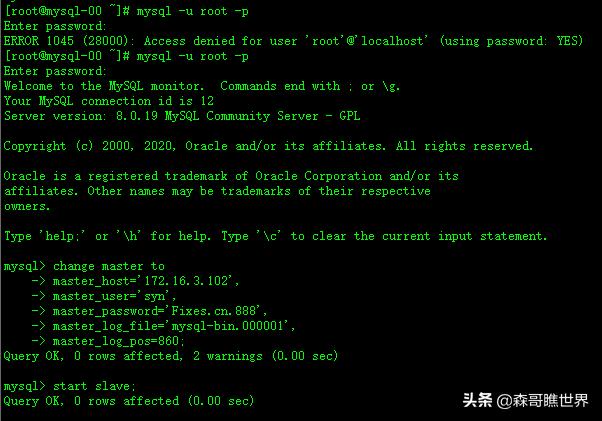
检查slave状态,若在error没有看到配置错误信息,且Slave状态为YES,则说明配置成功
Slave_IO_Running: YesSlave_SQL_Running: Yesmysql> show slave statusG;*************************** 1. row *************************** Slave_IO_State: Waiting for master to send event Master_Host: 172.16.3.102 Master_User: syn Master_Port: 3306 Connect_Retry: 60 Master_Log_File: mysql-bin.000001 Read_Master_Log_Pos: 860 Relay_Log_File: relay-bin.000002 Relay_Log_Pos: 322 Relay_Master_Log_File: mysql-bin.000001 Slave_IO_Running: Yes Slave_SQL_Running: Yes Replicate_Do_DB: Replicate_Ignore_DB: Replicate_Do_Table: Replicate_Ignore_Table: Replicate_Wild_Do_Table: Replicate_Wild_Ignore_Table: Last_Errno: 0 Last_Error: Skip_Counter: 0 Exec_Master_Log_Pos: 860 Relay_Log_Space: 524 Until_Condition: None Until_Log_File: Until_Log_Pos: 0 Master_SSL_Allowed: No Master_SSL_CA_File: Master_SSL_CA_Path: Master_SSL_Cert: Master_SSL_Cipher: Master_SSL_Key: Seconds_Behind_Master: 0Master_SSL_Verify_Server_Cert: No Last_IO_Errno: 0 Last_IO_Error: Last_SQL_Errno: 0 Last_SQL_Error: Replicate_Ignore_Server_Ids: Master_Server_Id: 2 Master_UUID: 1c3f5711-6765-11ea-96df-005056ae8a07 Master_Info_File: mysql.slave_master_info SQL_Delay: 0 SQL_Remaining_Delay: NULL Slave_SQL_Running_State: Slave has read all relay log; waiting for more updates Master_Retry_Count: 86400 Master_Bind: Last_IO_Error_Timestamp: Last_SQL_Error_Timestamp: Master_SSL_Crl: Master_SSL_Crlpath: Retrieved_Gtid_Set: Executed_Gtid_Set: Auto_Position: 0 Replicate_Rewrite_DB: Channel_Name: Master_TLS_Version: Master_public_key_path: Get_master_public_key: 0 Network_Namespace: 1 row in set (0.00 sec)ERROR: No query specified
4.4、数据库同步测试
在主库(mysql-00)上创建fixes库,并创建表product
mysql> create database IF NOT EXISTS `fixes` character set utf8mb4; Query OK, 1 row affected (0.01 sec)mysql> use fixes;Database changedmysql> create table product( -> product_id int(10) not NULL, -> product_name varchar(100) not NULL, -> product_tyep varchar(32) not NULL, -> sale_price int(10) default 0, -> input_price int(10) default 0, -> regist_time date, -> primary key (product_id) -> );Query OK, 0 rows affected, 3 warnings (0.02 sec)请注意,fixes创建这个数据库的时候,命令中的fixes,是使用反引号的,也就是键盘ESC键下面的那个字符。
森哥就遇到问题了,还以为命令有问题,不是单引号,是反引号哦。

现在上从库上查询一下刚刚创建的数据库是否存在。
mysql> show databases;+--------------------+| Database |+--------------------+| fixes || information_schema || mysql || performance_schema || sys |+--------------------+5 rows in set (0.00 sec)mysql> use fixes;Reading table information for completion of table and column namesYou can turn off this feature to get a quicker startup with -ADatabase changedmysql> show tables;+-----------------+| Tables_in_fixes |+-----------------+| product |+-----------------+1 row in set (0.00 sec)mysql> desc product;+--------------+--------------+------+-----+---------+-------+| Field | Type | Null | Key | Default | Extra |+--------------+--------------+------+-----+---------+-------+| product_id | int | NO | PRI | NULL | || product_name | varchar(100) | NO | | NULL | || product_tyep | varchar(32) | NO | | NULL | || sale_price | int | YES | | 0 | || input_price | int | YES | | 0 | || regist_time | date | YES | | NULL | |+--------------+--------------+------+-----+---------+-------+6 rows in set (0.00 sec)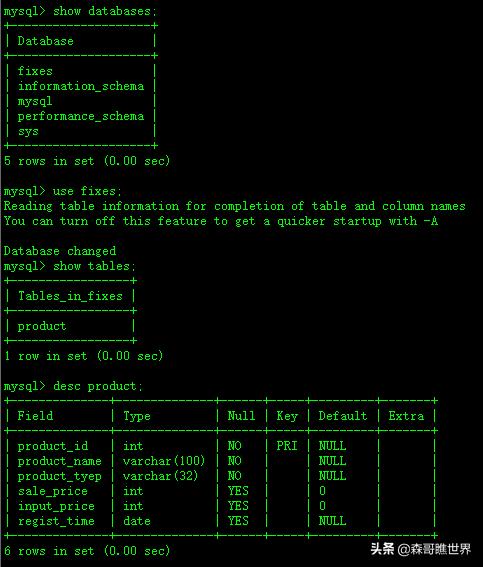
至此,两台主MySQL数据库配置完成。
注意事项:
- 若只想同步指定的数据库,则在my.cnf中,加上binlog_do_db参数,后面跟上一个或多个数据库名
- 两台主从数据库中,只有server-id 和auto-increment-offset 不同。
- 数据库的主主同步时需要设置自增长的两个相关配置auto_increment_offset 和auto_increment_increment
auto-increment-increment表示自增长字段每次递增的量,其默认值是 1。它的值应设为整个 结构中服务器的总数,本案例用到两台服务器,所以值设为 2。auto-increment-offset 是用来设定数据库中自动增长的起点(即初始值),因为这两能服务器都设定了一次自动增长值 2,所以它们的起点必须得不同,这样才能避免两台服务器数据同步时出现主键冲突。 - Slave_IO_Running、Slave_SQL_Running不全为YES时,show slave statusG信息中有错误提示,可根据错误提示进行更正。大多数问题都是数据不统一导致
- 两个数据库最好软件硬件等规格配置要一致
可能出错的点
- 两台数据库都存在db数据库,而第一台MySQL db中有tab1,第二台MySQL db中没有tab1,那肯定不能成功。
- 已经获取了数据的二进制日志名和位置,又进行了数据操作,导致POS发生变更。在配置CHANGE MASTER时还是用到之前的POS。
- stop slave后,数据变更,再start slave。出错。
终极更正法:重新执行一遍CHANGE MASTER就好了。
五、配置keepalived
请注意,两台服务器的时间要一致。最好是同步一下。
在两台数据库上面安装keepalived应用
yum install -y keepalived进入keepalived的配置文件夹内。
cd /etc/keepalived/由于我们是要监测MySQL的状态,若其中一台MySQL数据库出问题的时候,需要自动切换到另一台,这里,就需要用到前面提到的VIP。
首先,我们需要先创建一个MySQL状态的监测脚本,这里,简单的,以监测MySQL的端口为例。
[root@mysql-00 keepalived]# cat keepalived_check_mysql.sh #!/bin/bash# Author: Fixes.cn# Date: 20200317# History:# 20200317:# 1、简单的基于端口检测的方式,判断named,http服务器是否存活#v_tcp_3306=$( lsof -i tcp:3306 >/dev/null 2>&1 echo $?)v_log="/var/log/keepalived_checking.log" if [ "$v_tcp_3306" != "0" ]; then echo -n "$(date) " >>$v_log echo "[warn] MySQL service port 3306 chekcing fail , restart now !" >>$v_log systemctl restart mysqld >/dev/null 2>&1 sleep 10 v_tcp_3306=$( lsof -i tcp:3306 >/dev/null 2>&1 echo $? ) if [ "$v_tcp_3306" != "0" ]; then echo -n "$(date) " >>$v_log echo "[critical] MySQL Server port 3306 check still failed, keepalived stopping !" >>$v_log systemctl stop keepalived fi fi将该脚本,存放在/etc/keepalived/文件夹下面,两台数据库服务器上的都一样。
接着,要对keepalived.conf进行动刀。先备份好一份。
cp keepalived.conf keepalived.conf.bak清空原来的keepalived.conf。
> keepalived.conf将调整过的内容,写入进去。
在MySQL-00上操作。
cat keepalived.conf! Configuration File for keepalivedglobal_defs { //报警通知 script_user root enable_script_security notification_email { mail@mail.com } notification_email_from mail@mail.com smtp_server smtp.mail.com smtp_connect_timeout 30 router_id master-node}vrrp_script check_mysql_status {script "keepalived_check_mysql.sh" //调用刚刚写的关于MySQL监测的脚本 interval 5 //每5秒监测一次}vrrp_instance mysqldata { nopreempt state BACKUP interface ens192 virtual_router_id 99 //两台要一样。 priority 100 //调整优先级,数值越大,优先级越高。 advert_int 5 authentication { auth_type PASS auth_pass Fixes.cn.888 //两台要一样 } virtual_ipaddress { 172.16.3.100/23 //VIP地址 } track_script { check_mysql_status }}
在MySQL-01上操作。
cat keepalived.conf! Configuration File for keepalivedglobal_defs { //报警通知 script_user root enable_script_security notification_email { mail@mail.com } notification_email_from mail@mail.com smtp_server smtp.mail.com smtp_connect_timeout 30 router_id master-node}vrrp_script check_mysql_status {script "keepalived_check_mysql.sh" //调用刚刚写的关于MySQL监测的脚本 interval 5 //每5秒监测一次}vrrp_instance mysqldata { nopreempt state BACKUP interface ens192 virtual_router_id 99 //两台要一样 priority 100 //调整优先级,数值越大,优先级越高。 advert_int 5 authentication { auth_type PASS auth_pass Fixes.cn.888 //两台要一样 } virtual_ipaddress { 172.16.3.100/23 //VIP地址 } track_script { check_mysql_status }}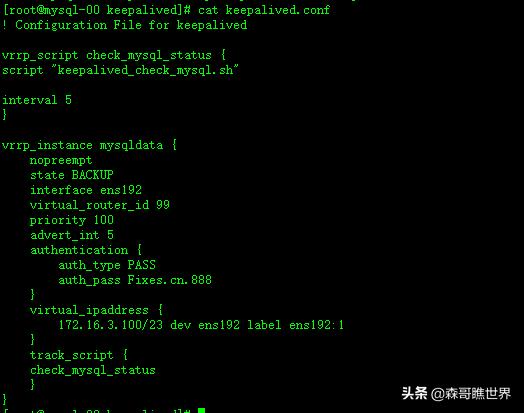
现在,重启一下keepalived。
当其中一台出现如下,说明成功。

而另一台是不会出现这个IP的,只有当这台机器宕机后,才会自动的把VIP切换到另一台。这就是双主后的结果。
另外 ,由于keepalived在启动的过程中,不会出现错误的提示,所以,需要直接去检查一下日志。

在一台运行正常的时候,另一台就不正常了。发现是少了参数。加了
script_user root enable_script_security后,重启keepalived正常。
上面的配置,是正确的,是在调试完成后,直接附上的。
至此,MySQL双主高可用性下的安装与配置。完美收工。


 690
690


 被折叠的 条评论
为什么被折叠?
被折叠的 条评论
为什么被折叠?
 到【灌水乐园】发言


