


1. 前言
原文发布在语雀:
<Vue 源码笔记系列2>依赖收集的触发 · 语雀www.yuque.com
上一章,我们讲了 Vue 依赖收集的准备工作。我们知道,依赖收集一定是触发了我们给 data 定义的 get 属性。
回顾一下我们定义的 get 属性:
// src/core/observer/index.js    line134  function defineReactive
get: function reactiveGetter () {
  // ...
  if (Dep.target) {
    dep.depend()
    // ...
  }
  // ...
},
当时我们在 defineReactive 方法中为 data 定义 get 属性时,涉及到了两个东西。一个是 Dep.target, 一个是 dep.depend。当时我们只是讲,dep 为 Dep 实例,是负责收集依赖的盒子。Dep.target 为观察者实例。
接下来我们详细看看 Dep 与 Watcher 是如何产生的,以及各自有哪些功能。
我们知道,要想触发 get,那么我们一定是对这个 data 进行了求值操作。哪些操作会触发呢,很明显,render 应该是可以的。我们将数据渲染到页面上理所当然会对其求值嘛。
我们知道 new Vue 时会执行其原型链上的_init 方法,即 Vue.prototype._init 方法:
// src/core/instance/init.js
Vue.prototype._init = function (options?: Object) {
  // ...
  if (vm.$options.el) {
    vm.$mount(vm.$options.el)
  }
}
在最后执行 vm.$mount 来最终将 VNode 渲染到页面。
所以我们从 $mount 开始往下找找看。
2. 流程图
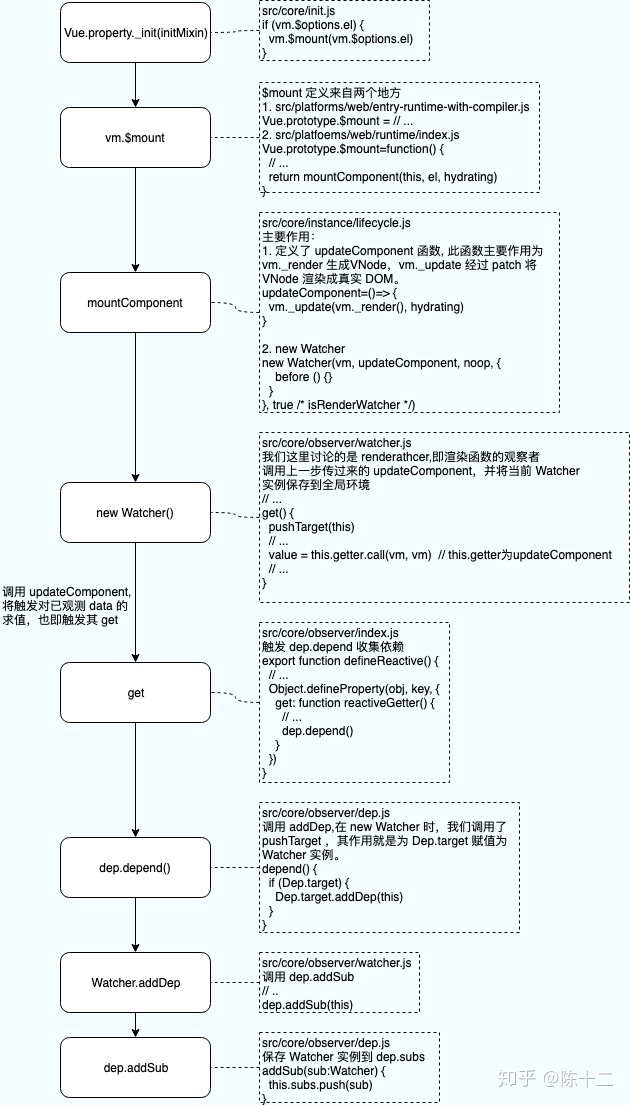
还是老规矩,先放一张大致的流程图。不必弄懂,可以先大致浏览,方便后边对照着看。
2. $mount
$mount 方法的定义有两处。
2.1 为 $mount 添加编译模板能力
先来看第一处,比较简单:
// src/platforms/web/entry-runtime-with-compiler.js

const mount = Vue.prototype.$mount
Vue.prototype.$mount = function (
  el?: string | Element,
  hydrating?: boolean
): Component {
  // ...
  const options = this.options
  if (!options.render) {
    if (template) {
      // ...
      const { render, staticRenderFns } = compileToFunctions(template, {
        shouldDecodeNewlines,
        shouldDecodeNewlinesForHref,
        delimiters: options.delimiters,
        comments: options.comments
      }, this)
      options.render = render
      options.staticRenderFns = staticRenderFns
      // ...
    }
  }
  return mount.call(this, el, hydrating)
}
第3行:
const mount = Vue.prototype.$mount
缓存一份旧的 $mount, 后边会用到。
第 8 行省略的部分:
主要作用是为 template 赋值,我们这里先不管详细的实现。
9 到 23 行:
const options = this.options
if (!options.render) {
  if (template) {
    // ...
    const { render, staticRenderFns } = compileToFunctions(template, {
      shouldDecodeNewlines,
      shouldDecodeNewlinesForHref,
      delimiters: options.delimiters,
      comments: options.comments
    }, this)
    options.render = render
    options.staticRenderFns = staticRenderFns
    // ...
  }
}
当 options.render 不存在时,使用 compileToFunctions 将 template 转化为 render 函数。也就是说实例化 Vue 时只有 render 渲染函数选项不存在,Vue 才会编译模板。
24 行:
return mount.call(this, el, hydrating)
最终返回的仍然是之前我们缓存的 $mount。
可以知道,这部分代码的主要作用是为 Vue.prototype.$mount 补充了编译模板的能力, 从文件名 entry-runtime-with-compiler.js 也能看出一二。最终执行的仍然是运行时版 $mount。
2.2 运行时版 $mount
那么我们来看看运行时版 $mount 究竟干了些什么吧:
// src/platforms/web/runtime/index.js

Vue.prototype.$mount = function (
  el?: string | Element,
  hydrating?: boolean
): Component {
  el = el && inBrowser ? query(el) : undefined
  return mountComponent(this, el, hydrating)
}
很简单,只是调用 mountComponent。
3. mountComponent
// src/core/instance/lifecycle.js

export function mountComponent (
  vm: Component,
  el: ?Element,
  hydrating?: boolean
): Component {
  vm.$el = el
  if (!vm.$options.render) {
    vm.$options.render = createEmptyVNode
    if (process.env.NODE_ENV !== 'production') {
      /* istanbul ignore if */
      if ((vm.$options.template && vm.$options.template.charAt(0) !== '#') ||
        vm.$options.el || el) {
        warn(
          'You are using the runtime-only build of Vue where the template ' +
          'compiler is not available. Either pre-compile the templates into ' +
          'render functions, or use the compiler-included build.',
          vm
        )
      } else {
        warn(
          'Failed to mount component: template or render function not defined.',
          vm
        )
      }
    }
  }
  callHook(vm, 'beforeMount')

  let updateComponent
  /* istanbul ignore if */
  if (process.env.NODE_ENV !== 'production' && config.performance && mark) {
    updateComponent = () => {
      const name = vm._name
      const id = vm._uid
      const startTag = `vue-perf-start:${id}`
      const endTag = `vue-perf-end:${id}`

      mark(startTag)
      const vnode = vm._render()
      mark(endTag)
      measure(`vue ${name} render`, startTag, endTag)

      mark(startTag)
      vm._update(vnode, hydrating)
      mark(endTag)
      measure(`vue ${name} patch`, startTag, endTag)
    }
  } else {
    updateComponent = () => {
      vm._update(vm._render(), hydrating)
    }
  }

  // we set this to vm._watcher inside the watcher's constructor
  // since the watcher's initial patch may call $forceUpdate (e.g. inside child
  // component's mounted hook), which relies on vm._watcher being already defined
  new Watcher(vm, updateComponent, noop, {
    before () {
      if (vm._isMounted) {
        callHook(vm, 'beforeUpdate')
      }
    }
  }, true /* isRenderWatcher */)
  hydrating = false

  // manually mounted instance, call mounted on self
  // mounted is called for render-created child components in its inserted hook
  if (vm.$vnode == null) {
    vm._isMounted = true
    callHook(vm, 'mounted')
  }
  return vm
}
9 到 29 行:
if (!vm.$options.render) {
  vm.$options.render = createEmptyVNode
  if (process.env.NODE_ENV !== 'production') {
    /* istanbul ignore if */
    if ((vm.$options.template && vm.$options.template.charAt(0) !== '#') ||
      vm.$options.el || el) {
      warn(
        'You are using the runtime-only build of Vue where the template ' +
        'compiler is not available. Either pre-compile the templates into ' +
        'render functions, or use the compiler-included build.',
        vm
      )
    } else {
      warn(
        'Failed to mount component: template or render function not defined.',
        vm
      )
    }
  }
}
callHook(vm, 'beforeMount')
如果 render 为空,那么将 render 赋值为 createEmptyVNode。看名字就能知道这个方法是创建空 VNode。
如果不是生产环境,打印警告信息。
之后触发 beforeMount 生命周期钩子。
31 到 54 行:
let updateComponent
/* istanbul ignore if */
if (process.env.NODE_ENV !== 'production' && config.performance && mark) {
  updateComponent = () => {
    const name = vm._name
    const id = vm._uid
    const startTag = `vue-perf-start:${id}`
    const endTag = `vue-perf-end:${id}`

    mark(startTag)
    const vnode = vm._render()
    mark(endTag)
    measure(`vue ${name} render`, startTag, endTag)

    mark(startTag)
    vm._update(vnode, hydrating)
    mark(endTag)
    measure(`vue ${name} patch`, startTag, endTag)
  }
} else {
  updateComponent = () => {
    vm._update(vm._render(), hydrating)
  }
}
if 内部有大量的 mark,这些代码的作用是性能分析。
所以要弄清楚这部分代码的作用,主要看下 else 内的代码就可以。
为 updateComponent 赋值,其作用主要是生成 VNode(vm._render),并渲染(vm._update)。
59 到 65 行:
new Watcher(vm, updateComponent, noop, {
  before () {
    if (vm._isMounted) {
      callHook(vm, 'beforeUpdate')
    }
  }
}, true /* isRenderWatcher */)
new Watcher
我们来看一下实例化 Watcher 时的几个参数:
- vm Vue 实例
- updateComponent 我们刚刚在上边定义的,主要作用是生成 VNode 并渲染。
- noop 空函数
- true 是否是渲染函数的观察者,这里当然为 true
4. Watcher
终于遇到了 Watcher 了, 代码比较长,我们这里节选我认为比较重要的部分讲一下:
// src/core/observer/watcher.js

export default class Watcher {
  constructor() {}
  get () {}
  addDep () {}
  cleanupDeps () {}
  update () {}
  run () {}
  getAndInvoke () {}
  evaluate () {}
  depend () {}
  teardown () {}
}
Watcher 类有九个实例方法和一大堆的实例属性。不必一次性弄清楚所有的方法,我们遇到了哪个就来了解哪个。
4.1 构造函数
先来看一下 constructor 构造函数:
constructor (
  vm: Component,
  expOrFn: string | Function,
  cb: Function,
  options?: ?Object,
  isRenderWatcher?: boolean
) {
    // ...
  vm._watchers.push(this)
  // ...
  this.cb = cb
  this.id = ++uid // uid for batching
  this.active = true
  this.dirty = this.computed // for computed watchers
  this.deps = []
  this.newDeps = []
  this.depIds = new Set()
  this.newDepIds = new Set()
  this.expression = process.env.NODE_ENV !== 'production'
    ? expOrFn.toString()
    : ''
  // parse expression for getter
  if (typeof expOrFn === 'function') {
    this.getter = expOrFn
  } else {
    this.getter = parsePath(expOrFn)
    if (!this.getter) {
      this.getter = function () {}
      process.env.NODE_ENV !== 'production' && warn(
        `Failed watching path: "${expOrFn}" ` +
        'Watcher only accepts simple dot-delimited paths. ' +
        'For full control, use a function instead.',
        vm
      )
    }
  }
  if (this.computed) {
    this.value = undefined
    this.dep = new Dep()
  } else {
    this.value = this.get()
  }
}
11 到 21 行:
this.cb = cb
this.id = ++uid // uid for batching
this.active = true
this.dirty = this.computed // for computed watchers
this.deps = []
this.newDeps = []
this.depIds = new Set()
this.newDepIds = new Set()
this.expression = process.env.NODE_ENV !== 'production'
  ? expOrFn.toString()
  : ''
为一大堆实例属性赋值
cb 为我们刚刚new Watcher时传入的第三个参数即空函数 noop;
uid 为在文件开始处声明的变量,初始值为 0;
dirty 如注释所说,为 computed 使用,这与 computed 惰性求值有关,我们这里讨论的是 renderWatcher,所以暂时不必管;
接下来声明了两个空数组 this.deps this.newDeps, 两个空 Set this.depIds this.newDepIds;
23 到 36 行:
if (typeof expOrFn === 'function') {
  this.getter = expOrFn
} else {
  this.getter = parsePath(expOrFn)
  if (!this.getter) {
    this.getter = function () {}
    process.env.NODE_ENV !== 'production' && warn(
      `Failed watching path: "${expOrFn}" ` +
      'Watcher only accepts simple dot-delimited paths. ' +
      'For full control, use a function instead.',
      vm
    )
  }
}
为 this.getter 赋值。
当 expOrFn 为函数时:
expOrFn 为我们 new Watcher 传入的第二个参数,即 updateComponent, 其主体为 vm._update(vm._render()), 生成 VNode 并渲染。
否则:this.getter = parsePath(expOrFn)
我们来看一下 parsePath 的代码:
// src/core/util/lang.js

const bailRE = /[^w.$]/
export function parsePath (path: string): any {
  if (bailRE.test(path)) {
    return
  }
  const segments = path.split('.')
  return function (obj) {
    for (let i = 0; i < segments.length; i++) {
      if (!obj) return
      obj = obj[segments[i]]
    }
    return obj
  }
}
对传入的参数使用正则 /[^w.$]/检测,[^……] 匹配不在方括号内任意字符,w 表示任何ASCⅡ字符组成的单词,等价于[a-zA-Z0-9_],即数字字母下划线。所以这个正则匹配的就是非数字、字母、下划线、点、$符。
正则匹配成功则代表参数不合法。
接下来的代码比较简单,联想下我们平时使用$watch:
vm.$watch('a.b', function (newVal, oldVal) {
  // 做点什么
})
可知parsePath 方法返回一个函数,这个函数的作用是取得该路径对应的属性值并返回。
接着往下,37 到 41 行:
if (this.computed) {
  this.value = undefined
  this.dep = new Dep()
} else {
  this.value = this.get()
}
我们这里为 renderWatcher ,所以走 else,调用 this.get
4.2 实例方法 get
看下源码:
get () {
  pushTarget(this)
  let value
  const vm = this.vm
  try {
    value = this.getter.call(vm, vm)
  } catch (e) {
    if (this.user) {
      handleError(e, vm, `getter for watcher "${this.expression}"`)
    } else {
      throw e
    }
  } finally {
    // "touch" every property so they are all tracked as
    // dependencies for deep watching
    if (this.deep) {
      traverse(value)
    }
    popTarget()
    this.cleanupDeps()
  }
  return value
}
第 2 行:pushTarget(this)
来看下 pushTarget 代码:
// src/core/observer/dep.js
export function pushTarget (_target: ?Watcher) {
  if (Dep.target) targetStack.push(Dep.target)
  Dep.target = _target
}
给class Dep 的属性 target 赋值,值为传入的 Watcher 实例。
5 到 21 行:
try {
  value = this.getter.call(vm, vm)
} catch (e) {
  if (this.user) {
    handleError(e, vm, `getter for watcher "${this.expression}"`)
  } else {
    throw e
  }
} finally {
  // "touch" every property so they are all tracked as
  // dependencies for deep watching
  if (this.deep) {
    traverse(value)
  }
  popTarget()
  this.cleanupDeps()
}
调用 this.getter ,对于 renderWatcher ,此方法为传入的 updateComponent。
该方法主体为 vm._update(vm._render()), 生成 VNode 并渲染。
生成 VNode,自然会对观测的数据求值,进而触发在依赖收集的准备工作中 defineReactive 定义的 get 属性。
在依赖收集完成后,会调用 this.cleanupDeps, 我们先来看一下这个方法再讲依赖收集。
4.3 实例方法 cleanupDeps
cleanupDeps () {
  let i = this.deps.length
  while (i--) {
    const dep = this.deps[i]
    if (!this.newDepIds.has(dep.id)) {
      dep.removeSub(this)
    }
  }
  let tmp = this.depIds
  this.depIds = this.newDepIds
  this.newDepIds = tmp
  this.newDepIds.clear()
  tmp = this.deps
  this.deps = this.newDeps
  this.newDeps = tmp
  this.newDeps.length = 0
}
deps newDeps 为 Dep 实例数组。在依赖收集时将当前 dep push 到 this.newDeps。
依赖收集完毕后,执行本方法:
2 到 8 行:
let i = this.deps.length
while (i--) {
  const dep = this.deps[i]
  if (!this.newDepIds.has(dep.id)) {
    dep.removeSub(this)
  }
}
遍历 this.deps, 移除 this.newDepIds 中不存在的 dep,此举的目的是移除当前已经用不到的旧 dep。
9 到 16 行:
let tmp = this.depIds
this.depIds = this.newDepIds
this.newDepIds = tmp
this.newDepIds.clear()
tmp = this.deps
this.deps = this.newDeps
this.newDeps = tmp
this.newDeps.length = 0
很简单,将 newDeps 的值与 deps 互换,并且情况 newDeps。
你也可以在下一节依赖收集结束后来回顾这个方法。
5. 依赖收集
这部分在上一章已经相信讲解过,不清楚的话可以回头再看看。
来看一下我们定义的 get 属性
// src/core/observer/index.js   defineReactive

get: function reactiveGetter () {
  // ...
  if (Dep.target) {
    dep.depend()
    // ...
  }
  // ...
},
Dep.target 为当前 Watcher 实例。
dep 为 Dep 实例,我们来看一下dep.depend的代码:
// src/core/observer/dep.js
depend () {
  if (Dep.target) {
    Dep.target.addDep(this)
  }
}
调用 Watcher 实例的 addDep 方法,代码如下:
// src/core/observer/watcher.js
addDep (dep: Dep) {
  const id = dep.id
  if (!this.newDepIds.has(id)) {
    this.newDepIds.add(id)
    this.newDeps.push(dep)
    if (!this.depIds.has(id)) {
      dep.addSub(this)
    }
  }
}
将 dep 和其 id 保存到 this.newDeps this.newDepIds ,判断语句的目的是防止重复依赖。
如果没有重复的话,调用 dep.addSub
来看下 dep.addSub 的代码:
// src/core/observer/dep.js
addSub (sub: Watcher) {
  this.subs.push(sub)
}
将当前 Watcher 实例保存到 dep 实例的 subs 属性中。
6. 小结
本章我们主要从渲染函数的观察者角度,分析了 Vue 从 $mount 到最终渲染页面的过程中,如何触发了依赖收集动作。
可以看到,关于 Dep 和 Watcher 类,我们还有很多属性没有讲到,这些主要和依赖更新有关。
依赖收集完成后,我们又如何在数据变化时更新页面呢,这就是我们下一章的内容:依赖更新。
7. 参考文献
- Vue 技术内幕


 2885
2885

 被折叠的 条评论
为什么被折叠?
被折叠的 条评论
为什么被折叠?
 到【灌水乐园】发言


