


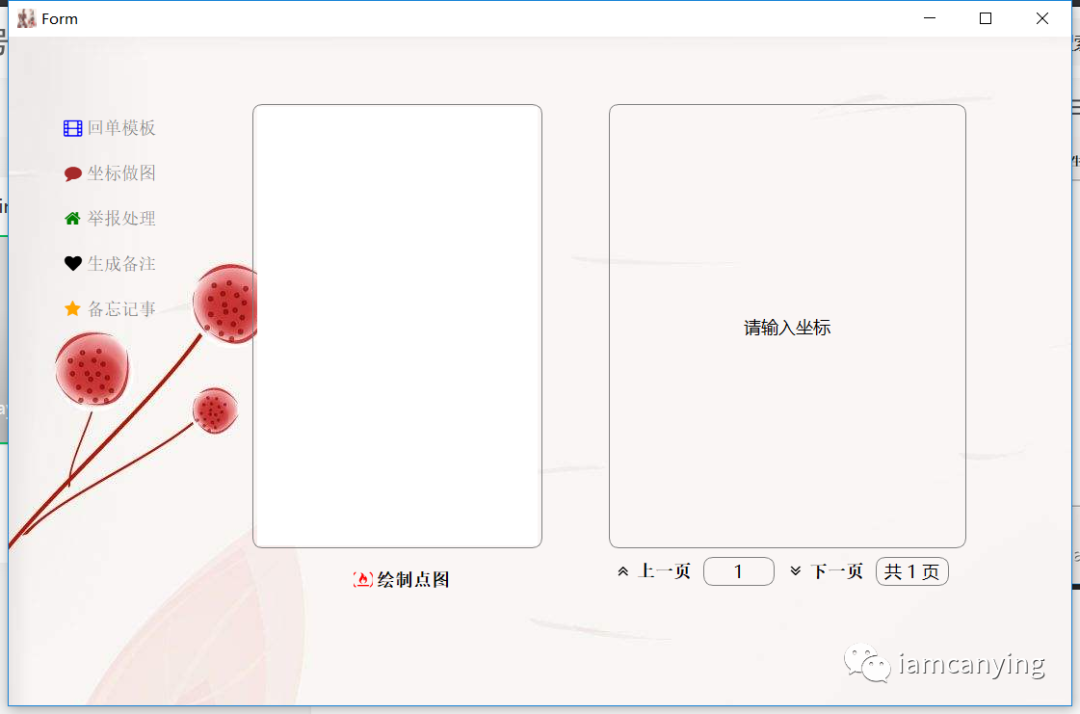
最近需要写一个本地exe程序小工具,学习了PyQt5,使用PyQt5+Pycharm设计了一个如下界面的小工具。上手遇到的难点所涉及主要知识有:
stackLayout堆叠布局实现UI与逻辑分离
QComboBox三级联动查询
StyleSheet部件样式控制
背景及图标的使用(需安装qtawesome)

stackLayout堆叠布局实现UI与逻辑分离
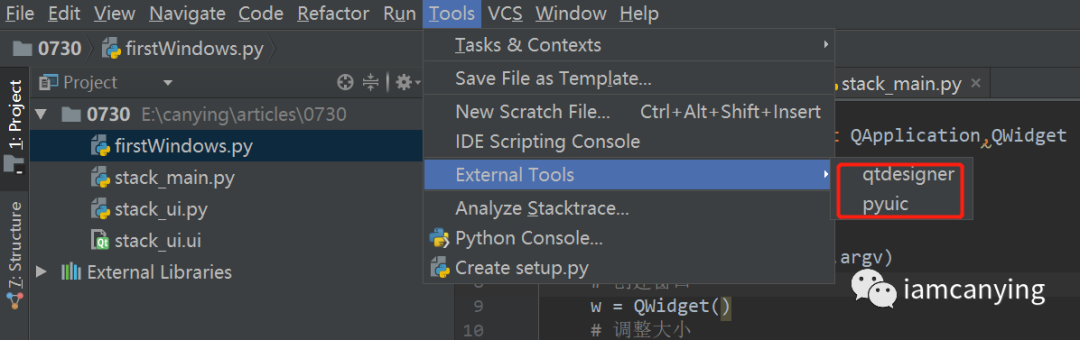
实现点击不同的左侧按钮,切换对不同的右侧界面,首先要安装qtDesigner(设计界面)和pyuic(将界面ui文件转为py文件),并配置到pycharm工具,百度大把教程。完成后pycharm>>tools>>external tools界面如下所示:
接下来,先熟悉一下pyqt5,创建第一个窗口。
#-*- coding:utf-8 -*-from PyQt5.QtWidgets import QApplication,QWidgetimport sysif __name__ == '__main__': app = QApplication(sys.argv) # 创建应用实例 w = QWidget() # 创建窗口 w.resize(400,200)# 调整大小 w.move(300,300) # 调整位置 w.setWindowTitle('第一个pyqt5窗口') # 设置标题 w.show() # 展示窗口 sys.exit(app.exec()) # 进入程序主循环,并通过exit()确保主循环安全结束然后开始设计本次exe工具的界面,在pycharm中打开qtdesigner。
左侧:拖动一个textlabel控件、一个垂直spacer、五个pushbotton按钮,全选右键设置为FormLayout,蓝色lable为显示需要,可以不设计,右侧黄色label同理。如需使用,需要在label上再设计一个Frame,否则表单FormLayout无法显示。
右侧:先拖动一个stackedWidget,然后再在stackedWidget空间上进行每一个界页面的设计,点击右上角的三角图标可进行切换页面,开始时只有两个界面,点击右键insertPage即可新增页面。

完成所有页面布局后命名为stack_ui.ui,使用pyuic生成py文件stack_ui.py。

打开生成的stack_ui.py文件,这是一个类。

接着,新建一个stack_main.py文件,import刚才设计好的界面类,并通过stackedWidget.setCurrentIndex函数设计对应的按钮响应事件,此时运行stack_main.py文件即可成功运行界面程序。
#-*- coding:utf-8 -*-from PyQt5.QtWidgets import QApplication,QWidgetimport sysfrom stack_ui import Ui_Formclass myForm(QWidget,Ui_Form): def __init__(self,parent=None): super().__init__() self.setupUi(self) self.pushButton.clicked.connect(self.btn1_fun) self.pushButton_2.clicked.connect(self.btn2_fun) self.pushButton_3.clicked.connect(self.btn3_fun) self.pushButton_4.clicked.connect(self.btn4_fun) self.pushButton_5.clicked.connect(self.btn5_fun) def btn1_fun(self): self.stackedWidget.setCurrentIndex(0) def btn2_fun(self): self.stackedWidget.setCurrentIndex(1) def btn3_fun(self): self.stackedWidget.setCurrentIndex(2) def btn4_fun(self): self.stackedWidget.setCurrentIndex(3) def btn5_fun(self): self.stackedWidget.setCurrentIndex(4)if __name__ == '__main__': app = QApplication(sys.argv) w = Mywindow() w.show() sys.exit(app.exec())QComboBox三级联动查询
先理一下逻辑,实现这个功能一共需要几步:
点击切换按钮时,设置第一个下拉选择框combobox的可选项
当combobox当前项激活时,设置第二个下拉选择框combobox_2的可选项
当combobox_2当前项激活时,设置第三个下拉选择框combobox_3的可选项
当点击生成按钮时,通过combobox的currentText,从self.data中获取数据并展示到textedit
因此,self.data为json格式的数据,实现代码如下:
class myForm(QWidget, Ui_Form): ... # 修改btn1_fun函数使其满足上述逻辑1 def btn1_fun(self): self.stackedWidget.setCurrentIndex(0) self.data = function_reply.read_model() items = set() for i in range(0,self.comboBox.count()): items.add(self.comboBox.itemText(i)) for key in self.data.keys(): if key not in items: self.comboBox.addItem(key) # 增加combobox_change函数使其满足逻辑2 def combobox_change(self): current_product = self.comboBox.currentText() self.comboBox_2.clear() self.comboBox_2.addItems(sorted(self.data[current_product])) # 增加combobox_2_change函数使其满足逻辑3 def combobox_2_change(self): current_product = self.comboBox.currentText() current_big_type = self.comboBox_2.currentText() if (current_product in self.data.keys()): if (current_big_type in self.data[current_product].keys()): self.comboBox_3.clear() self.comboBox_3.addItems(self.data[current_product][current_big_type].keys()) # 增加pushButton_6_event函数使其满足逻辑4 def pushButton_6_event(self): current_product = self.comboBox.currentText() current_big_type = self.comboBox_2.currentText() current_small_type = self.comboBox_3.currentText() if (current_product in self.data.keys()): if current_big_type in self.data[current_product].keys(): if current_small_type in self.data[current_product][current_big_type].keys(): t_text = self.data[self.comboBox.currentText()][self.comboBox_2.currentText()][self.comboBox_3.currentText()] text_choice = t_text[random.randint(0, len(t_text)-1)] self.textEdit.setText(text_choice) ...最后,连接相关信号和槽。
class myForm(QWidget, Ui_Form): def __init__(self): super().__init__() self.setupUi(self) ... self.comboBox.currentIndexChanged.connect(self.combobox_change) self.comboBox_2.currentIndexChanged.connect(self.combobox_2_change) self.pushButton_6.clicked.connect(self.pushButton_6_event) ...StyleSheet部件样式控制
class myForm(QWidget, Ui_Form): def __init__(self): super().__init__() self.setupUi(self) ... self.formLayoutWidget.setStyleSheet(''' QPushButton{ border:none; color:gray; font-size:18px; height:40px; padding-left:5px; padding-right:10px; text-align:left; } QPushButton:hover{ color:black; border:1px solid #F3F3F5; border-radius:10px; background:LightGray; } ''') self.stackedWidget.setStyleSheet(''' QPushButton{ border:1px solid gray; color:black; font-size:18px; height:40px; padding-left:5px; padding-right:10px; text-align:center; border-radius:10px; } QPushButton:hover{ color:black; border:1px solid #F3F3F5; border-radius:10px; background:LightBlue; } QComboBox{ border-radius: 7px; color:black; font-size:16px; height:30px; text-align:center; font-family: "Microsoft YaHei"; } QLabel{ border:1px solid gray; font-size:18px; border-radius:10px; padding:2px 4px; font-family: "Microsoft YaHei"; } QTextEdit{ border:1px solid gray; border-radius:10px; padding:2px 4px; font-family: "Microsoft YaHei"; } ''') ...背景及图标的使用(需安装qtawesome)
class myForm(qw.QWidget, ui_stack.Ui_Form): def __init__(self): super().__init__() self.setupUi(self) self.setWindowIcon(QtGui.QIcon('./image/background.jpg'))# 设置背景 self.pushButton.setIcon(qtawesome.icon('fa.film', color='blue')) ...


 1089
1089


 被折叠的 条评论
为什么被折叠?
被折叠的 条评论
为什么被折叠?
 到【灌水乐园】发言


