


Doris编译安装
1编译前准备
① 系统依赖
Tips:Centos编译存在许多关于Gcc 问题,建议==使用ubuntu18.04 64位==,Centos即使手动配置以下条件,在编译时存在Boost:Boost.Contextfails to build -> Call of overloaded 'callcc(...) is ambiguous' 等问题,使用阿里云ubuntu 18.04 64位可编译可以避免踩很多坑。
尝试使用Centos编译:一直失败,从未成功,最后使用ubuntu。
② 源码地址
doris不同版本下载地址:
http://doris.apache.org/master/zh-CN/downloads/downloads.html
doris0.12版本下载地址:
https://www.apache.org/dyn/closer.cgi?path=/incubator/doris/0.12.0-incubating/apache-doris-0.12.0-incubating-src.tar.gz
==为了支持kafka 中json 数据写入doris ,请使用社区版本的doris 0.12.21,下载地址如下:==
https://github.com/baidu-doris/incubator-doris/tags
③ 系统版本
| Linux系统 | 版本 |
| :--------: | -------------- |
| **Ubuntu** | **18.04 64位** |
| | |
Tips:使用ali的ubuntu 18.04 64位镜像编译成功。
④ 环境版本
| 软件 | 版本 |
| ---- | -------------- |
| Java | java 11 及以上 |
| | |
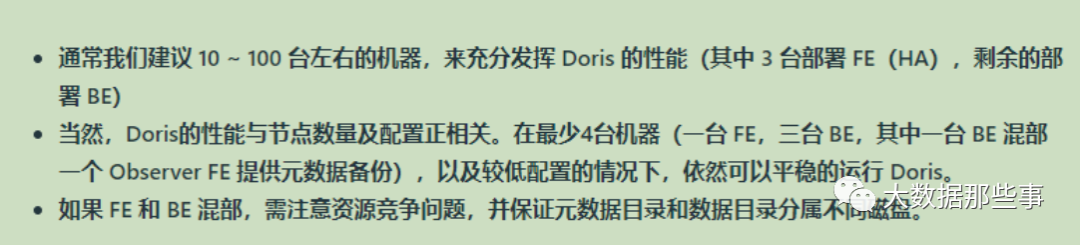
⑤ 生产环境资源最低配置
| 模块 | CPU | 内存| 磁盘 | 网络 | 实例数量(最低要求)|
| ---- | --- | --- | ----- | ----- | -------------------|
| fe | 16核+| 64GB+|SSD/SATA|千兆网| 1-5* |
| be | 16核+| 64GB+|SSD/SATA|千兆网| 10-100 * |
磁盘采用ssd,目前hive数据为556G,粗略计算为930G,doris初度定为1T,后期数据量上来在动态扩容。
⑥ 建立实例后登陆 使用wget 下载源码。
shell###安装wget$ apt-get update$ apt-get install wget$ wget --version###安装lrzsz$ apt install lrzsz###创建安装目录$ mkdir /opt/software &&cd /opt/software###wget下载安装包$ wget https://github.com/baidu-doris/incubator-doris/archive/DORIS-0.12.21-release.tar.gz###解压安装$ tar -zxvf/opt/software/DORIS-0.12.21-release.tar.gz -C /opt/software/编译
① 使用docker镜像方式,官方推荐。
② 直接编译,==本文档主要使用直接编译方式==,且编译系统为Ubuntu 18.04 64位。
Tips:==doris0.13版本取消mysql-5.7.18,lzo-2.10的依赖,移除依赖库 mysql-5.7.18会导致无法访问 MySQL 外部表。访问 MySQL 外部表的功能会在后续版本中通过 UnixODBC 实现==
shell$ cd/opt/software/incubator-doris-DORIS-0.12.21-release/thirdparty$ mkdir src$ cd src$ sudo apt-get install lrzsz$ rz###上传所有的依赖包arrow-apache-arrow-0.15.1.tar.gzbitshuffle-0.3.5.tar.gzboost_1_59_0.tar.gzboost_1_64_0.tar.gzbrotli-1.0.7.tar.gzbzip2-1.0.8.tar.gzcfe-3.4.2.src.tar.gzcompiler-rt-5.0.0.src.tar.xzCRoaring-0.2.60.tar.gzcurl-7.54.1.tar.gzdouble-conversion-3.1.1.tar.gzflatbuffers-v1.10.0.tar.gzgflags-2.2.0.tar.gzglog-0.3.3.tar.gzgoogletest-release-1.8.0.tar.gzgperftools-2.7.tar.gzincubator-brpc-0.9.5.tar.gzjemalloc-5.2.1.tar.bz2leveldb-1.20.tar.gzlibevent-20180622-24236aed01798303745470e6c498bf606e88724a.ziplibrdkafka-0.11.6-RC5.tar.gzllvm-3.4.2.src.tar.gzlz4-1.7.5.tar.gzlzo-2.10.tar.gzmysql-5.7.18.tar.gzopenssl-1.0.2k.tar.gzorc-1.5.8.tar.gzprotobuf-3.5.1.tar.gzrapidjson-1.1.0.tar.gzre2-2017-05-01.tar.gzrocksdb-5.14.2.tar.gzs2geometry-0.9.0.tar.gzsnappy-1.1.7.tar.gzthrift-0.9.3.tar.gzzlib-1.2.11.tar.gzzstd-1.3.7.tar.gz③ 基本环境准备完毕,配置JAVA_HOME,编译doris。
```shell$ apt-get -y update$ apt-get install build-essentialopenjdk-11-jdk maven cmake byacc flex automake libtool-bin bison binutils-devlibiberty-dev zip unzip libncurses5-dev### ubuntu默认换环境dash,切回bash$ ls -al /bin/sh$ dpkg-reconfigure dash### ==> 选择no$ vim /etc/profileexportJAVA_HOME=/usr/lib/jvm/java-11-openjdk-amd64/export PATH=${JAVA_HOME}/bin:$PATH$ source /etc/profile### 进入apache-doris-0.12.0-incubating-src目录$ cd apache-doris-0.12.0-incubating-src$ sh build.sh###进入到fs_brkers目录下的apache_hdfs_broker编译关于hdfs的部分$ cd fs_brkers/apache_hdfs_broker$ sh build.sh```Tips:ubuntu不存在以下错误,Centos存在,报错yacc: Commandnot found。解决办法:安装yacc,再执行sh build.sh。
如果操作第三方库:
$ sh /opt/software/doris_src/apache-doris-0.12.0-incubating-src/thirdparty/build-thirdparty.shsh build.sh出现如下依赖包问题:
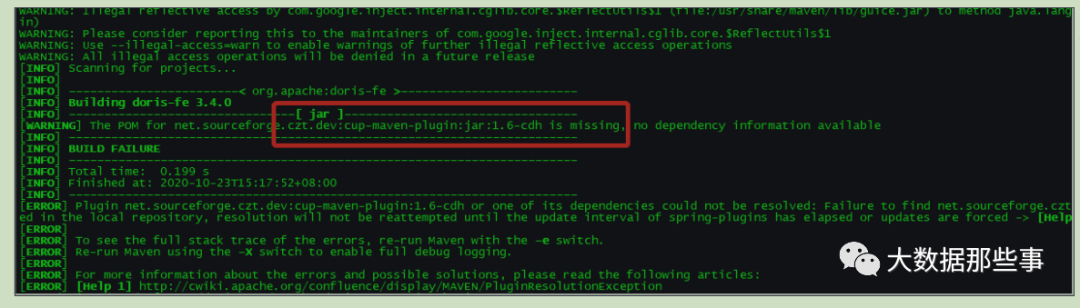
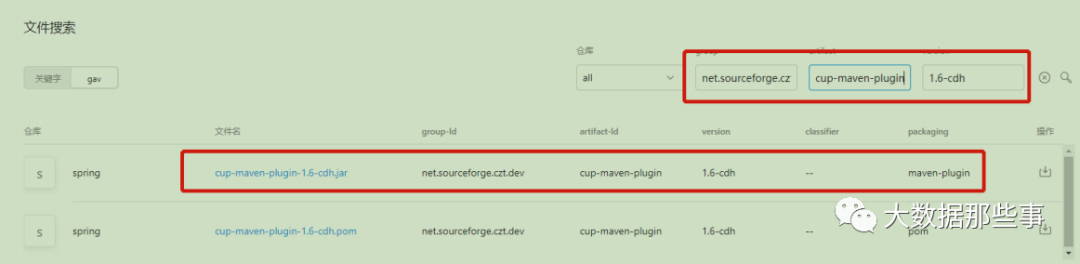
解决上面最直接的方式是修改pom依赖,[PR#4769](https://github.com/apache/incubator-doris/pull/4769/files)。
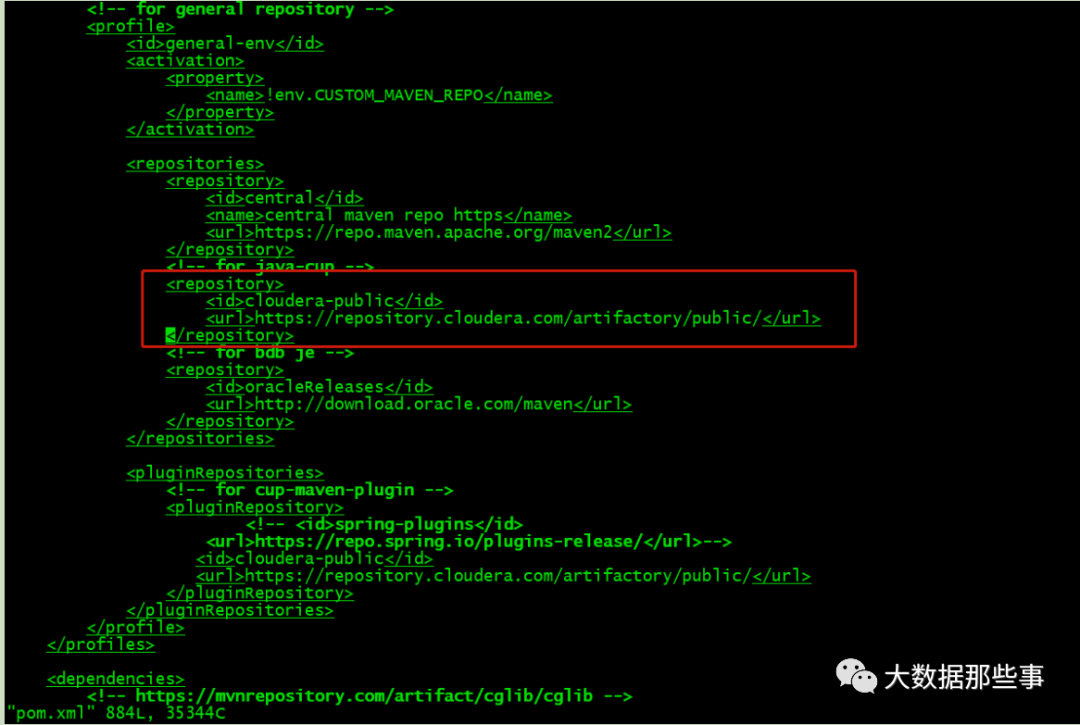
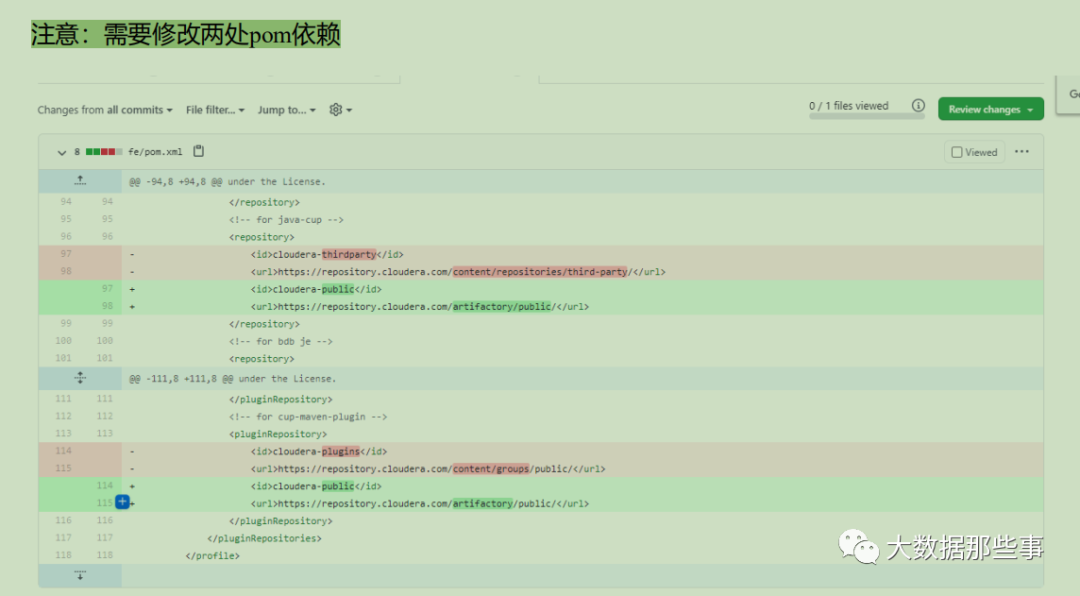
==注意:需要修改两处pom依赖==
然后执行sh build.sh。
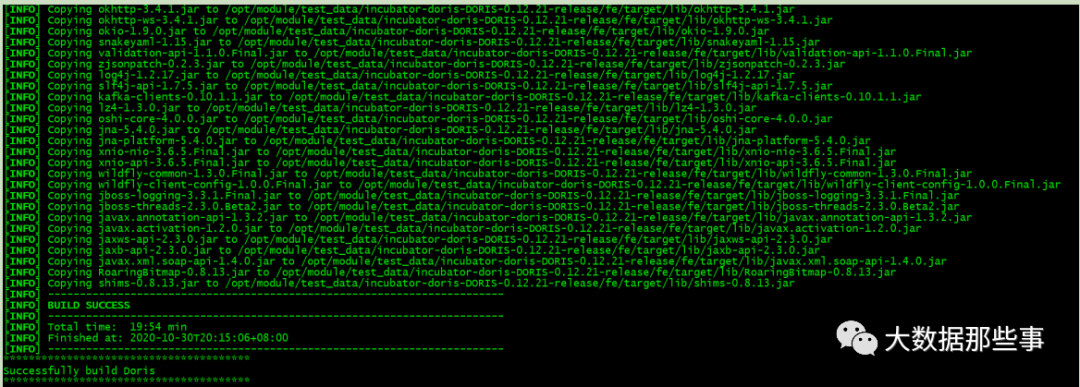
![编译耗时19分钟]
编译成功后:
编译hdfs和doris导数的部分[编译耗时15分钟]:
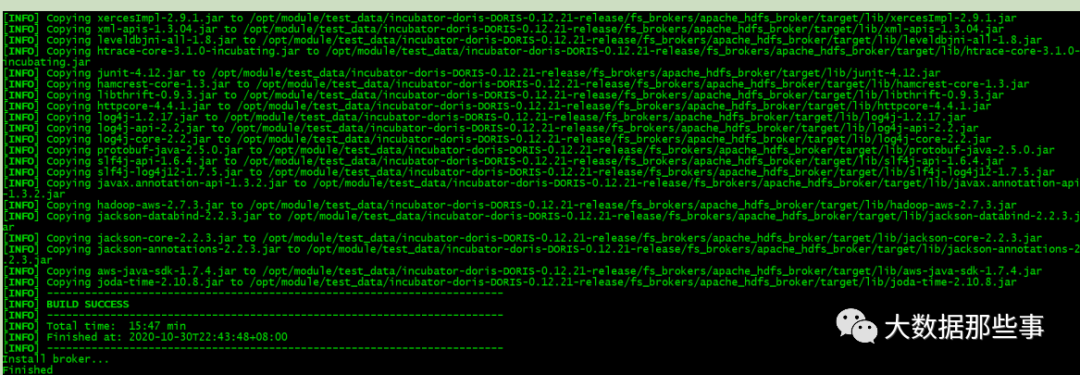
说明:doris安装的be,fe在output中,关于hdfs导入到doris的安装fs_brkers/apache_hdfs_broker下编译出来的output中,把对应的安装文件cp到对应的安装路径中。
把incubator-doris-DORIS-0.12.21-release下编译出的output 复制并重命名为doris0.12.21,把incubator-doris-DORIS-0.12.21-release/fs_brkers/apache_hdfs_broker下编译出的output下的apache_hdfs_broker0.12.21复制到安装目录即可。
3集群部署
具体安装细节说明请参考官方网站:
http://doris.apache.org/master/zh-CN/installing/install-deploy.html
生产环境官方建议:
① 规划
| 节点名 | wm_doris1 | wm_doris2 | wm_doris3 |
| --------- | -------------- |------------ | ------------ |
| fe角色 | FE(leader) | FE(follower) | FE(observer) |
| be角色 | BE | BE | BE |
|hdfs_import| BROKER | BROKER | BROKER |
TIPS:BROKER节点应该和BE节点在同一节点并且数据一致。
② 网络需求
|实例| 端口名称 | 端口| 通讯方 | 说明 |
| -- | -------- | --- | ------------ |---------------- |
| BE | be_port | 9060 | FE --> BE |BE上用于接 FE 请求|
| BE |webserver_p| 8040| BE BE |BE 上 httpserver端口|
| BE | heartbeat_p|9050| FE -->BE |BE 上用于接FE 的心跳 |
| BE | brpc_p |8060 |FEBE, BE BE | BE 上之间通讯 |
| FE | http_port | 8030 | FE FE | FE http serve端口 |
|FE|rpc_p|9020|BE --> FE, FE FE|FE上thriftserver 端口|
| FE | query_p | 9030 | 用户 | FE 上的 mysql server 端口 |
|FE|edit_log_p |9010|FE FE|FE上 bdbje之间通信用的端口|
|Broker|broker_ipc_p|8000|FE -->Broker| Broke上用接收请求 |
注:
1. 当部署多个 FE 实例时,要保证 FE 的 http_port 配置相同。
2. 部署前请确保各个端口在应有方向上的访问权限。
4添加ip&domain映射
5上传安装包,解压、配置
① 配置FE
```shell$ unzip doris.zip -d /opt/module/doris$ unzip apache_hdfs_broker.zip -d /opt/module/doris[root@doris01]# lltotal 20drwxr-xr-x 5 root root 4096 Nov 1 20:17 ./drwxr-xr-x 5 root root 4096 Nov 1 19:25 ../drwxr-xr-x 6 root root 4096 Nov 1 21:28 apache_hdfs_broker0.12.21/drwxr-xr-x 5 root root 4096 Nov 1 19:10 doris0.12.21/drwxr-xr-x 4 root root 4096 Nov 1 21:20 doris-meta/[root@doris01]# pwd/opt/module/doris###分发到其他节点,使用自己编写的分发shell脚本$ scp -r -P 22 dorisniaoshu@doris02:/opt/software ==> password$ scp -r -P 22 dorisniaoshu@doris02:/opt/software==> password$ cd /opt/module/doris/$ mkdir /opt/module/doris/doris-meta $ vi conf/fe.confmeta_dir = ${DORIS_HOME}/doris-meta 修改为 meta_dir = /opt/module/doris/doris-meta [所有节点]```Tips:
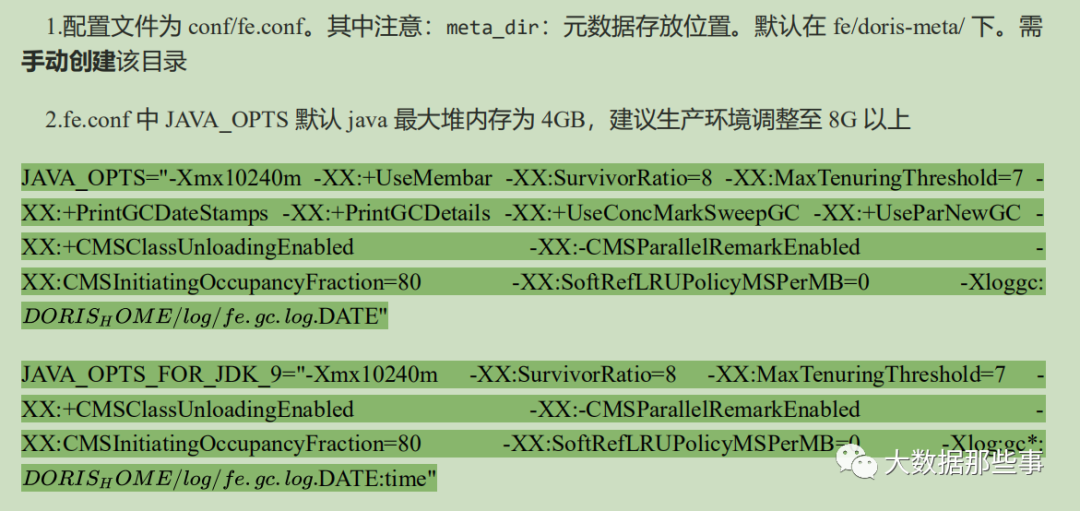
1.配置文件为conf/fe.conf。其中注意:`meta_dir`:元数据存放位置。默认在 fe/doris-meta/ 下。需**手动创建**该目录。
2.fe.conf 中 JAVA_OPTS 默认 java 最大堆内存为 4GB,建议生产环境调整至 8G 以上。
② 配置BE
```shell###创建数据存放目录$ cd /mnt/doris_data/$ mkdir /mnt/doris_data/storage1$ mkdir /mnt/doris_data/storage2$ vi conf/be.confstorage_root_path =${DORIS_HOME}/storage 修改为 storage_root_path =/mnt/doris_data/storage1,500;/mnt/doris_data/storage2```③ 配置FS_BROKER(hdfs导数)
```shell### 把编译好的包复制到安装目录,直接启动即可### 建议把emr中hdfs-site.xml导入 apache_hdfs_broker/conf目录中覆盖编译中自带的### 直接启动即可```Tips:所由节点都需要操作以上配置配置,也可以采用分发方式。
④ 安装mysql客户端
```shell##上传mysql-clien包$ mkdir /opt/software/mysql-client&& rz $ ll libmysqlclient20_5.7.31-1ubuntu18.04_amd64.deb libmysqlclient20-dbgsym_5.7.31-1ubuntu18.04_amd64.deb libmysqlclient-dev_5.7.31-1ubuntu18.04_amd64.deb mysql-client_5.7.31-1ubuntu18.04_amd64.deb mysql-common_5.7.31-1ubuntu18.04_amd64.deb mysql-community-client_5.7.31-1ubuntu18.04_amd64.deb mysql-community-client-dbgsym_5.7.31-1ubuntu18.04_amd64.deb ##安装$ dpkg -imysql-common_5.7.31-1ubuntu18.04_amd64.deb$ dpkg -imysql-community-client_5.7.31-1ubuntu18.04_amd64.deb$ dpkg -imysql-community-client-dbgsym_5.7.31-1ubuntu18.04_amd64.deb$ dpkg -ilibmysqlclient20-dbgsym_5.7.31-1ubuntu18.04_amd64.deb$ dpkg -ilibmysqlclient-dev_5.7.31-1ubuntu18.04_amd64.deb$ dpkg -imysql-client_5.7.31-1ubuntu18.04_amd64.deb```启动停止
```shell###启动be,fe,fs_broker命令$ sh /opt/module/doris/doris0.12.21/fe/bin/start_fe.sh --daemon [节点1]### 从节点首次启动[注意点]$ sh /opt/module/doris/doris0.12.21/fe/bin/start_fe.sh --helperdoris01:9010 --daemon[节点2,节点3] $ sh /opt/module/doris/doris0.12.21/be/bin/start_be.sh --daemon [节点1,节点2,节点3]$ sh /opt/module/doris/apache_hdfs_broker0.12.21/bin/start_broker.sh --daemon [节点1,节点2,节点3] ###停止be,fe,fs_broker命令$ sh /opt/module/doris/fe/bin/stop_fe.sh$ sh /opt/module/doris/be/bin/stop_be.sh $ sh /opt/module/apache_hdfs_broker/bin/stop_broker.sh ``` 想获取更多更全资料,扫码加好友入群

该公众号开源为大家解决大数据企业级遇到的各种问题,也欢迎各位大佬积极加入开源共享(共同面对大数据领域各种老大难问题)
来稿请投邮箱:miaochuanhai@126.com


 39
39


 被折叠的 条评论
为什么被折叠?
被折叠的 条评论
为什么被折叠?
 到【灌水乐园】发言


