


概述
在如今高并发的互联网应用中,缓存的地位举足轻重,对提升程序性能帮助不小。而 3.x开始的 Spring也引入了对 Cache的支持,那对于如今发展得如火如荼的 Spring Boot来说自然也是支持缓存特性的。当然 Spring Boot默认使用的是 SimpleCacheConfiguration,即使用 ConcurrentMapCacheManager 来实现的缓存。但本文将讲述如何将 Guava Cache缓存应用到 Spring Boot应用中。
Guava Cache是一个全内存的本地缓存实现,而且提供了线程安全机制,所以特别适合于代码中已经预料到某些值会被多次调用的场景
下文就上手来摸一摸它,结合对数据库的操作,我们让 Guava Cache作为本地缓存来看一下效果!
注: 本文首发于 My Personal Blog:CodeSheep·程序羊,欢迎光临 小站
准备工作
- 准备好数据库和数据表并插入相应实验数据(MySQL)
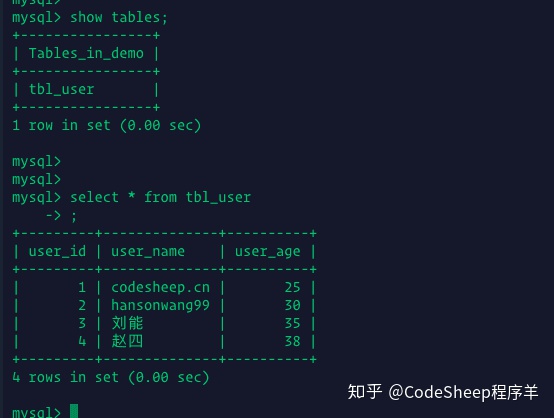
比如我这里准备了一张用户表,包含几条记录:
我们将通过模拟数据库的存取操作来看看 Guava Cache缓存加入后的效果。
搭建工程:Springboot + MyBatis + MySQL + Guava Cache
pom.xml 中添加如下依赖:
<dependencies>
        <dependency>
            <groupId>org.springframework.boot</groupId>
            <artifactId>spring-boot-starter-web</artifactId>
        </dependency>

        <dependency>
            <groupId>org.springframework.boot</groupId>
            <artifactId>spring-boot-starter-test</artifactId>
 最低0.47元/天 解锁文章


 2888
2888


 被折叠的 条评论
为什么被折叠?
被折叠的 条评论
为什么被折叠?
 到【灌水乐园】发言


