


 本文详细解析了Spring Boot Starter的工作原理,包括自动配置机制。并介绍了如何一步步创建自定义Starter,涵盖从新建模块、编写配置类到打包发布的过程。最后展示了如何在新项目中使用自定义Starter并进行测试。
1 springboot starter机制概述
starter是 SpringBoot中的一种非常重要的机制,它抛弃了曾经繁杂的配置部分,将其统一集成进starter。这样也就使得在maven中只需引进starter,SpringBoot就能自动扫描到要加载的信息并启动相应的默认配置。
2 springboot starter机制原理
当我们引入了starter,就会使用springboot自动配置原理,对这种场景进行配置。
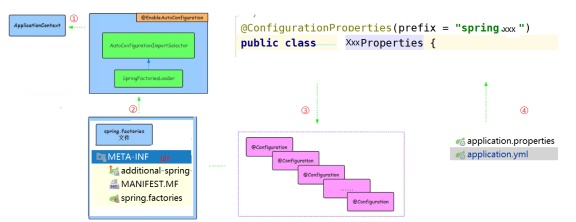
①Springboot应用入口类通过@SpringBootApplication注解简介使用@EnableAutoConfiguration(是父注解)
②使用@EnableAutoConfiguration后,会扫描所有jar中的spring.factories文件,加载所有的配置类(加了 @Configuration的类)
③配置类(加了@Configuration的类)使用XxxProperties以@Bean的方式完成对应场景的配置
④XxxPropereis里面的配置信息有默认值,但是我们可以在application.properties/application.yml中获取
3 自定义springboot starter步骤分析
3.1 一个springboot starter的组成
1 一个@Configuration的配置类
1.1 @Configuration依赖XxxProperties类
1.2 XxxProperties可以通过application.properties/yml来定制配置
2 META-INF/spring.factories
2.1 spring.factories有准备好的配置类的配置
3.2 编写springboot starter的步骤
1 新建一个springboot starter的模块
2 准备@Configuration的配置类
3 META-INF/spring.factories里面配置配置类
4 把starter进行打包 mvn clean install
5 新建模块使用配置类里面配置好的一些东西
4 自定义Springboot-starter实现
4.1 准备starter模块
4.1.1 新建starter模块
SpringBoot提供的starter以spring-boot-starter-xxx的方式命名的。官方建议自定义的starter使用xxx-spring-boot-starter命名规则。以区分SpringBoot生态提供的starter。
例如:spring-boot-starter-yhptest
4.1.2 导入jar
<?xml version="1.0" encoding="UTF-8"?><project xmlns="http://maven.apache.org/POM/4.0.0"
xmlns:xsi="http://www.w3.org/2001/XMLSchema-instance"
xsi:schemaLocation="http://maven.apache.org/POM/4.0.0 http://maven.apache.org/xsd/maven-4.0.0.xsd"><modelVersion>4.0.0</modelVersion><groupId>cn.itsource</groupId><artifactId>spring-boot-starter-yhptest</artifactId><version>1.0-SNAPSHOT</version><!--导入springboot相关的jar包--><parent><groupId>org.springframework.boot</groupId><artifactId>spring-boot-starter-parent</artifactId><version>2.0.5.RELEASE</version></parent><dependencies><dependency><groupId>org.springframework.boot</groupId><artifactId>spring-boot-configuration-processor</artifactId><optional>true</optional></dependency><dependency><groupId>org.springframework.boot</groupId><artifactId>spring-boot-starter</artifactId></dependency></dependencies></project>
4.2 准备配置类
4.2.1 准备XxxProperties
package cn.itsource.properties;import org.springframework.boot.context.properties.ConfigurationProperties;
@ConfigurationProperties(prefix = "yhptest")public class YhptestProperties {private String yhptest = "yhptest";public String getYhptest() {return yhptest;
}public void setYhptest(String yhptest) {this.yhptest = yhptest;
}
}
4.2.2 准备XxxAutoConfiguration
package cn.itsource.config;import cn.itsource.properties.YhptestProperties;import cn.itsource.service.YhptestService;import org.springframework.beans.factory.annotation.Autowired;import org.springframework.boot.autoconfigure.condition.ConditionalOnClass;import org.springframework.boot.autoconfigure.condition.ConditionalOnProperty;import org.springframework.boot.context.properties.EnableConfigurationProperties;import org.springframework.context.annotation.Bean;import org.springframework.context.annotation.Configuration;
@Configuration
@EnableConfigurationProperties(YhptestProperties.class) //加载配置Properties
@ConditionalOnClass(YhptestAutoConfiguration.class) // 触发配置条件public class YhptestAutoConfiguration {//注入
@Autowiredprivate YhptestProperties yhptestProperties;
@Bean//使用YhptestProperties进行配置public YhptestService yhptestService(){return new YhptestService(yhptestProperties.getYhptest());
}
}
4.2.3 准备要配置的类
package cn.itsource.service;//给其他模块注入使用的public class YhptestService {private String yhptest;public YhptestService(String yhptest) {this.yhptest = yhptest;
}public String getYhptest(){return this.yhptest;
}
}
4.3 spring.factories里面配置配置类
4.3.1 创建META-INF/spring.factories
在resource目录创建META-INF文件夹,并且在文件夹里面创建名为spring.factories的文件
4.3.2 配置配置类
#-------starter自动装配---------
org.springframework.boot.autoconfigure.EnableAutoConfiguration=cn.itsource.config.YhptestAutoConfiguration
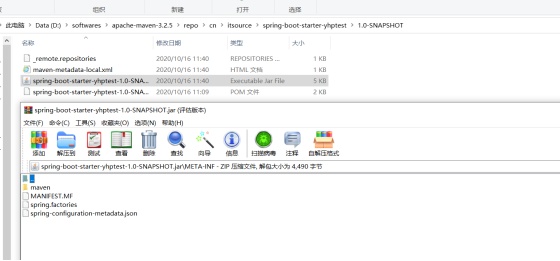
4.4 starter打包
在项目路径使用mvn clean install
5 模块使用自定义starter
5.1 步骤分析
1 创建springboot项目
创建maven并准备pom.xml
yml配置
入口类
启动测试
2 依赖自定义starter
3 测试测试注入自定义starter的自动配置里面配置的bean
5.2 测试自定义starter
5.2.1 创建springboot项目
创建maven项目并准备pom.xml
<?xml version="1.0" encoding="UTF-8"?><project xmlns="http://maven.apache.org/POM/4.0.0"
xmlns:xsi="http://www.w3.org/2001/XMLSchema-instance"
xsi:schemaLocation="http://maven.apache.org/POM/4.0.0 http://maven.apache.org/xsd/maven-4.0.0.xsd"><modelVersion>4.0.0</modelVersion><groupId>cn.itsource</groupId><artifactId>yhpteststarter-test</artifactId><version>1.0-SNAPSHOT</version><!--导入springboot相关的jar包--><parent><groupId>org.springframework.boot</groupId><artifactId>spring-boot-starter-parent</artifactId><version>2.0.5.RELEASE</version></parent><dependencies><dependency><groupId>org.springframework.boot</groupId><artifactId>spring-boot-starter-web</artifactId></dependency><dependency><groupId>org.springframework.boot</groupId><artifactId>spring-boot-starter-test</artifactId></dependency></dependencies></project>
yml配置
server:
port: 9999
入口类
package cn.itsource;import org.springframework.boot.SpringApplication;import org.springframework.boot.autoconfigure.SpringBootApplication;
@SpringBootApplicationpublic class App {public static void main(String[] args) {
SpringApplication.run(App.class,args);
}
}
启动测试
运行App.java main不报错就ok
5.2.2 依赖自定义starter
<!--依赖自定义stater--><dependency><groupId>cn.itsource</groupId><artifactId>spring-boot-starter-yhptest</artifactId><version>1.0-SNAPSHOT</version></dependency>
5.2.3 使用自定义stater里面配置的bean进行测试
package cn.itsource;import cn.itsource.service.YhptestService;import org.junit.Test;import org.junit.runner.RunWith;import org.springframework.beans.factory.annotation.Autowired;import org.springframework.boot.test.context.SpringBootTest;import org.springframework.test.context.junit4.SpringRunner;
@RunWith(SpringRunner.class)
@SpringBootTest(classes = App.class)public class Yhptest {
@Autowiredprivate YhptestService yhptestService;
@Testpublic void test() throws Exception{
System.out.println(yhptestService.getYhptest());
}
}
也可以修改application.yml中的配置进行修改


 1万+
1万+

 被折叠的 条评论
为什么被折叠?
被折叠的 条评论
为什么被折叠?
 到【灌水乐园】发言


