


导言
笔者耗时将近3周的时间将flume相关知识点进行了总结,并带有详细的案例demo,希望能够帮助读者快速上手学习。
另考虑到该文章篇幅较长,不适合读者短期阅读,建议读者收藏或者关注公众号后台回复"flume"可领取该文章的pdf版本
一、Flume介绍
1.1 前言
官网:http://flume.apache.org/releases/content/1.9.0/FlumeUserGuide.html#kafka-source
Flume最早是Cloudera提供的一个高可用的,高可靠的,分布式的海量日志采集、聚合和传输的系统(其中Logstash也是日志采集的一大解决方案,具体内容详见),是Apache下的一个孵化项目。它支持在日志系统中定制各类数据发送方,用于收集数据;同时,提供对数据进行简单处理,并写到各种数据接受方(可定制)的能力。开箱即用
当前Flume有两个版本Flume 0.9X版本的统称Flume-og,Flume1.X版本的统称Flume-ng。由于Flume-ng经过重大重构,与Flume-og有很大不同,使用时请注意区分

1.2 特性
提供上下文路由特征
Flume的管道是基于事务,保证了数据在传送和接收时的一致性
Flume是可靠的,容错性高的,可升级的,易管理的,并且可定制的。
Flume可以将应用产生的数据存储到任何集中存储器中,比如HDFS,HBase
可以被水平扩展
当收集数据的速度超过将写入数据的时候,也就是当收集信息遇到峰值时,这时候收集的信息非常大,甚至超过了系统的写入数据能力,这时候,Flume会在数据生产者和数据收容器间做出调整,保证其能够在两者之间提供平稳的数据.
1.3 核心概念
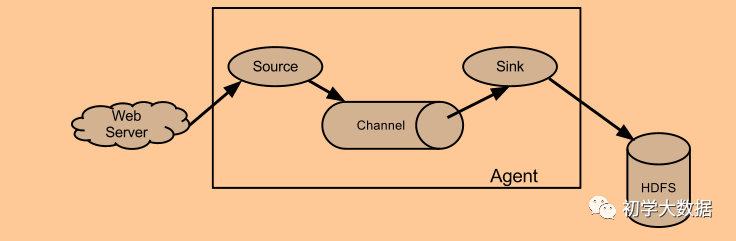
agent
flume最核心的角色就是agent。flume日志采集系统是由一个个agent连接起来的数据传输通道。
对于每个agent来说就是一个独立的守护进程(JVM),它负责从数据源接收数据,并发送到下一个目的地。
agent内部有三个重要的组件:source,channel,sink
source
从数据发生器接收数据,并将接收的数据以Event的形式传递给一个或多个channel.
Flume提供多种数据接收方式,比如Avro,Thrift等。
channel
channel是一种短暂的存储容器,它从source处接收到event格式数据后进行缓存,直到被消费掉。它在source和sink之间起到了桥梁作用,channel是一个完整的事务,这一点保障了数据在收发时的一致性,并且可以和任意数量的source和sink连接。
支持的类型有:JDBC channel,FileSystem Channel,Memory channel等。
sink
sink将数据存储到集中存储器比如Hbase和HDFS,它从channels消费数据(events)并将其传递给目标地. 目标地可能是另一个sink,也可能HDFS,HBase.
Event
数据在flume内部是以Event封装的形式存在的。因此source组件在获取到原始数据后,需要封装成Event后发送到channel中,然后sink从channel取出Event后,根据配置要求再转成其他的形式进行数据输出。
Event封装的对象主要有两部分:Headers和Body;
Headers是一个集合Map类型,用于存储元数据(如标志、描述等)
Body就是一个字节数组,装载具体的数据内容
transaction
Flume的事务机制,类似于数据库的事务机制。
Flume使用独立的事务分别从source到channel,以及从channel到sink的event传递。
注意:在任何时刻,Event至少在一个Channel是完整有效的(基于事务机制保障)
interceptor
拦截器,拦截工作在source组件之后,source产生的event会被传入的拦截器根据需要进行拦截处理。
拦截器可以组成拦截器链。
二、Flume安装部署
# 1.下载压缩包
# 2.解压缩
tar -zxvf apache-flume-XXX-bin.tar.gz
# 3.配置采集文件
# 4.启动
bin/flume-ng agent -n $agent_name -c conf -f conf/flume-conf.properties.template
commands:
  help                      显示本帮助信息
  agent                     启动一个agent进程
  avro-client                 启动一个用于测试avro source的客户端(能够发送avro序列化流)
  version                    显示当前flume的版本信息

global options:   全局通用选项
  --conf,-c           指定flume的系统配置文件所在目录
  --classpath,-C         添加额外的jar路径
  --dryrun,-d               不去真实启动flume agent,而是打印当前命令
  --plugins-path        指定插件(jar)所在路径
  -Dproperty=value          传入java环境参数
  -Xproperty=value          传入所需的JVM配置参数
agent options:
  --name,-n           agent的别名(在用户采集方案配置文件中)
  --conf-file,-f           指定用户采集方案配置文件的路径
  --zkConnString,-z       指定zookeeper的连接地址
  --zkBasePath,-p       指定用户配置文件所在的zookeeper path,比如:/flume/config
  --no-reload-conf            关闭配置文件动态加载
  --help,-h                   display help text
avro-client options:
  --rpcProps,-P    RPC client properties file with server connection params
  --host,-H      avro序列化数据所要发往的目标主机(avro source所在机器)
  --port,-p       avro序列化数据所要发往的目标主机的端口号
  --dirname
需要被序列化发走的数据所在目录(提前准备好测试数据放在一个文件中)
--filename,-F 需要被序列化发走的数据所在文件(default: std input)
--headerFile,-R 存储header key-value的文件
--help,-h 帮助信息
Either --rpcProps or both --host and --port must be specified.
Note that if directory is specified, then it is always included first
in the classpath.
三、Flume组件详解
3.1 Source
| Source | Desc |
|---|---|
| Avro Source | 通过监听一个网络端口来接受数据,而且接受的数据必须是使用avro序列化框架序列化后的数据; |
| Thrift Source | 监听Thrift端口并从外部Thrift客户端流接收事件 |
| Exec Source | 启动一个用户所指定的linux shell命令;采集这个linux shell命令的标准输出,作为收集到的数据,转为event写入channel |
| JMS Source | 从JMS目标(例如队列或主题)读取消息;作为JMS应用程序,它应可与任何JMS提供程序一起使用,但仅经过ActiveMQ的测试;注意,应该使用plugins.d目录(首选),命令行上的–classpath或通过flume-env.sh中的FLUME_CLASSPATH变量将提供的JMS jar包含在Flume类路径中 |
| Spooling Directory Source | 监视一个指定的文件夹,如果文件夹下有没采集过的新文件,则将这些新文件中的数据采集,并转成event写入channel;注意:spooling目录中的文件必须是不可变的,而且是不能重名的!否则,source会loudly fail! |
| Taildir Source | 监视指定目录下的一批文件,只要某个文件中有新写入的行,则会被tail到;它会记录每一个文件所tail到的位置,记录到一个指定的positionfile保存目录中,格式为json(如果需要的时候,可以人为修改,就可以让source从任意指定的位置开始读取数据);它对采集完成的文件,不会做任何修改 |
| Kafka Source | 就是用kafka consumer连接kafka,读取数据,然后转换成event,写入channel |
| NetCat Source | 启动一个socket服务,监听一个端口;将端口上收到的数据,转成event写入channel |
| Sequence Generator Source | 一个简单的序列生成器,它使用从0开始,递增1并在totalEvents处停止的计数器连续生成事件;当无法发送event到channel时会进行重试。通常用于测试。 |
| Syslog Sources | 读取系统日志数据生成event |
| HTTP Source | 通过http post/get来接收数据,通常get用于测试;该source基于Jetty 9.4,并提供了设置其他特定于Jetty的参数的功能,这些参数将直接传递给Jetty组件 |
| Stress Source | 主要用于压测,用于可以配置要发生的event总数以及要发送成功event的最大数 |
| Custom Source | 自定义source |
3.1.1 Netcat Source
工作机制:启动一个socket服务,监听一个端口,然后接收数据转换成event发送到channel中
示例
# 1.编辑配置文件netcat_source.conf
a1.sources=r1
a1.channels=c1
a1.sinks=k1

a1.sources.r1.type=netcat
a1.sources.r1.bind=localhost
a1.sources.r1.port=5555

a1.channels.c1.type=memory
a1.channels.c1.capacity=1000
a1.channels.c1.transactionCapacity=500

a1.sinks.k1.type=logger

a1.sources.r1.channels=c1
a1.sinks.k1.channel=c1

# 2.启动agent
/usr/local/flume/bin/flume-ng agent -n a1 --conf conf --conf-file ./netcat_source.conf -Dflume.root.logger=INFO,console

# 3.开启另外一个终端
telnet localhost 5555

3.1.2 Exec Source
工作机制:启动用户所指定的shell命令,然后采集这个命令下的输出,转为event发送到channel中
示例:
# 1.编辑exec_source.conf
a1.sources = s1
a1.channels = c1
a1.sinks = k1

a1.sources.s1.type=exec
a1.sources.s1.command=tail -F /root/access.log
a1.sources.s1.batchSize=200 # 该数值不能大于capacity设置的数值

a1.channels.c1.type=memory
a1.channels.c1.capacity=1000
a1.channels.c1.transactionCapacity=500 # 该数值不能大于capacity数值

a1.sinks.k1.type=logger

a1.sources.s1.channels = c1
a1.sinks.k1.channel = c1

# 2.编辑造数据脚本
vi gen_data.sh
#!/bin/bash

for i in {1..100};do
   echo $i >> /root/access.log
done

# 3.启动agent
/usr/local/flume/bin/flume-ng agent -n a1 --conf conf --conf-file ./exec_source.conf -Dflume.root.logger=INFO,console

# 4.调用脚本
sh gen_data.sh

3.1.3 Spooldir Source
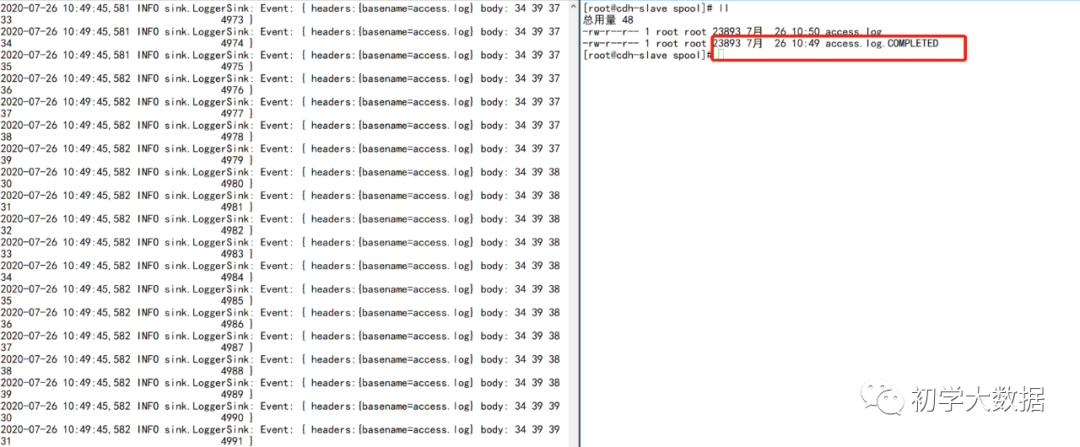
工作机制:监听一个指定的文件夹,如果文件夹下有没采集过的新文件,则将这些新文件中的数据采集,并转换为event写到channle中
**注意:监听的目录下文件是不可变的,而且不能重名,否则会抛出loudly fail **
示例
# 1.编辑spooldir_source.conf文件
a1.sources = s1
a1.sinks = k1
a1.channels = c1

a1.sources.s1.type= spooldir
a1.sources.s1.spoolDir=/root/spool
a1.sources.s1.basenameHeader=true
a1.sources.s1.basenameHeaderKey=basename
#a1.sources.s1.deletePolicy=immediate
a1.sources.s1.batchSize=500

a1.channels.c1.type=memory
a1.channels.c1.capacity=1000
a1.channels.c1.transactionCapacity=500

a1.sinks.k1.type=logger


a1.sources.s1.channels=c1
a1.sinks.k1.channel=c1

# 2.编辑造数据脚本
#!/bin/bash

for i in {1..5000};do
   echo $i >> /root/spool/access.log
done

# 3.启动flume agent
/usr/local/flume/bin/flume-ng agent -n a1 --conf conf --conf-file ./spooldir_source.conf -Dflume.root.logger=INFO,console

# 4.调用脚本
sh /root/gener_data.sh

# 最后可以flume会在已记录的文件自动加上后缀COMPLETED标识。
# 注意:flume是以UTF-8编码读取文件的
3.1.4 Avro Source
工作机制:通过监听一个端口来接受数据,而且接受的数据必须是avro序列化后的
# 示例
# 1.编辑avro_source.conf文件
a1.sources = s1
a1.channels = c1
a1.sinks = k1

a1.sources.s1.type=avro
a1.sources.s1.bind=0.0.0.0
a1.sources.s1.port=5555

a1.channels.c1.type=memory
a1.channels.c1.capacity=200
a1.channels.c1.transactonCapacity=100

a1.sinks.k1.type=logger

a1.sources.s1.channels = c1
a1.sinks.k1.channel = c1
# 2.启动agent
/usr/local/flume/bin/flume-ng agent -n a1 --conf conf --conf-file ./avro_source.conf -Dflume.root.logger=INFO,console

# 3.模拟avro client
/usr/local/flume/bin/flume-ng avro-client --host localhost --port 5555

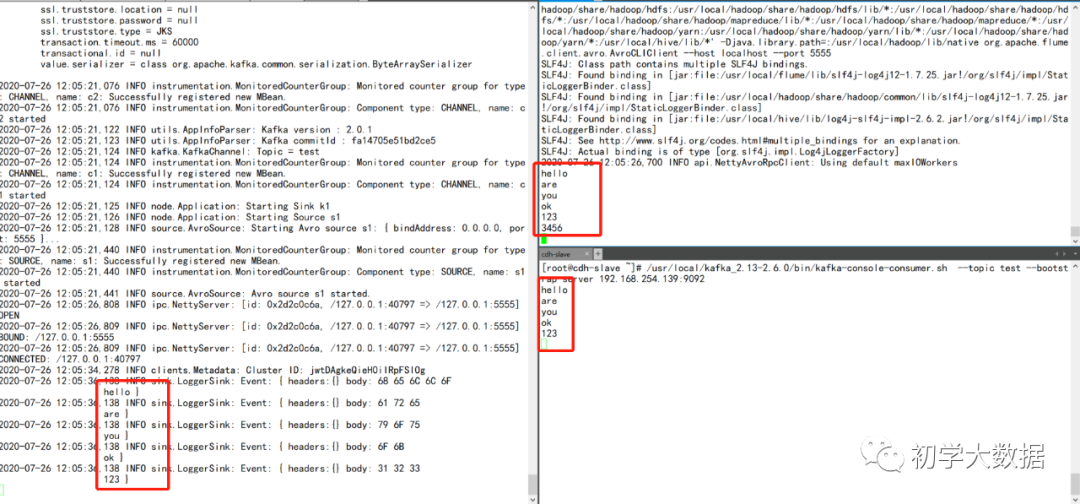
3.1.5 Kafka Source
工作机制:利用kafka consumer的原理消费kafka数据,然后转换成event后写入到channel中
# 示例
# 1.编辑kafka_source.conf文件
a1.sources = s1
a1.channels = c1
a1.sinks = k1
a1.sources.s1.type=org.apache.flume.source.kafka.KafkaSource
a1.sources.s1.batchSize = 100
a1.sources.s1.batchDurationMills = 2000
a1.sources.s1.kafka.bootstrap.servers = 192.168.254.139:9092
a1.sources.s1.kafka.topics = test
a1.sources.s1.kafka.consumer.group.id=flume
a1.channels.c1.type=memory
a1.channels.c1.capacity=200
a1.channels.c1.transactionCapacity=100
a1.sinks.k1.type=logger
a1.sources.s1.channels=c1
a1.sinks.k1.channel=c1
# 2.启动agent
/usr/local/flume/bin/flume-ng agent -n a1 --conf conf --conf-file ./kafka_source.conf -Dflume.root.logger=INFO,console
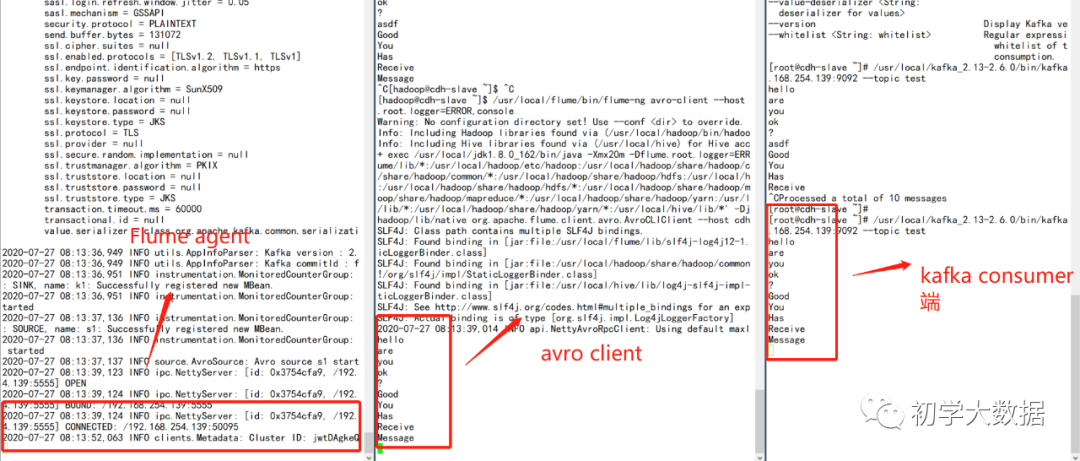
# 3.创建kafka topic
/usr/local/kafka_2.13-2.6.0/bin/kafka-topics.sh --create --topic test --partitions 3 --replication-factor 2 --zookeeper 192.168.254.139:2181
# 4.开启producer
/usr/local/kafka_2.13-2.6.0/bin/kafka-topics.sh --create --topic test --partitions 3 --replication-factor 1 --zookeeper 192.168.254.139:2181

3.1.6 taildir Source
工作机制:监听指定目录下的一批文件,只要某个文件被写入,那么就会被tail到.
这里原理其实就是source会记录每个文件所读取到的位置,然后记录到一个指定的positionfile目录文件中,通常为json格式,而且是可见的,因此可以人为修改。由于该种机制,可以实现从任意指定位置读取数据,所以这个source是可以保障可靠性的。但是会有数据重复的问题!
# 示例
# 1.编辑taildir_source.conf
1.sources = s1
a1.sinks = k1
a1.channels = c1

a1.sources.s1.type=TAILDIR
a1.sources.s1.positionFile=/root/access_position.json
a1.sources.s1.filegroups = f1
a1.sources.s1.filegroups.f1=/root/access.log
a1.sources.s1.fileHeader=true
a1.sources.s1.maxBatchCount=1000

a1.channels.c1.type=memory
a1.channels.c1.capacity=2000
a1.channels.c1.transactionCapacity=1000

a1.sinks.k1.type=logger

a1.sources.s1.channels=c1
a1.sinks.k1.channel=c1
# 2.造数据脚本
#!/bin/bash

for i in {1..5000};do
   echo $i >> /root/access.log
done

# 3.启动agent
/usr/local/flume/bin/flume-ng agent -n a1 --conf conf --conf-file ./taildir_source.conf -Dflume.root.logger=INFO,console

# 4.调用脚本
sh gener_data.sh

#最后可以看到flume会把监听到的文件postition信息写入到一个文件中,对该文件进行人为调整就可以重复消费数据

3.2 Channel
| Channel | Desc |
|---|---|
| Memory Channel | event存储在内存中,且可以配置最大值。对于需要高吞吐而且可以容忍数据丢失的情况下,可以选择该channel |
| JDBC Channel | event被持久到数据库中,目前支持derby.适用于可恢复的场景 |
| Kafka Channel | agent利用kafka作为channel数据缓存;kafka channel要跟 kafka source、 kafka sink区别开来;kafka channel在应用时,可以没有source |
| File Channel | event被缓存在本地磁盘文件中;可靠性高,不会丢失;但在极端情况下可能会重复数据 |
| Spillable Memory Channel | event存储在内存和磁盘上。内存充当主存储,磁盘充当溢出。 |
3.2.1 Memory Channel
工作机制:该channel类型会把event保存在内存中,这样的好处就是快,但是也很容易丢数据
该类型的channel不再举例子来说明了,在source示例中就可以看到
3.2.2 Kafka Channel
工作机制:利用kafka作为缓存,这里需要注意的是kafka channel、Kafka sink、kafka source要区分开;
如果最终要把kafka作为采集存储的话,其实就不需要kafka sink了,只需要使用source + kafka channel即可。
如果要把kafka作为数据源的话,那么就只需要kafka channel+ hdfs sink即可
# 1.编写kafka_channel.conf文件
a1.sources = s1
a1.channels = c1 c2
a1.sinks = k1

a1.sources.s1.type=avro
a1.sources.s1.bind=0.0.0.0
a1.sources.s1.port=5555
a1.sources.s1.selector.type = replicating

a1.channels.c1.type=org.apache.flume.channel.kafka.KafkaChannel
a1.channels.c1.kafka.bootstrap.servers=192.168.254.139:9092
a1.channels.c1.kafka.topic=test
#a1.channels.c1.kafka.consumer.group.id=flume-channel
a1.channels.c1.parseAsFlumeEvent=false

a1.channels.c2.type=memory

a1.sinks.k1.type=logger

a1.sources.s1.channels=c1 c2
a1.sinks.k1.channel=c2

# 2.启动agent
/usr/local/flume/bin/flume-ng agent -n a1 --conf conf --conf-file ./kafka_channel.conf -Dflume.root.logger=INFO,console
# 3.启动avro client
 /usr/local/flume/bin/flume-ng avro-client --host localhost --port 5555

# 4.启动kafka consumer
/usr/local/kafka_2.13-2.6.0/bin/kafka-console-consumer.sh  --topic test --bootstrap-server 192.168.254.139:9092

# 5.通过avro client模拟发送数据
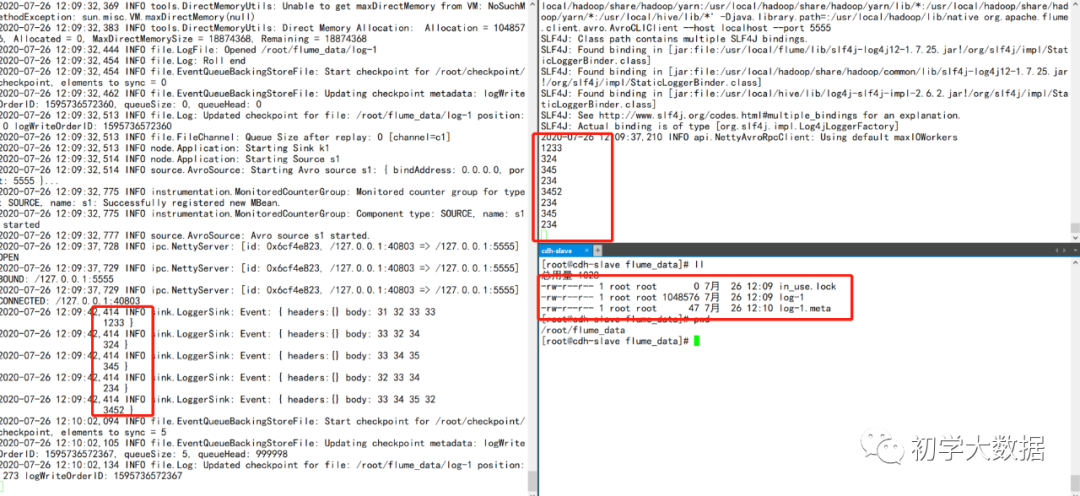
3.2.3 File Channel
工作机制:event会被缓存到本地磁盘文件中,可靠性高,不会丢失,但是可能会出现重复数据
# 1.编辑file_channel.conf文件
a1.sources = s1
a1.channels = c1 c2
a1.sinks = k1

a1.sources.s1.type=avro
a1.sources.s1.bind=0.0.0.0
a1.sources.s1.port=5555
a1.sources.s1.selector.type = replicating

a1.channels.c1.type=file
a1.channels.c1.checkpointDir=/root/checkpoint
a1.channels.c1.dataDirs=/root/flume_data

a1.channels.c2.type=memory

a1.sinks.k1.type=logger

a1.sources.s1.channels=c1 c2
a1.sinks.k1.channel=c2

# 2.启动agent
/usr/local/flume/bin/flume-ng avro-client --host localhost --port 5555

# 3.启动avro client模拟数据
3.3 Sink
| Sink | Desc |
|---|---|
| HDFS Sink | 数据被最终发往hdfs;可以生成text文件或 sequence 文件,而且支持压缩;支持生成文件的周期性roll机制:基于文件size,或者时间间隔,或者event数量;目标路径,可以使用动态通配符替换,比如用%D代表当前日期;当然,它也能从event的header中,取到一些标记来作为通配符替换 |
| Hive Sink | 可将text或json数据直接存储到hive分区表 |
| Logger Sink | 数据输出到日志中,通常用于debug |
| Avro Sink | avro sink用来向avro source发送avro序列化数据,这样就可以实现agent之间的级联 |
| Thrift Sink | 同avro sink |
| IRC Sink | 同avro sink |
| File Roll Sink | 数据存储到本地文件系统 |
| Null Sink | 直接丢弃 |
| HBaseSink | 数据存储到hbase中 |
| HBase2Sink | 等同于hbase 2版本的HBaseSink |
| AsyncHBaseSink | 异步模式写入hbase |
| MorphlineSolrSink | 该接收器从Flume事件中提取数据,对其进行转换,并将其几乎实时地加载到Apache Solr服务器中,后者再为最终用户或搜索应用程序提供查询 |
| ElasticSearchSink | 直接存储到es中 |
| Kite Dataset Sink | 将事件写入Kite数据集。该接收器将反序列化每个传入事件的主体,并将结果记录存储在Kite数据集中。它通过按URI加载数据集来确定目标数据集 |
| Kafka Sink | 存储到kafka中 |
| HTTP Sink | 将接收到的数据通过post请求发生到远程服务,event内容作为请求体发送 |
| Custom Sink | 自定义sink |
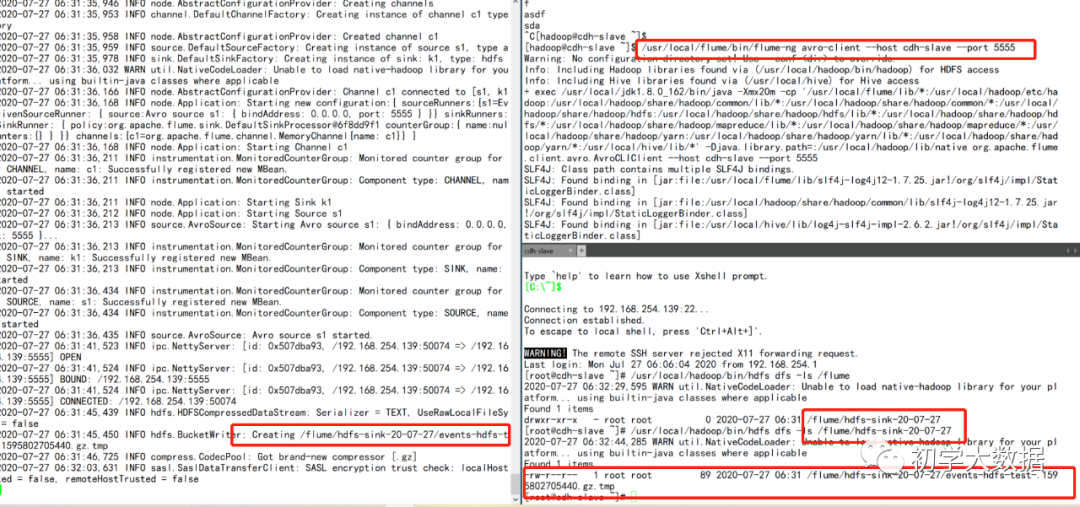
3.3.1 HDFS Sink
数据最终被写入到hdfs中,flume可以支持text文件或者sequence文件,而且支持压缩。支持周期性的roll机制或者是基于文件大小或者是event数量进行写入策略
# 示例
a1.sources = s1
a1.channels = c1
a1.sinks = k1

# source设置
a1.sources.s1.type=avro
a1.sources.s1.bind=0.0.0.0
a1.sources.s1.port=5555

#需要加上该参数,不然会抛出Expected timestamp in the Flume event headers, but it was null
a1.sources.s1.interceptors = t1
a1.sources.s1.interceptors.t1.type=timestamp

# channel设置
a1.channels.c1.type=memory
a1.channels.c1.capacity=1000
a1.channels.c1.transactionCapacity=500

# sinks设置
a1.sinks.k1.type=hdfs
a1.sinks.k1.hdfs.path=/flume/hdfs-sink-%y-%m-%d
a1.sinks.k1.hdfs.filePrefix=events-hdfs-test-
a1.sinks.k1.round=true
a1.sinks.k1.roundValue=5
a1.sinks.k1.roundUnit=second

a1.sinks.k1.hdfs.rollInterval=0
a1.sinks.k1.hdfs.rollSize=1024
a1.sinks.k1.hdfs.rollCount=0
a1.sinks.k1.hdfs.codeC=gzip
a1.sinks.k1.hdfs.writeFormat=Text
a1.sinks.k1.hdfs.fileType=CompressedStream

# source,channel,sink关联
a1.sources.s1.channels=c1
a1.sinks.k1.channel=c1
3.3.1.1 问题
Expected timestamp in the Flume event headers, but it was null
原因:写入到hfds时使用到了时间戳来区分目录结构,flume的消息组件event在接受到之后在header中没有发现时间戳参数
解决方案:
1.在source端配置agent1.sources.source1.interceptors = t1 agent1.sources.source1.interceptors.t1.type = timestamp
2.或者在sink端配置agent1.sinks.sink1.hdfs.useLocalTimeStamp = true,该参数配置笔者测试未生效
SinkRunner-PollingRunner-DefaultSinkProcessor" java.lang.NoSuchMethodError: com.google.common.base
原因:笔者使用的是hadoop3.x版本,与flume/lib目录下的guava相关jar包版本不一致
解决方案:删除flume/lib目录下guava相关jar包,将${HADOOP_HOME}/share/hadoop/common/lib目录下的guava对应的jar包拷贝到flume/lib目录下
Permission denied: user=root, access=WRITE, inode="/flume":hadoop:supergroup:drwxr-xr-x
原因:权限问题
解决方案:hdfs dfs -chown -R root:root 指定的hdfs目录
3.3.2 Kafka Sink
有了kafka channel后, kafka sink的必要性就降低了。因为我们可以用kafka作为channel来接收source产生的数据!
# 示例
a1.sources = s1
a1.channels = c1
a1.sinks = k1

a1.sources.s1.type=avro
a1.sources.s1.bind=0.0.0.0
a1.sources.s1.port=5555
a1.sources.s1.interceptors=i1
a1.sources.s1.interceptors.i1.type=timestamp

a1.channels.c1.type=memory

a1.sinks.k1.type=org.apache.flume.sink.kafka.KafkaSink
a1.sinks.k1.kafka.topic=test
a1.sinks.k1.kafka.bootstrap.servers=192.168.254.139:9092
a1.sinks.k1.kafka.flumeBatchSize=100
a1.sinks.k1.kafka.producer.acks=1
a1.sinks.k1.kafka.producer.compression.type=snappy

a1.sources.s1.channels=c1
a1.sinks.k1.channel=c1
3.3.3 Avro Sink
avro sink用来向avro source发送avro序列化数据,这样就可以实现agent之间的级联.通常用的场景比较少
这里就不给出简单demo了
3.3.4 ElasticSearch Sink
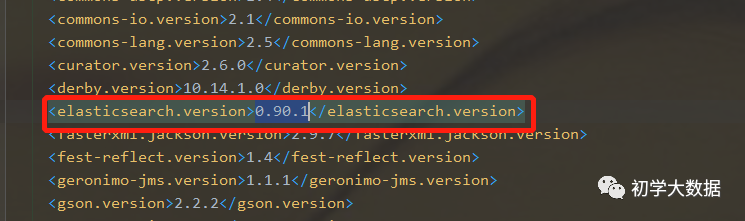
直接写入到es中,这里需要在lib目录下放入es相关的jar包,而且版本要一致,否则会抛出序列化异常问题。默认情况下,是由ElasticSearchLogStashEventSerializer序列化的
# 示例,flume1.9目前支持es0.9版本,因此对应高版本的es需要重写flume-ng-elasticsearch-sink源码
# 或者自定义sink
# 这里笔者采用了重写源码的方式
a1.sources = s1
a1.sinks = k1
a1.channels = c1


a1.sources.s1.type=avro
a1.sources.s1.bind=0.0.0.0
a1.sources.s1.port=5555

a1.channels.c1.type=memory

# 注意,这里的端口应该是9300,而不是9200
a1.sinks.k1.type=elasticsearch
a1.sinks.k1.hostNames=192.168.254.139:9300
a1.sinks.k1.indexName=flume
a1.sinks.k1.clusterName=my-application
a1.sinks.k1.batchSize=40
a1.sinks.k1.ttl=5d
a1.sinks.k1.serializer = org.apache.flume.sink.elasticsearch.ElasticSearchDynamicSerializer
a1.sources.s1.channels=c1
a1.sinks.k1.channel=c1
源码中的pom文件
最终结果示意图


3.3.4.1 最终编译jar包
笔者使用的是flume1.9+es6.6版本,且是在测试环境下验证使用,并未考虑性能以及未知bug,请读者自行考虑使用
获取方式
关注公众号“初学大数据”,后台回复flume可获取完整pdf教程以及对应jar包
通过https://download.csdn.net/download/qq_28680977/12861283进行下载
3.3.5 HBase Sink
将event写入到hbase中,这里需要注意的是hbase是行原子性的,也就是说如果hbase无法写入event,那么flume将会重播该事务下的所有event.
flume提供了两种序列化器:
一种是org.apache.flume.sink.hbase.SimpleHbaseEventSerializer:将event原样写入到hbase中
另外一种是org.apache.flume.sink.hbase.RegexHbaseEventSerializer:根据指定的regex进行匹配,将不同的部分写入到不同的列中
# 示例,笔者使用的环境是flume1.9+hbase1.2.6
a1.sources = s1
a1.channels = c1
a1.sinks = k1

a1.sources.s1.type=avro
a1.sources.s1.bind=0.0.0.0
a1.sources.s1.port=5555

#需要加上该参数,不然会抛出Expected timestamp in the Flume event headers, but it was null
a1.sources.s1.interceptors = t1
a1.sources.s1.interceptors.t1.type=timestamp

a1.channels.c1.type=memory
a1.channels.c1.capacity=1000
a1.channels.c1.transactionCapacity=500

a1.sinks.k1.type=hbase
a1.sinks.k1.table=flume-test
a1.sinks.k1.columnFamily=cf
a1.sinks.k1.serializer = org.apache.flume.sink.hbase.RegexHbaseEventSerializer

a1.sources.s1.channels=c1
a1.sinks.k1.channel=c1
如下图可以发现写入Hbase使用的字段是payload,也就是flume event中的装载数据的字节数组(byte payload) ,由此可以知道event是由两部分组成的:一个是装载数据的字节数组(byte payload)和一个可选头部组成

3.3.5.1问题:tried to access method com.google.common.base.Stopwatch.()V from class org.apache.hadoop.hbase.zookeeper.MetaTableLocator
原因:guava对应的jar包冲突
解决方案:将hbase中的jar包版本和flume中的jar包版本要保持一致
注意:
对于Flume-1.6.0 及以下版本:HBasesink目前只支持往 HBase-0.98 版本及以下版本写入数据,当HBase超过0.98版本,1.6.0 及以下版本的Flume则不支持往HBase写入数据
对于Flume-1.7.0 及以上版本:HBasesink目前支持往0.98及以上版本的HBase写入数据(当然也支持往0.98及以下版本的HBase写入数据)
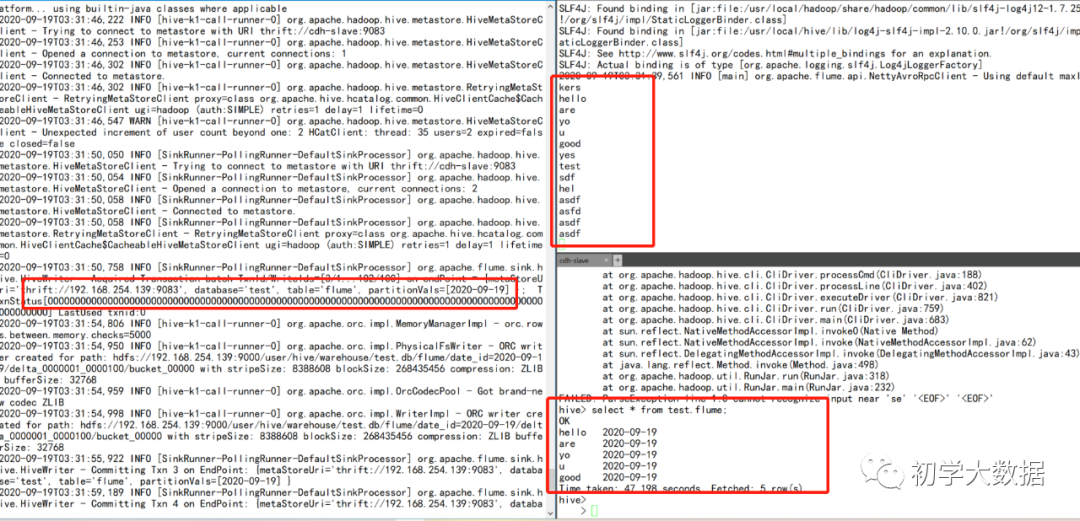
3.3.6 Hive Sink
将event以文本或者json的形式写入到hive表或者分区中。
对于json格式的数据,不需要进行额外的配置,JSON中的对象名称可以直接映射到hive表中具有相同名称的列。当然前提是需要使用org.apache.hive.hcatalog.data.JsonSerDe,而且需要安装Hcatalog
# 示例
# hive建表
create table test.flume(
  msg string comment "msg"
)
partitioned by (date_id string)
row format delimited
fields terminated by '\t'
stored as orc TBLPROPERTIES ('transactional'='true');

# 配置文件
a1.sources = s1
a1.channels = c1
a1.sinks = k1

a1.sources.s1.type=avro
a1.sources.s1.bind=0.0.0.0
a1.sources.s1.port=5555

a1.channels.c1.type=memory

# capacity的值要大于hive配置中的batchSize,默认值是15000
a1.channels.c1.capacity=20000
a1.channels.c1.transactionCapacity =20000

a1.sinks.k1.type=hive
# 前提要先开启hive metastore服务
a1.sinks.k1.hive.metastore=thrift://192.168.254.139:9083
a1.sinks.k1.hive.database=test
a1.sinks.k1.hive.table=flume
a1.sinks.k1.useLocalTimeStamp=true
a1.sinks.k1.round=true
a1.sinks.k1.roundValue=10
a1.sinks.k1.roundUnit=second
a1.sinks.k1.serializer=DELIMITED
a1.sinks.k1.serializer.delimiter="\t"
a1.sinks.k1.serializer.serdeSeparator='\t'
a1.sinks.k1.serializer.fieldnames=msg
a1.sinks.k1.hive.partition=%Y-%m-%d


a1.sources.s1.channels=c1
a1.sinks.k1.channel=c1

# 启动flume agent
usr/local/flume/bin/flume-ng agent -n a1 --conf conf --conf-file ./hive_sink.conf -Dflume.root.logger=INFO,console --classpath "/usr/local/hive/lib/*":"/usr/local/hive/hcatalog/share/hcatalog/*"
3.3.6.1 问题汇总
问题1:java.lang.NoClassDefFoundError: org/apache/hive/hcatalog/streaming/RecordWriter
原因:缺失jar包或者jar包冲突
解决方案:/usr/local/flume/bin/flume-ng agent -n a1 --conf conf --conf-file ./hive_sink.conf -Dflume.root.logger=INFO,console --classpath "/usr/local/hive/lib/":"/usr/local/hive/hcatalog/share/hcatalog/"
启动时指定classpath
问题2: Incompatible sink and channel settings defined. sink's batch size is greater than the channels transaction capacity. Sink: k1, batch size = 15000, channel c1, transaction capacity = 100
原因:本配置使用的是默认的memory channel和hive sink,由于hive sink中的batchSize值为15000,要大于memory channel中的capacity值
解决方案:设置capacity值大于15000即可
问题3:Invalid table db:test, table:flume: is not an Acid table
原因:flume sink到hive的表是要支持事务的
解决方案:在建表的时候开启事务,同时hive-site.xml配置中也要开启事务
hive.support.concurrencytrue
hive.exec.dynamic.partition.modenonstrict
hive.txn.managerorg.apache.hadoop.hive.ql.lockmgr.DbTxnManager
hive.compactor.initiator.ontrue
hive.compactor.worker.threads5
hive.enforce.bucketingtrue
3.4 Interceptor
拦截器,就是工作在source之后,可以从source获得event,做一个逻辑处理,然后再返回处理之后的event。这也就可以让用户不需要改动source代码的情况下,插入一些处理逻辑。学过java的同学对拦截器应该比较清楚了。具体类型如下
| Interceptor | Desc |
|---|---|
| host | 往event的header中插入主机名信息 |
| timestamp | 向event中,写入一个kv到header里;key的名称可以随意配置,value就是当前时间戳 |
| static | 让用户往event中添加一个自定义的header,key-value形式的,当然这个kv在配置文件中是写死的 |
| regex_filter | 将event中的body内容和指定的正则表达式进行匹配 |
| custom type as FQCN | 自定义实现拦截器 |
| uuid | 用于在每个event header中生成一个uuid字符串 |
| search_replace | 该拦截器基于Java正则表达式提供简单的基于字符串的搜索和替换功能;类似于Java中的Matcher.replaceAll方法 |
| RegexExtractorInterceptorMillisSerializer | 该拦截器使用指定的正则表达式提取正则表达式匹配组,并将匹配组附加到事件的header里 |
3.4.1 Timestamp Interceptor
时间戳拦截器的作用是向event中写入一个kv到header头部里,key的名称可以配置,value就是当前的时间戳
# 示例配置文件
a1.sources = s1
a1.channels = c1
a1.sinks = k1

a1.sources.s1.type=avro
a1.sources.s1.bind=0.0.0.0
a1.sources.s1.port=5555
a1.sources.s1.interceptors = i1
a1.sources.s1.interceptors.i1.type=timestamp
a1.sources.s1.interceptors.i1.preserveExisting=false


a1.channels.c1.type=memory

a1.sinks.k1.type=logger

a1.sources.s1.channels=c1
a1.sinks.k1.channel=c1

3.4.2 Host Interceptor
Host拦截器的作用是向evet的header中添加主机ip信息,通常是用来定位追踪采集信息所来源机器
# 示例
a1.sources = s1
a1.channels = c1
a1.sinks = k1

a1.sources.s1.type=avro
a1.sources.s1.bind=0.0.0.0
a1.sources.s1.port=5555
a1.sources.s1.interceptors = i1
a1.sources.s1.interceptors.i1.type=host
a1.sources.s1.interceptors.i1.preserveExisting=false
a1.sources.s1.interceptors.i1.useIp=true

a1.channels.c1.type=memory

a1.sinks.k1.type=logger

a1.sources.s1.channels=c1
a1.sinks.k1.channel=c1

3.4.3 Static Interceptor
Static拦截器的作用如字面意思,就是向event的header里插入自定义的kv信息,而且这个kv还是固定写死的,目前笔者所接触场景比较简单,暂未使用到这种拦截器
# 示例
a1.sources = s1
a1.channels = c1
a1.sinks = k1

a1.sources.s1.type=avro
a1.sources.s1.bind=0.0.0.0
a1.sources.s1.port=5555
a1.sources.s1.interceptors = i1
a1.sources.s1.interceptors.i1.type=static
a1.sources.s1.interceptors.i1.key=flume-static
a1.sources.s1.interceptors.i1.value=fluem-learn-test

a1.channels.c1.type=memory

a1.sinks.k1.type=logger

a1.sources.s1.channels=c1
a1.sinks.k1.channel=c1

3.4.4 UUId Interceptor
UUID拦截器的作用是往event的header中插入生成的uuid
# 示例
a1.sources = s1
a1.channels = c1
a1.sinks = k1

a1.sources.s1.type=avro
a1.sources.s1.bind=0.0.0.0
a1.sources.s1.port=5555
a1.sources.s1.interceptors = i1
a1.sources.s1.interceptors.i1.type=org.apache.flume.sink.solr.morphline.UUIDInterceptor$Builder
a1.sources.s1.interceptors.i1.headName=uuid-id
a1.sources.s1.interceptors.i1.prefix=flume-uuid

a1.channels.c1.type=memory

a1.sinks.k1.type=logger

a1.sources.s1.channels=c1
a1.sinks.k1.channel=c1

3.5 Selector
一个source可以对接多个channel,那么问题来了,source的数据是怎么在多个channel之间进行传递的呢?这就是selector的功能了,通过selector选择器根据策略可以将event从source传递到指定的channel中去。具体的selector选择器类型如下表格:
| Selector | Desc |
|---|---|
| replicating selector | 默认的选择器,将event进行复制分发给下游所有的节点 |
| Multiplexing selector | 多路选择器,可以根据event中的一个指定key对应的value来决定这条消息会被写入到那个哪个channel中 |
| Custom Selector | 自定义选择器 |
3.5.1 Replicating Selector
复用选择器是官网默认的选择器,该选择器将event进行复制,分发给所有下游节点。
直接上demo演示,这里配置两个channel,两个sink,一个打印log,另外一个写入到hbase中
# 示例
a1.sources = s1
a1.channels = c1 c2
a1.sinks = k1 k2

# source
a1.sources.s1.type=avro
a1.sources.s1.bind=0.0.0.0
a1.sources.s1.port=5555
a1.sources.s1.selector.type=replicating

# channel c1
a1.channels.c1.type=memory
a1.channels.c1.capacity=2000
a1.channels.c1.transactionCapacity=500

# channel c2
a1.channels.c2.type=file
a1.channels.c2.capacity=2000
a1.channels.c2.transactionCapacity=500
a1.channels.c2.checkpointDir=/data/flume-test
a1.channels.c2.dataDirs=/data/flume-data

# sink k1
a1.sinks.k1.type=logger

# sink k2
a1.sinks.k2.type=hbase
a1.sinks.k2.table=flume-selector
a1.sinks.k2.columnFamily=cf
a1.sinks.k2.serializer = org.apache.flume.sink.hbase.RegexHbaseEventSerializer

a1.sources.s1.channels = c1 c2
a1.sinks.k1.channel=c1
a1.sinks.k2.channel=c2
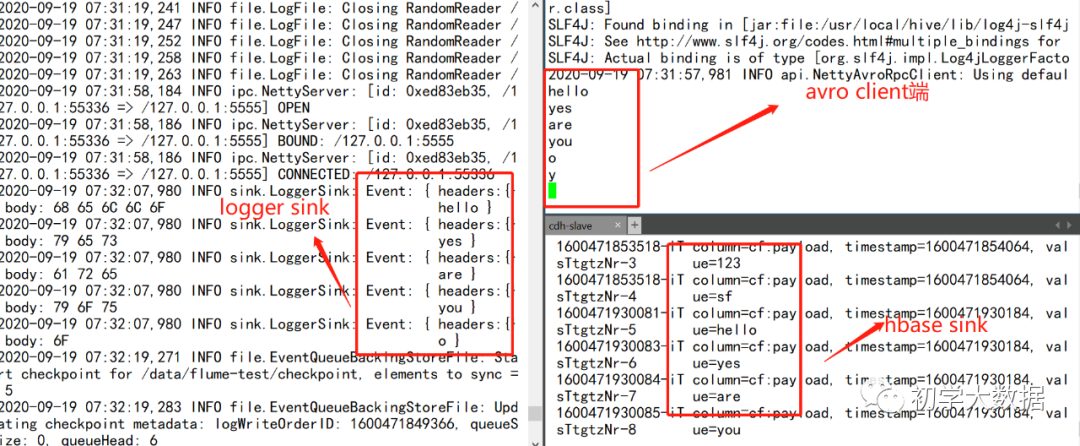
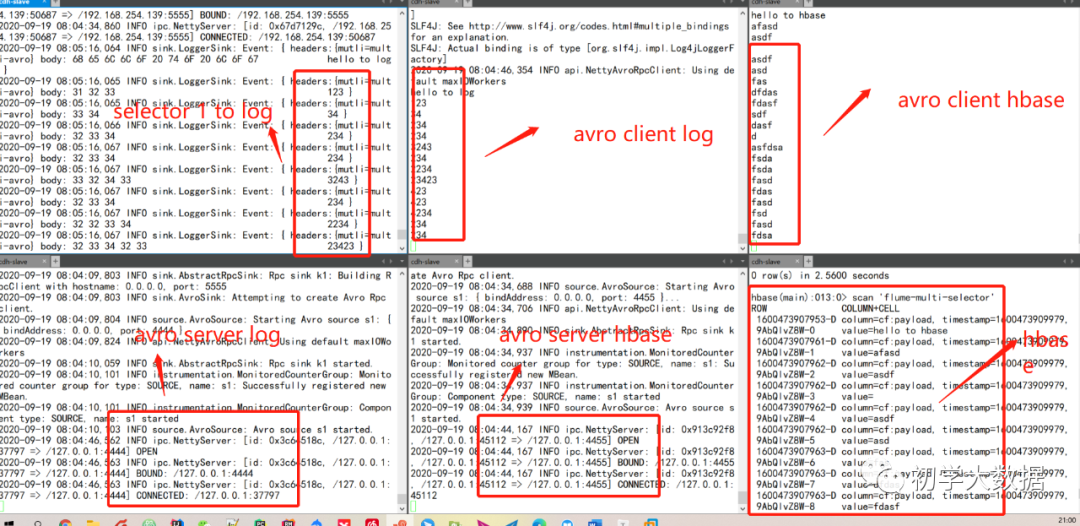
3.5.2 Multiplexing Selector
整体流向
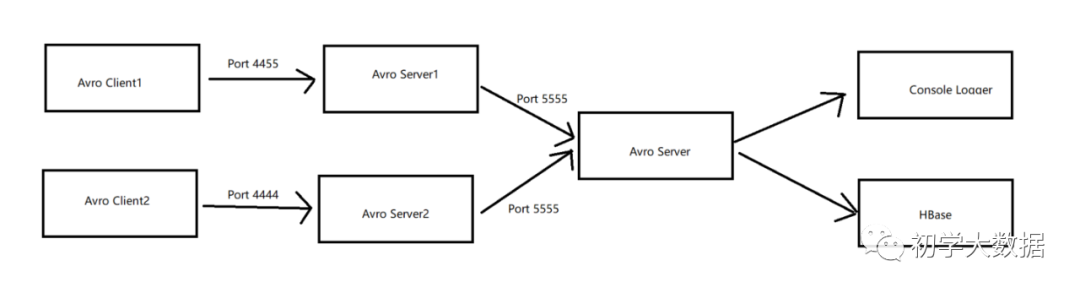
avro服务端1,模拟打印log到标准输出端
a1.sources = s1
a1.channels = c1
a1.sinks=k1

a1.sources.s1.type=avro
a1.sources.s1.bind=0.0.0.0
a1.sources.s1.port=4444
a1.sources.s1.interceptors = i1
a1.sources.s1.interceptors.i1.type=static
a1.sources.s1.interceptors.i1.key=mutli
a1.sources.s1.interceptors.i1.value=multi-avro
a1.channels.c1.type=memory

a1.sinks.k1.type=avro
a1.sinks.k1.hostname=0.0.0.0
a1.sinks.k1.port=5555

a1.sources.s1.channels=c1
a1.sinks.k1.channel=c1
avro服务端2,模拟数据输出到Hbase
a1.sources = s1
a1.channels = c1
a1.sinks=k1

a1.sources.s1.type=avro
a1.sources.s1.bind=0.0.0.0
a1.sources.s1.port=4455
a1.sources.s1.interceptors = i1
a1.sources.s1.interceptors.i1.type=static
a1.sources.s1.interceptors.i1.key=mutli
a1.sources.s1.interceptors.i1.value=avro-hbase
a1.channels.c1.type=memory

a1.sinks.k1.type=avro
a1.sinks.k1.hostname=0.0.0.0
a1.sinks.k1.port=5555

a1.sources.s1.channels=c1
a1.sinks.k1.channel=c1
avro服务端3,用于接收avro1和avro2的数据
a1.sources = s1
a1.channels = c1 c2
a1.sinks = k1 k2

# avro服务端,监听端口5555
a1.sources.s1.type=avro
a1.sources.s1.bind=0.0.0.0
a1.sources.s1.port=5555

# 路由分发器,header中mutli=multi-avro的event打印到log,mutli=avro-hbase存储到hbase
a1.sources.s1.selector.type=multiplexing
a1.sources.s1.selector.header=mutli
a1.sources.s1.selector.mapping.multi-avro=c1
a1.sources.s1.selector.mapping.avro-hbase=c2

a1.channels.c1.type=memory
a1.channels.c1.capacity=2000
a1.channels.c1.transactionCapacity=500

a1.channels.c2.type=file
a1.channels.c2.capacity=2000
a1.channels.c2.transactionCapacity=500
a1.channels.c2.checkpointDir=/data/flume-test
a1.channels.c2.dataDirs=/data/flume-data

a1.sinks.k1.type=logger

a1.sinks.k2.type=hbase
a1.sinks.k2.table=flume-multi-selector
a1.sinks.k2.columnFamily=cf
a1.sinks.k2.serializer = org.apache.flume.sink.hbase.RegexHbaseEventSerializer

a1.sources.s1.channels = c1 c2
a1.sinks.k1.channel=c1
a1.sinks.k2.channel=c2
3.6 Processor
一个agent中,多个sink可以被组装到一个组中,而数据在组内多个sink之间发送。接收处理器可以在组内提供负载均衡的功能,或者是在临时故障的情况下实现从一个接收器转移到另一个接收器上。具体的接收器模式见下表格
| Processor | Desc |
|---|---|
| default | 默认的接收处理器仅接受一个sink,当然用户也没有必要为了一个sink去创建processor |
| Failover | 故障转移模式,即一个组内只有优先级高的sink在工作,而其他的sink处于等待中 |
| load_balance | 负载均衡模式,允许channel中的数据在一组sink中的多个sink之间进行轮转,具体的策略有:round-robin(轮流发送);random(随记发送) |
| Custom processor | 自定义处理器 |
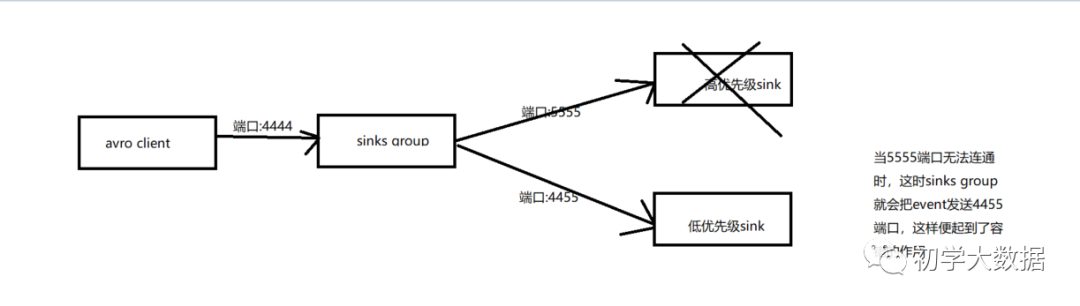
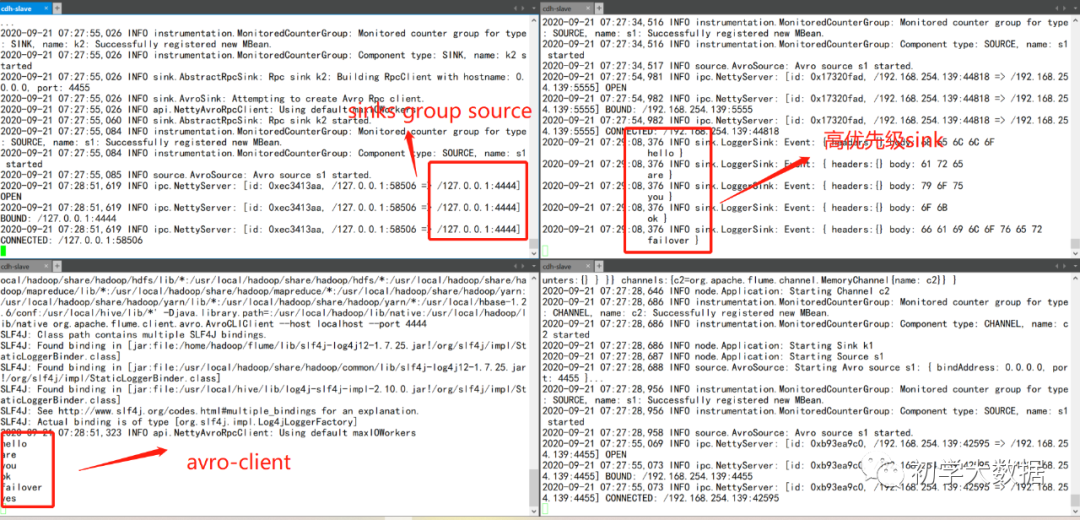
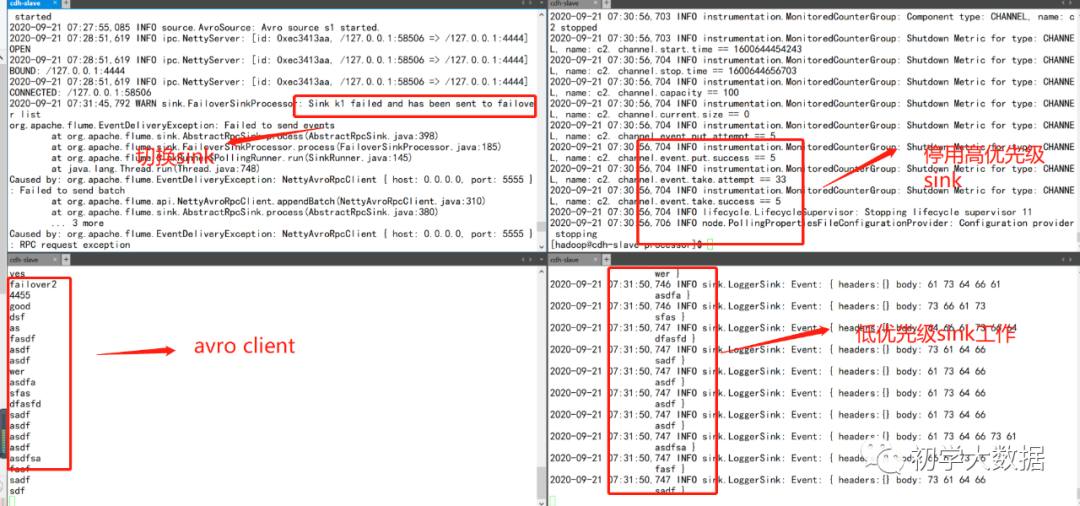
3.6.1 Failover Processor
该模式维护着sinks group内每个sink的优先级,然后根据优先级将event传输到优先级高的sink中,优先级低的sink处于等待模式,当优先级高的sink挂掉之后,优先级低的sink就会开始工作
流程图
source配置
# 示例
# sinks group
# source,channel,sink配置
a1.sources = s1
a1.channels = c1
a1.sinks = k1 k2

# source配置
a1.sources.s1.type=avro
a1.sources.s1.bind=0.0.0.0
a1.sources.s1.port=4444
a1.sources.s1.channels=c1

# channel配置
a1.channels.c1.type=memory
a1.channels.c1.capacity=2000
a1.channels.c1.transactionCapity=1000

# sinkgroups配置
a1.sinkgroups=g1
a1.sinkgroups.g1.sinks=k1 k2
a1.sinkgroups.g1.processor.type=failover
a1.sinkgroups.g1.processor.priority.k1=100 # k1配置高优先级
a1.sinkgroups.g1.processor.priority.k2=50
a1.sinkgroups.g1.processor.maxpenalty=10000

# sink k1配置
a1.sinks.k1.type=avro
a1.sinks.k1.hostname=0.0.0.0
a1.sinks.k1.port=5555
a1.sinks.k1.channel=c1

# sink k2配置
a1.sinks.k2.type=avro
a1.sinks.k2.hostname=0.0.0.0
a1.sinks.k2.port=4455
a1.sinks.k2.channel=c1
sink k1配置
a3.sources=s1
a3.channels=c2
a3.sinks=k1

a3.sources.s1.type=avro
a3.sources.s1.bind=0.0.0.0
a3.sources.s1.port=5555
a3.sources.s1.channels=c2

a3.channels.c2.type=memory

a3.sinks.k1.type=logger
a3.sinks.k1.channel=c2
sink k2配置
a2.sources=s1
a2.channels=c2
a2.sinks=k1

a2.sources.s1.type=avro
a2.sources.s1.bind=0.0.0.0
a2.sources.s1.port=4455
a2.sources.s1.channels=c2

a2.channels.c2.type=memory

a2.sinks.k1.type=logger
a2.sinks.k1.channel=c2
当高优先级sink正常工作时,低优先级sink处于等待状态中
当高优先级sink挂掉后,低优先级sink开始工作
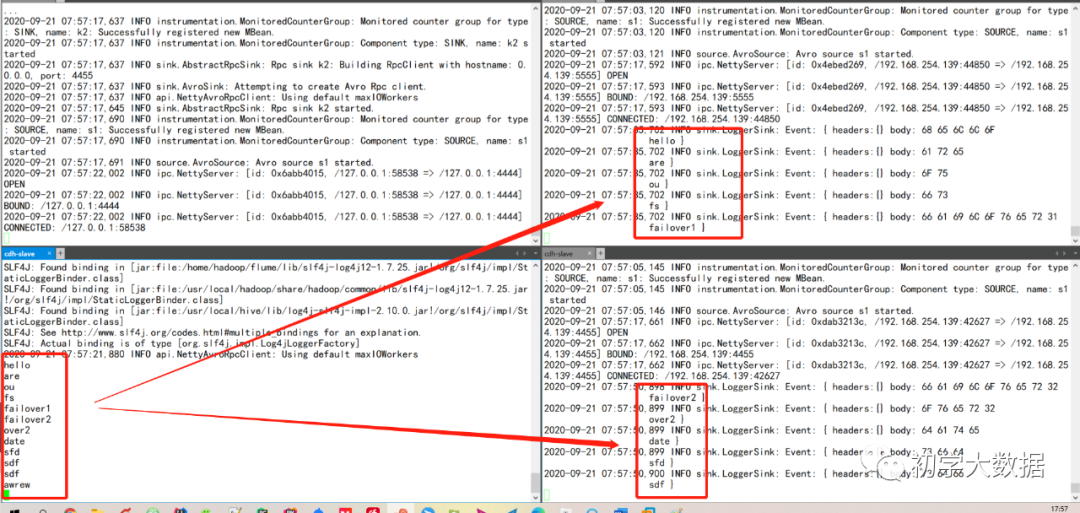
3.6.2 Load_Balance Processor
Load_Balance 顾名思义,起到负载平衡的作用,其实配置跟failover基本一致,那么该模式下对event的分发有以下两种策略:
round-robin:轮发
random:随机发
这里仍以failover配置流程举例子
source配置
a1.sources = s1
a1.channels = c1
a1.sinks = k1 k2

a1.sources.s1.type=avro
a1.sources.s1.bind=0.0.0.0
a1.sources.s1.port=4444
a1.sources.s1.channels=c1

a1.channels.c1.type=memory
a1.channels.c1.capacity=2000
a1.channels.c1.transactionCapity=1000

a1.sinkgroups=g1
a1.sinkgroups.g1.sinks=k1 k2
a1.sinkgroups.g1.processor.type= load_balance
a1.sinkgroups.g1.processor.backoff=true
a1.sinkgroups.g1.processor.selector=random # 采用random策略发送
a1.sinks.k1.type=avro
a1.sinks.k1.hostname=0.0.0.0
a1.sinks.k1.port=5555
a1.sinks.k1.channel=c1

a1.sinks.k2.type=avro
a1.sinks.k2.hostname=0.0.0.0
a1.sinks.k2.port=4455
a1.sinks.k2.channel=c1
sink k1配置
a2.sources=s1
a2.channels=c2
a2.sinks=k1

a2.sources.s1.type=avro
a2.sources.s1.bind=0.0.0.0
a2.sources.s1.port=4455
a2.sources.s1.channels=c2

a2.channels.c2.type=memory

a2.sinks.k1.type=logger
a2.sinks.k1.channel=c2
sink k2配置
a3.sources=s1
a3.channels=c2
a3.sinks=k1

a3.sources.s1.type=avro
a3.sources.s1.bind=0.0.0.0
a3.sources.s1.port=5555
a3.sources.s1.channels=c2

a3.channels.c2.type=memory

a3.sinks.k1.type=logger
a3.sinks.k1.channel=c2
最终结果图
四、Flume自定义组件
4.1 自定义source
目前Flume内置的source组件可以说是比较丰富了,但是在实际生产环境中,业务复杂,可能有些需求是无法直接使用内置的source组件可以实现的,那么这个时候就需要我们进行自定义source了,目前Flume提供了两种实现source的方式:
PollableSource :拉取的方式获取数据,
EventDrivenSource :事件驱动类型获取数据, 与PollableSource不同,EventDrivenSource必须具有自己的回调机制,以捕获新数据并将其存储到Channel中
具体的官网解释:

4.1.1 需求场景
当flume内置的source数据源无法满足我们的需求时,那么这个时候就需要自定义source了,比如xml文档。
这里给出一个简单的demo,通过自定义source随机生成ip,(这里生成的ip是为了方便结合下面的自定义拦截器使用),其最终的目的是通过给出一个ip来解析对应的省市地理信息。
该例子虽然简单,但也比较贴近实际业务场景
4.1.2 自定义套路
一般自定义source的具体套路流程如下:
找到自定义source所要实现或者继承的类/接口
重写方法
将代码打包,放到flume的lib目录下
最后写配置文件调用自定义的source
4.1.2.1 自定义source,重写方法
/**pom文件*/
org.apache.flumeflume-ng-core1.9.0
public class IpGen extends AbstractSource implements PollableSource, Configurable {
    private String staticField;

    private String getRandomWithIp() {
        int[][] range = {
                {607649792, 608174079},
                {1038614528, 1039007743},
                {1783627776, 1784676351},
                {2035023872, 2035154943},
                {2078801920, 2079064063},
                {-1950089216, -1948778497},
                {-1425539072, -1425014785},
                {-1236271104, -1235419137},
                {-770113536, -768606209},
                {-569376768, -564133889},
        };

        Random random = new Random();
        int index = random.nextInt(10);
        int[] b = new int[4];
        int ip = range[index][0] + new Random().nextInt(range[index][1] - range[index][0]);
        b[0] = (int) ((ip >> 24) & 0xff);
        b[1] = (int) ((ip >> 16) & 0xff);
        b[2] = (int) ((ip >> 8) & 0xff);
        b[3] = (int) (ip & 0xff);
        String ipStr = Integer.toString(b[0]) + "." + Integer.toString(b[1]) + "." + Integer.toString(b[2]) + "." + Integer.toString(b[3]);
        return ipStr;
    }

    @Override
    public Status process() throws EventDeliveryException {
        try {
            /**构建事件*/
            SimpleEvent event = new SimpleEvent();
            Map header = new HashMap<>();
            header.put("field", this.staticField);
            event.setHeaders(header);
            event.setBody(getRandomWithIp().getBytes());
            getChannelProcessor().processEvent(event);return Status.READY;
        } catch (Exception e) {
            e.printStackTrace();return Status.BACKOFF;
        }
    }@Overridepublic long getBackOffSleepIncrement() {return 0;
    }@Overridepublic long getMaxBackOffSleepInterval() {return 0;
    }@Overridepublic void configure(Context context) {this.staticField = context.getString("field", "hello");
    }/**
     * 初始化工作
     */@Overridepublic void start() {
    }/**
     * 资源释放
     */@Overridepublic void stop() {
    }@Overridepublic LifecycleState getLifecycleState() {return null;
    }
}
4.1.2.2 打包,放到flume/lib目录下,并编辑配置文件
a1.sources = s1
a1.channels = c1
a1.sinks = k1

a1.sources.s1.type=com.flume.source.IpGen
a1.sources.s1.field="custom_source"
a1.sources.s1.channels=c1

a1.channels.c1.type=memory

a1.sinks.k1.type=logger
a1.sinks.k1.channel=c1
最终结果图

4.2 自定义拦截器
自定义拦截器的工作机制如下:
Flume先调用自定义拦截器中的一个内部Builder类的config方法配置参数
flume再调用build方法获取实例对象
最后调用intercept方法来修改event
4.2.1 需求场景
同自定义source类似,当然是内置拦截器满足不了我们的需求,比如说对字段进行业务加解密,或者对文件进行切割策略等等。
和自定义source的场景一致,基于随机生成的ip,进行解析获得地理信息
4.2.2 自定义套路
同自定义source的套路一致。
找到要继承/实现的类/接口,重写/实现方法
将代码进行打包,放到flume的lib目录下
在配置文件中配置自定义的类
4.2.2.1 自定义interceptor,重写方法
public class IpParseIntercept implements Interceptor {
private static Logger logger = LoggerFactory.getLogger(IpParseIntercept.class);
private static final String URL = "http://ip-api.com/json/?lang=zh-CN";
private OkHttpClient client;
public IpParseIntercept() {
this.client = new OkHttpClient();
}
@Override
public void initialize() {
}
/**
* 对单个event进行拦截
*
* @param event
* @return
*/
@Override
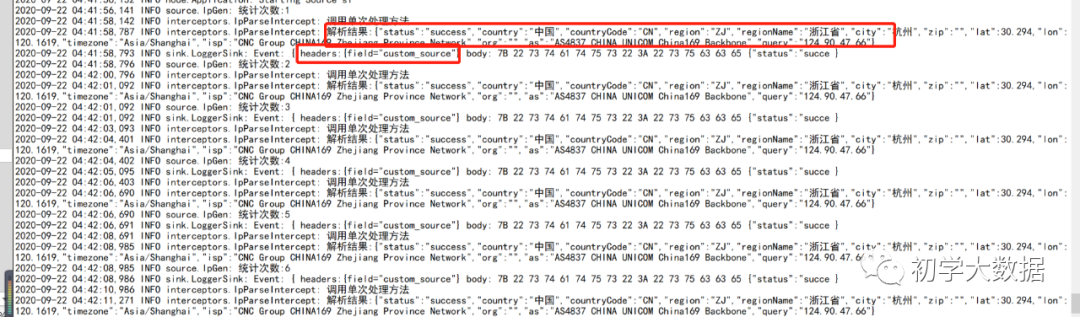
public Event intercept(Event event) {
logger.info("调用单次处理方法");
String str = new String(event.getBody());
FormBody body = new FormBody.Builder()
.add("ip", str).build();
Request request = new Request.Builder().url(URL).post(body).build();
try {
if (this.client == null) {
this.client = new OkHttpClient();
}
ResponseBody responseBody = this.client.newCall(request).execute().body();
if (responseBody != null) {
String result = responseBody.string();
logger.info("解析结果:{}", result);
event.setBody(result.getBytes());
} else {
logger.warn("调用API返回接口为空");
}
} catch (IOException e) {
e.printStackTrace();
}
return event;
}
/**
* 批量拦截event
*
* @param list
* @return
*/
@Override
public List intercept(List list) {
logger.info("调用批次处理方法");
List resultList = new ArrayList<>();for (Event event : list) {
String str = new String(event.getBody());
FormBody body = new FormBody.Builder()
.add("ip", str).build();
Request request = new Request.Builder().url(URL).post(body).build();try {
ResponseBody responseBody = this.client.newCall(request).execute().body();if (responseBody != null) {
String result = responseBody.string();
logger.info("解析结果:{}", result);
event.setBody(result.getBytes());
} else {
logger.warn("调用api接口为空");
}
} catch (IOException e) {
e.printStackTrace();
}
resultList.add(event);
}return resultList;
}@Overridepublic void close() {
}/**
* 需要构造内部类
*/public static class Builder implements Interceptor.Builder {@Overridepublic Interceptor build() {return new IpParseIntercept();
}@Overridepublic void configure(Context context) {
}
}
}4.2.2.2 打包,放入flume/lib目录下,编辑配置文件
# 示例
a1.sources = s1
a1.channels = c1
a1.sinks = k1

# 这里的source引用的是上一节中的自定义source
a1.sources.s1.type=com.flume.source.IpGen
a1.sources.s1.field="custom_source"
a1.sources.s1.interceptors=i1
a1.sources.s1.interceptors.i1.type=com.flume.interceptors.IpParseIntercept$Builder
a1.sources.s1.channels=c1

a1.channels.c1.type=memory

a1.sinks.k1.type=logger
a1.sinks.k1.channel=c1
最终结果
五、Flume高阶
5.1 Flume事务
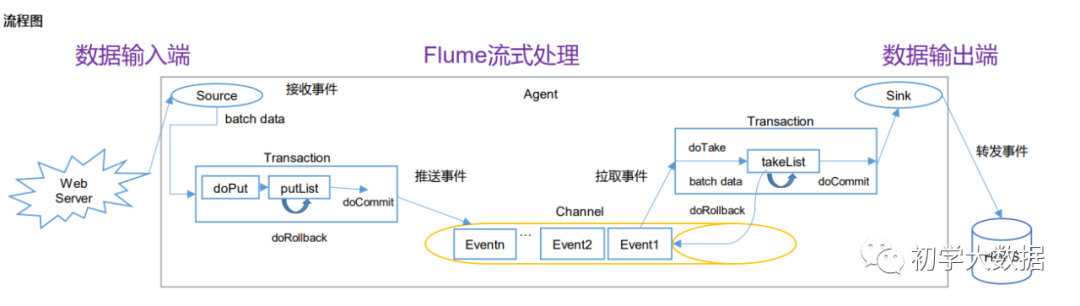
该图在网上可以很轻易搜索到,笔者这里也使用该图来描述一下flume是如何保证数据不丢失的,以及具体在哪个环节使用了事务呢?
首先我们先来了解一下消息传递的可靠性保证的三种方式,可以类比kafka,
At-Least-Once
At-Most-Once
Exactly-Once
Flume采用的是At-Least-Once策略,这里并不是说Flume任意一个组件就可以实现这种策略,而是通过三个组件(source,channel,sink)之间上下投递消息来保证,但是如果选择了Memory Channel的话,这个就不敢打包票能实现At-Least-Once了。
还有一种情况,比如channel和source都正常运行,但是sink突然挂掉了,那会不会造成数据丢失呢?如果Flume真的能够保证数据不丢失,基于刚才的场景,就必须要保障当sink挂掉之后,该数据仍然在channel里保留,而且当sink恢复后能够继续从上次消费channel的位置进行拉取数据。
这里结合刚才的疑惑再次回看上图,可以发现Flume要保障at-least-once的基础就是Transaction.这里也不仅仅是只针对channel做事务处理机制,而是整个环节都有事务机制,这样flume才敢对外称是完全可靠的,不然这不是砸招牌嘛。
这里再详解一下上图的流程,Flume的transaction是有生命周期的,分别是start、commit、rollback和close.
当source往channel投递事件的时候,会首先调用start方法开启事务,当put完事件后会提交commit执行事务,如果commit异常就会rollback,然后close事务,最后source将刚才提交的消息事件向源头进行ack确认
sink消费channel也是同样的模式,唯一不同的地方是sink在往目标源完成写入后才会对事务进行commit,这样也是为了保障数据不丢失。
这里再对每个流程(接收事件/消费事件)进行拆解:
针对接收事件流程:
doPut:将数据写入临时缓存区putList(从字面意思可以看到是写到列表中)
doCommit:检测channel中的内存是否足够合并
doRollback:回滚数据
针对消费事件流程:
doTake:和doPut相反,从临时缓冲区中拿数据
doCommit:当数据成功写入到目标源后,进行提交事务
doRollback:当数据写入失败后,则进行回滚 数据,将takeList中的数据归换给Channel
其实这里的思路都是一样的,都是当只有下游成功后才会向上游进行ack.
5.2 Flume传输流程
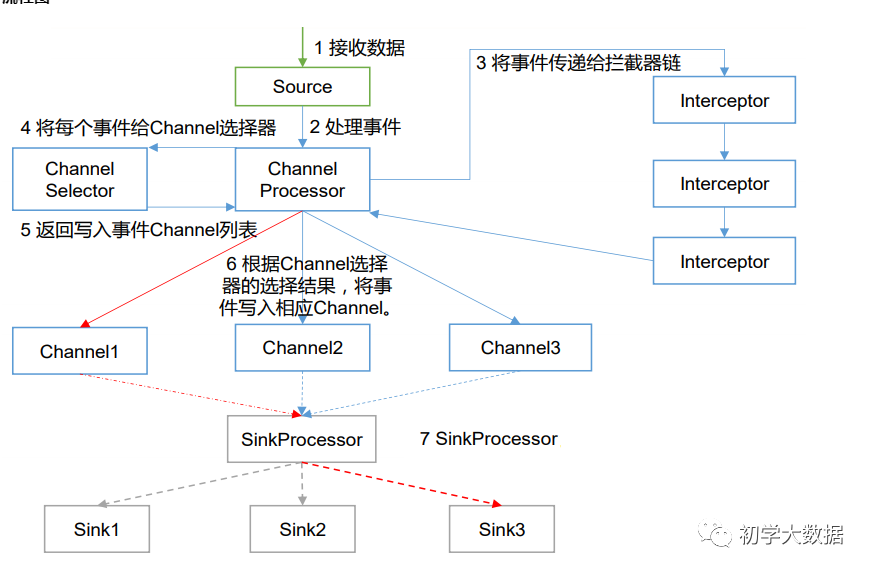
结合Flume事务流程,这里再细化一下Flume内部整体的流程机制
Flume source组件会监听数据源,接收数据,然后根据一定的规则做预处理或者分发
根据用户是否配置拦截器interceptors,对接收的event做一些定制化的处理
根据用户是否配置选择器(默认是选择多路复用选择器),基于选择器决定将event分发给具体哪个channel;这里就使用到了上小节的事务机制,当事务提交成功后,source会对源数据进行ack
根据用户是否配置processor,来选择是否需要进行容错或者负载均衡
基于配置的策略,sink读取channel中的event,然后写到目标源,这里使用事务机制,当写入成功后,会执行事务提交操作
5.3 Flume监控
这里的监控方式有很多,可结合企业现有的监控系统来完成对flume的监控,笔者在这里不做具体的讲解了
5.3.1 JMX监控
调整flume-env.sh脚本,配置jmx相关的信息即可
vi flume-env.sh
JAVA_OPTS="-Dcom.sun.management.jmxremote \
    -Dcom.sun.management.jmxremote.authenticate=false \
    -Dcom.sun.management.jmxremote.ssl=false \
    -Dcom.sun.management.jmxremote.port=54321 \
    -Dcom.sun.management.jmxremote.rmi.port=54322
    -Djava.rmi.server.hostname=192.168.254.139"
5.3.2 Http监控
在启动flume agent的时候指定监控端口
bin/flume-ng agent -c . -f conf/exec-tail.conf -n a1 -Dflume.root.logger=INFO,console -Dflume.monitoring.type=http -Dflume.monitoring.port=1234
5.3.3 Ganglia监控
这里涉及到ganglia相关的配置,具体可找度娘
5.4 Flume调优
调优其实也是针对组件的优化,那首先我们需要先定位到具体是哪个组件有延迟问题,然后有针对性的优化,一般是根据官网提供的参数来不断调节平衡优化。如果调节参数没有太大作用的话,这时候就要考虑策略优化,即看是否需要重新调整采集流程,或者对硬件进行升级等等操作。
根据网上的一些优化做一些总结汇总,笔者这里主要讲解一下优化的思路,毕竟每位读者所遇到的问题不同,无法完全适配
5.4.1 source配置
大多数场景下source端都是以监听文件为主,通常对source的优化就是增加source的数量,提高读取能力,调整batchSize参数,结合具体的资源来平衡优化点。
如果source端不是监听文件,以kafka消费为例的话,其实首先的优化点就是结合官网调整参数,不过一般这种优化只能是缓解,如果彻底要解决这个问题,可能要对整个链路做改造,或者结合业务场景自定义实现监听逻辑
5.4.2 channel配置
对于channel配置,通常都是使用filechannel,而不是使用memorychannel,毕竟会容易丢数据。那么优化点也是针对filechannel来讲的。
这里优化点有两个:
针对参数优化,这里结合官网和实际的环境,只能不断调整
策略优化,结合上节中的事务内容,其实这里会有事务操作,而事务又会跟锁操作有关系。FileChanel是基于本地磁盘实现的事务模式 ,因此要尽量避免多个source使用同一个filechannel,因此需要对fileChannel进行扩展,要么使用到选择器(根据策略分发event来分流),或者自定义channel来解决
具体可参考https://www.cnblogs.com/yurunmiao/p/5603097.html
5.4.3 sink配置
sink端的优化,可以通过压缩来节省空间和网络流量,但是会增加cpu的消耗,一般都是跟外部组件优化有关系,比如说对接kafka,那么可能需要结合kafka的优化。如果对接的是es,那么就需要结合es的优化。
如果涉及到sinkgroups的话,可以使用单独的sink来提高消费能力,因为sinkgroups是使用单线程来消费的
5.4.4 内存配置
JVM heap一般设置为4G或更高,部署在单独的服务器上(4核8线程16G内存)
-Xmx与-Xms最好设置一致,减少内存抖动带来的性能影响,如果设置不一致容易导致频繁fullgc。
5.4.5 BatchSize设置
batchSize几乎是比较常用的参数,这里做一个简单优化点介绍,有几条原则供读者参考:
Sink的 Batch Size 应该等于输入流 Batch Size 的和。举个例子,如果你有一个 flume agent, 上游的10个Flume agent通过avro以100的batch Size 向这个agent发送事件,那么这个agent的batch Size 就应该设置为10X100 = 1000
如果你发现你需要将Batch Size设置的非常大,比如比10000还大,那么需要考虑多设置几个channel来提高并发性(每一个channel都有一个自己的线程)。实践中, 使用一个batch Size 为20000的HDFS Sink的性能要比 使用 两个batch Size 为10000的channel 性能要差
在性能可接受的情况下,尽量选择较小的Batch Size
为了做更详细的性能调优,要对channel做一些监控,例如Channel Size参数
参考:https://www.open-open.com/lib/view/open1462497776701.html

2020大数据面试题真题总结(附答案)
一文探究数据仓库体系(2.7万字建议收藏)
一文带你走进HIVE的世界(1.8W字建议收藏)
你要悄悄学会HBase,然后惊艳所有人(1.7万字建议收藏)
如何写好一篇数据部门规范文档
Hive调优,数据工程师成神之路
数据质量那点事
简述元数据管理
Sqoop or Datax
大厂高频面试题-连续登录问题
朋友面试数据研发岗遇到的面试题
简单聊一聊大数据学习之路
朋友面试数据专家岗遇到的面试题
HADOOP快速入门
数仓工程师的利器-HIVE详解


 1086
1086


 被折叠的 条评论
为什么被折叠?
被折叠的 条评论
为什么被折叠?
 到【灌水乐园】发言


