


由于1.8及以后HashMap的实现方式不同,所以这里我们分开讲,由于1.8的HashMap也和1.7的有一些相似的地方,所以我们先看1.7的源码这样我们在理解1.8的时候也更加容易
1. 定义
1.1 继承和实现
public class HashMap<K,V> extends AbstractMap<K,V>
    implements Map<K,V>, Cloneable, Serializable {
- HashMap直接继承自AbstractMap抽象类,在AbstractMap已经实现了Map接口中的所有方法,只有
public abstract Set<Entry<K,V>> entrySet()方法是抽象,由子类实现自己的entrySet()方法。在HashMap中的一个实例域也和此方法有关联。后面会分析。 - HashMap实现了Map接口,Map中不能使用Map作为key,但Map可以作为value,但是不建议这样做。下图是JDK1.8官方文档给出的解释。

- 实现了Cloneable表明HashMap支持可克隆。
- 实现了Serializable接口,表明HashMap支持序列化。
1.2 常量变量
// 默认初始容量。容量必须是2的倍数
static final int DEFAULT_INITIAL_CAPACITY = 1 << 4; // aka 16

// 最大容量
static final int MAXIMUM_CAPACITY = 1 << 30;

// 默认加载因子,当实际使用容量/容量大于这个值时,进行扩容
static final float DEFAULT_LOAD_FACTOR = 0.75f;

static final Entry<?,?>[] EMPTY_TABLE = {};

// 存储键值对对应的Entry数组
transient Entry<K,V>[] table = (Entry<K,V>[]) EMPTY_TABLE;

// 键值对的数量
transient int size;

// 等于加载因子乘以总容量,表示一个阙值,当size(实际使用容量)超过了就会扩容
int threshold;

// 加载因子
final float loadFactor;
1.3 初始化
// 无参构造,调用有参构造将默认初始容量和默认加载因子传入
public HashMap() {
    this(DEFAULT_INITIAL_CAPACITY, DEFAULT_LOAD_FACTOR);
}

// 自定义初始容量初始化
public HashMap(int initialCapacity) {
    this(initialCapacity, DEFAULT_LOAD_FACTOR);
}

// 自定义初始容量和加载因子初始化
public HashMap(int initialCapacity, float loadFactor) {
    if (initialCapacity < 0)
        throw new IllegalArgumentException("Illegal initial capacity: " +
                                           initialCapacity);
    if (initialCapacity > MAXIMUM_CAPACITY)
        initialCapacity = MAXIMUM_CAPACITY;
    if (loadFactor <= 0 || Float.isNaN(loadFactor))
        throw new IllegalArgumentException("Illegal load factor: " +
                                           loadFactor);

    this.loadFactor = loadFactor;
    // 这里与1.8不同的是:
    // 1.7会在初始化的时候设置为初始容量,稍后再用初始容量乘以加载因子得到结果
    // 而1.8是在这里根据传入的初始容量计算出大于等于初始容量最接近的2的幂次,稍后再用初始容量乘以加载因子得到结果
    threshold = initialCapacity;
    init();
}

// 根据map初始化
public HashMap(Map<? extends K, ? extends V> m) {
// 调用有参构造初始化成员变量
    this(Math.max((int) (m.size() / DEFAULT_LOAD_FACTOR) + 1,
                  DEFAULT_INITIAL_CAPACITY), DEFAULT_LOAD_FACTOR);

    inflateTable(threshold); // 稍后介绍

    putAllForCreate(m); // 稍后介绍
}
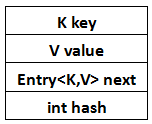
1.4 Map最重要的内容:静态内部类Entry
static class Entry<K,V> implements Map.Entry<K,V> {
    final K key;
    V value;
    Entry<K,V> next;
    int hash;

    /**
     * Creates new entry.
     */
    Entry(int h, K k, V v, Entry<K,V> n) {
        value = v;
        next = n;
        key = k;
        hash = h;
    }

    public final K getKey() {
        return key;
    }

    public final V getValue() {
        return value;
    }

    public final V setValue(V newValue) {
        V oldValue = value;
        value = newValue;
        return oldValue;
    }

    public final boolean equals(Object o) {
        if (!(o instanceof Map.Entry))
            return false;
        Map.Entry e = (Map.Entry)o;
        Object k1 = getKey();
        Object k2 = e.getKey();
        if (k1 == k2 || (k1 != null && k1.equals(k2))) {
            Object v1 = getValue();
            Object v2 = e.getValue();
            if (v1 == v2 || (v1 != null && v1.equals(v2)))
                return true;
        }
        return false;
    }

    public final int hashCode() {
        return Objects.hashCode(getKey()) ^ Objects.hashCode(getValue());
    }

    public final String toString() {
        return getKey() + "=" + getValue();
    }

    /**
     * This method is invoked whenever the value in an entry is
     * overwritten by an invocation of put(k,v) for a key k that's already
     * in the HashMap.
     */
    void recordAccess(HashMap<K,V> m) {
    }

    /**
     * This method is invoked whenever the entry is
     * removed from the table.
     */
    void recordRemoval(HashMap<K,V> m) {
    }
}
可以看出有点像1.7的LinkedList,而LinkedList是双向链表,这里可以看成是一个单向链表。用图可以表示成:
1.5 整个HashMap的图就像如下的结构:

2. 插入
2.1 put(K key, V value):
假如我执行了如下方法:
Map<String, String> map = new HashMap<String, String>();
map.put("111", "111");
map.put("222", "222");
具体做了什么呢?
-
首先第一行,调用无参构造初始化一个空的map。(此时阙值是初始容量)
查看IDEA的debug模式:

-
然后第二行put方法做了什么:
public V put(K key, V value) {
    if (table == EMPTY_TABLE) {
        inflateTable(threshold);
    }
    if (key == null)
        return putForNullKey(value);
    int hash = hash(key);
    int i = indexFor(hash, table.length);
    for (Entry<K,V> e = table[i]; e != null; e = e.next) {
        Object k;
        if (e.hash == hash && ((k = e.key) == key || key.equals(k))) {
            V oldValue = e.value;
            e.value = value;
            e.recordAccess(this);
            return oldValue;
        }
    }

    modCount++;
    addEntry(hash, key, value, i);
    return null;
}
- 第一步:如果当前存放Entry的数组table为空,说明是空map,则调用inflateTable方法初始化容量、阙值以及table数组。容量设置为大于等于传入容量的最接近的2的幂次,加载因子设置为容量乘以加载因子。Integer.highestOneBit方法的作用是取 i 这个数的二进制形式最左边的最高一位且高位后面全部补零,最后返回int型的结果。详解可查看Integer.highestOneBit详解
private void inflateTable(int toSize) {
    // Find a power of 2 >= toSize
    int capacity = roundUpToPowerOf2(toSize);
// 重新设置阙值为初始容量乘以加载因子
    threshold = (int) Math.min(capacity * loadFactor, MAXIMUM_CAPACITY + 1);
    table = new Entry[capacity];
    initHashSeedAsNeeded(capacity);
}
// 取 i 这个数的二进制形式最左边的最高一位且高位后面全部补零,最后返回int型的结果
// 意思就是将容量设置大于等于传入的初始容量的最接近的2的幂次,比如传入10则是16
// 先减一是为了防止传入的容量本就是2的幂次
private static int roundUpToPowerOf2(int number) {
    // assert number >= 0 : "number must be non-negative";
    return number >= MAXIMUM_CAPACITY
            ? MAXIMUM_CAPACITY
            : (number > 1) ? Integer.highestOneBit((number - 1) << 1) : 1;
}
- 第二步:判断插入的key是不是为空,如果为空则调用如下方法,将key为空的数据插入到table[0],即数组的最开始
private V putForNullKey(V value) {
    for (Entry<K,V> e = table[0]; e != null; e = e.next) {
        if (e.key == null) {
            V oldValue = e.value;
            e.value = value;
            e.recordAccess(this);
            return oldValue;
        }
    }
    modCount++;
    addEntry(0, null, value, 0);
    return null;
}
- 第三步:通过如下方法获取key的hash值,由于HashCode是Object的方法,因此每个对象都有一个HashCode,对这个HashCode做一次hash计算。按照JDK源码注释的说法,这次hash的作用是根据给定的HashCode对它做一次打乱的操作,防止一些糟糕的Hash算法产生的糟糕的Hash值,至于为什么要防止糟糕的Hash值,HashMap添加元素的最后会讲到。
final int hash(Object k) {
    int h = hashSeed;
    if (0 != h && k instanceof String) {
        return sun.misc.Hashing.stringHash32((String) k);
    }

    h ^= k.hashCode();

    // This function ensures that hashCodes that differ only by
    // constant multiples at each bit position have a bounded
    // number of collisions (approximately 8 at default load factor).
    h ^= (h >>> 20) ^ (h >>> 12);
    return h ^ (h >>> 7) ^ (h >>> 4);
}
- 第四步:根据重新计算的HashCode,对Entry数组的大小取模得到一个Entry数组的位置。看到这里使用了&,移位加快一点代码运行效率。另外,这个取模操作的正确性依赖于length必须是2的N次幂,这个熟悉二进制的朋友一定理解,因此注意HashMap构造函数中,如果你指定HashMap初始数组的大小initialCapacity,如果initialCapacity不是2的N次幂,HashMap会算出大于initialCapacity的最小2的N次幂的值,作为Entry数组的初始化大小。这里为了讲解方便,我们假定字符串111和字符串222算出来的i都是1
至于为什么HashMap的容量需要是2的N次幂,从这个indexFor方法可以提现出来。我的理解是:
HashMap寻找Index位置是通过位运算计算出来的,但是原理是对length取余数,只有是2的次幂的时候h & (length - 1) == h % length,效率最高
这个等式实际上可以推理出来,2^n转换成二进制就是1+n个0,减1之后就是0+n个1,如16 -> 10000,15 -> 01111,那根据&位运算的规则,都为1(真)时,才为1,那0 ≤ 运算后的结果 ≤ 15,假设h <= 15,那么运算后的结果就是h本身,h >15,运算后的结果就是最后四位二进制做&运算后的值,最终,就是%运算后的余数,这就是容量必须为2的幂的原因。
/**
 * Returns index for hash code h.
 */
static int indexFor(int h, int length) {
    // assert Integer.bitCount(length) == 1 : "length must be a non-zero power of 2";
    return h & (length-1);
}
- 第五步:自增modCount,用于fail-fast机制的,每次修改HashMap数据结构的时候都会自增一次这个值
- 第六步:判断map中是否存在需要插入的值,如果存在就用value覆盖原来的value,并返回原来的value。不执行后面的代码,包括modCount++。其中,这里的判断是否相等,是先判断的hash值是否相等,再通过equals判断是否相等,这样可以提高效率。另外,recordAccess这个方法,它也是HashMap的子类比如LinkedHashMap用的,HashMap中这个方法为空。
- 最后是调用addEntry()方法,将entry添加到链表打的头部,其中如果键值对长度超长并且当前数组索引处的链表不为空,就要对数组进行扩容,扩容为原来的2倍长度,然后创建entry
- 扩容时,原本table中的数据会重新计算hash值,然后放到table中去
- 对象还是跟插入一样,会从链表的头部插入
void addEntry(int hash, K key, V value, int bucketIndex) {
// 如果键值对长度超过阙值,并且数组中当前索引处不为null
    if ((size >= threshold) && (null != table[bucketIndex])) {
    	// table数组扩容为原来的2倍
        resize(2 * table.length);
        // 重新计算hash值
        hash = (null != key) ? hash(key) : 0;
        // 重新获取数组中的索引
        bucketIndex = indexFor(hash, table.length);
    }

    createEntry(hash, key, value, bucketIndex);
}
// 扩容到新容量
void resize(int newCapacity) {
    Entry[] oldTable = table;
    int oldCapacity = oldTable.length;
    if (oldCapacity == MAXIMUM_CAPACITY) {
        threshold = Integer.MAX_VALUE;
        return;
    }
	// 创建新hash表
    Entry[] newTable = new Entry[newCapacity];
    // 将旧表的数据转移至新表
    transfer(newTable, initHashSeedAsNeeded(newCapacity));
    table = newTable;
    // 更新阙值
    threshold = (int)Math.min(newCapacity * loadFactor, MAXIMUM_CAPACITY + 1);
}

//如果hashSeed变了,那么rehash为true,否则为false
void transfer(Entry[] newTable, boolean rehash) {
    int newCapacity = newTable.length;
    //遍历旧数组的头节点
    for (Entry<K,V> e : table) {
        //当桶不为空
        while(null != e) {
            Entry<K,V> next = e.next;
            //如果hashSeed变了,需要重新计算hash值
            if (rehash) {
                e.hash = null == e.key ? 0 : hash(e.key);
            }
            //得到新表中的索引
            int i = indexFor(e.hash, newCapacity);
            // 将当前节点的next节点设为新数组头节点
            e.next = newTable[i];
            // 将当前节点作为头节点放到新的数组中
            newTable[i] = e;
            // 链表向后遍历
            e = next;
        }
    }
}
void createEntry(int hash, K key, V value, int bucketIndex) {
    Entry<K,V> e = table[bucketIndex];
    // 将该节点作为头节点
    table[bucketIndex] = new Entry<>(hash, key, value, e);
    size++;
}
假设new出来的Entry地址为0x00000001,那么,put(“111”, “111”)用图表示应该是这样的:
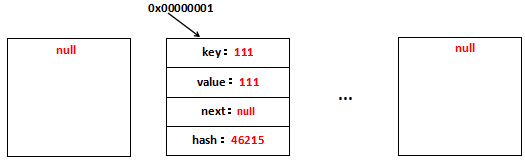
在IDEA的debug模式下(这里hash算出来要在table[7],但是我们假设还在table[1]):

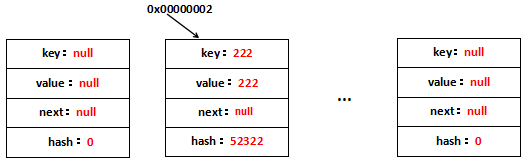
每一个新增的Entry都位于table[1]上,另外,里面的hash是rehash之后的hash而不是Key最原始的hash。看到table[1]上存放了111---->111这个键值对,它持有原table[1]的引用地址,因此可以寻址到原table[1],这就是单向链表。 再看一下put(“222”, “222”)做了什么,一张图就可以理解了(这里我们假设的是222的hash算出来还在table[1],但是实际上,在idea中,我们可以看到应该是位于table[2],为了讲解单链表,我们不管这个):

在idea中:

3. 删除
3.1 remove(Object key):
假如我执行了如下代码:
Map<String, String > map = new HashMap<>();
map.put("111", "111");
map.put("222", "222");
map.remove("111");
最后的remove方法做了哪些事情?首先来看remove源码:
public V remove(Object key) {
    Entry<K,V> e = removeEntryForKey(key);
    return (e == null ? null : e.value);
}

final Entry<K,V> removeEntryForKey(Object key) {
    if (size == 0) {
        return null;
    }
    // 根据key计算出数组中的位置
    int hash = (key == null) ? 0 : hash(key);
    int i = indexFor(hash, table.length);
    Entry<K,V> prev = table[i]; // 相当于被删除数据的前一个数据
    Entry<K,V> e = prev; // 当前位置

// 遍历链表
    while (e != null) {
        Entry<K,V> next = e.next;
        Object k;
        // 判断key是否相等
        if (e.hash == hash &&
            ((k = e.key) == key || (key != null && key.equals(k)))) {
            modCount++;
            size--;
            // 当找到要删除的key的时候,需要判断下这个entry是不是头节点,如果是直接将next设为头节点
            // 如果不是头节点,则将prev的next设为当前节点的next
            if (prev == e)
                table[i] = next;
            else
                prev.next = next;
            e.recordRemoval(this);
            return e;
        }
        prev = e;
        e = next;
    }

    return e;
}
我们来看做的事情:
- 首先是根据key计算出当前key在哪个链表中,然后遍历这个链表
- 在表里链表的时候定义了一个prev,相当于是需要被删除节点的前面的节点(prev.next即e),
- 当找到要删除的key的时候,需要判断下这个entry是不是头节点,如果是直接将next设为头节点。如果不是头节点,则将prev的next设为当前节点的next。这个时候e,即需要被删除的节点就失去了连接。
用图表示就是:
4. HashMap的table为什么是transient的
一个非常细节的地方:
transient Entry[] table;
看到table用了transient修饰,也就是说table里面的内容全都不会被序列化,不知道大家有没有想过这么写的原因?
在我看来,这么写是非常必要的。因为HashMap是基于HashCode的,HashCode作为Object的方法,是native的:
public native int hashCode();
这意味着的是:HashCode和底层实现相关,不同的虚拟机可能有不同的HashCode算法。再进一步说得明白些就是,可能同一个Key在虚拟机A上的HashCode=1,在虚拟机B上的HashCode=2,在虚拟机C上的HashCode=3。
这就有问题了,Java自诞生以来,就以跨平台性作为最大卖点,好了,如果table不被transient修饰,在虚拟机A上可以用的程序到虚拟机B上可以用的程序就不能用了,失去了跨平台性,因为:
1、Key在虚拟机A上的HashCode=100,连在table[4]上
2、Key在虚拟机B上的HashCode=101,这样,就去table[5]上找Key,明显找不到
整个代码就出问题了。因此,为了避免这一点,Java采取了重写自己序列化table的方法,在writeObject选择将key和value追加到序列化的文件最后面:
private void writeObject(java.io.ObjectOutputStream s)
    throws IOException
{
    // Write out the threshold, loadfactor, and any hidden stuff
    s.defaultWriteObject();

    // Write out number of buckets
    if (table==EMPTY_TABLE) {
        s.writeInt(roundUpToPowerOf2(threshold));
    } else {
       s.writeInt(table.length);
    }

    // Write out size (number of Mappings)
    s.writeInt(size);

    // Write out keys and values (alternating)
    if (size > 0) {
        for(Map.Entry<K,V> e : entrySet0()) {
            s.writeObject(e.getKey());
            s.writeObject(e.getValue());
        }
    }
}
而在readObject的时候重构HashMap数据结构:
private void readObject(java.io.ObjectInputStream s)
     throws IOException, ClassNotFoundException
{
    // Read in the threshold (ignored), loadfactor, and any hidden stuff
    s.defaultReadObject();
    if (loadFactor <= 0 || Float.isNaN(loadFactor)) {
        throw new InvalidObjectException("Illegal load factor: " +
                                           loadFactor);
    }

    // set other fields that need values
    table = (Entry<K,V>[]) EMPTY_TABLE;

    // Read in number of buckets
    s.readInt(); // ignored.

    // Read number of mappings
    int mappings = s.readInt();
    if (mappings < 0)
        throw new InvalidObjectException("Illegal mappings count: " +
                                           mappings);

    // capacity chosen by number of mappings and desired load (if >= 0.25)
    int capacity = (int) Math.min(
                mappings * Math.min(1 / loadFactor, 4.0f),
                // we have limits...
                HashMap.MAXIMUM_CAPACITY);

    // allocate the bucket array;
    if (mappings > 0) {
        inflateTable(capacity);
    } else {
        threshold = capacity;
    }

    init();  // Give subclass a chance to do its thing.

    // Read the keys and values, and put the mappings in the HashMap
    for (int i = 0; i < mappings; i++) {
        K key = (K) s.readObject();
        V value = (V) s.readObject();
        putForCreate(key, value);
    }
}
一种麻烦的方式,但却保证了跨平台性。
这个例子也告诉了我们:尽管使用的虚拟机大多数情况下都是HotSpot,但是也不能对其它虚拟机不管不顾,有跨平台的思想是一件好事。
5. HashMap和Hashtable的区别
HashMap和Hashtable是一组相似的键值对集合,它们的区别也是面试常被问的问题之一,我这里简单总结一下HashMap和Hashtable的区别:
- Hashtable是线程安全的,Hashtable所有对外提供的方法都使用了synchronized,也就是同步,而HashMap则是线程非安全的
- Hashtable不允许空的value,空的value将导致空指针异常,而HashMap则无所谓,没有这方面的限制
参考:
https://www.cnblogs.com/xrq730/p/5030920.html
https://blog.csdn.net/qq_19431333/article/details/61614414
https://blog.csdn.net/ghsau/article/details/16890151


 265
265


 被折叠的 条评论
为什么被折叠?
被折叠的 条评论
为什么被折叠?
 到【灌水乐园】发言


