


欢迎访问我的GitHub
https://github.com/zq2599/blog_demos
内容:所有原创文章分类和汇总,及配套源码,涉及Java、Docker、Kubernetes、DevOPS等;
本篇概览
- 本文是《dubbo实战》系列的第二篇,一起来实战SpringBoot(2.3.3.RELEASE版本)与dubbo的集成,这也是分布式服务的常用技术组合,本文由以下内容组成:
- 创建子工程springbootmulticastprovider,对外提供服务;
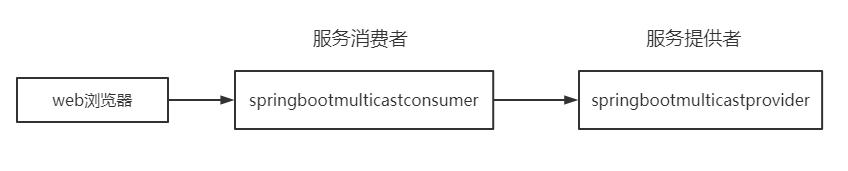
- 创建子工程springbootmulticastconsumer,启动后提供一个web接口,咱们调用这个web接口时,springbootmulticastconsumer会远程调用springbootmulticastprovider提供的服务,如下图:
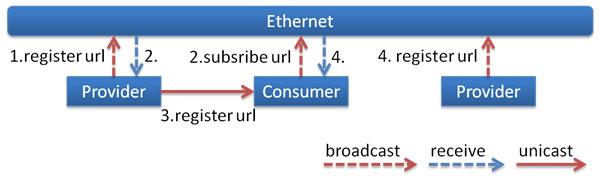
- 本篇的实战暂不使用注册中心,而是服务提供方启动时广播自己的地址,再由消费方启动时订阅,并随时远程调用,调用逻辑如下图所示:
源码下载
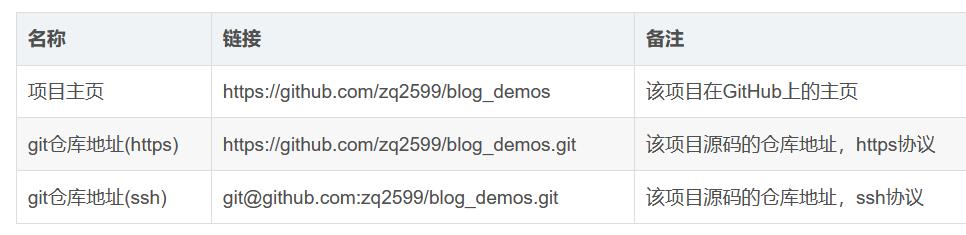
- 如果您不想编码,可以在GitHub下载所有源码,地址和链接信息如下表所示(
https://github.com/zq2599/blog_demos):
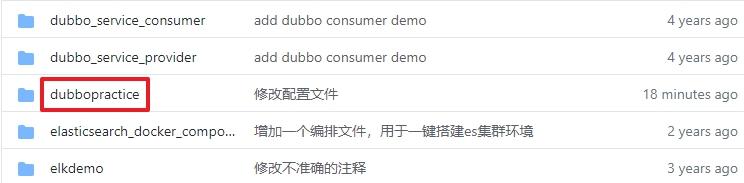
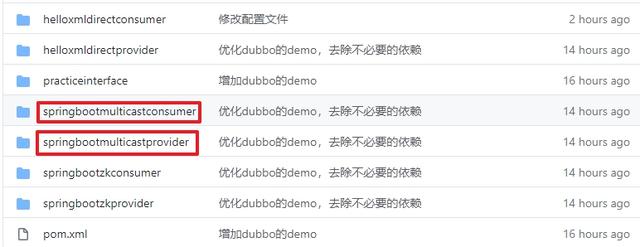
- 这个git项目中有多个文件夹,本章的应用在dubbopractice文件夹下,如下图红框所示:
- dubbopractice是父子结构的工程,本篇的代码在springbootmulticastprovider和springbootmulticastconsumer这两个子工程中,如下图:
编码(服务提供方)
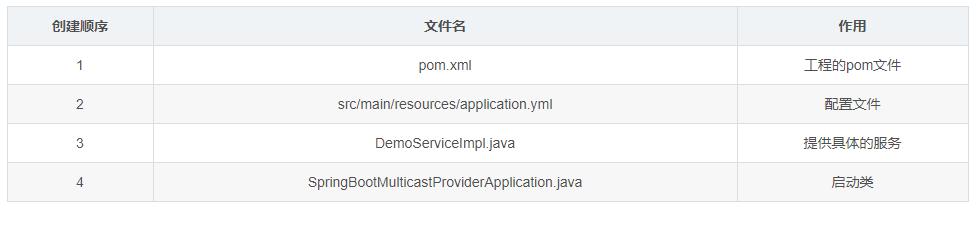
- 先创建提供服务的工程springbootmulticastprovider,一共要创建4个文件,创建顺序和功能如下表:
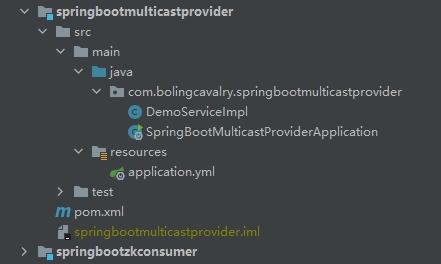
- 完整的文件位置如下图:
- 接下来逐个创建上述内容;
- 创建名为springbootmulticastprovider的子工程,pom.xml内容如下,要重点关注的是新增依赖dubbo-spring-boot-starter,这就是dubbo在SpringBoot环境的starter依赖:
<?xml version="1.0" encoding="UTF-8"?> dubbopractice com.bolingcavalry1.0-SNAPSHOT4.0.0com.bolingcavalry springbootmulticastprovider 1.0-SNAPSHOTspringbootmulticastproviderDemo project for dubbo service provider from Spring Boot, multicast modeorg.springframework.boot spring-boot-dependencies ${springboot.version}pomimportorg.springframework.boot spring-boot-starter-web org.springframework.boot spring-boot-starter-test testcom.bolingcavalry practiceinterface ${project.version}org.projectlombok lombok org.apache.dubbo dubbo-spring-boot-starter org.springframework.boot spring-boot-maven-plugin ${springboot.version}1234567891011121314151617181920212223242526272829303132333435363738394041424344454647484950515253545556575859606162636465- 配置文件application.yml,要注意的是registry.address的配置是广播模式:
dubbo: application: #application-name 本模块名字 name: springboot-multicast-provider id: springboot-multicast-provider registry: address: multicast://224.5.6.7:1234 id: registry protocol: name: dubbo port: 20880- 编写服务实现类DemoServiceImpl.java,注意@Service注解将当前类的实例作为远程服务对外暴露:
package com.bolingcavalry.springbootmulticastprovider;import com.bolingcavalry.dubbopractice.service.DemoService;import lombok.extern.slf4j.Slf4j;import org.apache.dubbo.config.annotation.Service;import org.apache.dubbo.rpc.RpcContext;@Slf4j@Servicepublic class DemoServiceImpl implements DemoService { @Override public String sayHello(String name) { log.info("I'm springboot-multicast-provider, Hello " + name + ", request from consumer: " + RpcContext.getContext().getRemoteAddress()); try { Thread.sleep(1000); } catch (InterruptedException e) { e.printStackTrace(); } return "I'm springboot-multicast-provider, Hello " + name + ", response from provider: " + RpcContext.getContext().getLocalAddress(); }}- 编写SpringBoot启动类SpringBootMulticastProviderApplication.java,注意要添加@EnableDubbo注解:
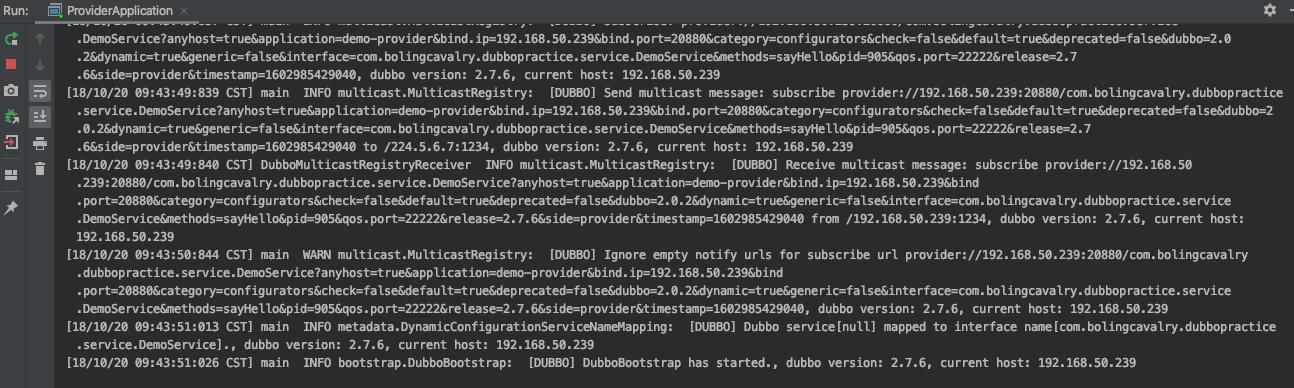
package com.bolingcavalry.springbootmulticastprovider;import org.apache.dubbo.config.spring.context.annotation.EnableDubbo;import org.springframework.boot.SpringApplication;import org.springframework.boot.autoconfigure.SpringBootApplication;@SpringBootApplication@EnableDubbopublic class SpringBootMulticastProviderApplication { public static void main(String[] args) { SpringApplication.run(SpringBootMulticastProviderApplication.class, args); }}- 服务提供方编码完成,直接在IDEA上运行SpringBootMulticastProviderApplication类即可启动服务,启动成功后的日志输出如下图:
编码(服务消费方)
- 现在网络上已经有了服务,咱们再来编写服用消费方的代码,一共要创建6个文件,创建顺序和功能如下表:
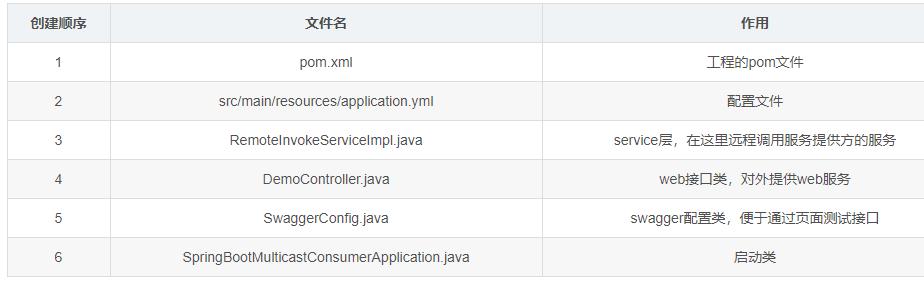
- 完整的文件位置如下图:
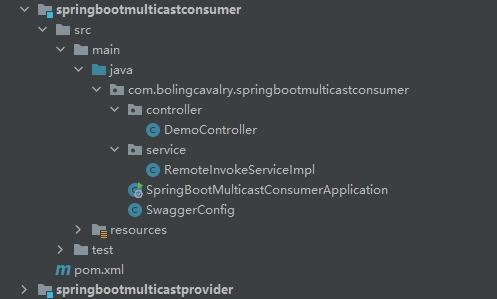
- 接下来逐个创建上述文件;
- 创建名为springbootmulticastconsumer的子工程,pom.xml内容如下,同样需要依赖dubbo-spring-boot-starter:
<?xml version="1.0" encoding="UTF-8"?> dubbopractice com.bolingcavalry1.0-SNAPSHOT4.0.0com.bolingcavalry springbootmulticastconsumer 1.0-SNAPSHOTspringbootmulticastconsumerDemo project for dubbo service consumer from Spring Boot, multicast modeorg.springframework.boot spring-boot-dependencies ${springboot.version}pomimportorg.springframework.boot spring-boot-starter-web org.springframework.boot spring-boot-starter-test testio.springfox springfox-swagger2 io.springfox springfox-swagger-ui com.bolingcavalry practiceinterface ${project.version}org.projectlombok lombok org.apache.dubbo dubbo-spring-boot-starter org.springframework.boot spring-boot-maven-plugin ${springboot.version}123456789101112131415161718192021222324252627282930313233343536373839404142434445464748495051525354555657585960616263646566676869707172737475- 编写配置文件application.yml,注意dubbo.registry.address的值,除了是广播模式,还要添加unicast=false,这样才能保证多个消费者进程都能收到广播:
dubbo: application: name: springboot-multicast-consumer id: springboot-multicast-consumer qosEnable: false registry: address: multicast://224.5.6.7:1234?unicast=false id: registry protocol: name: dubbo port: 20880server: port: 8081- 编写调用远程服务的代码,如下,可见如果想调用远程服务,只要对接口做@Reference注释即可,另外还通过timeout属性设置了远程调用的超时时间:
package com.bolingcavalry.springbootmulticastconsumer.service;import com.bolingcavalry.dubbopractice.service.DemoService;import org.apache.dubbo.config.annotation.Reference;import org.springframework.stereotype.Service;@Servicepublic class RemoteInvokeServiceImpl { @Reference(timeout = 2000) private DemoService demoService; public String sayHello(String name) { return "from dubbo remote (multicast mode) : " + demoService.sayHello(name); }}- 再编写对外提供web服务的Controller类:
package com.bolingcavalry.springbootmulticastconsumer.controller;import com.bolingcavalry.springbootmulticastconsumer.service.RemoteInvokeServiceImpl;import io.swagger.annotations.Api;import io.swagger.annotations.ApiImplicitParam;import io.swagger.annotations.ApiOperation;import org.springframework.beans.factory.annotation.Autowired;import org.springframework.web.bind.annotation.PathVariable;import org.springframework.web.bind.annotation.RequestMapping;import org.springframework.web.bind.annotation.RequestMethod;import org.springframework.web.bind.annotation.RestController;@RestController@RequestMapping("/demo")@Api(tags = {"DemoController"})public class DemoController { @Autowired private RemoteInvokeServiceImpl remoteInvokeService; @ApiOperation(value = "获取dubbo service provider的响应", notes=""获取dubbo service provider的响应") @ApiImplicitParam(name = "name", value = "昵称", paramType = "path", required = true, dataType = "String") @RequestMapping(value = "/{name}", method = RequestMethod.GET) public String sayHello(@PathVariable String name){ return remoteInvokeService.sayHello(name); }}- 还要添加swagger配置类:
package com.bolingcavalry.springbootmulticastconsumer;import org.springframework.context.annotation.Bean;import org.springframework.context.annotation.Configuration;import springfox.documentation.builders.ApiInfoBuilder;import springfox.documentation.builders.PathSelectors;import springfox.documentation.builders.RequestHandlerSelectors;import springfox.documentation.service.ApiInfo;import springfox.documentation.service.Contact;import springfox.documentation.service.Tag;import springfox.documentation.spi.DocumentationType;import springfox.documentation.spring.web.plugins.Docket;import springfox.documentation.swagger2.annotations.EnableSwagger2;@Configuration@EnableSwagger2public class SwaggerConfig { @Bean public Docket createRestApi() { return new Docket(DocumentationType.SWAGGER_2) .apiInfo(apiInfo()) .tags(new Tag("DemoController", "演示服务")) .select() // 当前包路径 .apis(RequestHandlerSelectors.basePackage("com.bolingcavalry.springbootmulticastconsumer.controller")) .paths(PathSelectors.any()) .build(); } //构建 api文档的详细信息函数,注意这里的注解引用的是哪个 private ApiInfo apiInfo() { return new ApiInfoBuilder() //页面标题 .title("dubbo远程调用服务的操作(广播模式)") //创建人 .contact(new Contact("程序员欣宸", "https://github.com/zq2599/blog_demos", "zq2599@gmail.com")) //版本号 .version("1.0") //描述 .description("API 描述") .build(); }}- 最后是启动类SpringBootMulticastConsumerApplication.java:
package com.bolingcavalry.springbootmulticastconsumer;import org.apache.dubbo.config.spring.context.annotation.EnableDubbo;import org.springframework.boot.SpringApplication;import org.springframework.boot.autoconfigure.SpringBootApplication;@SpringBootApplication@EnableDubbopublic class SpringBootMulticastConsumerApplication { public static void main(String[] args) { SpringApplication.run(SpringBootMulticastConsumerApplication.class, args); }}- 至此,服务消费方编码完成,直接在IDEA上运行SpringBootMulticastConsumerApplication类即可启动;
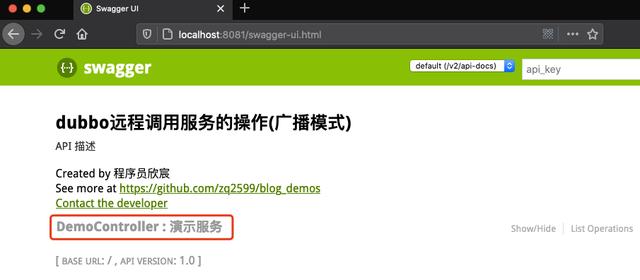
- 通过浏览器访问swagger,地址是:http://localhost:8081/swagger-ui.html ,如下图,点击红框位置展开接口详情:
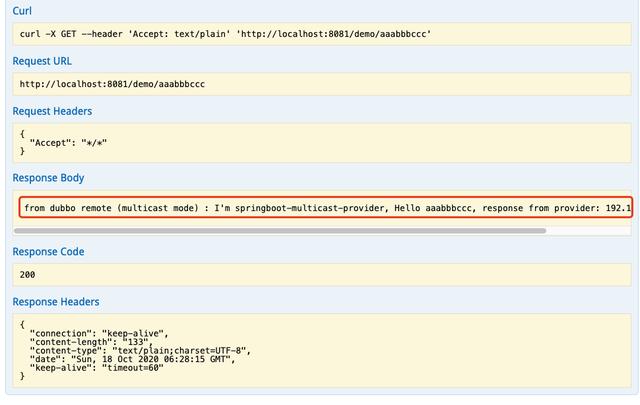
- 如下图,输入web接口参数发起请求:

- 下图红框中就是响应的数据,内容是springbootmulticastconsumer远程调用springbootmulticastprovider的服务得到的:
- 至此,dubbo与springboot集成的实战就完成了,希望能给您提供一些参考,助您快速开发dubbo应用;
欢迎关注我的公众号:程序员欣宸


 1451
1451


 被折叠的 条评论
为什么被折叠?
被折叠的 条评论
为什么被折叠?
 到【灌水乐园】发言


