


raspberry4
树莓派之人脸识别与智能家居
树莓派加上摄像头之后就可以拍照、录视频等各种功能了,这样做一个树莓派相机已经是非常简单的事情了。我们在这里做一个简单的人脸区域检测的功能实验,然后我们在下一个实验让树莓派来控制风扇转动。发现有人脸了,就开始转动风扇。这也是生活中的一个场景,当然加入实验3的温度检测根据温度和人脸一起决定是否吹风扇会更加精确化。
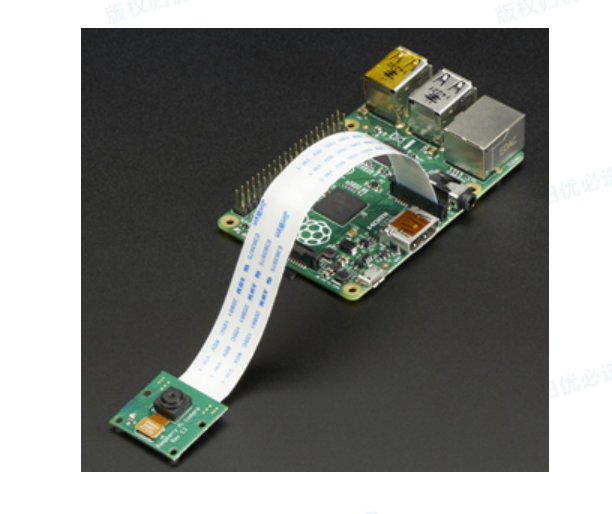
实验材料准备:原装树莓派800万像素CSI摄像头。
软件:rasbian系统、opencv
 环境配置:
环境配置:
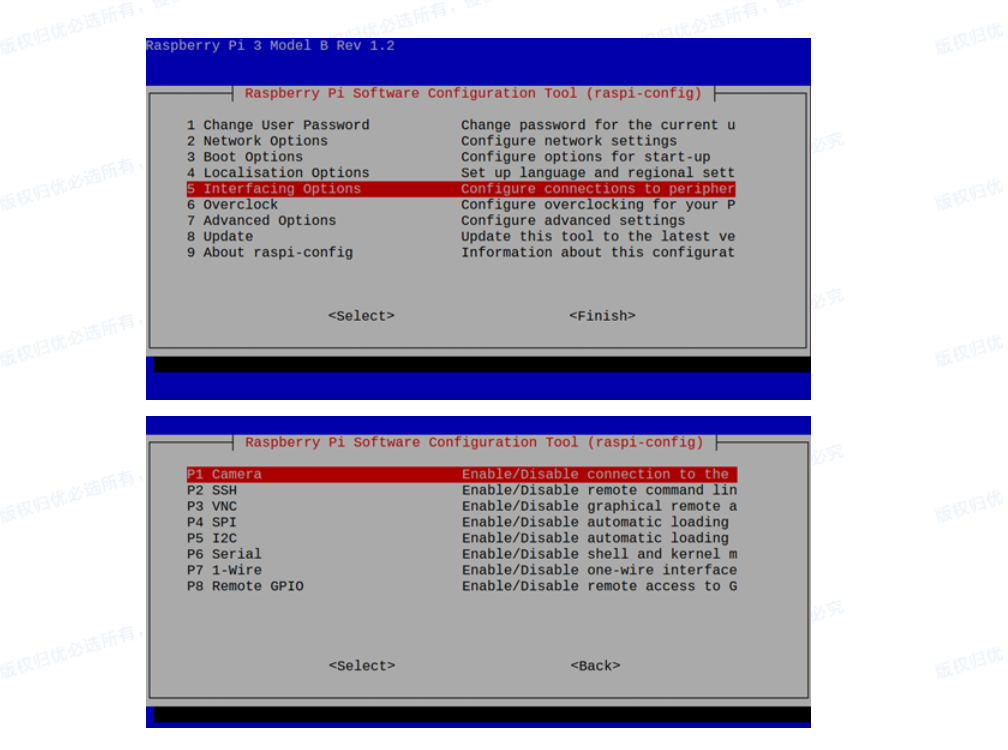
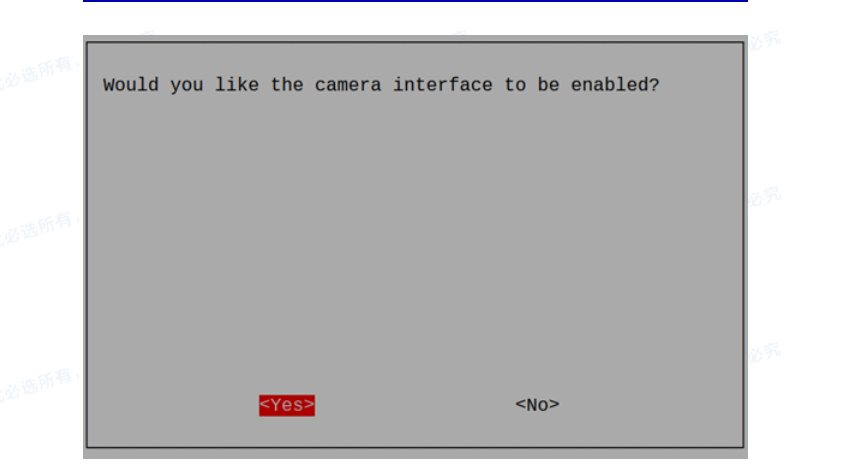
使能camera模块:
sudo raspi-config
安装必要的依赖库:
安装OpenCV
sudo apt-get update
sudo apt-get upgrade
sudo apt-get install libopencv-dev
sudo apt-get install python-opencv
安装PiCamera库:
sudo apt-get install python-pip
sudo apt-get install python-dev
sudo pip install picamera
测试人脸识别代码
import io
import picamera
import cv2
import numpy
#Create a memory stream so photos doesn't need to be saved in a file
stream = io.BytesIO()
#Get the picture (low resolution, so it should be quite fast)
#Here you can also specify other parameters (e.g.:rotate the image)
with picamera.PiCamera() as camera:
camera.resolution = (320, 240)
camera.capture(stream, format='jpeg')
#Convert the picture into a numpy array
buff = numpy.fromstring(stream.getvalue(), dtype=numpy.uint8)
#Now creates an OpenCV image
image = cv2.imdecode(buff, 1)
#Load a cascade file for detecting faces
face_cascade = cv2.CascadeClassifier('/usr/share/opencv/haarcascades/haarcascade_frontalface_alt.xml')
#Convert to grayscale
gray = cv2.cvtColor(image,cv2.COLOR_BGR2GRAY)
#Look for faces in the image using the loaded cascade file
faces = face_cascade.detectMultiScale(gray, 1.1, 5)
print "Found "+str(len(faces))+" face(s)"
#Draw a rectangle around every found face
for (x,y,w,h) in faces:
cv2.rectangle(image,(x,y),(x+w,y+h),(255,255,0),2)
#Save the result image
cv2.imwrite('result.jpg',image)
cv2.imshow('face_detect', image)
c = cv2.waitKey(0)
cv2.destroyAllWindows()
运行成功图
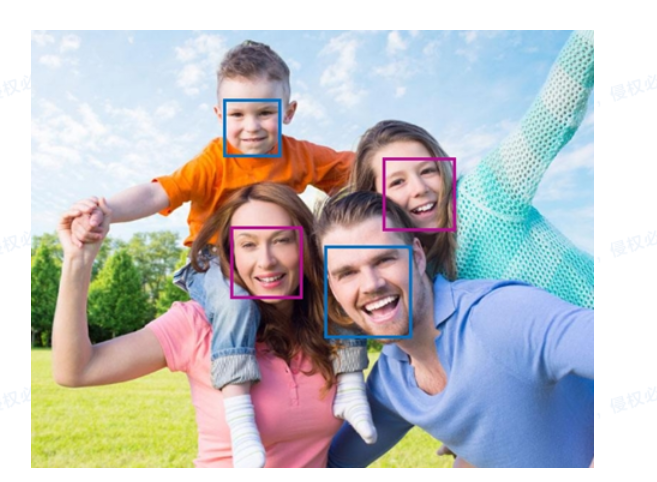
**代码原理说明:**我们使用与树莓派原装摄像头匹配的picamera程序库来获取图片信息然后利用opencv的人脸库来识别是否有人脸,其中haarcascade_frontalface_alt.xml,就是opencv自带的人脸模型库,我们就是利用这个识别出人脸的。这个路径下还有眼睛、鼻子、人体等模型库,你也可以换成相应的模型做相应的识别。
6、树莓派智能风扇
本实验通过实验5的人脸检测系统来判断是否有人脸,当有人脸的时候树莓派控制风扇转动,当没有人脸时停止风扇转动。
下面我们首先加入风扇控制系统:
由于实验条件的限制我们采用小功率风扇做例子,例如:普通usb改装风扇、树莓派散热风扇等直接由正负极控制的风扇。
树莓派的8号引脚连接到了usb改装风扇的正极,树莓派的一根地线接改装风扇的负极,当检测到人脸时,GPIO引脚输出低电平,可以开启风扇,当没有人脸时GPIO引脚输出高电平,可以关闭风扇。
测试代码
#!/usr/bin/env python
# -*- coding: utf-8 -*-
import io
import picamera
import cv2
import numpy
import time
import RPi.GPIO as GPIO
#GPIO setting for fan control
GPIO.setwarnings(False) # Ignore warning for now
GPIO.setmode(GPIO.BOARD) # Use physical pin numbering
# Set pin 8 to be an output pin and set initial value to high
GPIO.setup(8, GPIO.OUT, initial=GPIO.LOW)
#get the pictures and found face
while True :
#Create a memory stream so photos doesn't need to be saved
stream = io.BytesIO()
with picamera.PiCamera() as camera:
camera.resolution = (320, 240)
camera.capture(stream, format='jpeg')
#Convert the picture into a numpy array
buff = numpy.fromstring(stream.getvalue(), dtype=numpy.uint8)
#Now creates an OpenCV image
image = cv2.imdecode(buff, 1)
#Load a cascade file for detecting faces
face_cascade = cv2.CascadeClassifier('/usr/share/opencv/haarcascades/haarcascade_frontalface_alt.xml')
#Convert to grayscale
gray = cv2.cvtColor(image,cv2.COLOR_BGR2GRAY)
#Look for faces in the image using the loaded cascade file
faces = face_cascade.detectMultiScale(gray, 1.1, 5)
print "Found "+str(len(faces))+" face(s)"
for (x,y,w,h) in faces:
cv2.rectangle(image,(x,y),(x+w,y+h),(255,255,0),2)
cv2.imwrite('result.jpg',image)
# if found face turn on the fan
if len(faces) > 0 :
GPIO.output(8, GPIO.HIGH) # Turn on
else :
GPIO.output(8, GPIO.LOW) # Turn off
time.sleep(1)
如果一切顺利的话我们会看到,当摄像头发现人脸的时候,风扇开启了转动、当没有人脸的时候,风扇停止了转动。


 1373
1373


 被折叠的 条评论
为什么被折叠?
被折叠的 条评论
为什么被折叠?
 到【灌水乐园】发言


