


整合struts 和 spring
预期:如果可以在action中能够正确调用service里面的方法执行并返回到一个页面中;那么我们认定struts和spring的整合是成功的。
编写JUnit测试类,测试spring加载是否正确:
1 public classTestMerge {2 ClassPathXmlApplicationContext ctx;3 @Before4 public voidloadCtx() {5 ctx= new ClassPathXmlApplicationContext("applicationContext.xml");6
7 }8 @Test9 public voidtestSpring() {10 TestService ts = (TestService)ctx.getBean("testService");11 ts.say();12 }
编写 TestService 接口 和实现类 TestServiceImpl
1 packagecn.itcast.test.service;2
3 public interfaceTestService {4 public voidsay();5
6 }
1 packagecn.itcast.test.service.impl;2
3 importorg.springframework.stereotype.Service;4
5 importcn.itcast.test.service.TestService;6
7 @Service("testService")8 public class TestServiceImpl implementsTestService {9
10 @Override11 public voidsay() {12 System.out.println("service say haha ");13 }14
15 }
在applicationContext.xml中添加bean扫描配置信息;这边使用导入配置文件的方式配置。
①首先在cn.itcast.test.conf中建立test-spring.xml,里面内容:
1 <?xml version="1.0" encoding="UTF-8"?>
2
3 xmlns:xsi="http://www.w3.org/2001/XMLSchema-instance" xmlns:p="http://www.springframework.org/schema/p"
4 xmlns:context="http://www.springframework.org/schema/context"
5 xmlns:aop="http://www.springframework.org/schema/aop" xmlns:tx="http://www.springframework.org/schema/tx"
6 xsi:schemaLocation=" http://www.springframework.org/schema/beans http://www.springframework.org/schema/beans/spring-beans-3.0.xsd
7 http://www.springframework.org/schema/aophttp://www.springframework.org/schema/aop/spring-aop-3.0.xsd
8 http://www.springframework.org/schema/txhttp://www.springframework.org/schema/tx/spring-tx-3.0.xsd
9 http://www.springframework.org/schema/contexthttp://www.springframework.org/schema/context/spring-context-3.0.xsd">
10
11
12
13
14
②将test-spring.xml导入到applicationContext.xml中如下:
1 2 3
编写TestAction类
1 public class TestAction extendsActionSupport {2 @Resource3 TestService testService;4
5 publicString execute(){6 testService.say();7 returnSUCCESS;8 }9 }
在test的conf文件夹下新建test-struts.xml中配置TestAction :
1 <?xml version="1.0" encoding="UTF-8" ?>
2 "-//Apache Software Foundation//DTD Struts Configuration 2.3//EN"
4 "http://struts.apache.org/dtds/struts-2.3.dtd">
5
6
7
8
9 /WEB-INF/jsp/test/test.jsp
10
11
12
13
将test-struts.xml导入到struts.xml文件中。
1
在webRoot目录下新建test/test.jsp
整合hibernate 和 spring
在applicationContext.xml中配置如下原本在hibernate.cfg.xml中需要配置的信息,在spring中配置后hibernate.cfg.xml 可删除。
1、 配置c3p0数据库连接源:
1
2
3
4
5
6
7
8
9
10
11
12
13
14
15
16
17
18
19
20
2、db.properties
1 jdbcUrl=jdbc:mysql://localhost:3306/itcastTax_0406?useUnicode=true&characterEncoding=utf8
2 driverClass=com.mysql.jdbc.Driver3 user=root4 password=123456
5 initialPoolSize=10
6 maxPoolSize=30
3、 配置sessionFactory,并将dataSource指向c3p0创建的dataSource:
1
2
3
4
5 org.hibernate.dialect.MySQL5Dialect
6 true
7 update
8 none
9
10
11
12
13 classpath:cn/itcast/nsfw/*/entity/*.hbm.xml14 classpath:cn/itcast/test/entity/*.hbm.xml15 16 17
编写实体类Person和对应的映射文件Person.hbm.xml:
1 public class Person implementsSerializable {2 privateString id;3 privateString name;4
5 publicPerson() {6
7 }8
9 publicPerson(String name) {10 super();11 this.name =name;12 }13
14 publicPerson(String id, String name) {15 this.id =id;16 this.name =name;17 }18 publicString getId() {19 returnid;20 }21 public voidsetId(String id) {22 this.id =id;23 }24 publicString getName() {25 returnname;26 }27 public voidsetName(String name) {28 this.name =name;29 }30
31 }
映射文件的头部信息:
1 <?xml version="1.0" encoding="utf-8"?>
2 /p>
3 "http://hibernate.sourceforge.net/hibernate-mapping-3.0.dtd">
4
5
6
7
8
9
10
11
12
13
14
15
编写完实体映射文件后,用JUnit测试hibernate和spring的整合,在测试用例中启动spring容器的时候将扫描Person类根据其创建数据库表,并在测试时将向表插入一条数据。
测试hibernate,添加一个人员
1 @Test2 public voidtestHibernate() {3 SessionFactory sf = (SessionFactory) ctx.getBean("sessionFactory");4
5 Session session =sf.openSession();6 Transaction transaction =session.beginTransaction();7
8 session.save(new Person("人员1"));9 transaction.commit();10 session.close();11 }
配置spring事务管理
1
2
3
4
5
6
7
8
9
10
11
12
13
14
15
16
17
18
19
【注意:上面的pointcut expression 表示拦截以Service结尾的bean,或者可写成
execution(* cn.itcast..service.impl.*.*(..))】
完善 TestService接口和TestServiceImpl;利用service中的操作来验证上面配置的事务管理是否生效。
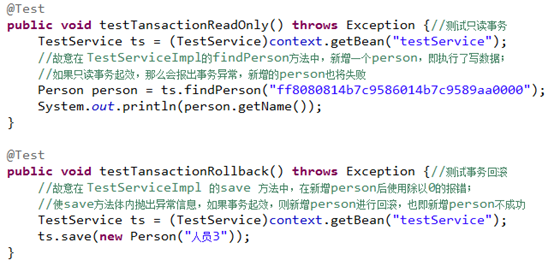
测试方法
Dao中
1 public class TestDaoImpl extends HibernateDaoSupport implementsTestDao {2
3
4 @Override5 public voidsave(Person person) {6
7 getHibernateTemplate().save(person);8 }9
10 @Override11 publicPerson findPerson(Serializable id) {12
13 return getHibernateTemplate().get(Person.class,id);14 }15 }
Service中
1 @Service("testService")2 public class TestServiceImpl implementsTestService {3 @Resource4 TestDao testDao;5
6 @Override7 public voidsay() {8 System.out.println("service say haha ");9 }10
11 @Override12 public voidsave(Person person) {13 testDao.save(person);14 int i= 1/0;15 }16
17 @Override18 publicPerson findPerson(Serializable id) {19 save(new Person("test"));20 returntestDao.findPerson(id);21 }22
23 }


 1464
1464


 被折叠的 条评论
为什么被折叠?
被折叠的 条评论
为什么被折叠?
 到【灌水乐园】发言


