


doCreateBean() 主要用于完成 bean 的创建和初始化工作,我们可以将其分为四个过程:
- createBeanInstance() 实例化 bean
- populateBean() 属性填充
- 循环依赖的处理
- initializeBean() 初始化 bean
第一个过程实例化 bean 已经在前面两篇博客分析完毕了,这篇博客开始分析 属性填充,也就是 populateBean(),该函数的作用是将 BeanDefinition 中的属性值赋值给 BeanWrapper 实例对象(对于 BeanWrapper 我们后续专门写文分析)。
protected void populateBean(String beanName, RootBeanDefinition mbd, @Nullable BeanWrapper bw) { // 没有实例化对象 if (bw == null) { // 有属性抛出异常 if (mbd.hasPropertyValues()) { throw new BeanCreationException( mbd.getResourceDescription(), beanName, "Cannot apply property values to null instance"); } else { // 没有属性直接返回 return; } } // 在设置属性之前给 InstantiationAwareBeanPostProcessors 最后一次改变 bean 的机会 boolean continueWithPropertyPopulation = true; // bena 不是"合成"的,即未由应用程序本身定义 // 是否持有 InstantiationAwareBeanPostProcessor if (!mbd.isSynthetic() && hasInstantiationAwareBeanPostProcessors()) { // 迭代所有的 BeanPostProcessors for (BeanPostProcessor bp : getBeanPostProcessors()) { // 如果为 InstantiationAwareBeanPostProcessor if (bp instanceof InstantiationAwareBeanPostProcessor) { InstantiationAwareBeanPostProcessor ibp = (InstantiationAwareBeanPostProcessor) bp; // 返回值为是否继续填充 bean // postProcessAfterInstantiation:如果应该在 bean上面设置属性则返回true,否则返回false // 一般情况下,应该是返回true,返回 false 的话, // 将会阻止在此 Bean 实例上调用任何后续的 InstantiationAwareBeanPostProcessor 实例。 if (!ibp.postProcessAfterInstantiation(bw.getWrappedInstance(), beanName)) { continueWithPropertyPopulation = false; break; } } } } // 如果后续处理器发出停止填充命令,则终止后续操作 if (!continueWithPropertyPopulation) { return; } // bean 的属性值 PropertyValues pvs = (mbd.hasPropertyValues() ? mbd.getPropertyValues() : null); if (mbd.getResolvedAutowireMode() == RootBeanDefinition.AUTOWIRE_BY_NAME || mbd.getResolvedAutowireMode() == RootBeanDefinition.AUTOWIRE_BY_TYPE) { // 将 PropertyValues 封装成 MutablePropertyValues 对象 // MutablePropertyValues 允许对属性进行简单的操作, // 并提供构造函数以支持Map的深度复制和构造。 MutablePropertyValues newPvs = new MutablePropertyValues(pvs); // 根据名称自动注入 if (mbd.getResolvedAutowireMode() == RootBeanDefinition.AUTOWIRE_BY_NAME) { autowireByName(beanName, mbd, bw, newPvs); } // 根据类型自动注入 if (mbd.getResolvedAutowireMode() == RootBeanDefinition.AUTOWIRE_BY_TYPE) { autowireByType(beanName, mbd, bw, newPvs); } pvs = newPvs; } // 是否已经注册了 InstantiationAwareBeanPostProcessors boolean hasInstAwareBpps = hasInstantiationAwareBeanPostProcessors(); // 是否需要进行依赖检查 boolean needsDepCheck = (mbd.getDependencyCheck() != RootBeanDefinition.DEPENDENCY_CHECK_NONE); if (hasInstAwareBpps || needsDepCheck) { if (pvs == null) { pvs = mbd.getPropertyValues(); } // 从 bw 对象中提取 PropertyDescriptor 结果集 // PropertyDescriptor:可以通过一对存取方法提取一个属性 PropertyDescriptor[] filteredPds = filterPropertyDescriptorsForDependencyCheck(bw, mbd.allowCaching); if (hasInstAwareBpps) { for (BeanPostProcessor bp : getBeanPostProcessors()) { if (bp instanceof InstantiationAwareBeanPostProcessor) { InstantiationAwareBeanPostProcessor ibp = (InstantiationAwareBeanPostProcessor) bp; // 对所有需要依赖检查的属性进行后处理 pvs = ibp.postProcessPropertyValues(pvs, filteredPds, bw.getWrappedInstance(), beanName); if (pvs == null) { return; } } } } if (needsDepCheck) { // 依赖检查,对应 depends-on 属性 checkDependencies(beanName, mbd, filteredPds, pvs); } } if (pvs != null) { // 将属性应用到 bean 中 applyPropertyValues(beanName, mbd, bw, pvs); } }处理流程如下:
- 根据 hasInstantiationAwareBeanPostProcessors 属性来判断是否需要在注入属性之前给 InstantiationAwareBeanPostProcessors 最后一次改变 bean 的机会,此过程可以控制 Spring 是否继续进行属性填充。
- 根据注入类型的不同来判断是根据名称来自动注入(autowireByName())还是根据类型来自动注入(autowireByType()),统一存入到 PropertyValues 中,PropertyValues 用于描述 bean 的属性。
- 判断是否需要进行 BeanPostProcessor 和 依赖检测。
- 将所有 PropertyValues 中的属性填充到 BeanWrapper 中。
自动注入
Spring 会根据注入类型( byName / byType )的不同,调用不同的方法(autowireByName() / autowireByType())来注入属性值。autowireByName() 方法 autowireByName() 是根据属性名称完成自动依赖注入的,代码如下:
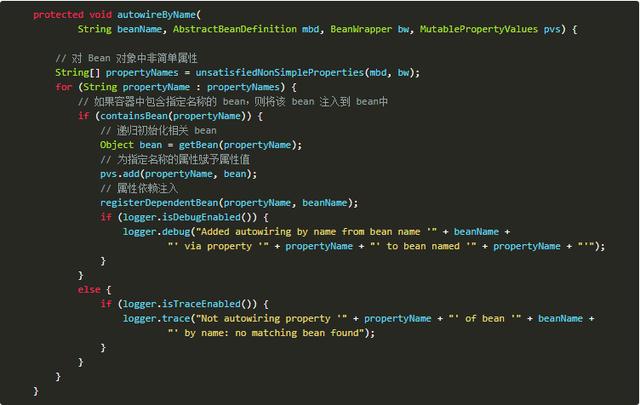
该方法逻辑很简单,获取该 bean 的非简单属性,什么叫做非简单属性呢?就是类型为对象类型的属性,但是这里并不是将所有的对象类型都都会找到,比如 8 个原始类型,String 类型 ,Number类型、Date类型、URL类型、URI类型等都会被忽略,如下:
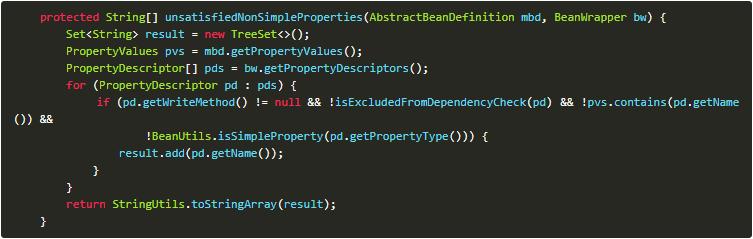
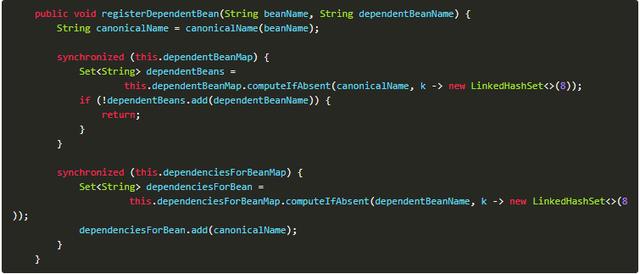
过滤条件为:有可写方法、依赖检测中没有被忽略、不是简单属性类型。其实这里获取的就是需要依赖注入的属性。 获取需要依赖注入的属性后,通过迭代、递归的方式初始化相关的 bean,然后调用 registerDependentBean() 完成注册依赖,如下:
autowireByType()
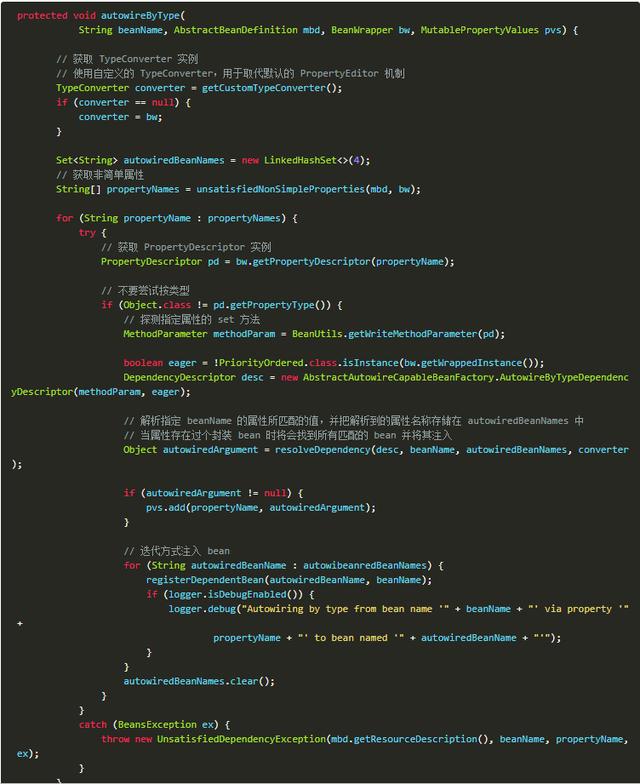
其实主要过程和根据名称自动注入差不多都是找到需要依赖注入的属性,然后通过迭代的方式寻找所匹配的 bean,最后调用registerDependentBean() 注册依赖。不过相对于 autowireByName() 而言,根据类型寻找相匹配的 bean 过程比较复杂,下面我们就分析这个复杂的过程,如下:
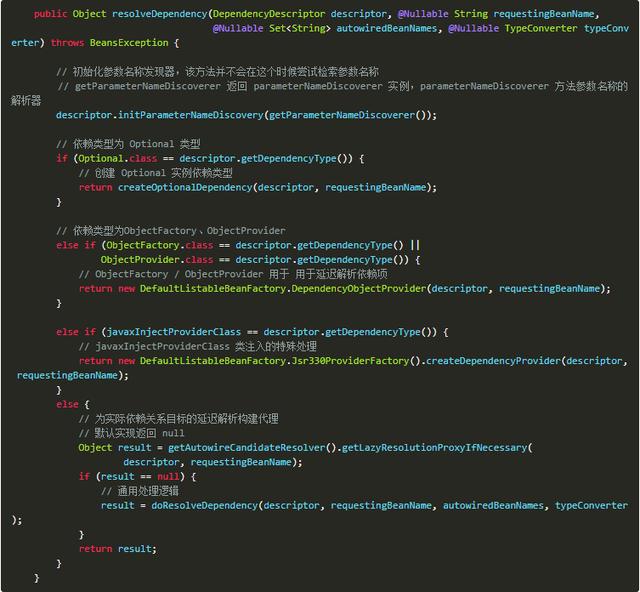
这里我们关注通用处理逻辑:doResolveDependency(),如下:
public Object doResolveDependency(DependencyDescriptor descriptor, @Nullable String beanName, @Nullable Set autowiredBeanNames, @Nullable TypeConverter typeConverter) throws BeansException { // 注入点 InjectionPoint previousInjectionPoint = ConstructorResolver.setCurrentInjectionPoint(descriptor); try { // 针对给定的工厂给定一个快捷实现的方式,例如考虑一些预先解析的信息 // 在进入所有bean的常规类型匹配算法之前,解析算法将首先尝试通过此方法解析快捷方式。 // 子类可以覆盖此方法 Object shortcut = descriptor.resolveShortcut(this); if (shortcut != null) { // 返回快捷的解析信息 return shortcut; } // 依赖的类型 Class> type = descriptor.getDependencyType(); // 支持 Spring 的注解 @value Object value = getAutowireCandidateResolver().getSuggestedValue(descriptor); if (value != null) { if (value instanceof String) { String strVal = resolveEmbeddedValue((String) value); BeanDefinition bd = (beanName != null && containsBean(beanName) ? getMergedBeanDefinition(beanName) : null); value = evaluateBeanDefinitionString(strVal, bd); } TypeConverter converter = (typeConverter != null ? typeConverter : getTypeConverter()); return (descriptor.getField() != null ? converter.convertIfNecessary(value, type, descriptor.getField()) : converter.convertIfNecessary(value, type, descriptor.getMethodParameter())); } // 解析复合 bean,其实就是对 bean 的属性进行解析 // 包括:数组、Collection 、Map 类型 Object multipleBeans = resolveMultipleBeans(descriptor, beanName, autowiredBeanNames, typeConverter); if (multipleBeans != null) { return multipleBeans; } // 查找与类型相匹配的 bean // 返回值构成为:key = 匹配的 beanName,value = beanName 对应的实例化 bean Map matchingBeans = findAutowireCandidates(beanName, type, descriptor); // 没有找到,检验 @autowire 的 require 是否为 true if (matchingBeans.isEmpty()) { // 如果 @autowire 的 require 属性为 true ,但是没有找到相应的匹配项,则抛出异常 if (isRequired(descriptor)) { raiseNoMatchingBeanFound(type, descriptor.getResolvableType(), descriptor); } return null; } String autowiredBeanName; Object instanceCandidate; if (matchingBeans.size() > 1) { // 确认给定 bean autowire 的候选者 // 按照 @Primary 和 @Priority 的顺序 autowiredBeanName = determineAutowireCandidate(matchingBeans, descriptor); if (autowiredBeanName == null) { if (isRequired(descriptor) || !indicatesMultipleBeans(type)) { // 唯一性处理 return descriptor.resolveNotUnique(type, matchingBeans); } else { // 在可选的Collection / Map的情况下,默默地忽略一个非唯一的情况:可能它是一个多个常规bean的空集合 return null; } } instanceCandidate = matchingBeans.get(autowiredBeanName); } else { // We have exactly one match. Map.Entry entry = matchingBeans.entrySet().iterator().next(); autowiredBeanName = entry.getKey(); instanceCandidate = entry.getValue(); } if (autowiredBeanNames != null) { autowiredBeanNames.add(autowiredBeanName); } if (instanceCandidate instanceof Class) { instanceCandidate = descriptor.resolveCandidate(autowiredBeanName, type, this); } Object result = instanceCandidate; if (result instanceof NullBean) { if (isRequired(descriptor)) { raiseNoMatchingBeanFound(type, descriptor.getResolvableType(), descriptor); } result = null; } if (!ClassUtils.isAssignableValue(type, result)) { throw new BeanNotOfRequiredTypeException(autowiredBeanName, type, instanceCandidate.getClass()); } return result; } finally { ConstructorResolver.setCurrentInjectionPoint(previousInjectionPoint); } }到这里就已经完成了所有属性的注入了。populateBean() 该方法就已经完成了一大半工作了,下一步则是对依赖 bean 的检测和 PostProcessor 处理,这个我们后面分析,下面分析该方法的最后一步:applyPropertyValues()applyPropertyValues
其实上面只是完成了所有注入属性的获取,将获取的属性封装在 PropertyValues 的实例对象 pvs 中,并没有应用到已经实例化的 bean 中,而 applyPropertyValues() 则是完成这一步骤的。
protected void applyPropertyValues(String beanName, BeanDefinition mbd, BeanWrapper bw, PropertyValues pvs) { if (pvs.isEmpty()) { return; } if (System.getSecurityManager() != null && bw instanceof BeanWrapperImpl) { ((BeanWrapperImpl) bw).setSecurityContext(getAccessControlContext()); } // MutablePropertyValues 类型属性 MutablePropertyValues mpvs = null; // 原始类型 List original; if (pvs instanceof MutablePropertyValues) { mpvs = (MutablePropertyValues) pvs; if (mpvs.isConverted()) { try { // 设置到 BeanWrapper 中去 bw.setPropertyValues(mpvs); return; } catch (BeansException ex) { throw new BeanCreationException( mbd.getResourceDescription(), beanName, "Error setting property values


 531
531


 被折叠的 条评论
为什么被折叠?
被折叠的 条评论
为什么被折叠?
 到【灌水乐园】发言


