


本文简单介绍了SwiftUI2.0中全新提供的App协议、Scene协议,浅谈了在全新的代码结构下如何组织Data Flow,并提供了SwiftUI2.0中预置的Scene的一些使用示例。
当前运行环境为 Xcode Version 12.0 beta (12A6159), macOS Big Sur 11.0 Beta版(20A4299v)。原文发表在我的博客Swift记事簿
WWDC20中,苹果为开发者带来了基于SwiftUI的全新项目模板。使用该模板,将使项目代码变得异常简洁、清晰。
@main
struct NewAllApp: App {
    var body: some Scene {
        WindowGroup {
            Text("Hello world")
        }
    }
}
上述代码可以在屏幕上完成Hello world的显示,且能够运行于iOS和macOS平台下。
基本概念
App
SwiftUI2.0提供的全新协议。通过声明一个符合App协议的结构来创建一个程序,并通过计算属性body来实现程序的内容。
- 通过@main(swift5.3 新特性)设定程序的入口,每个项目只能有一个进入点
- 管理整个app的生命周期
- 在这个作用域下声明的常量、变量其生命周期与整个app是完全一致的。
Scene
场景是视图(View)层次结构的容器。通过在App实例的body中组合一个或多个符合Scene协议的实例来呈现具体程序。
- 生命周期由系统管理
- 系统会根据运行平台的不同而调整场景的展示行为(比如相同的代码在iOS和macOS下的呈现不同,或者某些场景仅能运行于特定的平台)
- SwiftUI2.0提供了几个预置的场景,用户也可以自己编写符合Scene协议的场景。上述代码中便是使用的一个预置场景WindowGroup
通过App和Scene的加入,绝不是仅仅减少代码量这么简单。通过这个明确的层级设定,我们可以更好的掌握在不同作用域下各个部分的生命周期、更精准数据传递、以及更便利的多平台代码共享。本文后面会用具体代码来逐个阐述。
App和Scene都是通过各自的functionBuilder来解析的,也就是说,新的模板从程序的入口开始便是使用DSL来描述的。
程序系统事件响应
由于去除了AppDelegate.swift和SceneDelegate.swift,SwiftUI2.0提供了新的方法来让程序响应系统事件。
针对AppDelegate.swift
在iOS系统下,通过使用@UIApplicationDelegateAdaptor可以方便的实现之前AppDelegate.swfit中提供的功能:
@main
struct NewAllApp: App {
    @UIApplicationDelegateAdaptor(AppDelegate.self) var appDelegate
    var body: some Scene {
        WindowGroup {
            Text("Hello world")
        }
    }
}

class AppDelegate:NSObject,UIApplicationDelegate{
    func application(_ application: UIApplication, didFinishLaunchingWithOptions launchOptions: [UIApplication.LaunchOptionsKey : Any]? = nil) -> Bool {
        print("launch")
        return true
    }
}
由于目前还是测试版,虽然很多的事件已经定义,但现在并没有响应。估计很快会增加修改过来
针对SceneDelegate.swift
通过新增添的EnvironmentKey scenePhase 和新的.onChange 方法,SwiftUI提供了一个更加有趣的场景事件解决方案:
@main
struct NewAllApp: App {
    @Environment(.scenePhase) var phase
    var body: some Scene {
        WindowGroup {
           ContentView()
        }
        .onChange(of: phase){phase in
                switch phase{
                case .active:
                    print("active")
                case .inactive:
                    print("inactive")
                case .background:
                    print("background")
                @unknown default:
                    print("for future")
                }

          }
    }
}
同样是由于测试版的原因,该响应目前并没有完成。不过这段代码目前来看是iOS和macOS都通用的
更新
目前发现如果在View中,可以获取scenePhase的状态更新。下来代码目前可以正常执行
struct ContentView:View{
  @Environment(.scenePhase) private var scenePhase
	var body: some Scene {
		WindowGroup {
			ContentView()
		}
		.onChange(of: phase){phase in
                switch phase{
                case .active:
                    print("active")
                case .inactive:
                    print("inactive")
                case .background:
                    print("background")
                @unknown default:
                    print("for future")
                }
         }
    }
}
预置场景
WKNotificationScene
仅适用于watchOS7.0,用于响应指定类别的远程或本地通知。目前还没有研究。
WindowGroup
最常用的场景,可以呈现一组结构相同的窗口。使用该场景,我们无需在代码上做修改,只需要在项目中设定是否支持多窗口,系统将会按照运行平台的特性自动管理。
在iOS中,只能呈现一个运行窗口。
在PadOS中(如打开多窗口支持),最多可以打开两个运行窗口,可以分屏显示,也可以全屏独立显示。
在macOS中,可以打开多个窗口,并通过程序菜单中的窗口菜单来进行多窗口管理。
最开始的代码在三个平台下的状态:
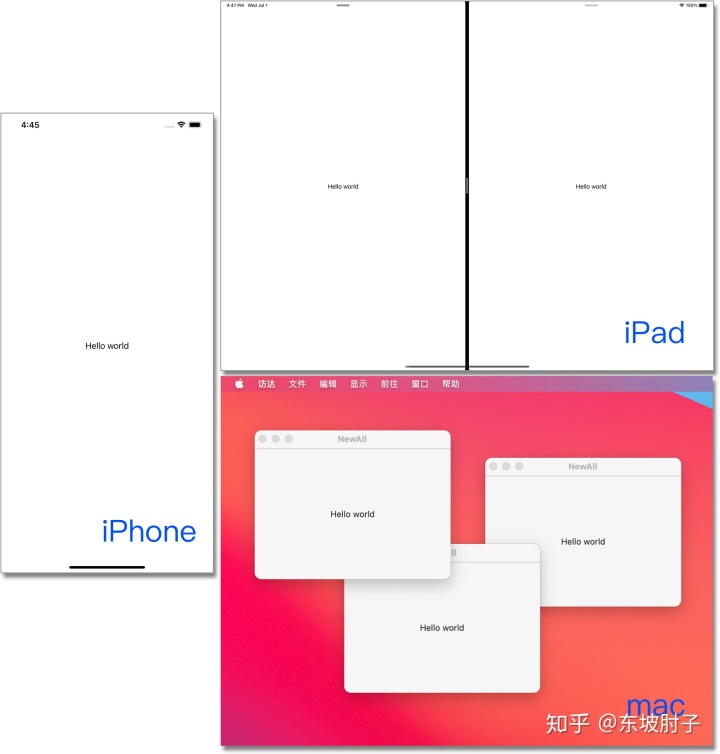
如果在一个WindowGroup里加入多个View,呈现状态有点类似VStack。
在一个Scene中加入多个WindowGroup,只有最前面的可以被显示。
DocumentGroup
创建一个可处理指定文件类型的窗口。在iOS和PadOS下都首先会呈现文件管理器,点击文件,进入对应的View来处理。macOS下,通过菜单中的文件操作来选择或创建文件。
通过创建一个符合FileDocument的结构来定义支持哪种格式,以及打开和保存的工作。
//纯文本格式文件。write的方法用于描述如何写入文件,如果不需写入可为空。
struct TextFile: FileDocument {
    static var readableContentTypes = [UTType.plainText]
    var text = ""
    init(initialText: String = "") {
        text = initialText
    }
    init(fileWrapper: FileWrapper, contentType: UTType) throws {
        if let data = fileWrapper.regularFileContents {
            text = String(decoding: data, as: UTF8.self)
        }
    }
    func write(to fileWrapper: inout FileWrapper, contentType: UTType) throws {
        let data = Data(text.utf8)
        let file = FileWrapper(regularFileWithContents: data)
        fileWrapper = file
    }
}
//图片文件,由于需要转换成UIImage,该代码只支持iOS或PadOS
#if os(iOS)
struct ImageFile: FileDocument {
    static var readableContentTypes = [UTType.image]
    var image = UIImage()
    init(initialImage: UIImage = UIImage()) {
        image = initialImage
    }

    init(fileWrapper: FileWrapper, contentType: UTType) throws {
        if let data = fileWrapper.regularFileContents {
            image =   UIImage(data: data) ?? UIImage()
        }
    }

    func write(to fileWrapper: inout FileWrapper, contentType: UTType) throws { }
}
#endif
调用
import SwiftUI
#if os(iOS)
import UIKit
#endif
import UniformTypeIdentifiers

@main
struct NewAllApp: App {
   @SceneBuilder var body: some Scene {
        //可读写
        DocumentGroup(newDocument: TextFile()) { file in
                TextEditorView(document: file.$document)
        }

        #if os(iOS)
        //只读
        DocumentGroup(viewing: ImageFile.self) { file in
                ImageViewerView(file: file.$document)
          }
        #endif
    }
}

struct TextEditorView: View {
    @Binding var document: TextFile
    @State var name = ""
    var body: some View {
        VStack{
        TextEditor(text: $document.text)
            .padding()
        }
        .background(Color.gray)
    }
}

#if os(iOS)
struct ImageViewerView:View{
    @Binding var document:ImageFile
    var body: some View{
        Image(uiImage: document.image)
            .resizable(resizingMode: .stretch)
            .aspectRatio(contentMode: .fit)
    }
}
#endif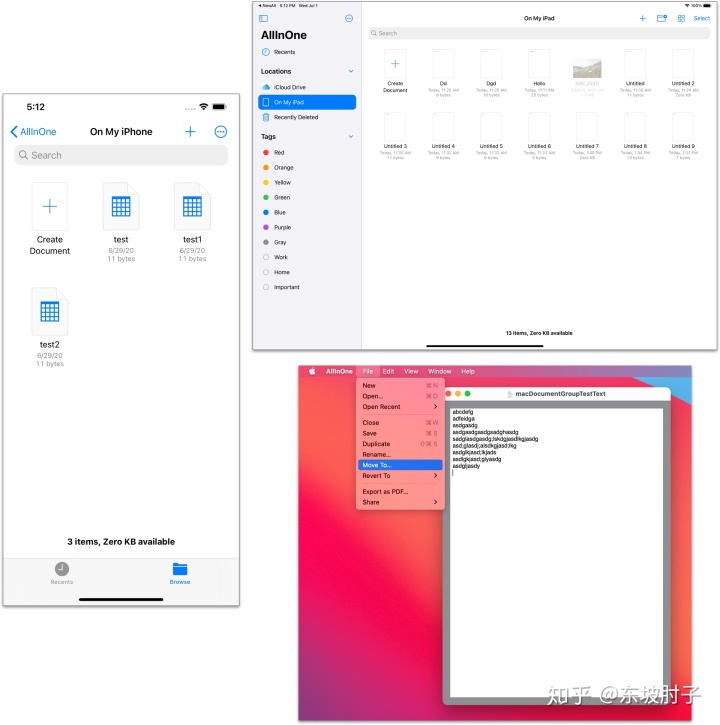
可以将多个DocumentGroup放入Scene中,程序将会一并支持每个DocumentGroup所定义的文件类型。上述代码使程序可以创建、编辑纯文本文件,并且可以浏览图片文件。
在macOS上,需要在macOS.entitlements中设置com.apple.security.files.user-selected.read-write为真才能完成写入。
当在Scene中加入多个场景时,需要使用@SceneBuilder或用Group将多个场景涵盖起来。
macOS下当同时加入WindowGroup和DocumentGroup时,两个功能都可以正常运行。iOS或PadOS下,只有顺序在最前面的被显示。
由于测试版的原因,目前仍有大量的功能无法实现或有问题。比如仍无法在iOS上通过fileDocument提供的filename来设置文件名,或者无法在创建新文件时选择格式等
Settings
只用于macOS,用于编写程序的偏好设置窗口。
   WindowGroup{
      Text(".....")
   }

#if os(macOS)
    Settings{
      Text("偏好设置").padding(.all, 50)
    }
#endif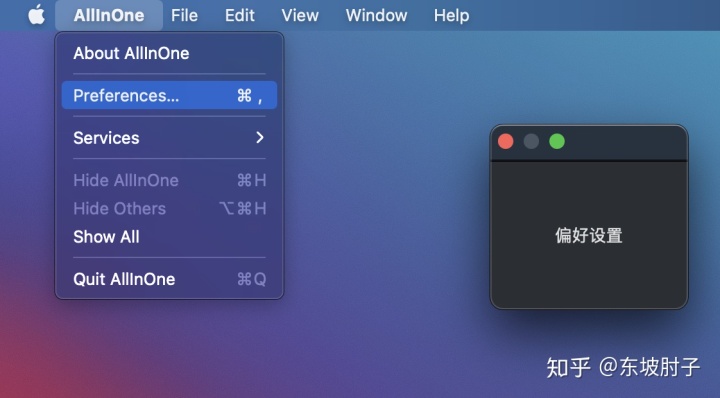
其他
- onChange
监视指定的值,在值改变时执行指定的action。在scenePhase的用法介绍中有使用的范例 - onCommands
在macOS下设置程序的菜单。具体的使用方法请查看SwiftUI2.0 —— Commands(macOS菜单) - defaultAppStorage
如果不想使用系统缺省UserDefault.standard,可以自行设置存储位置,使用的几率不高。
小结
至此,本文简单介绍了SwiftUI2.0新增的App和Scene,下篇文章我们将探讨在新的层次结构下如何组织我们代码的Data Flow。
当前的@AppBuilder和@SceneBuilder的功能都十分的基础,不包含任何的逻辑判断功能,因此目前我还没有办法实现根据条件来选择性的展示所需的Scene。相信苹果应该会在未来增加这样的能力
本文的代码为了能够在多平台使用,所以增加了不少编译判断,如果你只是在iOS,或macOS下开发SwiftUI,则可根据各自平台简化代码。另外Xcode12中的代码补全对于Target的设定很敏感,如果你发现无法对某些平台的特定语句进行补全,请查看是否将Scheme设置到对应的平台。
东坡肘子:SwiftUI2.0 —— App、Scene、新的代码结构(二)zhuanlan.zhihu.com


 760
760


 被折叠的 条评论
为什么被折叠?
被折叠的 条评论
为什么被折叠?
 到【灌水乐园】发言


