原标题:Android 超简单的夜间模式如何实现?
本文作者
作者: 唐子玄
实现夜间模式有很多种方式,经过多次尝试,算是找到了一种性价比较高的方式。
1
主题方式
这是最正统的方式,但工作量巨大,因为要全局替换 xml 布局中所有硬编码的色值,将其换成主题色。然后通过换主题达到换肤的效果。
2
窗口方式
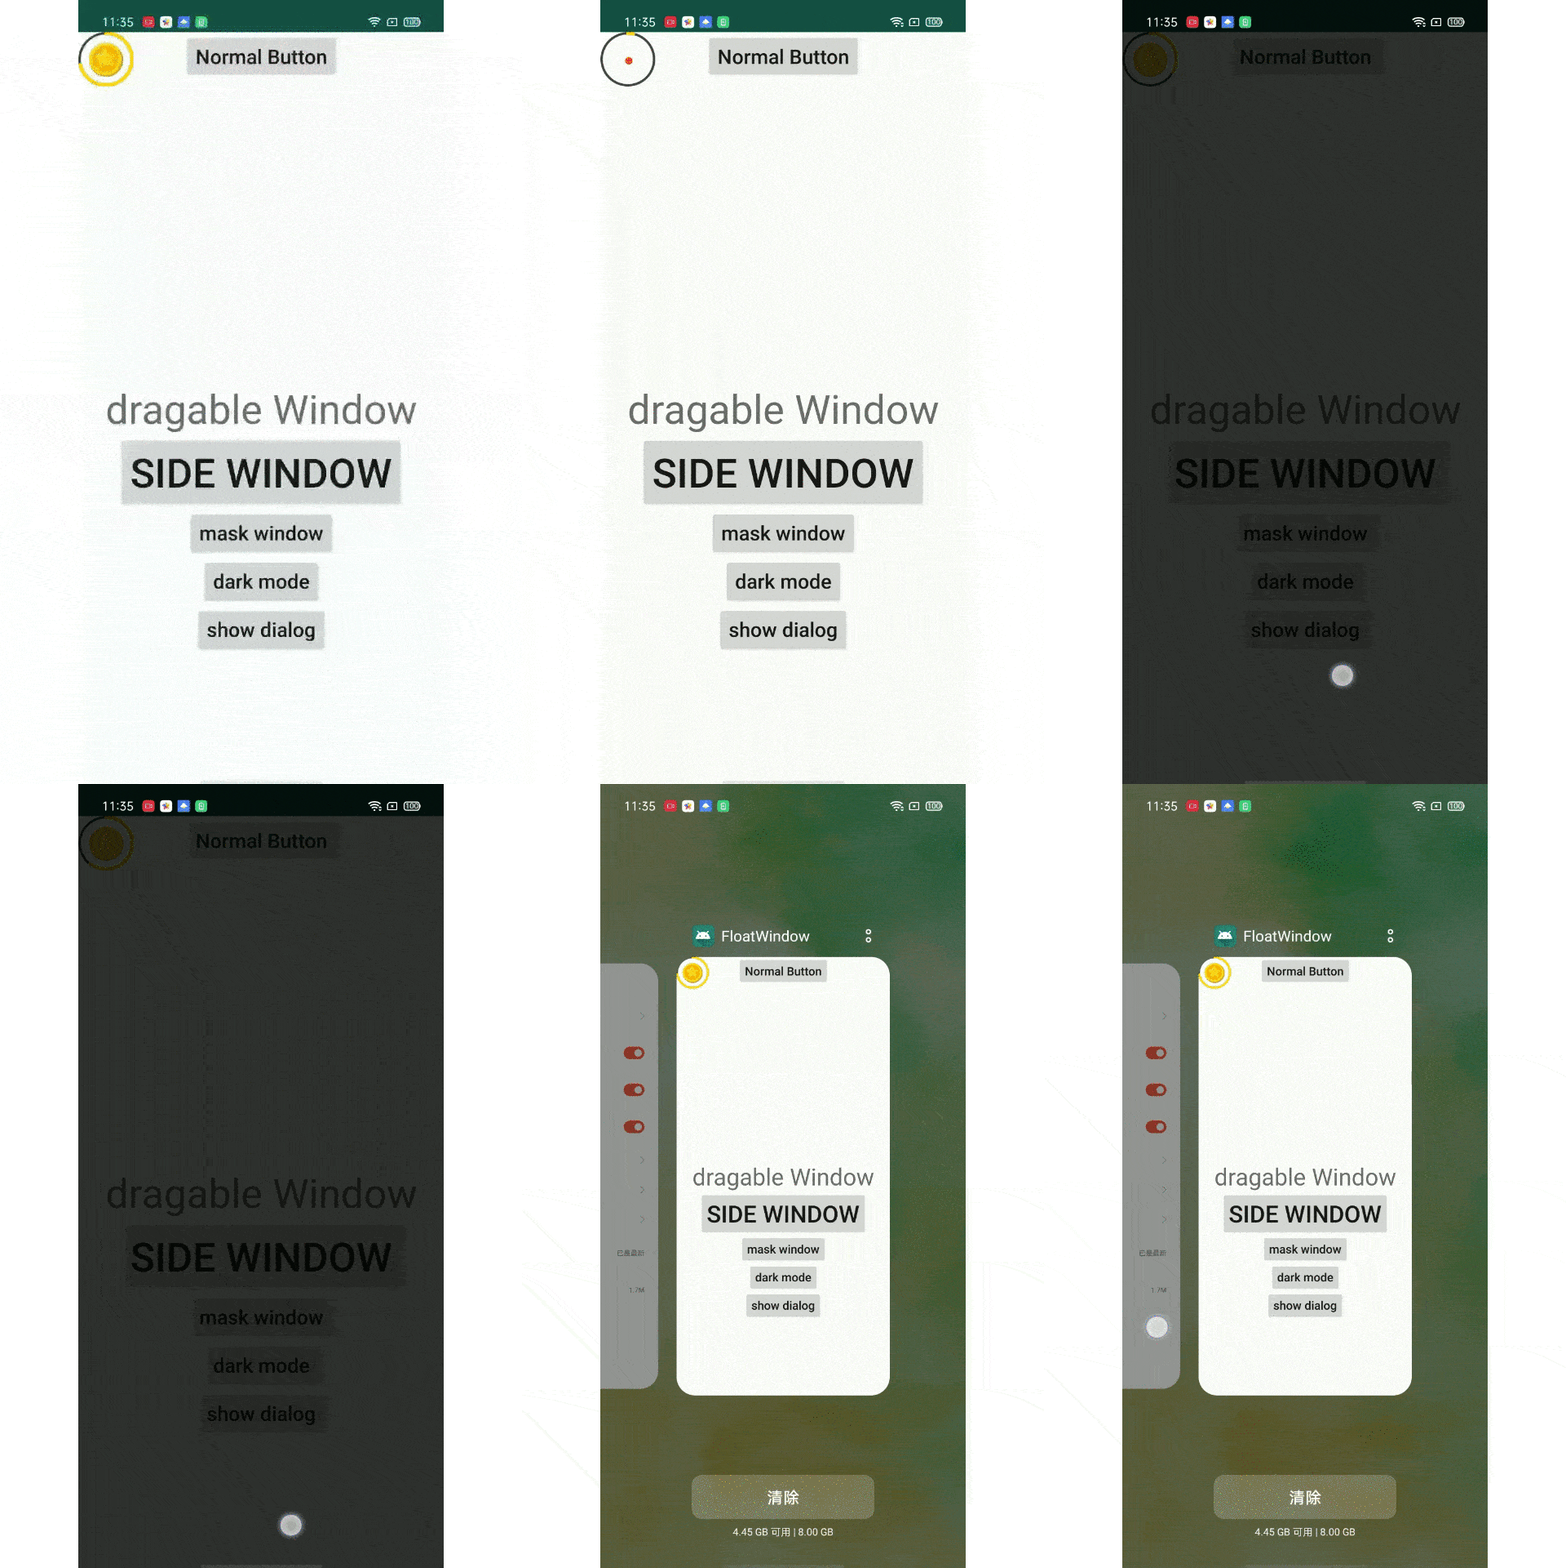
是不是可以在所有界面上罩一个半透明的窗口,就好像戴墨镜看屏幕一样。虽然这是换肤方案的“退而求其次”,但也是能达到不刺眼的效果:
openclassBaseActivity: AppCompatActivity{
// 展示全局半透明浮窗
privatefunshowMaskWindow{
// 浮窗内容
valview = View {
layout_width = match_parent
layout_height = match_parent
background_color = "#c8000000"
}
valwindowInfo = FloatWindow.WindowInfo(view).apply {
width = DimensionUtil.getScreenWidth( this@BaseActivity)
height = DimensionUtil.getScreenHeight( this@BaseActivity)
}
// 展示浮窗
FloatWindow.show( this, "mask", windowInfo, 0, 100, false, false, true)
}
}
为了让浮窗跨Activity展示,需要将窗口的type设置为WindowManager.LayoutParams.TYPE_APPLICATION_OVERLAY。
为了让触摸事件穿透浮窗传递到Activity,需要为窗口添加下面这几个flag,FLAG_NOT_FOCUSABLE、FLAG_NOT_TOUCHABLE、FLAG_NOT_TOUCH_MODAL、FLAG_FULLSCREEN。
这些细节已封装在FloatWindow中。
这个方案有一个缺点,当展示系统多任务时,全局浮窗会消失,效果如下:

3
子视图方式
是不是可以向每个当前界面添加一个半透明的View作为蒙版?
funActivity. nightMode(lightOff: Boolean, color: String){
// 构建主线程消息处理器
valhandler = Handler(Looper.getMainLooper)
// 蒙版控件id
valid = "darkMask"
// 打开夜间模式
if(lightOff) {
// 向主线程消息队列头部插入“展示蒙版”任务
handler.postAtFrontOfQueue {
// 构建蒙版视图
valmaskView = View {
layout_id = id
layout_width = match_parent
layout_height = match_parent
background_color = color
}
// 向当前界面顶层视图中添加蒙版视图
decorView?.apply {
valview = findViewById(id.toLayoutId)
if(view == null) { addView(maskView) }
}
}
}
// 关闭夜间模式
else{
// 从当前界面顶层视图中移出蒙版视图
decorView?.apply {
find(id)?.let { removeView(it) }
}
}
}
为AppCompatActivity扩展了一个方法,它用于开关夜间模式。打开夜间模式的方式是 “向当前界面顶层视图添加一个蒙版视图” 。
其中decorView是Activity的一个扩展属性:
val Activity.decorView: FrameLayout?
get= (takeIf { !isFinishing && !isDestroyed }?. window?.decorView) as? FrameLayout
当Activity还展示的时候,从它的Window中获取DecorView。
其中toLayoutId是String的扩展方法:
funString. toLayoutId: Int{
varid = java.lang.String( this).bytes.sum
if(id == 48) id = 0
returnid
}
为了避免界面展示出来后黑一下,所以将“添加蒙版”任务添加到主线程消息队列的头部,优先处理。
然后只需在Application中监听Activity的生命周期,在onCreate中开关夜间模式即可:
classTaylorApplication: Application{
privatevalpreference bylazy { Preference(getSharedPreferences( "dark-mode", Context.MODE_PRIVATE)) }
overridefunonCreate{
super.onCreate
registerActivityLifecycleCallbacks( object:ActivityLifecycleCallbacks{
overridefunonActivityPaused(activity: Activity?){}
overridefunonActivityResumed(activity: Activity?){}
overridefunonActivityStarted(activity: Activity?){}
overridefunonActivityDestroyed(activity: Activity?){}
overridefunonActivitySaveInstanceState(activity: Activity?, outState: Bundle?){}
overridefunonActivityStopped(activity: Activity?){}
overridefunonActivityCreated(activity: Activity?, savedInstanceState: Bundle?){
activity?.night(preference[ "dark-mode", false])
}
}
}
}
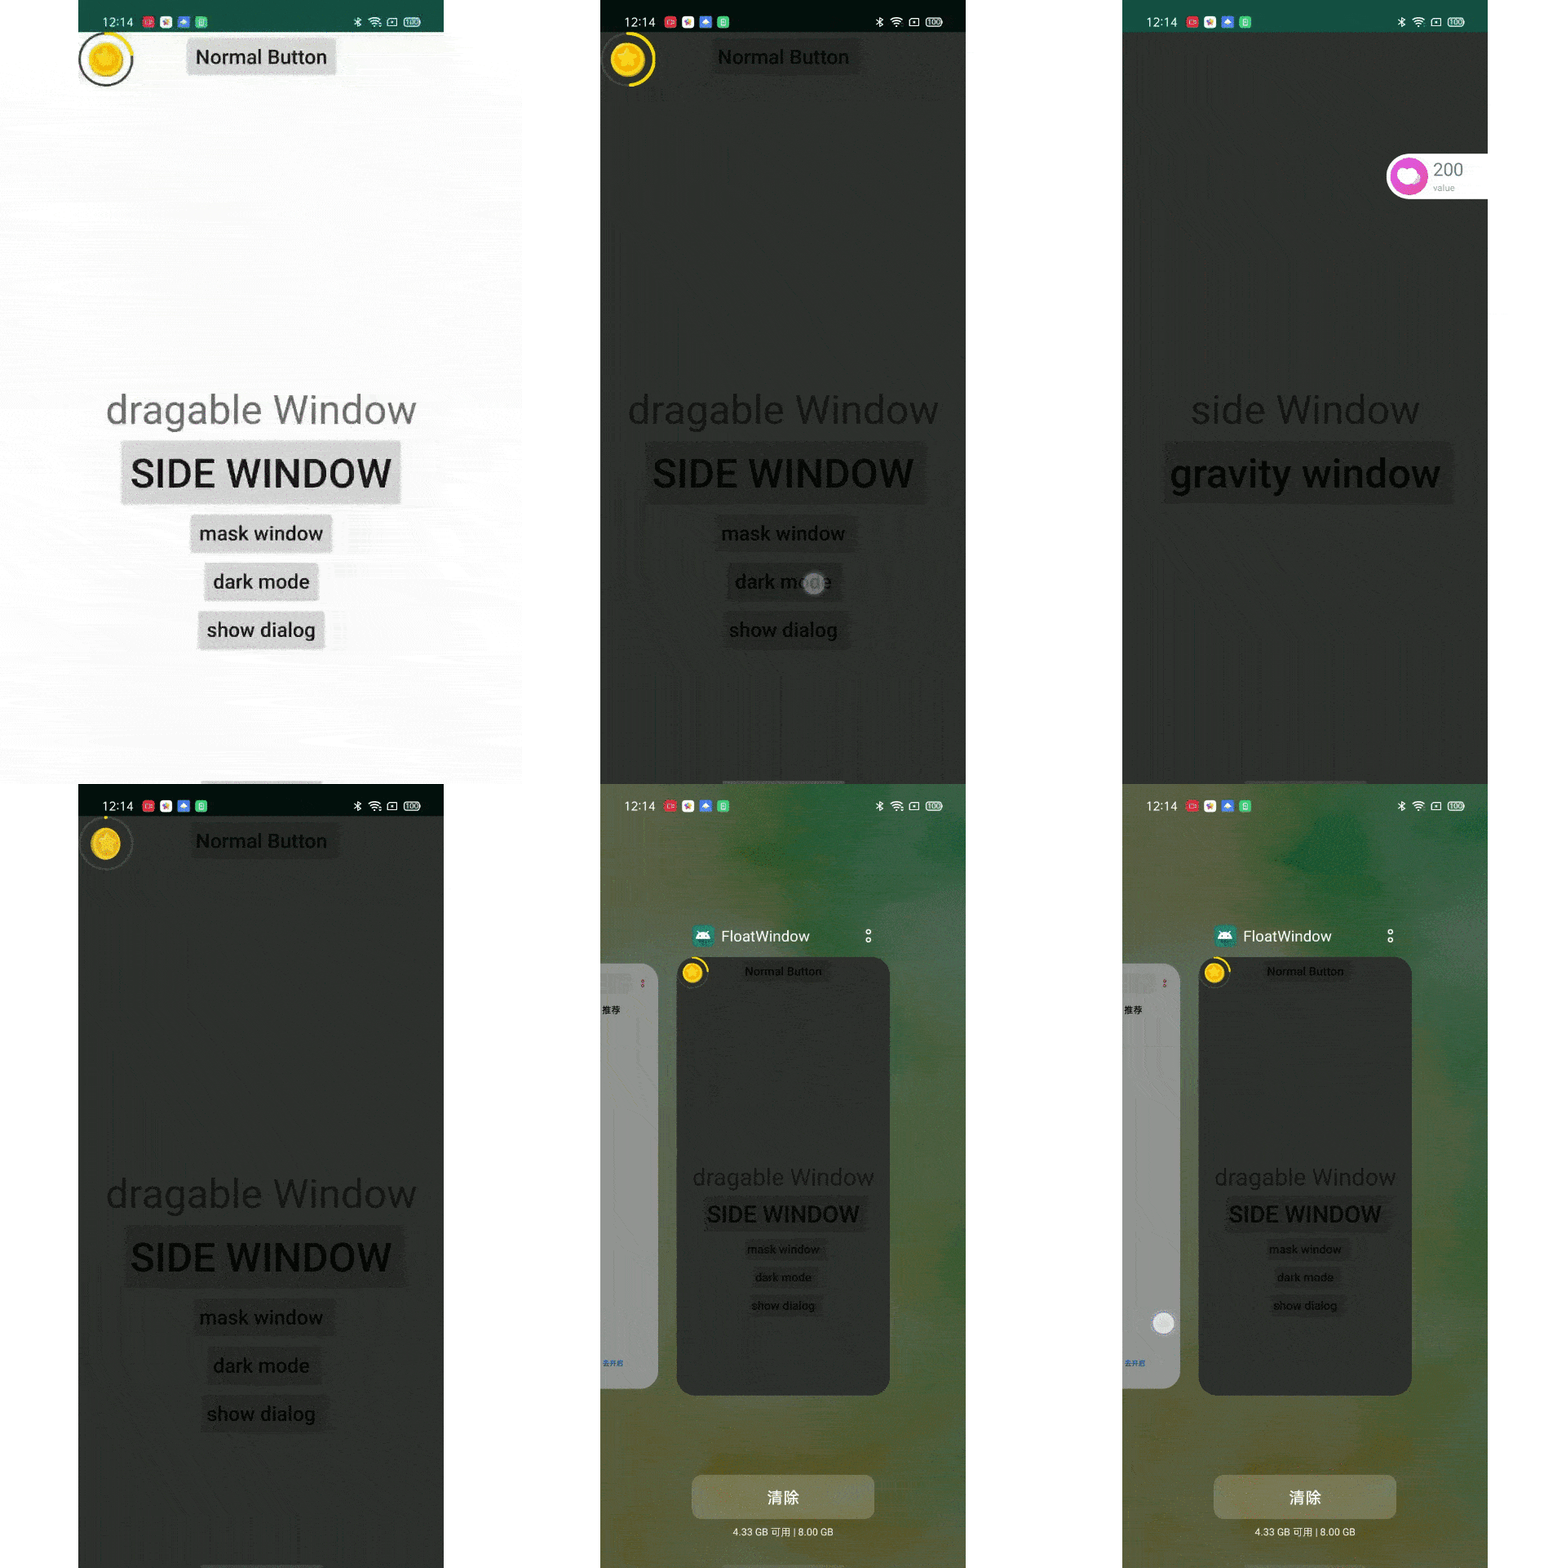
效果如下:

这个方案不是全局的,而是针对单界面的,所以弹出的DialogFragment会在蒙版之上,那就用同样的方法在对话框上再覆盖一层蒙版:
funDialogFragment. nightMode(lightOff: Boolean, color: String= "#c8000000"){
valhandler = Handler(Looper.getMainLooper)
valid = "darkMask"
if(lightOff) {
handler.postAtFrontOfQueue {
valmaskView = View {
layout_id = id
layout_width = match_parent
layout_height = match_parent
background_color = color
}
decorView?.apply {
valview = findViewById(id.toLayoutId)
if(view == null) {
addView(maskView)
}
}
}
} else{
decorView?.apply {
find(id)?.let { removeView(it) }
}
}
}
// 获取对话框的根视图
valDialogFragment.decorView: ViewGroup?
get{
returnview?.parent as? ViewGroup
}
添加蒙版的算法和之前的一模一样,只不过这次是DialogFragment的扩展方法。
覆盖了 Activity 和 DialogFragment,还不够,项目中有些弹窗是用 Window 实现的,咋办呢,继续覆盖:
funWindow. nightMode(lightOff: Boolean, color: String= "#c8000000"){
valhandler = Handler(Looper.getMainLooper)
valid = "darkMask"
if(lightOff) {
handler.postAtFrontOfQueue {
valmaskView = View(context).apply {
setId(id.toLayoutId)
layoutParams = FrameLayout.LayoutParams(FrameLayout.LayoutParams.MATCH_PARENT, FrameLayout.LayoutParams.MATCH_PARENT)
setBackgroundColor(Color.parseColor(color))
}
(decorView as? ViewGroup)?.apply {
valview = findViewById(id.toLayoutId)
if(view == null) {
addView(maskView)
}
}
}
} else{
(decorView as? ViewGroup)?.apply {
find(id)?.let { removeView(it) }
}
}
}
算法和之前的一摸一样。即往 DecorView 中添加蒙版。
故事就这样结束?还有 PopupWindow,这次情况略复杂,因为没有现成的方法可以获取它的 DecorView
publicclassPopupWindow{
privatePopupDecorView mDecorView;
privateclassPopupDecorViewextendsFrameLayout{
...
}
}
PopupWindow的根视图是一个私有成员,遂只能通过反射获取:
funPopupWindow. nightMode(lightOff: Boolean, color: String= "#c8000000"){
contentView.post {
try{
// 通过反射获取 mDecorView 实例
valwindowClass: Class? = this.javaClass
valpopupDecorView = windowClass?.getDeclaredField( "mDecorView")
popupDecorView?.isAccessible = true
valmask = contentView.context.run {
View {
layout_width = contentView.width
layout_height = contentView.height
background_color = color
}
}
// 向 mDecorView 中添加蒙版
(popupDecorView?. get( this) as? FrameLayout)?.addView(mask, FrameLayout.LayoutParams(contentView.width, contentView.height))
} catch(e: Exception) {
}
}
}
4
父视图方式
子视图方式在 Activity 中效果良好,但对于非全屏的 DialogFragment 却有可能出现布局问题。
因为向容器控件添加一个 MATCH_PARENT 的子视图后很可能会把父视图撑开,当 Dialog 的 Window 宽高是 WRAP_CONTENT 时,运用上面DialogFragment.nightMode,app 中很多对话框都撑满全屏。
换一个思路,在DialogFragment原有视图外面包一层父视图,在父视图中画一个半透明矩形:
// 对话框基类
abstractclassBaseDialogFragment: DialogFragment{
overridefunonCreateView(inflater: LayoutInflater, container: ViewGroup?, savedInstanceState: Bundle?): View? {
// 在对话框视图外层包一个蒙版
returncontext?.let {
MaskViewGroup(it).apply {
addView(createView(inflater, container, savedInstanceState))
}
}
}
// 子类必须重载这个方法以自定义布局
abstractfuncreateView(inflater: LayoutInflater, container: ViewGroup?, savedInstanceState: Bundle?): View?
其中的MaskViewGroup定义如下:
// 蒙版容器控件
classMaskViewGroup@JvmOverloadsconstructor(context: Context, attrs: AttributeSet? = null, defStyleAttr: Int= 0) : FrameLayout(context, attrs, defStyleAttr) {
privatelateinitvarpaint: Paint
init {
// 允许 ViewGroup 在自己画板上绘制内容
setWillNotDraw( false)
paint = Paint(Paint.ANTI_ALIAS_FLAG)
paint.color = Color.parseColor( "#c8000000")
}
overridefunonDrawForeground(canvas: Canvas?){
super.onDrawForeground(canvas)
// 绘制灰色前景
canvas?.drawRect( 0f, 0f, right.toFloat, bottom.toFloat, paint)
}
}
关于如何在父控件中绘制内容的详细介绍可以点击Android自定义控件 | 小红点的三种实现(下)
完整代码:
https://github.com/wisdomtl/FloatWindow返回搜狐,查看更多
责任编辑:


 534
534


 被折叠的 条评论
为什么被折叠?


