


在上篇[1]中,我们分别用 Django 和 Nuxt 实现了后端和前端的雏形。在这一部分,我们将实现前后端之间的通信,使得前端可以从后端获取数据,并且将进一步丰富网站的功能。
本文所涉及的源代码都放在了 Github[2] 上,如果您觉得我们写得还不错,希望您能给❤️这篇文章点个在看+Github仓库加星❤️哦~ 本文代码改编自 Scotch[3]。
从服务器获取数据
在这一部分,我们将真正实现一个全栈应用——让前端能够向后端发起请求,从而获取想要的数据。
配置 Django 的静态文件服务
首先我们要配置一下 Django 服务器,使前端能够访问其静态文件。调整 api/api/urls.py 文件如下:
# ...from django.conf import settingsfrom django.conf.urls.static import staticurlpatterns = [ path('admin/', admin.site.urls), path('api/', include('core.urls')),] + static(settings.MEDIA_URL, document_root=settings.MEDIA_ROOT)注意
这样配置静态文件路由的方式仅应当在开发环境下使用。在生产环境下(settings.py 中的
DEBUG设为False时),静态文件路由将自动失效(因为 Django 并不适合作为静态文件服务器,应该选用类似 Nginx 之类的服务器,在后续教程中我们将更深入地讨论)。
实现前端的数据请求功能
在客户端,我们先要对 Nuxt 进行全局配置。Nuxt 包括 axios[4] 包,这是一个非常出色的基于 Promise 的 HTTP 请求库。在 nuxt.config.js 中的 axios 一项中添加 Django 服务器的 URL:
export default { // ... /* ** Axios module configuration ** See https://axios.nuxtjs.org/options */ axios: { baseURL: 'http://localhost:8000/api', }, // ...}将食谱列表页面中暂时填充的假数据删去,通过 asyncData 方法获取数据。由于我们之前配置好了 axios,所以 asyncData 函数可以获取到 $axios 对象用于发起 HTTP 请求。我们实现页面加载的数据获取以及 deleteRecipe 事件,代码如下:
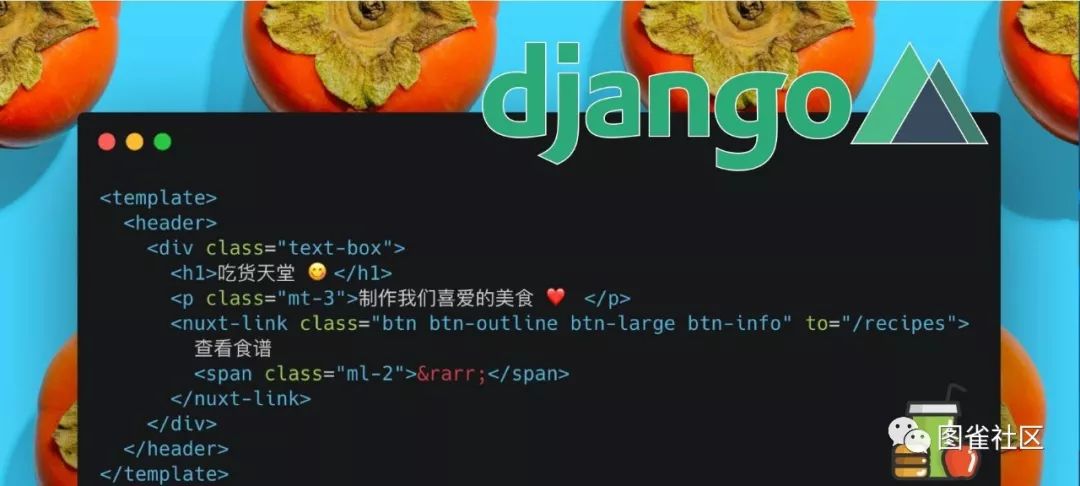
<template> <main class="container mt-5"> <div class="row"> <div class="col-12 text-right mb-4"> <div class="d-flex justify-content-between"> <h3>吃货天堂h3> <nuxt-link to="/recipes/add" class="btn btn-info">添加食谱nuxt-link> div> div> <template v-for="recipe in recipes"> <div :key="recipe.id" class="col-lg-3 col-md-4 col-sm-6 mb-4"> <recipe-card :onDelete="deleteRecipe" :recipe="recipe">recipe-card> div> template> div> main>template><script>import RecipeCard from "~/components/RecipeCard.vue";export default { head() { return { title: "食谱列表" }; }, components: { RecipeCard }, async asyncData({ $axios, params }) { try { let recipes = await $axios.$get(`/recipes/`); return { recipes }; } catch (e) { return { recipes: [] }; } }, data() { return { recipes: [] }; }, methods: { async deleteRecipe(recipe_id) { try { if (confirm('确认要删除吗?')) { await this.$axios.$delete(`/recipes/${recipe_id}/`); let newRecipes = await this.$axios.$get("/recipes/"); this.recipes = newRecipes; } } catch (e) { console.log(e); } } }};script><style scoped>style>实现食谱详情页面
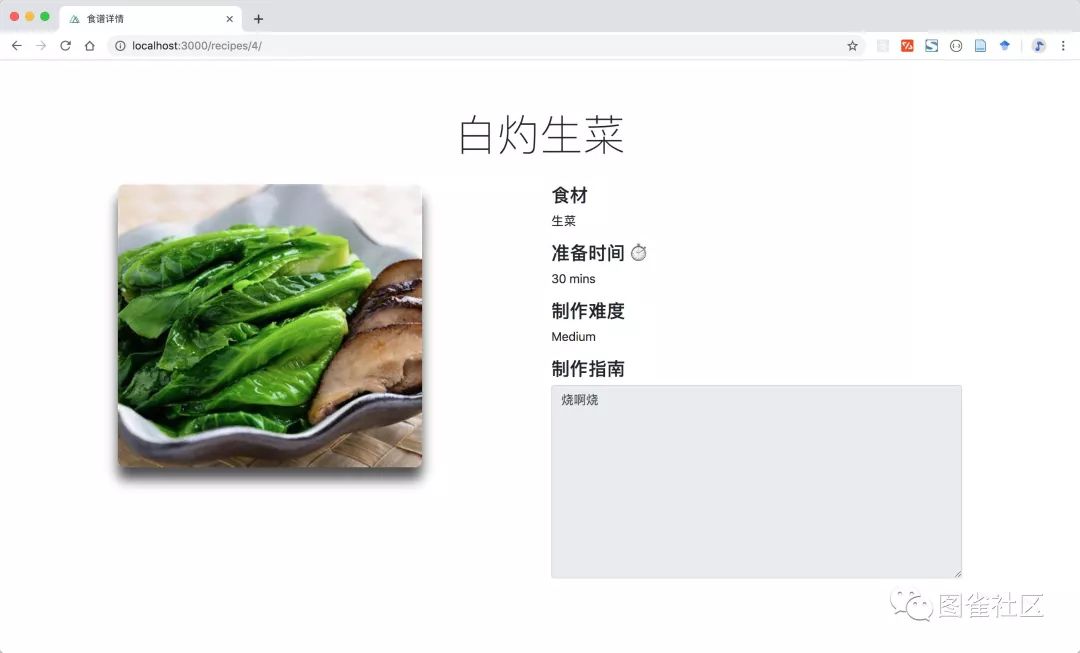
我们进一步实现食谱详情页面。在 pages/recipes 目录中创建 _id 目录,在其中添加 index.vue 文件,代码如下:
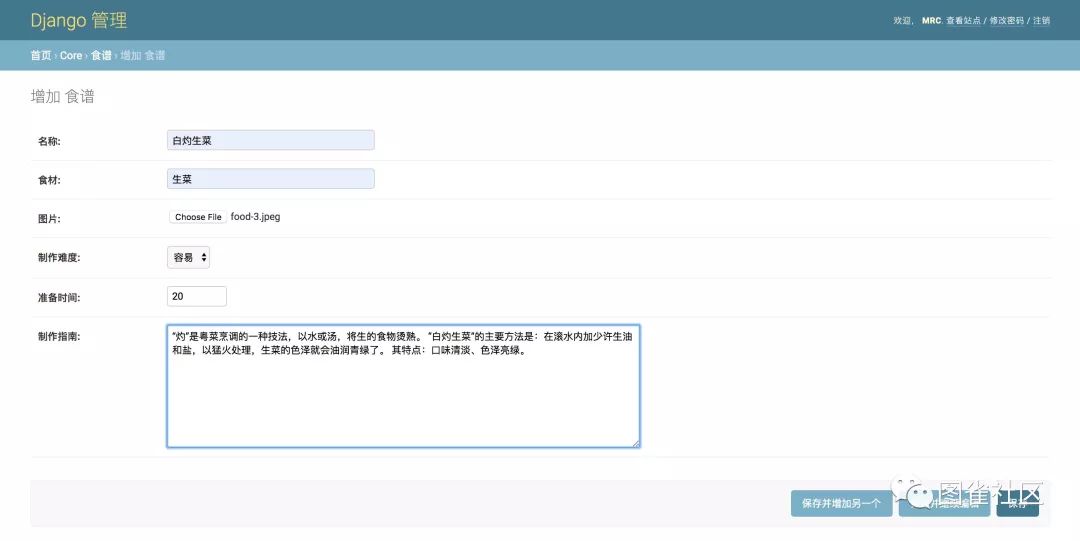
<template> <main class="container my-5"> <div class="row"> <div class="col-12 text-center my-3"> <h2 class="mb-3 display-4 text-uppercase">{{ recipe.name }}h2> div> <div class="col-md-6 mb-4"> <img class="img-fluid" style="width: 400px; border-radius: 10px; box-shadow: 0 1rem 1rem rgba(0,0,0,.7);" :src="recipe.picture" alt > div> <div class="col-md-6"> <div class="recipe-details"> <h4>食材h4> <p>{{ recipe.ingredients }}p> <h4>准备时间 ⏱h4> <p>{{ recipe.prep_time }} minsp> <h4>制作难度h4> <p>{{ recipe.difficulty }}p> <h4>制作指南h4> <textarea class="form-control" rows="10" v-html="recipe.prep_guide" disabled/> div> div> div> main>template><script>export default { head() { return { title: "食谱详情" }; }, async asyncData({ $axios, params }) { try { let recipe = await $axios.$get(`/recipes/${params.id}`); return { recipe }; } catch (e) { return { recipe: [] }; } }, data() { return { recipe: { name: "", picture: "", ingredients: "", difficulty: "", prep_time: null, prep_guide: "" } }; }};script><style scoped>style>为了测试前端页面能否真正从后端获取数据,我们先要在后端数据库中添加一些数据,而这对 Django 来说就非常方便了。进入 api 目录,运行 python manage.py runserver 打开服务器,然后进入后台管理页面(http://localhost:8000/admin[5]),添加一些数据:
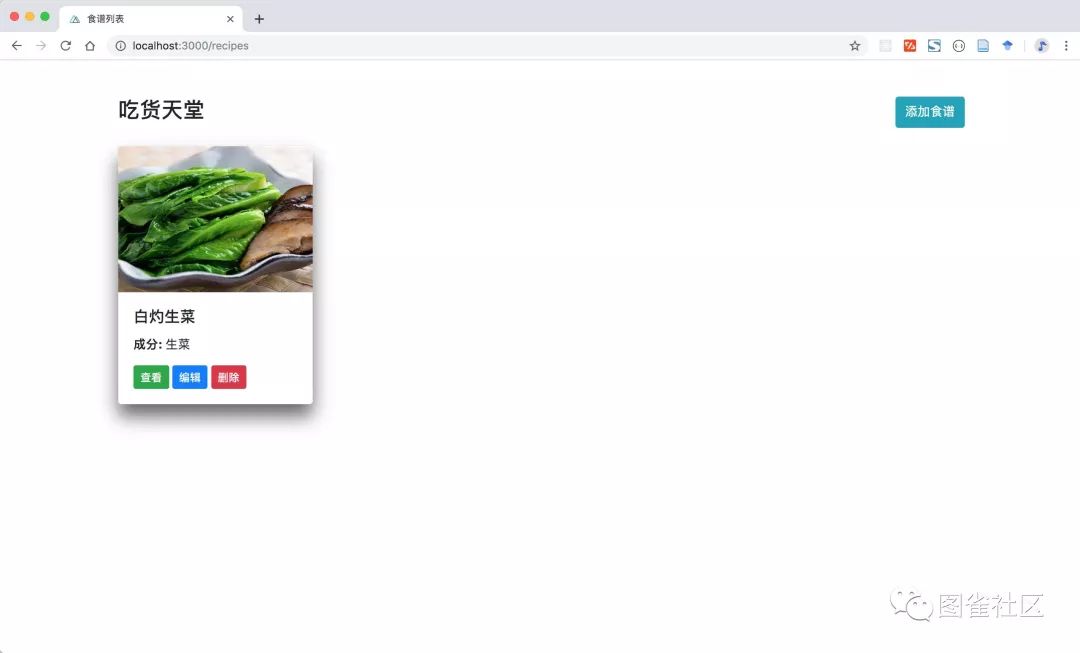
再运行前端页面,可以看到我们刚刚在 Django 后台管理中添加的项目:
实现食谱的编辑和创建页面
有了前面的铺垫,实现食谱的添加和删除也基本上是按部就班了。我们在 pages/recipes/_id 中实现 edit.vue(食谱编辑页面),代码如下:
<template> <main class="container my-5"> <div class="row"> <div class="col-12 text-center my-3"> <h2 class="mb-3 display-4 text-uppercase">{{ recipe.name }}h2> div> <div class="col-md-6 mb-4"> <img v-if="!preview" class="img-fluid" style="width: 400px; border-radius: 10px; box-shadow: 0 1rem 1rem rgba(0,0,0,.7);" :src="recipe.picture"> <img v-else class="img-fluid" style="width: 400px; border-radius: 10px; box-shadow: 0 1rem 1rem rgba(0,0,0,.7);" :src="preview"> div> <div class="col-md-4"> <form @submit.prevent="submitRecipe"> <div class="form-group"> <label for>Recipe Namelabel> <input type="text" class="form-control" v-model="recipe.name" > div> <div class="form-group"> <label for>Ingredientslabel> <input type="text" v-model="recipe.ingredients" class="form-control" name="Ingredients" > div> <div class="form-group"> <label for>Food picturelabel> <input type="file" @change="onFileChange"> div> <div class="row"> <div class="col-md-6"> <div class="form-group"> <label for>Difficultylabel> <select v-model="recipe.difficulty" class="form-control" > <option value="Easy">Easyoption> <option value="Medium">Mediumoption> <option value="Hard">Hardoption> select> div> div> <div class="col-md-6"> <div class="form-group"> <label for> Prep time <small>(minutes)small> label> <input type="text" v-model="recipe.prep_time" class="form-control" name="Ingredients" > div> div> div> <div class="form-group mb-3"> <label for>Preparation guidelabel> <textarea v-model="recipe.prep_guide" class="form-control" rows="8">textarea> div> <button type="submit" class="btn btn-success">Savebutton> form> div> div> main>template><script>export default { head(){ return { title: "编辑食谱" } }, async asyncData({ $axios, params }) { try { let recipe = await $axios.$get(`/recipes/${params.id}`); return { recipe }; } catch (e) { return { recipe: [] }; } }, data() { return { recipe: { name: "", picture: "", ingredients: "", difficulty: "", prep_time: null, prep_guide: "" }, preview: "" }; }, methods: { onFileChange(e) { let files = e.target.files || e.dataTransfer.files; if (!files.length) { return; } this.recipe.picture = files[0] this.createImage(files[0]); }, createImage(file) { let reader = new FileReader(); let vm = this; reader.onload = e => { vm.preview = e.target.result; }; reader.readAsDataURL(file); }, async submitRecipe() { let editedRecipe = this.recipe if (editedRecipe.picture.indexOf("http://") != -1){ delete editedRecipe["picture"] } const config = { headers: { "content-type": "multipart/form-data" } }; let formData = new FormData(); for (let data in editedRecipe) { formData.append(data, editedRecipe[data]); } try { let response = await this.$axios.$patch(`/recipes/${editedRecipe.id}/`, formData, config); this.$router.push("/recipes/"); } catch (e) { console.log(e); } } }};script><style>style>实现之后的页面如下:
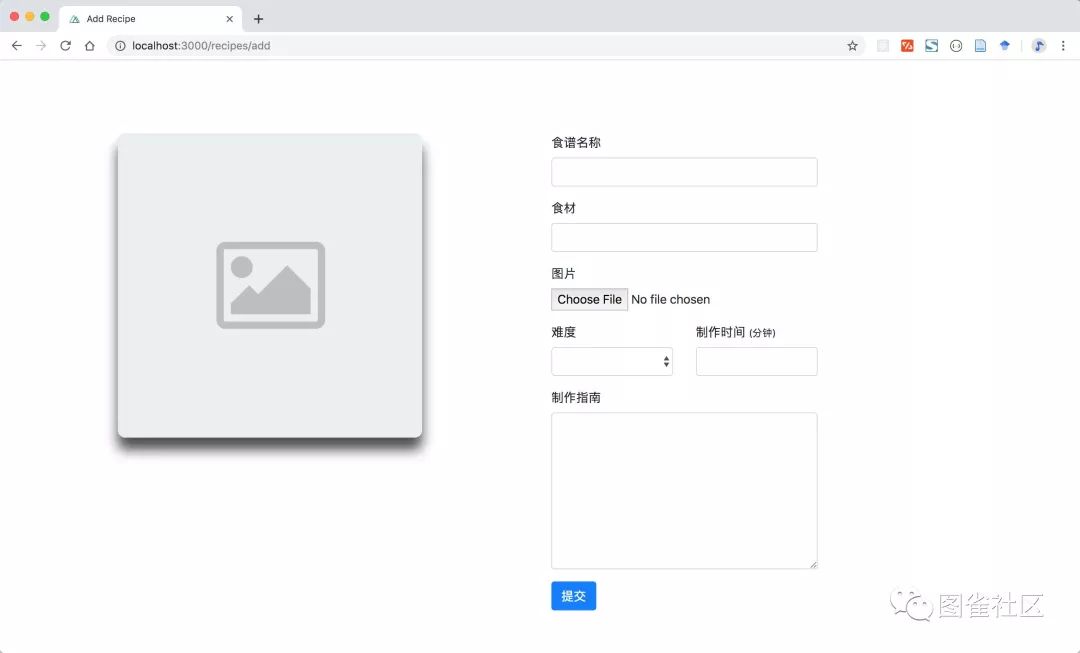
继续在 pages/recipes/_id 中实现 add.vue (创建食谱页面)如下:
<template> <main class="container my-5"> <div class="row"> <div class="col-12 text-center my-3"> <h2 class="mb-3 display-4 text-uppercase">{{ recipe.name }}h2> div> <div class="col-md-6 mb-4"> <img v-if="preview" class="img-fluid" style="width: 400px; border-radius: 10px; box-shadow: 0 1rem 1rem rgba(0,0,0,.7);" :src="preview" alt > <img v-else class="img-fluid" style="width: 400px; border-radius: 10px; box-shadow: 0 1rem 1rem rgba(0,0,0,.7);" src="@/static/images/placeholder.png" > div> <div class="col-md-4"> <form @submit.prevent="submitRecipe"> <div class="form-group"> <label for>食谱名称label> <input type="text" class="form-control" v-model="recipe.name"> div> <div class="form-group"> <label for>食材label> <input v-model="recipe.ingredients" type="text" class="form-control"> div> <div class="form-group"> <label for>图片label> <input type="file" name="file" @change="onFileChange"> div> <div class="row"> <div class="col-md-6"> <div class="form-group"> <label for>难度label> <select v-model="recipe.difficulty" class="form-control"> <option value="Easy">容易option> <option value="Medium">中等option> <option value="Hard">困难option> select> div> div> <div class="col-md-6"> <div class="form-group"> <label for> 制作时间 <small>(分钟)small> label> <input v-model="recipe.prep_time" type="number" class="form-control"> div> div> div> <div class="form-group mb-3"> <label for>制作指南label> <textarea v-model="recipe.prep_guide" class="form-control" rows="8">textarea> div> <button type="submit" class="btn btn-primary">提交button> form> div> div> main>template><script>export default { head() { return { title: "Add Recipe" }; }, data() { return { recipe: { name: "", picture: "", ingredients: "", difficulty: "", prep_time: null, prep_guide: "" }, preview: "" }; }, methods: { onFileChange(e) { let files = e.target.files || e.dataTransfer.files; if (!files.length) { return; } this.recipe.picture = files[0]; this.createImage(files[0]); }, createImage(file) { let reader = new FileReader(); let vm = this; reader.onload = e => { vm.preview = e.target.result; }; reader.readAsDataURL(file); }, async submitRecipe() { const config = { headers: { "content-type": "multipart/form-data" } }; let formData = new FormData(); for (let data in this.recipe) { formData.append(data, this.recipe[data]); } try { let response = await this.$axios.$post("/recipes/", formData, config); this.$router.push("/recipes/"); } catch (e) { console.log(e); } } }};script><style scoped>style>实现的页面如下:
一点强迫症:全局页面跳转效果
在这一节中,我们将演示如何在 Nuxt 中添加全局样式文件,来实现前端页面之间的跳转效果。
首先在 assets 目录中创建 css 目录,并在其中添加 transition.css 文件,代码如下:
.page-enter-active,.page-leave-active { transition: opacity .3s ease;}.page-enter,.page-leave-to { opacity: 0;}在 Nuxt 配置文件中将刚才写的 transition.css 中添加到全局 CSS 中:
export default { // ... /* ** Global CSS */ css: [ '~/assets/css/transition.css', ], // ...}欧耶,一个具有完整增删改查功能、实现了前后端分离的美食分享网站就完成了!
想要学习更多精彩的实战技术教程?来图雀社区[6]逛逛吧。
本文所涉及的源代码都放在了 Github[7] 上,如果您觉得我们写得还不错,希望您能给❤️这篇文章点个在看+Github仓库加星❤️哦~ 本文代码改编自 Scotch[8]。
参考资料
[1]上篇: https://juejin.im/post/5e435dfc6fb9a07cc3213686
[2]Github: https://github.com/tuture-dev/recipes_app
[3]Scotch: https://scotch.io/tutorials/building-a-universal-application-with-nuxtjs-and-django
[4]axios: https://github.com/axios/axios
[5]http://localhost:8000/admin: http://localhost:8000/admin
[6]图雀社区: https://tuture.co/
[7]Github: https://github.com/tuture-dev/recipes_app
[8]Scotch: https://scotch.io/tutorials/building-a-universal-application-with-nuxtjs-and-django
● 一杯茶的时间,上手Django框架开发
● 全栈“食”代:用Django+Nuxt实现美食分享网站(一)
● 用Vue+ElementUI搭建后台管理极简模板
·END·
图雀社区汇聚精彩的免费实战教程

喜欢本文,点个“在看”告诉我


 2988
2988


 被折叠的 条评论
为什么被折叠?
被折叠的 条评论
为什么被折叠?
 到【灌水乐园】发言


