


刚开始学,有点简陋哈。
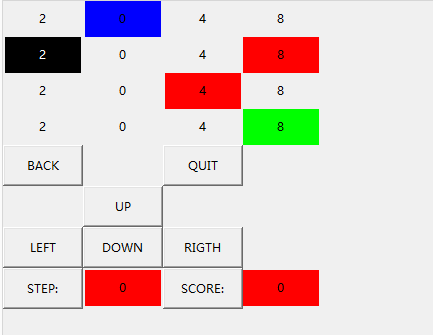
简单说下,这里边所有数字的地方,用的是lebal,一共是18个lebal。
所有文字的地方,用的是button因为要根据操作触发相应的事件。
布局使用的是grid。
下面贴代码:
from Tkinter import *
root = Tk()
win = Frame(root, height=600, width=600)
win.grid_propagate(False)
win.grid()
helloLabel = Label(win, text='2', height=2, width=10)
helloLabel.grid(row=0, column=0)
helloLabe2 = Label(win, text='0', height=2, width=10,bg='blue')
helloLabe2.grid(row=0, column=1)
helloLabe3 = Label(win, text='4', height=2, width=10)
helloLabe3.grid(row=0, column=2)
helloLabe4 = Label(win, text='8', height=2, width=10)
helloLabe4.grid(row=0, column=3)
helloLabe5 = Label(win, text='2', height=2, width=10,bg='black',fg='white')
helloLabe5.grid(row=1, column=0)
helloLabe6 = Label(win, text='0', height=2, width=10)
helloLabe6.grid(row=1, column=1)
helloLabe7 = Label(win, text='4', height=2, width=10)
helloLabe7.grid(row=1, column=2)
helloLabe8 = Label(win, text='8', height=2, width=10,bg='red')
helloLabe8.grid(row=1, column=3)
helloLabe9 = Label(win, text='2', height=2, width=10)
helloLabe9.grid(row=2, column=0)
helloLabe10 = Label(win, text='0', height=2, width=10)
helloLabe10.grid(row=2, column=1)
helloLabe11 = Label(win, text='4', height=2, width=10,bg='red')
helloLabe11.grid(row=2, column=2)
helloLabe12 = Label(win, text='8', height=2, width=10)
helloLabe12.grid(row=2, column=3)
helloLabe13 = Label(win, text='2', height=2, width=10)
helloLabe13.grid(row=3, column=0)
helloLabe14 = Label(win, text='0', height=2, width=10)
helloLabe14.grid(row=3, column=1)
helloLabe15 = Label(win, text='4', height=2, width=10)
helloLabe15.grid(row=3, column=2)
helloLabe16 = Label(win, text='8', height=2, width=10,bg='green')
helloLabe16.grid(row=3, column=3)
helloLabe17 = Label(win, text='0', height=2, width=10,bg='red')
helloLabe17.grid(row=7, column=1)
helloLabe18 = Label(win, text='0', height=2, width=10,bg='red')
helloLabe18.grid(row=7, column=3)
button_1 = Button(win, text='BACK', height=2, width=10)
button_1.grid(row=4, column=0)
button_2 = Button(win, text='QUIT', height=2, width=10)
button_2.grid(row=4, column=2)
button_3 = Button(win, text='UP', height=2, width=10)
button_3.grid(row=5, column=1)
button_4 = Button(win, text='LEFT', height=2, width=10)
button_4.grid(row=6, column=0)
button_5 = Button(win, text='DOWN', height=2, width=10)
button_5.grid(row=6, column=1)
button_6 = Button(win, text='RIGTH', height=2, width=10)
button_6.grid(row=6, column=2)
button_6 = Button(win, text='STEP:', height=2, width=10)
button_6.grid(row=7, column=0)
button_6 = Button(win, text='SCORE:', height=2, width=10)
button_6.grid(row=7, column=2)
root.mainloop()
界面比较简陋,代码也写的很罗嗦,等有时间再往里边添加交互和算法。


 1492
1492

 被折叠的 条评论
为什么被折叠?
被折叠的 条评论
为什么被折叠?
 到【灌水乐园】发言


