大家好,我是“廖某某前端日志”,今天为大家讲讲前端的进阶技能。
小Tips:一般在做日常web前端开发的时候,会划分开发环境和生产环境。开发环境的时候为了方便调试,所以代码不会做压缩处理,而生产环境是用于部署到实际环境中,所以代码会做一定的处理。
上一篇我们学习了利用gulp的一些插件实现了将src的资源文件打包到dist开发环境中,那么这一篇我们将学习如何让我们的框架更加智能和多样。
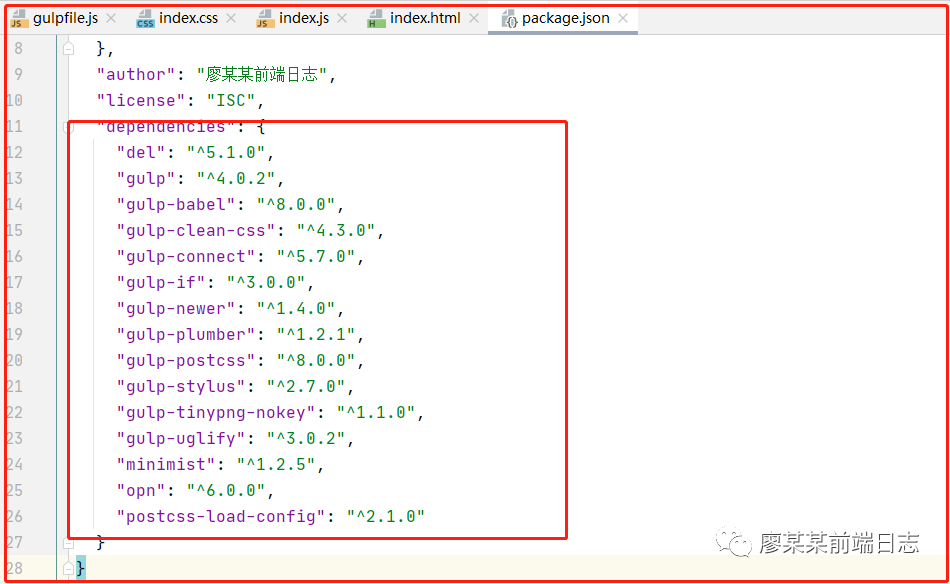
首先,我们将安装下面一系列的插件:
gulp-postcss //模块打包postcss-load-config //加载 .postcssrc.jsgulp-connect //websock更新文件刷新浏览器gulp-plumber //避免出错task终止minimist // 用于命令行传参数gulp-if // 条件控制输出gulp-newer //增量更新gulp-babel // ES6以上语法转ES5gulp-tinypng-nokey //免key图片压缩opn //打开浏览器del //删除文件夹
依旧通过cnpm来安装,在控制台中执行下面的命令:
cnpm install gulp-postcss postcss-load-config gulp-connect gulp-plumber minimist gulp-if gulp-newer gulp-babel gulp-tinypng-nokey opn del --save
安装成功后,可以在package.json文件中看到包名和版本号。
然后在gulpfile.js文件中导入安装的模块,接下来要实现的功能
1.将项目运行起来,并在浏览器中打开
2.在修改代码保存后自动打包到dist文件夹中,浏览器同步刷新
3.将项目输出到生产环境build目录下
4.图片压缩输出和ES6以上代码转ES5
那么我们先从第一步开始,利用nodeJS将项目运行起来。在根目录下创建个utils.js文件。
const os = require('os');const net = require('net');const host = showObj(os.networkInterfaces());const getPort = async function () { const a = await getPortPromise(); console.log(a) return a}function getPortPromise() { return new Promise((resolve) => { portIsOccupied(1234); function portIsOccupied(port) { // 创建服务并监听该端口 var server = net.createServer().listen(port, host); server.on('listening', function () { // 执行这块代码说明端口未被占用 server.close() // 关闭服务 resolve(port) }) server.on('error', function (err) { if (err.code === 'EADDRINUSE') { // 端口已经被使用 port += 1; portIsOccupied(port); } }) } })}// 获取本地IP地址function showObj(obj) { for (var devName in obj) { var iface = obj[devName]; for (var i = 0; i < iface.length; i++) { var alias = iface[i]; if (alias.family === 'IPv4' && alias.address !== '127.0.0.1' && !alias.internal) { return alias.address; } } }}module.exports = { host, getPort}
上面代码中os和net模块是nodeJS自带的,所以可以直接导入就可以使用了。
然后在框架根目录下再来创建一个config.js文件。
const { host } = require('./utils');const Config = { connect: { root: 'dist', //运行目录 livereload: true, port: 1234, //端口号 host }};module.exports = Config;
创建好这两个文件并添加好代码后,在gulpfile.js文件中导入这两个文件并指定要用到的模块,然后写入:
const Config = require('./config');const { getPort } = require('./utils');// 命令行传参数const knownOptions = { string: 'env', default: { env: process.env.NODE_ENV || 'production' }};const options = minimist(process.argv.slice(2), knownOptions);// 检查端口冲突const checkPort = async () => { Config.connect.port = await getPort();};// 开启文件服务器const openServer = async () => await connect.server(Config.connect);// 自动打开浏览器const openBrowser = async () => { const { host, port } = Config.connect; const url = `http://${host}:${port}/view`; opn(url);};
修改gulp运行的语句,首先检查一下运行端口,然后再同时执行打包代码和开启服务,之后再打开浏览器。
const prodbuild = gulp.series( checkPort, gulp.parallel(openServer, htmls, styles, images, scripts), //并行运行 openBrowser);
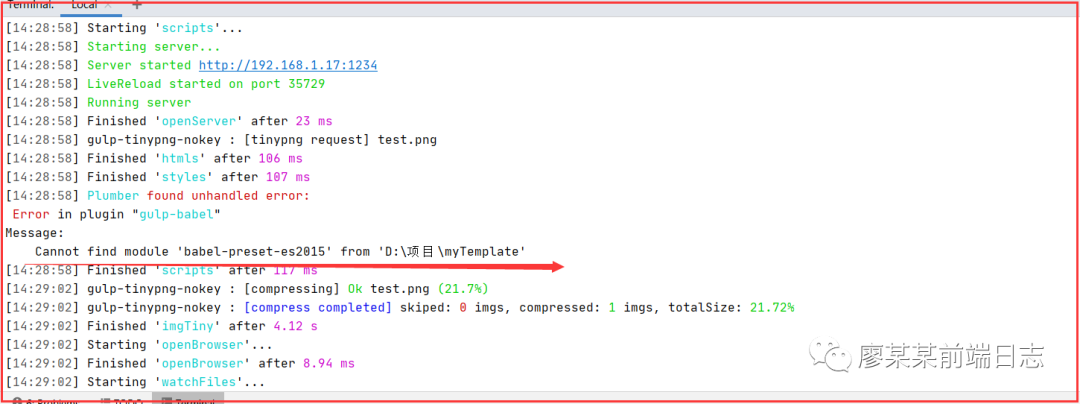
然后我们执行下gulp命令,看看能不能成功运行。
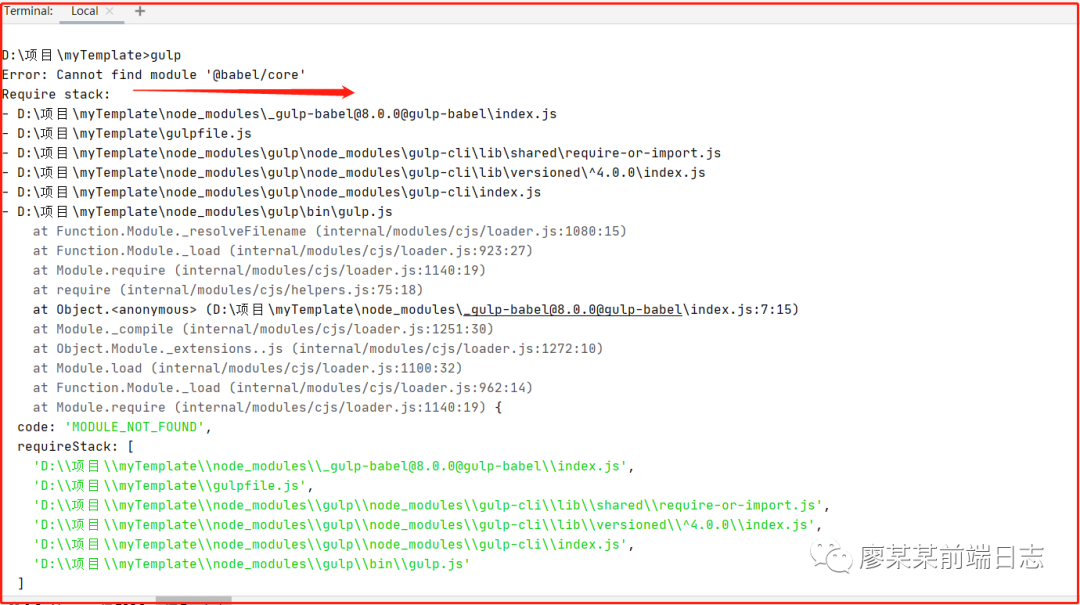
运行之后报了个 :
Error: Cannot find module '@babel/core
这个错误说的是没有找
到“babel/core”这个东西,原来我们在前面安装的gulp-babel需要和这个插件配套使用,那么我们来安装它一下。
cnpm install @babel/core --save
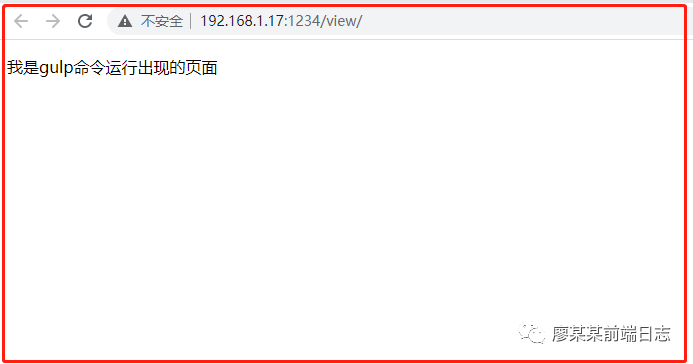
安装成功之后,我们再来运行一下gulp命令。
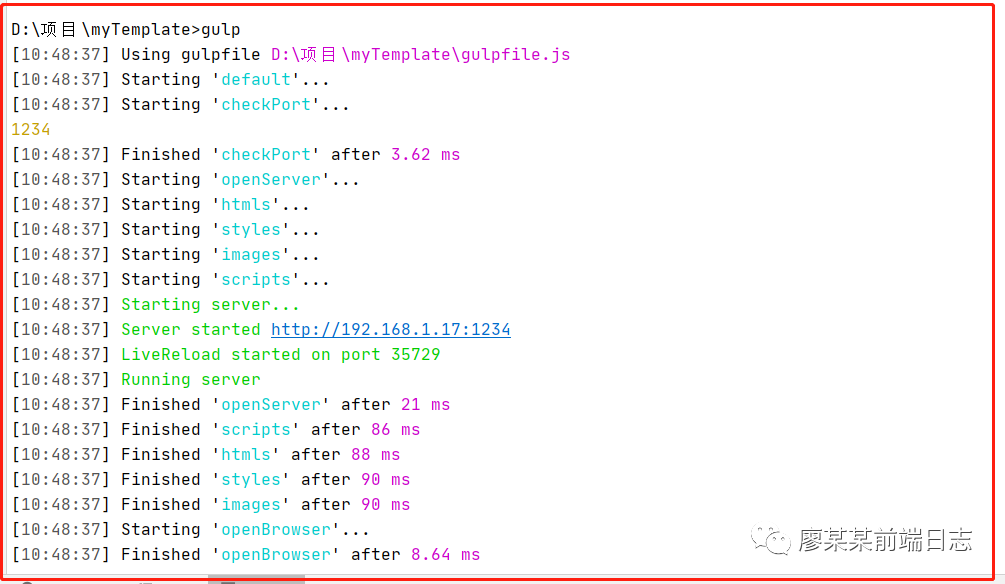
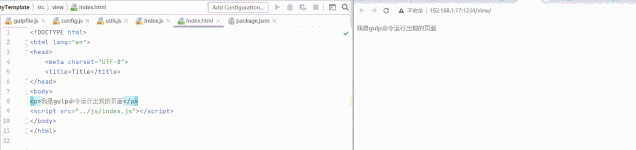
从上面可以看到,已经是服务是已经运行成功了,再看一下浏览器,成功打开了服务域下的view文件夹饼运行了index.html文件(
如果html文件名是index,会直接默认打开这个文件的
)
是不是有点小激动,别急,好戏还在后头。我们接着讲第二步,如何在修改代码保存后,自动打包到dist文件夹中,并实现浏览器同步刷新。
// HTML文件const htmls = () => { return gulp .src('src/view/**/*.html') .pipe(changed('src/view/**/*.html')) .pipe(plumber()) .pipe(gulp.dest('dist/view/')) .pipe(connect.reload());};// CSS文件const styles = () => { return gulp .src('src/css/**/*.styl') .pipe(changed('src/css/**/*.styl')) .pipe(plumber()) .pipe(stylus()) .pipe(cleanCss()) .pipe(gulp.dest('dist/css/')) .pipe(connect.reload());};// 图片文件const images = () => { return gulp .src('src/images/**/*') .pipe(changed('src/images/**/*')) .pipe(plumber()) .pipe(gulp.dest('dist/images/')) .pipe(connect.reload());};// JS文件const scripts = () => { return gulp .src('src/js/**/*.js') .pipe(changed('src/js/**/*.js')) .pipe(plumber()) .pipe(uglify()) .pipe(gulp.dest('dist/js/')) .pipe(connect.reload());};//检测文件是否有更新const watchFiles = () => { gulp.watch('src/view/**/*.html', htmls); //检测到html文件更新,更新版本号 gulp.watch('src/css/**/*.styl', styles); gulp.watch('src/images/*', images); gulp.watch('src/js/**/*.js', scripts);};
在每个打包方法后面添加上 “connect.reload()”,让浏览器自动刷新。添加监听文件更新方法,当检测到文件被保存之后,同步更新到dist开发环境目录中。将该方法添加到gulp执行语句中。
const prodbuild = gulp.series( checkPort, gulp.parallel(openServer, htmls, styles, images, scripts), openBrowser, watchFiles);
完成上述步骤之后,我们再来运行一下gulp命令,看看有没有效果。
成功运行之后,我们可以看到,当在编译器修改文件之后,可以看到浏览器已经同步刷新了。
这步简单实现之后,我们来看看下一步,第三步我们先不做,我们先把第四步实现先。
我们在gulpfile.js中写两段简单的代码:
// 图片压缩const imgTiny = () => { return gulp .src('src/images/**/*') .pipe(changed('src/images/**/*')) .pipe(tinypng_nokey()) .pipe(gulp.dest('dist/images/')) .pipe(connect.reload());}// JS文件const scripts = () => { return gulp .src('src/js/**/*.js') .pipe(changed('src/js/**/*.js')) .pipe(plumber()) .pipe(babel()) //ES6转换 .pipe(uglify()) .pipe(gulp.dest('dist/js/')) .pipe(connect.reload());};
修改一下gulp执行图片的打包的那个步骤,换回图片压缩。
const prodbuild = gulp.series( checkPort, gulp.parallel(openServer, htmls, styles, imgTiny, scripts), openBrowser, watchFiles);
这样就可以了吗?还不行,还差一个重要的步骤,babel的使用的话,我们需要给它创建一个配置文件。在项目根目录下创建一个“.babelrc”的文件,并写上一些配置。
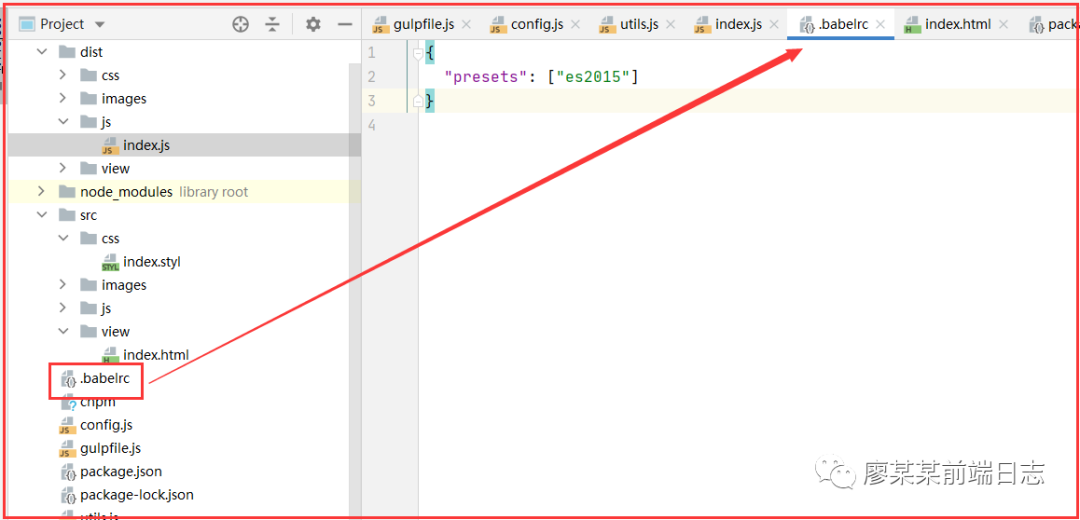
好,现在我们来运行一下!
运行之后发现报了“ Cannot find module 'babel-preset-es2015'”这样一个错,看来这个babel不是那么好搞呀!查到的说需要安装一个“@babel/preset-env”这个东西,好,我们在控制台用cnpm安装一下。
cnpm install @babel/preset-env --save
安装成功之后,我们再改一下.babelrc文件中的配置,把原来的删掉:
{ "presets": [ "@babel/env" ]}
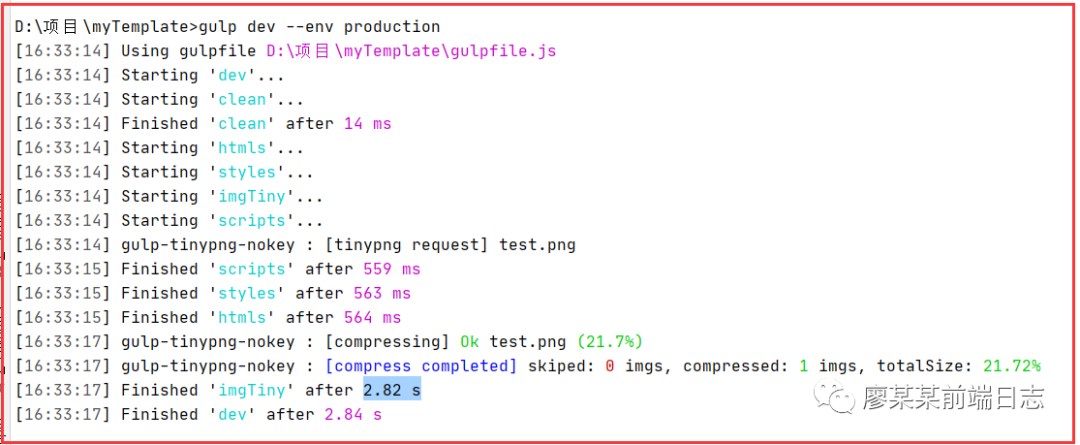
做完之后,我们再来运行一下gulp命令:
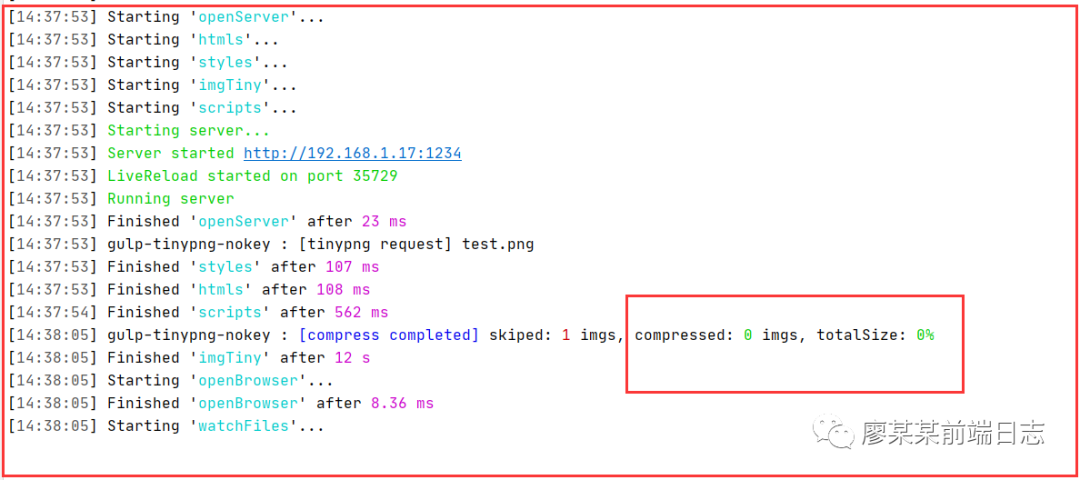
没有报错了,然后中间圈出来的部分是图片压缩模块打印的数据,我们再看一下开发写的代码和打包之后的代码。
那这一步就算是完美实现了呀!嘻嘻!
第三步是将项目输出到生产环境build目录下。这步看起来不是很好理解,我们可以回到这篇的头部第一短话,就明白了。
这个时候我们就需要用到gulp-if这个插件了,如何使用,跟平常一样写if和else就好了。
const gulp = require('gulp');const stylus = require('gulp-stylus');const uglify = require('gulp-uglify');const cleanCss = require('gulp-clean-css');const postcss = require('gulp-postcss');const postcssrc = require('postcss-load-config');const connect = require('gulp-connect');const plumber = require('gulp-plumber'); // 避免出错task终止const minimist = require('minimist'); // 用于命令行传参数const gulpif = require('gulp-if'); // 用于命令行传参const cleanCSS = require('gulp-clean-css'); // 缩小css文件const changed = require('gulp-newer'); // 增量更新const babel = require('gulp-babel');const tinypng_nokey = require('gulp-tinypng-nokey'); //压缩图片--免keyconst opn = require('opn'); // 开启浏览器const del = require('del'); // 删除dist文件夹const { getPort } = require('./utils');const Config = require('./config');// 命令行传参数const knownOptions = { string: 'env', default: { env: process.env.NODE_ENV || 'production' }};const options = minimist(process.argv.slice(2), knownOptions);// 检查端口冲突const checkPort = async () => { Config.connect.port = await getPort();};// 开启文件服务器const openServer = async () => await connect.server(Config.connect);// 自动打开浏览器const openBrowser = async () => { const { host, port } = Config.connect; const url = `http://${host}:${port}/view`; opn(url);};// HTML文件const htmls = () => { return gulp .src('src/view/**/*.html') .pipe(changed('src/view/**/*.html')) .pipe(plumber()) .pipe(gulp.dest('dist/view/')) .pipe(connect.reload());};// CSS文件const styles = () => { return gulp .src('src/css/**/*.styl') .pipe(changed('src/css/**/*.styl')) .pipe(plumber()) .pipe(stylus()) .pipe(gulpif(options.env === 'production', cleanCSS())) .pipe(gulp.dest('dist/css/')) .pipe(connect.reload());};// 图片文件const images = () => { return gulp .src('src/images/**/*') .pipe(changed('src/images/**/*')) .pipe(plumber()) .pipe(gulp.dest('dist/images/')) .pipe(connect.reload());};// 图片压缩const imgTiny = () => { return gulp .src('src/images/**/*') .pipe(changed('src/images/**/*')) .pipe(tinypng_nokey()) .pipe(gulp.dest('dist/images/')) .pipe(connect.reload());}// JS文件const scripts = () => { return gulp .src('src/js/**/*.js') .pipe(changed('src/js/**/*.js')) .pipe(plumber()) .pipe(babel()) //ES6转换 .pipe(gulpif(options.env === 'production', uglify())) .pipe(gulp.dest('dist/js/')) .pipe(connect.reload());};//检测文件是否有更新const watchFiles = () => { gulp.watch('src/view/**/*.html', htmls); //检测到html文件更新,更新版本号 gulp.watch('src/css/**/*.styl', styles); gulp.watch('src/images/*', images); gulp.watch('src/js/**/*.js', scripts);};// 删除dist目录const clean = () => { return del(['dist']);};// 开发环境-不压缩JS、css和图片const devbuild = gulp.series( checkPort, gulp.parallel(openServer, htmls, styles, imgTiny, scripts), openBrowser, watchFiles);// 生产环境-不运行服务、不开启浏览器、代码压缩和图片压缩const prodbuild = gulp.series( clean, gulp.parallel(htmls, styles, imgTiny, scripts),);gulp.task('dev',devbuild); //开发环境运行命令gulp.task('build', prodbuild); // 生产环境打包命令const build = options.env === 'production' ? prodbuild : devbuild; //判断是开发环境还是生产环境gulp.task('dev',build);
当我们需要执行运行和打包到时候,在控制台中输入:
gulp dev --env development //开发环境gulp dev --env production //生产环境
其中development是开发环境,production是生产环境.
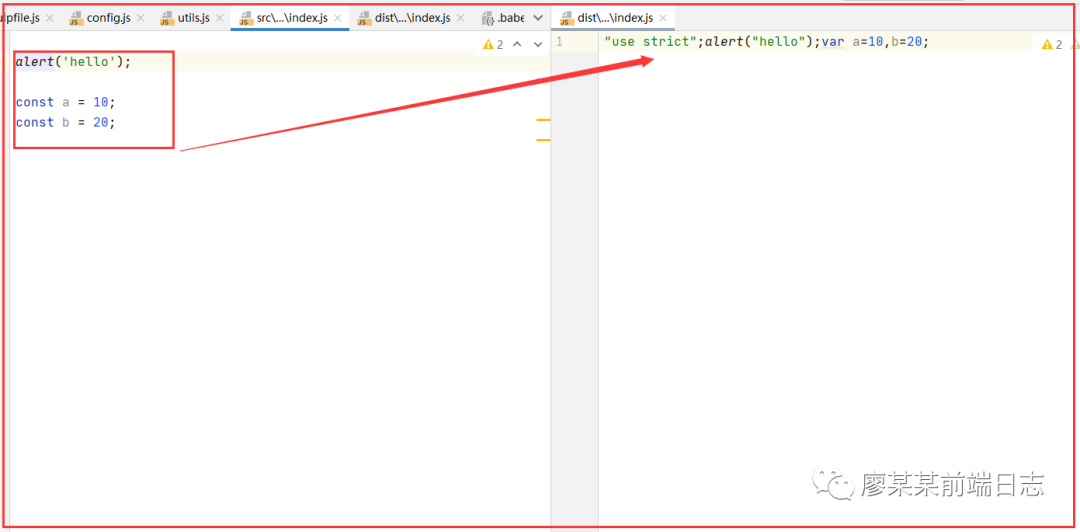
上面执行的是打包生产环境,看一下文件内容,可以看到代码是有被压缩过了的。
执行一下开发环境命令:gulp dev --env build
以上就是这篇的全部内容了,或许有点长,但是花费点时间能学到东西,相信还是
值得的。
格言:人生没有重来,每天都是现场直播!加油!


 304
304

 被折叠的 条评论
为什么被折叠?
被折叠的 条评论
为什么被折叠?
 到【灌水乐园】发言


