


 本文介绍IBM Security Guardium Key Lifecycle Manager容器化应用的安装与升级流程,涵盖Kubernetes平台下的部署步骤,包括安装前准备、Operator安装及验证等关键环节。
The containerized IBM® Security Guardium® Key Lifecycle Manager application provides a simpler installation and upgrade experience.
For the containerized installation, you must install the preinstalled images for the database and the application in the following order:
- Database
- IBM Security Guardium Key Lifecycle Manager application
For more information, see Overview of IBM Security Guardium Key Lifecycle Manager container.
You can install the containers on one of the following platforms:
Kubernetes
You can install the product in a containerized server cluster, managed by Kubernetes. IBM Security Guardium Key Lifecycle Manager works with Kubernetes to simplify application deployment and manage versions in the containers.
For more information, see Installing on a Kubernetes cluster.
You can install the IBM® Security Guardium® Key Lifecycle Manager container on a Kubernetes cluster. You can use the provided Helm charts for the installation.
Before you begin
Prepare the Kubernetes cluster
Set up a Kubernetes cluster. You can use Version 1.17 or later. For more information, see https://kubernetes.io/docs/setup/.
Review the minimum system requirements. For more information, see the Support matrix.
Obtain the Helm charts
- Install Helm Version 3.4.0 on the system from which you will access the Kubernetes cluster. For more information, see https://helm.sh/docs/intro/install/.
- From the IBM Security Guardium Key Lifecycle Manager utilities page, download the file (k8s-helm.zip) that contains the sample Helm charts for installing IBM Security Guardium Key Lifecycle Manager container.
The sample helm charts include helm charts for the database, PostgreSQL, as well.
Note: Only PostgreSQL database is supported with IBM Security Guardium Key Lifecycle Manager container on Kubernetes.
Create storage class for persistent storage
Create storage class for persistent storage of database and the IBM Security Guardium Key Lifecycle Manager application data. For more information, see https://kubernetes.io/docs/concepts/storage/storage-classes/.
Obtain the container installation files (eImages) and license activation file
Obtain the container installation files (eImages) and license activation file for IBM Security Guardium Key Lifecycle Manager container from IBM Passport Advantage. For more information, see Installation images for containerized platforms.
Extract the container installation files to a local repository directory. You need to provide the location of this directory in the values.yaml file in the chart.
You can avoid downloading the container installation files if you plan to pull the container image directly from the Docker Hub repository.
1. Install IBM License Service
Install the IBM License Service. For instructions, see the relevant section in License Service for stand-alone products.
With this link for k8s:
Manual installation on Kubernetes from scratch with kubectl - IBM Documentation
https://github.com/IBM/ibm-licensing-operator/blob/latest/docs/Content/Install_from_scratch.md
Prerequisites
- Administrator permissions for the cluster
kubectl1.19 or higher- Linux or iOS
Before installation, see Preparing for installation to check the supported platforms, required resources, and cluster permissions.
Installation
This procedure guides you through the installation of License Service. It does not cover the installation of License Service Reporter, which is not available without an IBM Cloud Pak on OpenShift Container Platform.
Note: To install License Service on Windows, adjust the commands to fit the Windows standard.
1. Install the Operator Lifecycle Manager (OLM)
a. Make sure that you are connected to your cluster. You can run the following command:
kubectl get node
The response should contain a list of your nodes.
b. Check if you have OLM installed. For example, run the following command.
kubectl get crd clusterserviceversions.operators.coreos.com
-
If you get the following response, OLM is installed.
NAME CREATED AT clusterserviceversions.operators.coreos.com 2020-06-04T14:42:13Z -
If you get the following response, OLM CRD is not installed. Continue with step 1c.
Error from server (NotFound): customresourcedefinitions.apiextensions.k8s.io "clusterserviceversions.operators.coreos.com" not found
c. If OLM is not installed, download it from the OLM GitHub repository. Use following script to download and install OLM v0.16.1
Note: For versions newer than 0.16.1, the process might differ.
olm_version=0.16.1
curl -sL https://github.com/operator-framework/operator-lifecycle-manager/releases/download/${olm_version}/install.sh | bash -s ${olm_version}
Troubleshooting: If you get an error, you might have the old version of Kubernetes. You can try either upgrading your Kubernetes server version or using the older version of OLM.
[root@master ~]# curl -L https://github.com/operator-framework/operator-lifecycle-manager/releases/download/v0.20.0/install.sh -o install.sh
  % Total    % Received % Xferd  Average Speed   Time    Time     Time  Current
                                 Dload  Upload   Total   Spent    Left  Speed
100   649  100   649    0     0    499      0  0:00:01  0:00:01 --:--:--   500
100  1884  100  1884    0     0    664      0  0:00:02  0:00:02 --:--:--  1536
[root@master ~]# ls -ltr
total 24
-rw-------. 1 shensh root 1634 Jul 13  2021 anaconda-ks.cfg
-rw-r--r--  1 root   root 1884 Mar 22 10:22 install.sh


[root@master ~]# chmod +x install.sh
[root@master ~]# ls -ltr
total 24
-rw-------. 1 shensh root 1634 Jul 13  2021 anaconda-ks.cfg
-rwxr-xr-x  1 root   root 1884 Mar 22 10:22 install.sh
[root@master ~]# ./install.sh v0.20.0
customresourcedefinition.apiextensions.k8s.io/catalogsources.operators.coreos.com created
customresourcedefinition.apiextensions.k8s.io/clusterserviceversions.operators.coreos.com created
customresourcedefinition.apiextensions.k8s.io/installplans.operators.coreos.com created
customresourcedefinition.apiextensions.k8s.io/olmconfigs.operators.coreos.com created
customresourcedefinition.apiextensions.k8s.io/operatorconditions.operators.coreos.com created
customresourcedefinition.apiextensions.k8s.io/operatorgroups.operators.coreos.com created
customresourcedefinition.apiextensions.k8s.io/operators.operators.coreos.com created
customresourcedefinition.apiextensions.k8s.io/subscriptions.operators.coreos.com created
customresourcedefinition.apiextensions.k8s.io/catalogsources.operators.coreos.com condition met
customresourcedefinition.apiextensions.k8s.io/clusterserviceversions.operators.coreos.com condition met
customresourcedefinition.apiextensions.k8s.io/installplans.operators.coreos.com condition met
customresourcedefinition.apiextensions.k8s.io/olmconfigs.operators.coreos.com condition met
customresourcedefinition.apiextensions.k8s.io/operatorconditions.operators.coreos.com condition met
customresourcedefinition.apiextensions.k8s.io/operatorgroups.operators.coreos.com condition met
customresourcedefinition.apiextensions.k8s.io/operators.operators.coreos.com condition met
customresourcedefinition.apiextensions.k8s.io/subscriptions.operators.coreos.com condition met
namespace/olm created
namespace/operators created
serviceaccount/olm-operator-serviceaccount created
clusterrole.rbac.authorization.k8s.io/system:controller:operator-lifecycle-manager created
clusterrolebinding.rbac.authorization.k8s.io/olm-operator-binding-olm created
olmconfig.operators.coreos.com/cluster created
deployment.apps/olm-operator created
deployment.apps/catalog-operator created
clusterrole.rbac.authorization.k8s.io/aggregate-olm-edit created
clusterrole.rbac.authorization.k8s.io/aggregate-olm-view created
operatorgroup.operators.coreos.com/global-operators created
operatorgroup.operators.coreos.com/olm-operators created
clusterserviceversion.operators.coreos.com/packageserver created
catalogsource.operators.coreos.com/operatorhubio-catalog created
Waiting for deployment "olm-operator" rollout to finish: 0 of 1 updated replicas are available...
deployment "olm-operator" successfully rolled out
Waiting for deployment "catalog-operator" rollout to finish: 0 of 1 updated replicas are available...
deployment "catalog-operator" successfully rolled out
Package server phase: Installing
Package server phase: Succeeded
deployment "packageserver" successfully rolled out
[root@master ~]#
2. Create the CatalogSource
a. To get GLOBAL_CATALOG_NAMESPACE, check global catalog namespace in a yaml in a packageserver OLM pod that is somewhere in your cluster. You can, for example, use the following command:
olm_namespace=$(kubectl get csv --all-namespaces -l olm.version -o jsonpath="{.items[?(@.metadata.name=='packageserver')].metadata.namespace}")
GLOBAL_CATALOG_NAMESPACE=$(kubectl get deployment --namespace="${olm_namespace}" packageserver -o yaml | grep -A 1 -i global-namespace | tail -1 | cut -d "-" -f 2- | sed -e 's/^[ \t]*//')
# check if the namespace is found
echo ${GLOBAL_CATALOG_NAMESPACE}
If you get an empty response to the echo command, you can get global catalog namespace using the following command.
Note: The following method should only be used for getting global catalog namespace if the previous method failed.
GLOBAL_CATALOG_NAMESPACE=$(kubectl get pod --all-namespaces -l app=olm-operator -o jsonpath="{.items[0].metadata.namespace}")
echo ${GLOBAL_CATALOG_NAMESPACE}
b. Create the CatalogSource by using the following command:
cat <<EOF | kubectl apply -f -
apiVersion: operators.coreos.com/v1alpha1
kind: CatalogSource
metadata:
  name: opencloud-operators
  namespace: $GLOBAL_CATALOG_NAMESPACE
spec:
  displayName: IBMCS Operators
  publisher: IBM
  sourceType: grpc
  image: icr.io/cpopen/ibm-operator-catalog
  updateStrategy:
    registryPoll:
      interval: 45m
EOF
Check the results
- Run the following command to check if the
CatalogSourceis created in the$GLOBAL_CATALOG_NAMESPACEnamespace:
kubectl get catalogsource -n $GLOBAL_CATALOG_NAMESPACE
The following is the sample output:
NAME                           DISPLAY                        TYPE   PUBLISHER   AGE
opencloud-operators            IBMCS Operators                grpc   IBM         20m
[...]
- If everything goes well, you should see similar pod running. Run the following command to check if the pod is running:
kubectl get pod -n $GLOBAL_CATALOG_NAMESPACE
The following is the sample output:
NAME                                            READY   STATUS    RESTARTS   AGE
opencloud-operators-66df4d97ff-4rhjj            1/1     Running   0          80s
[...]
3. Create an OperatorGroup
An OperatorGroup is used to denote which namespaces your Operator should watch. It must exist in the namespace where your operator is deployed, for example, ibm-common-services.
a. Create a namespace for IBM Licensing Operator with the following command.
kubectl create namespace ibm-common-services
b. Check if you have tha operator group in that namespace by running the following command.
kubectl get OperatorGroup -n ibm-common-services
- If you get the following response, the operator group was found, and you can go to step 4. Create a Subscription.
NAME            AGE
operatorgroup   39d
- If you get the following response, the operator group was not found, and you need to create it.
No resources found.
c. Create the operator group. Use the following command to deploy the OperatorGroup resource.
cat <<EOF | kubectl apply -f -
apiVersion: operators.coreos.com/v1
kind: OperatorGroup
metadata:
  name: operatorgroup
  namespace: ibm-common-services
spec:
  targetNamespaces:
  - ibm-common-services
EOF
4. Create a Subscription A subscription is created for the operator and is responsible for upgrades of IBM Licensing Operator when needed.
a. Make sure that the GLOBAL_CATALOG_NAMESPACE variable has the global catalog namespace value. The global catalog namespace was retrieved in step 2a.
b. Create the Subscription using the following command:
cat <<EOF | kubectl apply -f -
apiVersion: operators.coreos.com/v1alpha1
kind: Subscription
metadata:
  name: ibm-licensing-operator-app
  namespace: ibm-common-services
spec:
  channel: v3
  name: ibm-licensing-operator-app
  source: opencloud-operators
  sourceNamespace: $GLOBAL_CATALOG_NAMESPACE
EOF
5. Verify Operator health
a. To check whether the IBM Licensing Operator is deployed by OLM from the CatalogSource, run the following command.
kubectl get clusterserviceversion -n ibm-common-services
The following is the sample output:
NAME                            DISPLAY                  VERSION   REPLACES                        PHASE
ibm-licensing-operator.v1.13.0   IBM Licensing Operator   1.13.0     ibm-licensing-operator.v1.12.0   Succeeded
Note: The above command assumes that you have created the Subscription in the ibm-common-services namespace. If your Operator deployment (CSV) shows Succeeded in the InstallPhase status, your Operator is deployed successfully. Otherwise, check the ClusterServiceVersion objects status for details.
b. Optional: Check if the operator is deployed. Run the following command:
kubectl get deployment -n ibm-common-services | grep ibm-licensing-operator
Results: You have created the Operator for IBM Licensing Service. The Operator is only responsible for watching over the configuration and managing resources used by IBM Licensing Service.
What's Next: Create an IBM Licensing instance.
Creating an IBM Licensing instance
Important: The minimal setup requires applying this IBMLicensing instance. However, before applying the instance, get familiar with the entire configuration process.
To create the IBM Licensing instance, run the following command:
cat <<EOF | kubectl apply -f -
apiVersion: operator.ibm.com/v1alpha1
kind: IBMLicensing
metadata:
  name: instance
spec:
  apiSecretToken: ibm-licensing-token
  httpsEnable: true
  instanceNamespace: ibm-common-services
  datasource: datacollector
EOF
Results: Installation is complete and License Service is running in your cluster.
Verification
To check whether License Service components are properly installed and running, see Checking License Service components.
Related links
2. Create storage class for persistent storage
一、什么是StorageClass
Kubernetes提供了一套可以自动创建PV的机制,即:Dynamic Provisioning.而这个机制的核心在于:StorageClass这个API对象.

StorageClass对象会定义下面两部分内容:
1,PV的属性.比如,存储类型,Volume的大小等.
2,创建这种PV需要用到的存储插件
有了这两个信息之后,Kubernetes就能够根据用户提交的PVC,找到一个对应的StorageClass,之后Kubernetes就会调用该StorageClass声明的存储插件,进而创建出需要的PV.
但是其实使用起来是一件很简单的事情,你只需要根据自己的需求,编写YAML文件即可,然后使用kubectl create命令执行即可
二、为什么需要StorageClass
在一个大规模的Kubernetes集群里,可能有成千上万个PVC,这就意味着运维人员必须实现创建出这个多个PV,此外,随着项目的需要,会有新的PVC不断被提交,那么运维人员就需要不断的添加新的,满足要求的PV,否则新的Pod就会因为PVC绑定不到PV而导致创建失败.而且通过 PVC 请求到一定的存储空间也很有可能不足以满足应用对于存储设备的各种需求
而且不同的应用程序对于存储性能的要求可能也不尽相同,比如读写速度、并发性能等,为了解决这一问题,Kubernetes 又为我们引入了一个新的资源对象:StorageClass,通过 StorageClass 的定义,管理员可以将存储资源定义为某种类型的资源,比如快速存储、慢速存储等,用户根据 StorageClass 的描述就可以非常直观的知道各种存储资源的具体特性了,这样就可以根据应用的特性去申请合适的存储资源了。
三、StorageClass运行原理及部署流程
要使用 StorageClass,我们就得安装对应的自动配置程序,比如我们这里存储后端使用的是 nfs,那么我们就需要使用到一个 nfs-client 的自动配置程序,我们也叫它 Provisioner,这个程序使用我们已经配置好的 nfs 服务器,来自动创建持久卷,也就是自动帮我们创建 PV。
1.自动创建的 PV 以${namespace}-${pvcName}-${pvName}这样的命名格式创建在 NFS 服务器上的共享数据目录中
2.而当这个 PV 被回收后会以archieved-${namespace}-${pvcName}-${pvName}这样的命名格式存在 NFS 服务器上。
1.原理及部署流程说明
详细的运作流程可以参考下图:
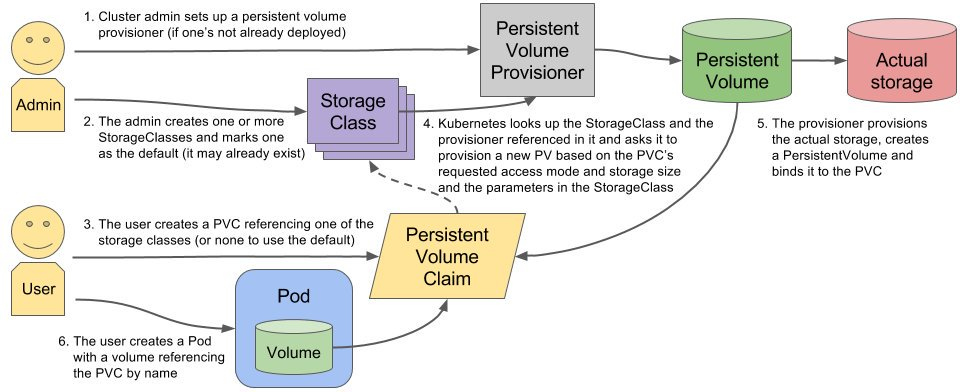
搭建StorageClass+NFS,大致有以下几个步骤:
1.创建一个可用的NFS Serve
2.创建Service Account.这是用来管控NFS provisioner在k8s集群中运行的权限
3.创建StorageClass.负责建立PVC并调用NFS provisioner进行预定的工作,并让PV与PVC建立管理
4.创建NFS provisioner.有两个功能,一个是在NFS共享目录下创建挂载点(volume),另一个则是建了PV并将PV与NFS的挂载点建立关联
四、创建StorageClass
1.创建NFS共享服务
该步骤比较简单不在赘述,大家可以自行百度搭建
当前环境NFS server及共享目录信息
IP: 172.16.155.227
Export PATH: /data/volumes/
2.使用以下文档配置account及相关权限
rbac.yaml: #唯一需要修改的地方只有namespace,根据实际情况定义
apiVersion: v1
kind: ServiceAccount
metadata:
  name: nfs-client-provisioner
  # replace with namespace where provisioner is deployed
  namespace: default        #根据实际环境设定namespace,下面类同
---
kind: ClusterRole
apiVersion: rbac.authorization.k8s.io/v1
metadata:
  name: nfs-client-provisioner-runner
rules:
  - apiGroups: [""]
    resources: ["persistentvolumes"]
    verbs: ["get", "list", "watch", "create", "delete"]
  - apiGroups: [""]
    resources: ["persistentvolumeclaims"]
    verbs: ["get", "list", "watch", "update"]
  - apiGroups: ["storage.k8s.io"]
    resources: ["storageclasses"]
    verbs: ["get", "list", "watch"]
  - apiGroups: [""]
    resources: ["events"]
    verbs: ["create", "update", "patch"]
---
kind: ClusterRoleBinding
apiVersion: rbac.authorization.k8s.io/v1
metadata:
  name: run-nfs-client-provisioner
subjects:
  - kind: ServiceAccount
    name: nfs-client-provisioner
    # replace with namespace where provisioner is deployed
    namespace: default
roleRef:
  kind: ClusterRole
  name: nfs-client-provisioner-runner
  apiGroup: rbac.authorization.k8s.io
---
kind: Role
apiVersion: rbac.authorization.k8s.io/v1
metadata:
  name: leader-locking-nfs-client-provisioner
    # replace with namespace where provisioner is deployed
  namespace: default
rules:
  - apiGroups: [""]
    resources: ["endpoints"]
    verbs: ["get", "list", "watch", "create", "update", "patch"]
---
kind: RoleBinding
apiVersion: rbac.authorization.k8s.io/v1
metadata:
  name: leader-locking-nfs-client-provisioner
subjects:
  - kind: ServiceAccount
    name: nfs-client-provisioner
    # replace with namespace where provisioner is deployed
    namespace: default
roleRef:
  kind: Role
  name: leader-locking-nfs-client-provisioner
  apiGroup: rbac.authorization.k8s.io
3.创建NFS资源的StorageClass
nfs-StorageClass.yaml
apiVersion: storage.k8s.io/v1
kind: StorageClass
metadata:
  name: managed-nfs-storage
provisioner: qgg-nfs-storage #这里的名称要和provisioner配置文件中的环境变量PROVISIONER_NAME保持一致
parameters:
  archiveOnDelete: "false"
4.创建NFS provisioner
nfs-provisioner.yaml
apiVersion: apps/v1
kind: Deployment
metadata:
  name: nfs-client-provisioner
  labels:
    app: nfs-client-provisioner
  # replace with namespace where provisioner is deployed
  namespace: default  #与RBAC文件中的namespace保持一致
spec:
  replicas: 1
  selector:
    matchLabels:
      app: nfs-client-provisioner
  strategy:
    type: Recreate
  selector:
    matchLabels:
      app: nfs-client-provisioner
  template:
    metadata:
      labels:
        app: nfs-client-provisioner
    spec:
      serviceAccountName: nfs-client-provisioner
      containers:
        - name: nfs-client-provisioner
          image: quay.io/external_storage/nfs-client-provisioner:latest
          volumeMounts:
            - name: nfs-client-root
              mountPath: /persistentvolumes
          env:
            - name: PROVISIONER_NAME
              value: qgg-nfs-storage  #provisioner名称,请确保该名称与 nfs-StorageClass.yaml文件中的provisioner名称保持一致
            - name: NFS_SERVER
              value: 172.16.155.227   #NFS Server IP地址
            - name: NFS_PATH
              value: /data/volumes    #NFS挂载卷
      volumes:
        - name: nfs-client-root
          nfs:
            server: 172.16.155.227  #NFS Server IP地址
            path: /data/volumes     #NFS 挂载卷
五、创建测试pod,检查是否部署成功
1.Pod+PVC
创建PVC
test-claim.yaml
kind: PersistentVolumeClaim
apiVersion: v1
metadata:
  name: test-claim
  annotations:
    volume.beta.kubernetes.io/storage-class: "managed-nfs-storage"   #与nfs-StorageClass.yaml metadata.name保持一致
spec:
  accessModes:
    - ReadWriteMany
  resources:
    requests:
      storage: 1Mi
确保PVC状态为Bound
[root@k8s-master-155-221 deploy]# kubectl get pvc
NAME         STATUS   VOLUME                                     CAPACITY   ACCESS MODES   STORAGECLASS          AGE
test-claim   Bound    pvc-aae2b7fa-377b-11ea-87ad-525400512eca   1Mi        RWX            managed-nfs-storage   2m48s
[root@k8s-master-155-221 deploy]# kubectl get pv
NAME                                       CAPACITY   ACCESS MODES   RECLAIM POLICY   STATUS   CLAIM                STORAGECLASS          REASON   AGE
pvc-aae2b7fa-377b-11ea-87ad-525400512eca   1Mi        RWX            Delete           Bound    default/test-claim   managed-nfs-storage            4m13s
创建测试pod,查看是否可以正常挂载
test-pod.yaml
kind: Pod
apiVersion: v1
metadata:
  name: test-pod
spec:
  containers:
  - name: test-pod
    image: busybox:1.24
    command:
      - "/bin/sh"
    args:
      - "-c"
      - "touch /mnt/SUCCESS && exit 0 || exit 1"   #创建一个SUCCESS文件后退出
    volumeMounts:
      - name: nfs-pvc
        mountPath: "/mnt"
  restartPolicy: "Never"
  volumes:
    - name: nfs-pvc
      persistentVolumeClaim:
        claimName: test-claim  #与PVC名称保持一致
检查结果:
[root@nginx-keepalived-155-227 ~]# ll /data/volumes/default-test-claim-pvc-aae2b7fa-377b-11ea-87ad-525400512eca/   #文件规则是按照${namespace}-${pvcName}-${pvName}创建的
总用量 0
-rw-r--r-- 1 root root 0 2020-01-15 17:51 SUCCESS  #下面有一个 SUCCESS 的文件,证明我们上面的验证是成功
2.StateFulDet+volumeClaimTemplates自动创建PV
创建无头服务及statefulset
nginx-statefulset.yaml
---
apiVersion: v1
kind: Service
metadata:
  name: nginx-headless
  labels:
    app: nginx
spec:
  ports:
  - port: 80
    name: web
  clusterIP: None   #注意此处的值,None表示无头服务
  selector:
    app: nginx
---
apiVersion: apps/v1beta1
kind: StatefulSet
metadata:
  name: web
spec:
  serviceName: "nginx"
  replicas: 2  #两个副本
  template:
    metadata:
      labels:
        app: nginx
    spec:
      containers:
      - name: nginx
        image: ikubernetes/myapp:v1
        ports:
        - containerPort: 80
          name: web
        volumeMounts:
        - name: www
          mountPath: /usr/share/nginx/html
  volumeClaimTemplates:
  - metadata:
      name: www
      annotations:
        volume.beta.kubernetes.io/storage-class: "managed-nfs-storage"   #managed-nfs-storage为我们创建的storage-class名称
    spec:
      accessModes: [ "ReadWriteOnce" ]
      resources:
        requests:
          storage: 1Gi
检查结果:
集群节点上
[root@k8s-master-155-221 classStorage]#kubectl delete -f nginx-statefulset.yaml
[root@k8s-master-155-221 classStorage]# kubectl get pods -l app=nginx  #检查pod状态
NAME    READY   STATUS    RESTARTS   AGE
web-0   1/1     Running   0          115m
web-1   1/1     Running   0          114m
[root@k8s-master-155-221 classStorage]# kubectl get pvc #查看PVC
NAME         STATUS   VOLUME                                     CAPACITY   ACCESS MODES   STORAGECLASS          AGE
test-claim   Bound    pvc-aae2b7fa-377b-11ea-87ad-525400512eca   1Mi        RWX            managed-nfs-storage   19h
www-web-0    Bound    pvc-4d7e342a-3810-11ea-87ad-525400512eca   1Gi        RWO            managed-nfs-storage   115m
www-web-1    Bound    pvc-5431c8ba-3810-11ea-87ad-525400512eca   1Gi        RWO            managed-nfs-storage   115m
[root@k8s-master-155-221 classStorage]# kubectl get pv #查看PV
NAME                                       CAPACITY   ACCESS MODES   RECLAIM POLICY   STATUS   CLAIM                STORAGECLASS          REASON   AGE
pvc-4d7e342a-3810-11ea-87ad-525400512eca   1Gi        RWO            Delete           Bound    default/www-web-0    managed-nfs-storage            115m
pvc-5431c8ba-3810-11ea-87ad-525400512eca   1Gi        RWO            Delete           Bound    default/www-web-1    managed-nfs-storage            115m
pvc-aae2b7fa-377b-11ea-87ad-525400512eca   1Mi        RWX            Delete           Bound    default/test-claim   managed-nfs-storage            19h
NFS Server上:
[root@nginx-keepalived-155-227 ~]# cd /data/volumes/
[root@nginx-keepalived-155-227 volumes]# ll  #注意目录的命名格式
总用量 0
drwxrwxrwx 2 root root 21 2020-01-15 17:51 default-test-claim-pvc-aae2b7fa-377b-11ea-87ad-525400512eca
drwxrwxrwx 2 root root  6 2020-01-16 11:28 default-www-web-0-pvc-4d7e342a-3810-11ea-87ad-525400512eca
drwxrwxrwx 2 root root  6 2020-01-16 11:28 default-www-web-1-pvc-5431c8ba-3810-11ea-87ad-525400512eca
[root@nginx-keepalived-155-227 volumes]# echo "web-00" > default-www-web-0-pvc-4d7e342a-3810-11ea-87ad-525400512eca/index.html #分别创建不同的index文件
[root@nginx-keepalived-155-227 volumes]# echo "web-01" > default-www-web-1-pvc-5431c8ba-3810-11ea-87ad-525400512eca/index.html
集群任意节点上:
[root@k8s-master-155-221 classStorage]# kubectl exec -it pod-cm-1 -- /bin/sh  #进入集群中任意pod中,解析nginx-headless 服务/ # nslookup nginx-headless
nslookup: can't resolve '(null)': Name does not resolve

Name:      nginx-headless
Address 1: 172.17.136.7 172-17-136-7.nginx-headless.default.svc.cluster.local  #可以看到有两个地址
Address 2: 172.17.248.5 172-17-248-5.nginx-headless.default.svc.cluster.local
[root@k8s-master-155-221 classStorage]# curl 172.17.248.5 #分别访问一下查看结果
web-00
[root@k8s-master-155-221 classStorage]# curl 172.17.136.7
web-01#对于statefulset我们可以通过添加/删除pod副本的数量,观察PV/PVC的状态及变化.
六、关于StorageClass回收策略对数据的影响
1.第一种配置
   archiveOnDelete: "false"
   reclaimPolicy: Delete   #默认没有配置,默认值为Delete
测试结果:
1.pod删除重建后数据依然存在,旧pod名称及数据依然保留给新pod使用
2.sc删除重建后数据依然存在,旧pod名称及数据依然保留给新pod使用
3.删除PVC后,PV被删除且NFS Server对应数据被删除
2.第二种配置
   archiveOnDelete: "false"
   reclaimPolicy: Retain
测试结果:
1.pod删除重建后数据依然存在,旧pod名称及数据依然保留给新pod使用
2.sc删除重建后数据依然存在,旧pod名称及数据依然保留给新pod使用
3.删除PVC后,PV不会别删除,且状态由Bound变为Released,NFS Server对应数据被保留
4.重建sc后,新建PVC会绑定新的pv,旧数据可以通过拷贝到新的PV中
3.第三种配置
   archiveOnDelete: "ture"
   reclaimPolicy: Retain
结果:
1.pod删除重建后数据依然存在,旧pod名称及数据依然保留给新pod使用
2.sc删除重建后数据依然存在,旧pod名称及数据依然保留给新pod使用
3.删除PVC后,PV不会别删除,且状态由Bound变为Released,NFS Server对应数据被保留
4.重建sc后,新建PVC会绑定新的pv,旧数据可以通过拷贝到新的PV中
4.第四种配置
  archiveOnDelete: "ture"
  reclaimPolicy: Delete
结果:
1.pod删除重建后数据依然存在,旧pod名称及数据依然保留给新pod使用
2.sc删除重建后数据依然存在,旧pod名称及数据依然保留给新pod使用
3.删除PVC后,PV不会别删除,且状态由Bound变为Released,NFS Server对应数据被保留
4.重建sc后,新建PVC会绑定新的pv,旧数据可以通过拷贝到新的PV中
总结:除以第一种配置外,其他三种配置在PV/PVC被删除后数据依然保留
七、常见问题
1.如何设置默认的StorageClass
我们可以用 kubectl patch 命令来更新:
[root@k8s-master-155-221 classStorage]# kubectl get sc  #查看当前sc
NAME                  PROVISIONER       AGE
managed-nfs-storage   qgg-nfs-storage   20h
[root@k8s-master-155-221 classStorage]# kubectl patch storageclass managed-nfs-storage -p '{"metadata": {"annotations":{"storageclass.kubernetes.io/is-default-class":"true"}}}'  #设置managed-nfs-storage为默认后端存储
storageclass.storage.k8s.io/managed-nfs-storage patched
[root@k8s-master-155-221 classStorage]# kubectl get sc  #再次查看,注意是否有default标识
NAME                            PROVISIONER       AGE
managed-nfs-storage (default)   qgg-nfs-storage   20h
[root@k8s-master-155-221 deploy]# kubectl patch storageclass managed-nfs-storage -p '{"metadata": {"annotations":{"storageclass.kubernetes.io/is-default-class":"false"}}}' #取消默认存储后端
storageclass.storage.k8s.io/managed-nfs-storage patched
[root@k8s-master-155-221 deploy]# kubectl get sc
NAME                  PROVISIONER       AGE
managed-nfs-storage   qgg-nfs-storage   20h
YAML文件
apiVersion: storage.k8s.io/v1
kind: StorageClass
metadata:
  name: managed-nfs-storage
  annotations:
    "storageclass.kubernetes.io/is-default-class": "true"   #添加此注释
provisioner: qgg-nfs-storage #or choose another name, must match deployment's env PROVISIONER_NAME'
parameters:
  archiveOnDelete: "false"
2.如何使用默认的StorageClass
如果集群有一个默认的StorageClass能够满足我们的需求,那么剩下所有需要做的就是创建PersistentVolumeClaim(PVC),剩下的都有默认的动态配置搞定,包括无需去指定storageClassName:
apiVersion: v1
kind: PersistentVolumeClaim
metadata:
 name: mypvc
 namespace: testns
spec:
 accessModes:
 - ReadWriteOnce
 resources:
   requests:
     storage: 10Gi
3.修改默回收策略(默认为Delete)
apiVersion: storage.k8s.io/v1
kind: StorageClass
metadata:
  name: managed-nfs-storage
  annotations:
provisioner: qgg-nfs-storage #or choose another name, must match deployment's env PROVISIONER_NAME'
parameters:
  archiveOnDelete: "ture" #暂时不清楚该值对回收策略产生什么影响
reclaimPolicy: Retain   #只有NFS 和hostPth支持两种回收策略
4.能过删除/关闭默认的StorageClass
不能删除默认的StorageClass,因为它是作为集群的add-on安装的,如果它被删除,会被重新安装。
当然,可以停掉默认的StorageClass行为,通过删除annotation:storageclass.beta.kubernetes.io/is-default-class,或者设置为false。
如果没有StorageClass对象标记默认的annotation,那么PersistentVolumeClaim对象(在不指定StorageClass情况下)将不自动触发动态配置。相反,它们将回到绑定可用的*PersistentVolume(PV)*的状态。
5.当删除PersistentVolumeClaim(PVC)会发生什么
如果一个卷是动态配置的卷,则默认的回收策略为“删除”。这意味着,在默认的情况下,当PVC被删除时,基础的PV和对应的存储也会被删除。如果需要保留存储在卷上的数据,则必须在PV被设置之后将回收策略从delete更改为retain。
参考文档:https://github.com/kubernetes-incubator/external-storage/tree/master/nfs-client
3. Verify the installation by running the following
commands:
# kubectl get pods --namespace ibm-common-services
# kubectl get service --namespace ibm-common-services
# kubectl get secret ibm-licensing-token -o jsonpath={.data.token} -n ibm-common-services | base64 -d
-
Note down the host, port, and service token values from the command output to be updated in the Helm charts file.
- Update the following parameters in the sample Helm charts (k8s-helm.zip):
config:
sklmapp_license:
license_service_host
license_service_port
secret:
license_service_token
Procedure
Complete the following steps on the system on which you installed Helm:
- Extract the k8s-helm.zip file.
- In the directory where you extracted the files, navigate to k8s-helm > sklm directory.
If you plan to install the PostgreSQL database separately, delete the database directory.
- Open the values.yaml file and modify the parameter values in the file as per your requirement.
The file has information about the mandatory parameters to be updated and description of all the parameters.
- Navigate to k8s-helm directory and run the following command:
helm install name sklm
-
where, name is the release name, which you can use in the helm delete command. For example, sklm.
- Verify the installation by running the following commands:
helm list kubectl get pods kubectl get pv kubectl get pvc - Sample response:
Launch the IBM Security Guardium Key Lifecycle Manager graphical user interface.helm list NAME NAMESPACE REVISION UPDATED STATUS CHART APP VERSION sklm default 3 2020-11-07 21:32:32.063018197 -0800 PST deployed sklm-0.1.0 4.1 kubectl get pods NAME READY STATUS RESTARTS AGE postgressqldb-7fd84488fc-abcdc 1/1 Running 0 2d18h sklmapp-56768dddc5-al5a2 1/1 Running 0 2d1h kubectl get pv NAME CAPACITY ACCESS MODES RECLAIM POLICY STATUS CLAIM STORAGECLASS REASON AGE pvc-8c45fb02-0f13-4aab-830f-4e82fe1bfba0 25Gi RWX Delete Bound default/postgressqldb-pvc nfs-client 2d18h pvc-c2b9fa6b-dc6e-43f9-9489-939d64a22aa3 15Gi RWX Delete Bound default/sklmapp-pvc nfs-client 2d18h 12:53 NAME STATUS VOLUME CAPACITY ACCESS MODES STORAGECLASS AGE postgressqldb-pvc Bound pvc-8c45fb02-0f13-4aab-830f-4e82fe1bfba0 25Gi RWX nfs-client 2d18h sklmapp-pvc Bound pvc-c2b9fa6b-dc6e-43f9-9489-939d64a22aa3 15Gi RWX nfs-client 2d18hhttps://master_server_IP_address:port/ibm/SKLM/login.jsp-
Where, master_server_IP_address is the IP address of the master server on the Kubernetes cluster, and port is the port number that IBM Security Guardium Key Lifecycle Manager server listens on for requests.
- On the Configuration page that appears, click the License Agreements link to review the license terms, and then select the I accept the terms in the License Agreements check box.
- Click Activate License.
- Upload the IBM Security Guardium Key Lifecycle Manager license activation file and activate the license.
- Click Login.
- Log in to the IBM Security Guardium Key Lifecycle Manager graphical user interface with the Administrator user credentials (sklmadmin).
- Optional: Configure Kubernetes to call the Health Status REST Service.Health checks are a simple way to determine whether a server-side application is working properly. Kubernetes requires two types of health checks: readiness probe and liveness probe. These probes are implemented by performing an HTTPS invocation by using the REST interface.
For more information about configuring liveness and readiness probes, see the Kubernetes documentation.
What to do next
- From the Welcome page, configure the drive types, keys, and certificates that your organization requires, or get started with using the product. See Administering.
- Optional: Enhance secure communication between the client and the IBM Security Guardium Key Lifecycle Manager server by using a CA-signed certificate. See Securing communication with IBM Security Guardium Key Lifecycle Manager container using a CA-signed certificate.
Table 1. Topic revision history Revision date Change description 29 Apr 2021 Updated the Before you begin section. Refreshed only the English language content. 27 Mar 2021 Updated the section about obtaining installation and license activation files. Refreshed only the English language content. 08 Dec 2020 Initial version. -


 1017
1017

 被折叠的 条评论
为什么被折叠?
被折叠的 条评论
为什么被折叠?
 到【灌水乐园】发言


