


以下我们系统通过原理,过程等方便给大家深入的简介了Java NIO的函数机制以及用法等,学习下吧。
前言
本篇主要讲解Java中的IO机制
分为两块:
第一块讲解多线程下的IO机制
第二块讲解如何在IO机制下优化CPU资源的浪费(New IO)
Echo服务器
单线程下的socket机制就不用我介绍了,不懂得可以去查阅下资料
那么多线程下,如果进行套接字的使用呢?
我们使用最简单的echo服务器来帮助大家理解
首先,来看下多线程下服务端和客户端的工作流程图:
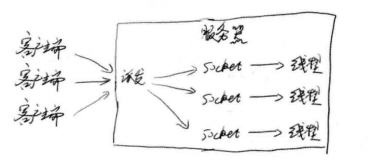
可以看到,多个客户端同时向服务端发送请求
服务端做出的措施是开启多个线程来匹配相对应的客户端
并且每个线程去独自完成他们的客户端请求
原理讲完了我们来看下是如何实现的
在这里我写了一个简单的服务器
用到了线程池的技术来创建线程(具体代码作用我已经加了注释):
public class MyServer {
private static ExecutorService executorService = Executors.newCachedThreadPool(); //创建一个线程池
private static class HandleMsg implements Runnable{ //一旦有新的客户端请求,创建这个线程进行处理
Socket client; //创建一个客户端
public HandleMsg(Socket client){ //构造传参绑定
this.client = client;
}
@Override
public void run() {
BufferedReader bufferedReader = null; //创建字符缓存输入流
PrintWriter printWriter = null; //创建字符写入流
try {
bufferedReader = new BufferedReader(new InputStreamReader(client.getInputStream())); //获取客户端的输入流
printWriter = new PrintWriter(client.getOutputStream(),true); //获取客户端的输出流,true是随时刷新
String inputLine = null;
long a = System.currentTimeMillis();
while ((inputLine = bufferedReader.readLine())!=null){
printWriter.println(inputLine);
}
long b = System.currentTimeMillis();
System.out.println("此线程花费了:"+(b-a)+"秒!");
} catch (IOException e) {
e.printStackTrace();
}finally {
try {
bufferedReader.close();
printWriter.close();
client.close();
} catch (IOException e) {
e.printStackTrace();
}
}
}
}
public static void main(String[] args) throws IOException { //服务端的主线程是用来循环监听客户端请求
ServerSocket server = new ServerSocket(8686); //创建一个服务端且端口为8686
Socket client = null;
while (true){ //循环监听
client = server.accept(); //服务端监听到一个客户端请求
System.out.println(client.getRemoteSocketAddress()+"地址的客户端连接成功!");
executorService.submit(new HandleMsg(client)); //将该客户端请求通过线程池放入HandlMsg线程中进行处理
}
}
}
上述代码中我们使用一个类编写了一个简单的echo服务器
在主线程中用死循环来开启端口监听
简单客户端
有了服务器,我们就可以对其进行访问,并且发送一些字符串数据
服务器的功能是返回这些字符串,并且打印出线程占用时间
下面来写个简单的客户端来响应服务端:
public class MyClient {
public static void main(String[] args) throws IOException {
Socket client = null;
PrintWriter printWriter = null;
BufferedReader bufferedReader = null;
try {
client = new Socket();
client.connect(new InetSocketAddress("localhost",8686));
printWriter = new PrintWriter(client.getOutputStream(),true);
printWriter.println("hello");
printWriter.flush();
bufferedReader = new BufferedReader(new InputStreamReader(client.getInputStream())); //读取服务器返回的信息并进行输出
System.out.println("来自服务器的信息是:"+bufferedReader.readLine());
} catch (IOException e) {
e.printStackTrace();
}finally {
printWriter.close();
bufferedReader.close();
client.close();
}
}
}
代码中,我们用字符流发送了一个hello字符串过去,如果代码没问题
服务器会返回一个hello数据,并且打印出我们设置的日志信息
echo服务器结果展示
我们来运行:
1.打开server,开启循环监听:
2.打开一个客户端:
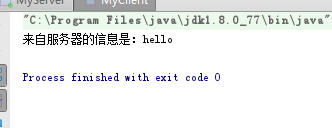
可以看到客户端打印出了返回结果
3.查看服务端日志:
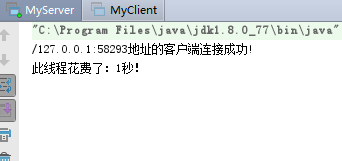
很好,一个简单的多线程套接字编程就实现了
但是试想一下:
如果一个客户端请求中,在IO写入到服务端过程中加入Sleep,
使每个请求占用服务端线程10秒
然后有大量的客户端请求,每个请求都占用那么长时间
那么服务端的并能能力就会大幅度下降
这并不是因为服务端有多少繁重的任务,而仅仅是因为服务线程在等待IO(因为accept,read,write都是阻塞式的)
让高速运行的CPU去等待及其低效的网络IO是非常不合算的行为
这时候该怎么办?
NIO
New IO成功的解决了上述问题,它是怎样解决的呢?
IO处理客户端请求的最小单位是线程
而NIO使用了比线程还小一级的单位:通道(Channel)
可以说,NIO中只需要一个线程就能完成所有接收,读,写等操作
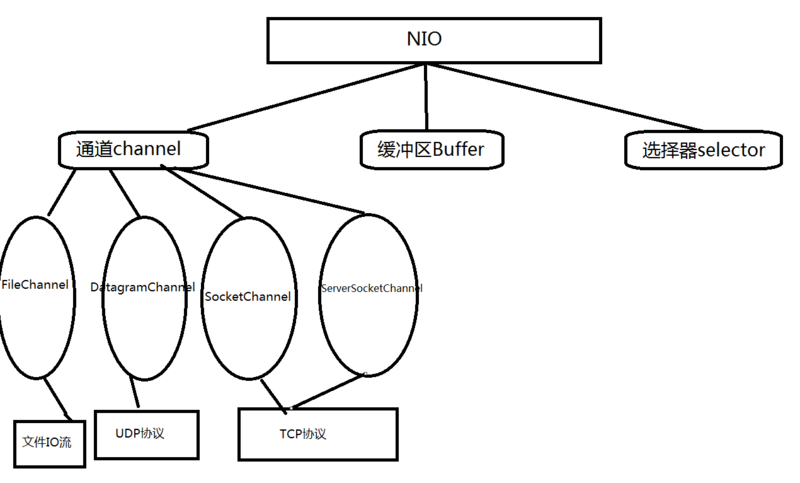
要学习NIO,首先要理解它的三大核心
Selector,选择器
Buffer,缓冲区
Channel,通道
博主不才,画了张丑图给大家加深下印象 ^ . ^
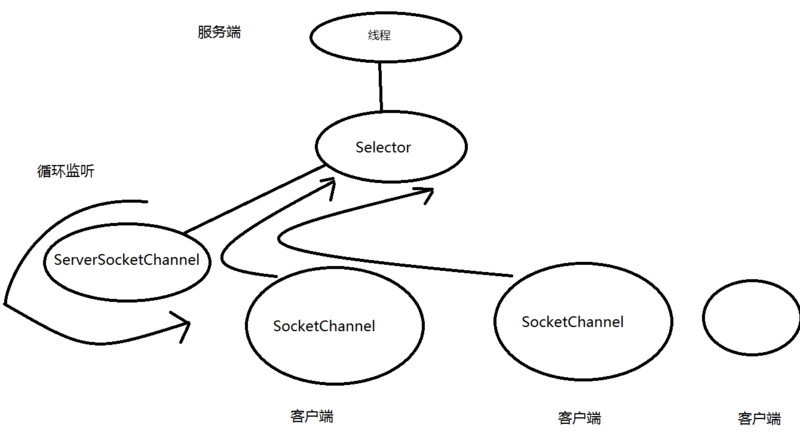
再给一张TCP下的NIO工作流程图(好难画的线条...)
大家大致看懂就行,我们一步步来
Buffer
首先要知道什么是Buffer
在NIO中数据交互不再像IO机制那样使用流
而是使用Buffer(缓冲区)
博主觉得图才是最容易理解的
所以...

可以看出Buffer在整个工作流程中的位置
来点实际点的,上面图中的具体代码如下:
1.首先给Buffer分配空间,以字节为单位
ByteBuffer byteBuffer = ByteBuffer.allocate(1024);
创建一个ByteBuffer对象并且指定内存大小
2.向Buffer中写入数据:
1).数据从Channel到Buffer:channel.read(byteBuffer);
2).数据从Client到Buffer:byteBuffer.put(...);
3.从Buffer中读取数据:
1).数据从Buffer到Channel:channel.write(byteBuffer);
2).数据从Buffer到Server:byteBuffer.get(...);
Selector
选择器是NIO的核心,它是channel的管理者
通过执行select()阻塞方法,监听是否有channel准备好
一旦有数据可读,此方法的返回值是SelectionKey的数量
所以服务端通常会死循环执行select()方法,直到有channl准备就绪,然后开始工作
每个channel都会和Selector绑定一个事件,然后生成一个SelectionKey的对象
需要注意的是:
channel和Selector绑定时,channel必须是非阻塞模式
而FileChannel不能切换到非阻塞模式,因为它不是套接字通道,所以FileChannel不能和Selector绑定事件
在NIO中一共有四种事件:
1.SelectionKey.OP_CONNECT:连接事件
2.SelectionKey.OP_ACCEPT:接收事件
3.SelectionKey.OP_READ:读事件
4.SelectionKey.OP_WRITE:写事件
Channel
共有四种通道:
FileChannel:作用于IO文件流
DatagramChannel:作用于UDP协议
SocketChannel:作用于TCP协议
ServerSocketChannel:作用于TCP协议
本篇文章通过常用的TCP协议来讲解NIO
我们以ServerSocketChannel为例:
打开一个ServerSocketChannel通道
ServerSocketChannel serverSocketChannel = ServerSocketChannel.open();
关闭ServerSocketChannel通道:
serverSocketChannel.close();
循环监听SocketChannel:
while(true){
SocketChannel socketChannel = serverSocketChannel.accept();
clientChannel.configureBlocking(false);
}
clientChannel.configureBlocking(false);语句是将此通道设置为非阻塞,也就是异步
自由控制阻塞或非阻塞便是NIO的特性之一
SelectionKey
SelectionKey是通道和选择器交互的核心组件
比如在SocketChannel上绑定一个Selector,并注册为连接事件:
SocketChannel clientChannel = SocketChannel.open();
clientChannel.configureBlocking(false);
clientChannel.connect(new InetSocketAddress(port));
clientChannel.register(selector, SelectionKey.OP_CONNECT);
核心在register()方法,它返回一个SelectionKey对象
来检测channel事件是那种事件可以使用以下方法:
selectionKey.isAcceptable();
selectionKey.isConnectable();
selectionKey.isReadable();
selectionKey.isWritable();
服务端便是通过这些方法 在轮询中执行相对应操作
当然通过Channel与Selector绑定的key也可以反过来拿到他们
Channel channel = selectionKey.channel();
Selector selector = selectionKey.selector();
在Channel上注册事件时,我们也可以顺带绑定一个Buffer:
clientChannel.register(key.selector(), SelectionKey.OP_READ,ByteBuffer.allocateDirect(1024));
或者绑定一个Object:
selectionKey.attach(Object);
Object anthorObj = selectionKey.attachment();
NIO的TCP服务端
讲了这么多,都是理论
我们来看下最简单也是最核心的代码(加那么多注释很不优雅,但方便大家看懂):
package cn.blog.test.NioTest;
import java.io.IOException;
import java.net.InetSocketAddress;
import java.nio.ByteBuffer;
import java.nio.channels.*;
import java.nio.charset.Charset;
import java.util.Iterator;
import java.util.Set;
public class MyNioServer {
private Selector selector; //创建一个选择器
private final static int port = 8686;
private final static int BUF_SIZE = 10240;
private void initServer() throws IOException {
//创建通道管理器对象selector
this.selector=Selector.open();
//创建一个通道对象channel
ServerSocketChannel channel = ServerSocketChannel.open();
channel.configureBlocking(false); //将通道设置为非阻塞
channel.socket().bind(new InetSocketAddress(port)); //将通道绑定在8686端口
//将上述的通道管理器和通道绑定,并为该通道注册OP_ACCEPT事件
//注册事件后,当该事件到达时,selector.select()会返回(一个key),如果该事件没到达selector.select()会一直阻塞
SelectionKey selectionKey = channel.register(selector,SelectionKey.OP_ACCEPT);
while (true){ //轮询
selector.select(); //这是一个阻塞方法,一直等待直到有数据可读,返回值是key的数量(可以有多个)
Set keys = selector.selectedKeys(); //如果channel有数据了,将生成的key访入keys集合中
Iterator iterator = keys.iterator(); //得到这个keys集合的迭代器
while (iterator.hasNext()){ //使用迭代器遍历集合
SelectionKey key = (SelectionKey) iterator.next(); //得到集合中的一个key实例
iterator.remove(); //拿到当前key实例之后记得在迭代器中将这个元素删除,非常重要,否则会出错
if (key.isAcceptable()){ //判断当前key所代表的channel是否在Acceptable状态,如果是就进行接收
doAccept(key);
}else if (key.isReadable()){
doRead(key);
}else if (key.isWritable() && key.isValid()){
doWrite(key);
}else if (key.isConnectable()){
System.out.println("连接成功!");
}
}
}
}
public void doAccept(SelectionKey key) throws IOException {
ServerSocketChannel serverChannel = (ServerSocketChannel) key.channel();
System.out.println("ServerSocketChannel正在循环监听");
SocketChannel clientChannel = serverChannel.accept();
clientChannel.configureBlocking(false);
clientChannel.register(key.selector(),SelectionKey.OP_READ);
}
public void doRead(SelectionKey key) throws IOException {
SocketChannel clientChannel = (SocketChannel) key.channel();
ByteBuffer byteBuffer = ByteBuffer.allocate(BUF_SIZE);
long bytesRead = clientChannel.read(byteBuffer);
while (bytesRead>0){
byteBuffer.flip();
byte[] data = byteBuffer.array();
String info = new String(data).trim();
System.out.println("从客户端发送过来的消息是:"+info);
byteBuffer.clear();
bytesRead = clientChannel.read(byteBuffer);
}
if (bytesRead==-1){
clientChannel.close();
}
}
public void doWrite(SelectionKey key) throws IOException {
ByteBuffer byteBuffer = ByteBuffer.allocate(BUF_SIZE);
byteBuffer.flip();
SocketChannel clientChannel = (SocketChannel) key.channel();
while (byteBuffer.hasRemaining()){
clientChannel.write(byteBuffer);
}
byteBuffer.compact();
}
public static void main(String[] args) throws IOException {
MyNioServer myNioServer = new MyNioServer();
myNioServer.initServer();
}
}
我打印了监听channel,告诉大家ServerSocketChannel是在什么时候开始运行的
如果配合NIO客户端的debug,就能很清楚的发现,进入select()轮询前
虽然已经有了ACCEPT事件的KEY,但select()默认并不会去调用
而是要等待有其它感兴趣事件被select()捕获之后,才会去调用ACCEPT的SelectionKey
这时候ServerSocketChannel才开始进行循环监听
也就是说一个Selector中,始终保持着ServerSocketChannel的运行
而serverChannel.accept();真正做到了异步(在initServer方法中的channel.configureBlocking(false);)
如果没有接受到connect,会返回一个null
如果成功连接了一个SocketChannel,则此SocketChannel会注册写入(READ)事件
并且设置为异步
NIO的TCP客户端
有服务端必定有客户端
其实如果能完全理解了服务端
客户端的代码大同小异
package cn.blog.test.NioTest;
import java.io.IOException;
import java.net.InetSocketAddress;
import java.nio.ByteBuffer;
import java.nio.channels.SelectionKey;
import java.nio.channels.Selector;
import java.nio.channels.SocketChannel;
import java.util.Iterator;
public class MyNioClient {
private Selector selector; //创建一个选择器
private final static int port = 8686;
private final static int BUF_SIZE = 10240;
private static ByteBuffer byteBuffer = ByteBuffer.allocate(BUF_SIZE);
private void initClient() throws IOException {
this.selector = Selector.open();
SocketChannel clientChannel = SocketChannel.open();
clientChannel.configureBlocking(false);
clientChannel.connect(new InetSocketAddress(port));
clientChannel.register(selector, SelectionKey.OP_CONNECT);
while (true){
selector.select();
Iterator iterator = selector.selectedKeys().iterator();
while (iterator.hasNext()){
SelectionKey key = iterator.next();
iterator.remove();
if (key.isConnectable()){
doConnect(key);
}else if (key.isReadable()){
doRead(key);
}
}
}
}
public void doConnect(SelectionKey key) throws IOException {
SocketChannel clientChannel = (SocketChannel) key.channel();
if (clientChannel.isConnectionPending()){
clientChannel.finishConnect();
}
clientChannel.configureBlocking(false);
String info = "服务端你好!!";
byteBuffer.clear();
byteBuffer.put(info.getBytes("UTF-8"));
byteBuffer.flip();
clientChannel.write(byteBuffer);
//clientChannel.register(key.selector(),SelectionKey.OP_READ);
clientChannel.close();
}
public void doRead(SelectionKey key) throws IOException {
SocketChannel clientChannel = (SocketChannel) key.channel();
clientChannel.read(byteBuffer);
byte[] data = byteBuffer.array();
String msg = new String(data).trim();
System.out.println("服务端发送消息:"+msg);
clientChannel.close();
key.selector().close();
}
public static void main(String[] args) throws IOException {
MyNioClient myNioClient = new MyNioClient();
myNioClient.initClient();
}
}
输出结果
这里我打开一个服务端,两个客户端:
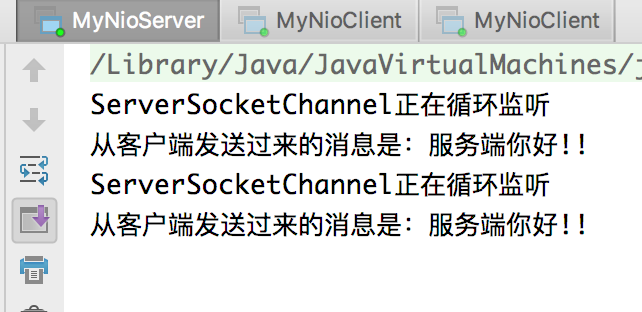
接下来,你可以试下同时打开一千个客户端,只要你的CPU够给力,服务端就不可能因为阻塞而降低性能
以上便是Java NIO的基础详解,如果大家还有什么不明白的地方可以在下方的留言区域讨论。


 890
890


 被折叠的 条评论
为什么被折叠?
被折叠的 条评论
为什么被折叠?
 到【灌水乐园】发言


