


学习完列表渲染后,我打算做一个综合一点的练习小项目:豆瓣Top电影排行列表;
这个练习小项目主要是为了锻炼布局Widget,但是也涉及到一些其他知识点:评分展示、分割线、bottomNavigationBar等。
这些内容,我们放到后面进行补充,但是在进行豆瓣Top电影模仿时,有两个东西实现起来比较复杂:
1、评分展示: 我们需要根据不同的评分显示不同的星级展示,这里我封装了一个StarRating的小Widget来实现;
2、分割线: 最初我考虑使用边框虚线来完成分割线,后来发现Flutter并不支持虚线边框,因此封装了一个DashedLine的小Widget来实现。
当然,这个章节如果你觉得过于复杂,可以直接把我封装好的两个东西拿过去使用;
一. StarRating
1.1. 最终效果展示
目的:实现功能展示的同时,提供高度的定制效果
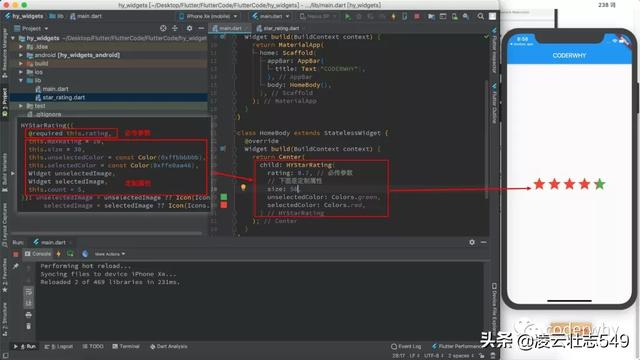
- rating:必传参数,告诉Widget当前的评分。
- maxRating:可选参数,最高评分,根据它来计算一个比例,默认值为10;
- size:星星的大小,决定每一个star的大小;
- unselectedColor:未选中星星的颜色(该属性是使用默认的star才有效);
- selectedColor:选中星星的颜色(该属性也是使用默认的star才有效);
- unselectedImage:定制未选中的star;
- selectedImage:定义选中时的star;
- count:展示星星的个数;
暂时实现上面的定制,后续有新的需求继续添加新的功能点~
1.2. 实现思路分析
理清楚思路后,你会发现并不是非常复杂,主要就是两点的展示:
- 未选中star的展示:根据个数和传入的unselectedImage创建对应个数的Widget即可;
- 选中star的展示:
- 计算出满star的个数,创建对应的Widget;
- 计算剩余比例的评分,对最后一个Widget进行裁剪;
问题一:选择StatelessWidget还是StatefulWidget?
考虑到后面可能会做用户点击进行评分或者用户手指滑动评分的效果,所以这里选择StatefulWidget
- 目前还没有讲解事件监听相关,所以暂时不添加这个功能
问题二:如何让选中的star和未选中的star重叠显示?
- 非常简单,使用Stack即可;
child: Stack( children: [ Row(children: getUnSelectImage(), mainAxisSize: MainAxisSize.min,), Row(children: getSelectImage(), mainAxisSize: MainAxisSize.min,), ],),问题三:如何实现对选中的最后一个star进行裁剪?
- 可以使用ClipRect定制CustomClipper进行裁剪
定义CustomClipper裁剪规则:
class MyRectClipper extends CustomClipper{ final double width; MyRectClipper({ this.width }); @override Rect getClip(Size size) { return Rect.fromLTRB(0, 0, width, size.height); } @override bool shouldReclip(MyRectClipper oldClipper) { return width != oldClipper.width; }}使用MyRectClipper进行裁剪:
Widget leftStar = ClipRect( clipper: MyRectClipper(width: leftRatio * widget.size), child: widget.selectedImage,);1.3. 最终代码实现
最终代码并不复杂,而且我也有给出主要注释:
import 'package:flutter/material.dart';class HYStarRating extends StatefulWidget { final double rating; final double maxRating; final Widget unselectedImage; final Widget selectedImage; final int count; final double size; final Color unselectedColor; final Color selectedColor; HYStarRating({ @required this.rating, this.maxRating = 10, this.size = 30, this.unselectedColor = const Color(0xffbbbbbb), this.selectedColor = const Color(0xffe0aa46), Widget unselectedImage, Widget selectedImage, this.count = 5, }): unselectedImage = unselectedImage ?? Icon(Icons.star, size: size, color: unselectedColor,), selectedImage = selectedImage ?? Icon(Icons.star, size: size, color: selectedColor); @override _HYStarRatingState createState() => _HYStarRatingState();}class _HYStarRatingState extends State { @override Widget build(BuildContext context) { return Container( child: Stack( children: [ Row(children: getUnSelectImage(), mainAxisSize: MainAxisSize.min), Row(children: getSelectImage(), mainAxisSize: MainAxisSize.min), ], ), ); } // 获取评星 List getUnSelectImage() { return List.generate(widget.count, (index) => widget.unselectedImage); } List getSelectImage() { // 1.计算Star个数和剩余比例等 double oneValue = widget.maxRating / widget.count; int entireCount = (widget.rating / oneValue).floor(); double leftValue = widget.rating - entireCount * oneValue; double leftRatio = leftValue / oneValue; // 2.获取start List selectedImages = []; for (int i = 0; i < entireCount; i++) { selectedImages.add(widget.selectedImage); } // 3.计算 Widget leftStar = ClipRect( clipper: MyRectClipper(width: leftRatio * widget.size), child: widget.selectedImage, ); selectedImages.add(leftStar); return selectedImages; }}class MyRectClipper extends CustomClipper{ final double width; MyRectClipper({ this.width }); @override Rect getClip(Size size) { return Rect.fromLTRB(0, 0, width, size.height); } @override bool shouldReclip(MyRectClipper oldClipper) { return width != oldClipper.width; }}二. DashedLine
2.1. 最终实现效果
目的:实现效果的同时,提供定制,并且可以实现水平和垂直两种虚线效果:
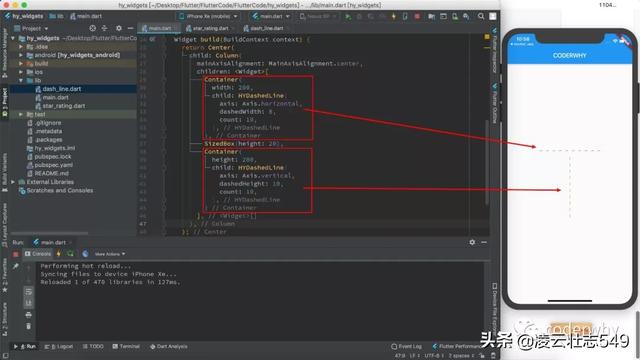
- axis:确定虚线的方向;
- dashedWidth:根据虚线的方向确定自己虚线的宽度;
- dashedHeight:根据虚线的方向确定自己虚线的高度;
- count:内部会根据设置的个数和宽高确定密度(虚线的空白间隔);
- color:虚线的颜色,不多做解释;
暂时实现上面的定制,后续有新的需求继续添加新的功能点~
2.2. 实现思路分析
实现比较简单,主要是根据用户传入的方向确定添加对应的SizedBox即可。
这里有一个注意点:虚线到底是设置多宽或者多高呢?
- 我这里是根据方向获取父Widget的宽度和高度来决定的;
- 通过LayoutBuilder可以获取到父Widget的宽度和高度;
return LayoutBuilder( builder: (BuildContext context, BoxConstraints constraints) { // 根据宽度计算个数 return Flex( direction: this.axis, mainAxisAlignment: MainAxisAlignment.spaceBetween, children: List.generate(this.count, (int index) { return SizedBox( width: dashedWidth, height: dashedHeight, child: DecoratedBox( decoration: BoxDecoration(color: color), ), ); }), ); },);2.3. 最终代码实现
比较简单的封装,直接给出最终代码实现:
class HYDashedLine extends StatelessWidget { final Axis axis; final double dashedWidth; final double dashedHeight; final int count; final Color color; HYDashedLine({ @required this.axis, this.dashedWidth = 1, this.dashedHeight = 1, this.count, this.color = const Color(0xffff0000) }); @override Widget build(BuildContext context) { return LayoutBuilder( builder: (BuildContext context, BoxConstraints constraints) { // 根据宽度计算个数 return Flex( direction: this.axis, mainAxisAlignment: MainAxisAlignment.spaceBetween, children: List.generate(this.count, (int index) { return SizedBox( width: dashedWidth, height: dashedHeight, child: DecoratedBox( decoration: BoxDecoration(color: color), ), ); }), ); }, ); }}三. 实现底部TabBar
3.1. TabBar实现说明
在即将完成的小练习中,我们有实现一个底部的TabBar,如何实现呢?
在Flutter中,我们会使用Scaffold来搭建页面的基本结构,实际上它里面有一个属性就可以实现底部TabBar功能:bottomNavigationBar。
bottomNavigationBar对应的类型是BottomNavigationBar,我们来看一下它有什么属性:
- 属性非常多,但是都是设置底部TabBar相关的,我们介绍几个:
- currentIndex:当前选中哪一个item;
- selectedFontSize:选中时的文本大小;
- unselectedFontSize:未选中时的文本大小;
- type:当item的数量超过2个时,需要设置为fixed;
- items:放入多个BottomNavigationBarItem类型;
- onTap:监听哪一个item被选中;
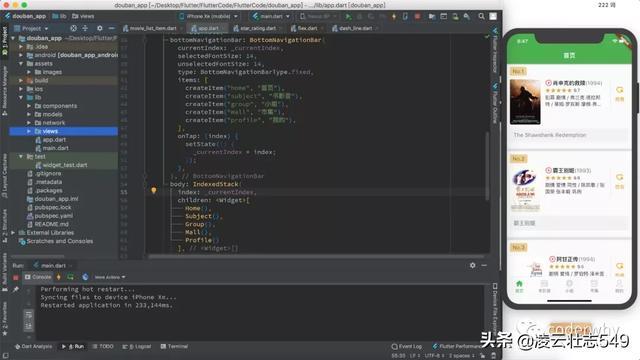
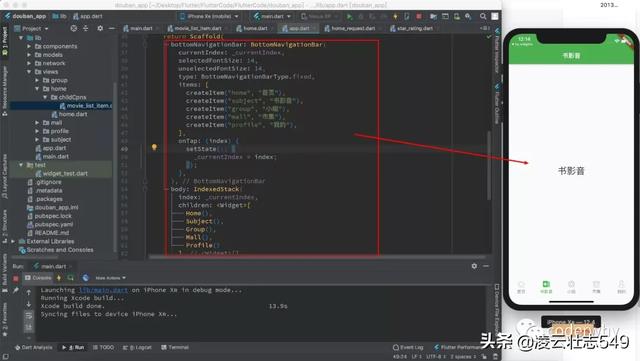
class BottomNavigationBar extends StatefulWidget { BottomNavigationBar({ Key key, @required this.items, this.onTap, this.currentIndex = 0, this.elevation = 8.0, BottomNavigationBarType type, Color fixedColor, this.backgroundColor, this.iconSize = 24.0, Color selectedItemColor, this.unselectedItemColor, this.selectedIconTheme = const IconThemeData(), this.unselectedIconTheme = const IconThemeData(), this.selectedFontSize = 14.0, this.unselectedFontSize = 12.0, this.selectedLabelStyle, this.unselectedLabelStyle, this.showSelectedLabels = true, bool showUnselectedLabels, })}当实现了底部TabBar展示后,我们需要监听它的点击来切换显示不同的页面,这个时候我们可以使用IndexedStack来管理多个页面的切换:
body: IndexedStack( index: _currentIndex, children: [ Home(), Subject(), Group(), Mall(), Profile() ],3.2. TabBar代码实现
注意事项:
- 1、我们需要在其他地方创建对应要切换的页面;
- 2、需要引入对应的资源,并且在pubspec.yaml中引入;
import 'package:flutter/material.dart';import 'views/home/home.dart';import 'views/subject/subject.dart';import 'views/group/group.dart';import 'views/mall/mall.dart';import 'views/profile/profile.dart';class MyApp extends StatelessWidget { @override Widget build(BuildContext context) { return MaterialApp( title: "豆瓣", theme: ThemeData( primaryColor: Colors.green, highlightColor: Colors.transparent, splashColor: Colors.transparent ), home: MyStackPage(), ); }}class MyStackPage extends StatefulWidget { @override _MyStackPageState createState() => _MyStackPageState();}class _MyStackPageState extends State { var _currentIndex = 0; @override Widget build(BuildContext context) { return Scaffold( bottomNavigationBar: BottomNavigationBar( currentIndex: _currentIndex, selectedFontSize: 14, unselectedFontSize: 14, type: BottomNavigationBarType.fixed, items: [ createItem("home", "首页"), createItem("subject", "书影音"), createItem("group", "小组"), createItem("mall", "市集"), createItem("profile", "我的"), ], onTap: (index) { setState(() { _currentIndex = index; }); }, ), body: IndexedStack( index: _currentIndex, children: [ Home(), Subject(), Group(), Mall(), Profile() ], ), ); }}BottomNavigationBarItem createItem(String iconName, String title) { return BottomNavigationBarItem( icon: Image.asset("assets/images/tabbar/$iconName.png", width: 30,), activeIcon: Image.asset("assets/images/tabbar/${iconName}_active.png", width: 30,), title: Text(title) );}四. 数据请求和转化
4.1. 网络请求简单封装
目前我还没有详细讲解网络请求相关的知识,开发中我们更多选择地方的dio。
后面我会详细讲解网络请求的几种方式,我这里基于dio进行了一个简单工具的封装:
配置文件存放:http_config.dart
const baseURL = "http://123.207.32.32:8000";const timeout = 5000;网络请求工具文件:http_request.dart
- 目前只是封装了一个方法,更多细节后续再补充
import 'package:dio/dio.dart';import 'http_config.dart';class HttpRequest { // 1.创建实例对象 static BaseOptions baseOptions = BaseOptions(connectTimeout: timeout); static Dio dio = Dio(baseOptions); static Future request(String url, {String method = "get",Map params}) async { // 1.单独相关的设置 Options options = Options(); options.method = method; // 2.发送网络请求 try { Response response = await dio.request(url, queryParameters: params, options: options); return response.data; } on DioError catch (e) { throw e; } }}4.2. 首页数据请求转化
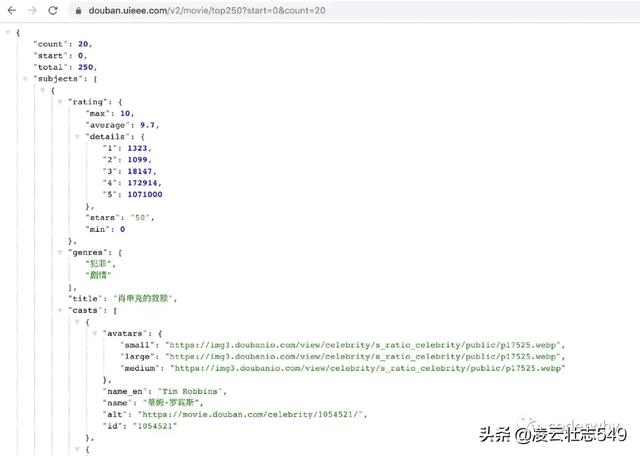
豆瓣数据的获取
这里我使用豆瓣的API接口来请求数据:
- https://douban.uieee.com/v2/movie/top250?start=0&count=20
模型对象的封装
在面向对象的开发中,数据请求下来并不会像前端那样直接使用,而是封装成模型对象:
- 前端开发者很容易没有面向对象的思维或者类型的思维。
- 但是目前前端开发正在向TypeScript发展,也在帮助我们强化这种思维方式。
为了方便之后使用请求下来的数据,我将数据划分成了如下的模型:
Person、Actor、Director模型:它们会被使用到MovieItem中
class Person { String name; String avatarURL; Person.fromMap(Map json) { this.name = json["name"]; this.avatarURL = json["avatars"]["medium"]; }}class Actor extends Person { Actor.fromMap(Map json): super.fromMap(json);}class Director extends Person { Director.fromMap(Map json): super.fromMap(json);}MovieItem模型:
int counter = 1;class MovieItem { int rank; String imageURL; String title; String playDate; double rating; List genres; List casts; Director director; String originalTitle; MovieItem.fromMap(Map json) { this.rank = counter++; this.imageURL = json["images"]["medium"]; this.title = json["title"]; this.playDate = json["year"]; this.rating = json["rating"]["average"]; this.genres = json["genres"].cast(); this.casts = (json["casts"] as List).map((item) { return Actor.fromMap(item); }).toList(); this.director = Director.fromMap(json["directors"][0]); this.originalTitle = json["original_title"]; }}首页数据请求封装以及模型转化
这里我封装了一个专门的类,用于请求首页的数据,这样让我们的请求代码更加规范的管理:HomeRequest
- 目前类中只有一个方法getMovieTopList;
- 后续有其他首页数据需要请求,就继续在这里封装请求的方法;
import 'package:douban_app/models/home_model.dart';import 'http_request.dart';class HomeRequest { Future> getMovieTopList(int start, int count) async { // 1.拼接URL final url = "https://douban.uieee.com/v2/movie/top250?start=$start&count=$count"; // 2.发送请求 final result = await HttpRequest.request(url); // 3.转成模型对象 final subjects = result["subjects"]; List movies = []; for (var sub in subjects) { movies.add(MovieItem.fromMap(sub)); } return movies; }}在home.dart文件中请求数据
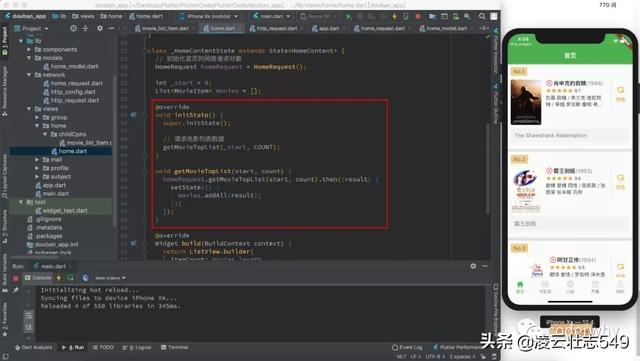
五. 界面效果实现
5.1. 首页整体代码
首页整体布局非常简单,使用一个ListView即可
import 'package:douban_app/models/home_model.dart';import 'package:douban_app/network/home_request.dart';import 'package:douban_app/views/home/childCpns/movie_list_item.dart';import 'package:flutter/material.dart';const COUNT = 20;class Home extends StatelessWidget { @override Widget build(BuildContext context) { return Scaffold( appBar: AppBar( title: Text("首页"), ), body: Center( child: HomeContent(), ), ); }}class HomeContent extends StatefulWidget { @override _HomeContentState createState() => _HomeContentState();}class _HomeContentState extends State { // 初始化首页的网络请求对象 HomeRequest homeRequest = HomeRequest(); int _start = 0; List movies = []; @override void initState() { super.initState(); // 请求电影列表数据 getMovieTopList(_start, COUNT); } void getMovieTopList(start, count) { homeRequest.getMovieTopList(start, count).then((result) { setState(() { movies.addAll(result); }); }); } @override Widget build(BuildContext context) { return ListView.builder( itemCount: movies.length, itemBuilder: (BuildContext context, int index) { return MovieListItem(movies[index]); } ); }}5.2. 单独Item局部
下面是针对界面结构的分析:
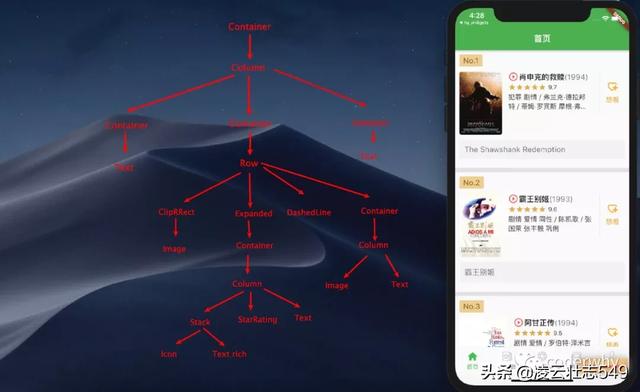
大家按照对应的结构,实现代码即可:
import 'package:douban_app/components/dash_line.dart';import 'package:flutter/material.dart';import 'package:douban_app/models/home_model.dart';import 'package:douban_app/components/star_rating.dart';class MovieListItem extends StatelessWidget { final MovieItem movie; MovieListItem(this.movie); @override Widget build(BuildContext context) { return Container( padding: EdgeInsets.all(10), decoration: BoxDecoration( border: Border(bottom: BorderSide(width: 10, color: Color(0xffe2e2e2))) ), child: Column( crossAxisAlignment: CrossAxisAlignment.start, children: [ // 1.电影排名 getMovieRankWidget(), SizedBox(height: 12), // 2.具体内容 getMovieContentWidget(), SizedBox(height: 12), // 3.电影简介 getMovieIntroduceWidget(), SizedBox(height: 12,) ], ), ); } // 电影排名 Widget getMovieRankWidget() { return Container( padding: EdgeInsets.fromLTRB(9, 4, 9, 4), decoration: BoxDecoration( borderRadius: BorderRadius.circular(3), color: Color.fromARGB(255, 238, 205, 144) ), child: Text( "No.${movie.rank}", style: TextStyle(fontSize: 18, color: Color.fromARGB(255, 131, 95, 36)), ) ); } // 具体内容 Widget getMovieContentWidget() { return Container( height: 150, child: Row( crossAxisAlignment: CrossAxisAlignment.start, children: [ getContentImage(), getContentDesc(), getDashLine(), getContentWish() ], ), ); } Widget getContentImage() { return ClipRRect( borderRadius: BorderRadius.circular(5), child: Image.network(movie.imageURL) ); } Widget getContentDesc() { return Expanded( child: Container( padding: EdgeInsets.symmetric(horizontal: 15), child: Column( crossAxisAlignment: CrossAxisAlignment.start, children: [ getTitleWidget(), SizedBox(height: 3,), getRatingWidget(), SizedBox(height: 3,), getInfoWidget() ], ), ), ); } Widget getDashLine() { return Container( width: 1, height: 100, child: DashedLine( axis: Axis.vertical, dashedHeight: 6, dashedWidth: .5, count: 12, ), ); } Widget getTitleWidget() { return Stack( children: [ Icon(Icons.play_circle_outline, color: Colors.redAccent,), Text.rich( TextSpan( children: [ TextSpan( text: " " + movie.title, style: TextStyle( fontSize: 18, fontWeight: FontWeight.bold ) ), TextSpan( text: "(${movie.playDate})", style: TextStyle( fontSize: 18, color: Colors.black54 ), ) ] ), maxLines: 2, ), ], ); } Widget getRatingWidget() { return Row( crossAxisAlignment: CrossAxisAlignment.end, children: [ StarRating(rating: movie.rating, size: 18,), SizedBox(width: 5), Text("${movie.rating}") ], ); } Widget getInfoWidget() { // 1.获取种类字符串 final genres = movie.genres.join(" "); final director = movie.director.name; var castString = ""; for (final cast in movie.casts) { castString += cast.name + " "; } // 2.创建Widget return Text( "$genres / $director / $castString", maxLines: 2, overflow: TextOverflow.ellipsis, style: TextStyle(fontSize: 16), ); } Widget getContentWish() { return Container( width: 60, child: Column( mainAxisAlignment: MainAxisAlignment.start, children: [ SizedBox(height: 20,), Image.asset("assets/images/home/wish.png", width: 30,), SizedBox(height: 5,), Text( "想看", style: TextStyle(fontSize: 16, color: Color.fromARGB(255, 235, 170, 60)), ) ], ), ); } // 电影简介(原生名称) Widget getMovieIntroduceWidget() { return Container( width: double.infinity, padding: EdgeInsets.all(12), decoration: BoxDecoration( color: Color(0xfff2f2f2), borderRadius: BorderRadius.circular(5) ), child: Text(movie.originalTitle, style: TextStyle(fontSize: 18, color: Colors.black54),), ); }}结束!!
原文出处:https://mp.weixin.qq.com/s/-aJ2EPEj6yzCgQBOy60zXw(侵权删除)


 892
892


 被折叠的 条评论
为什么被折叠?
被折叠的 条评论
为什么被折叠?
 到【灌水乐园】发言


