


1. 起源
spark的类加载及参数传递过程还是很复杂的,主要是因为他运行环境太复杂了,不同的集群管理器完全不一样,即使是同一集群管理器cluster和client也不一样,再加上这块探究还是需要一定的java功底和耐心的,会使得很多人望而却步。
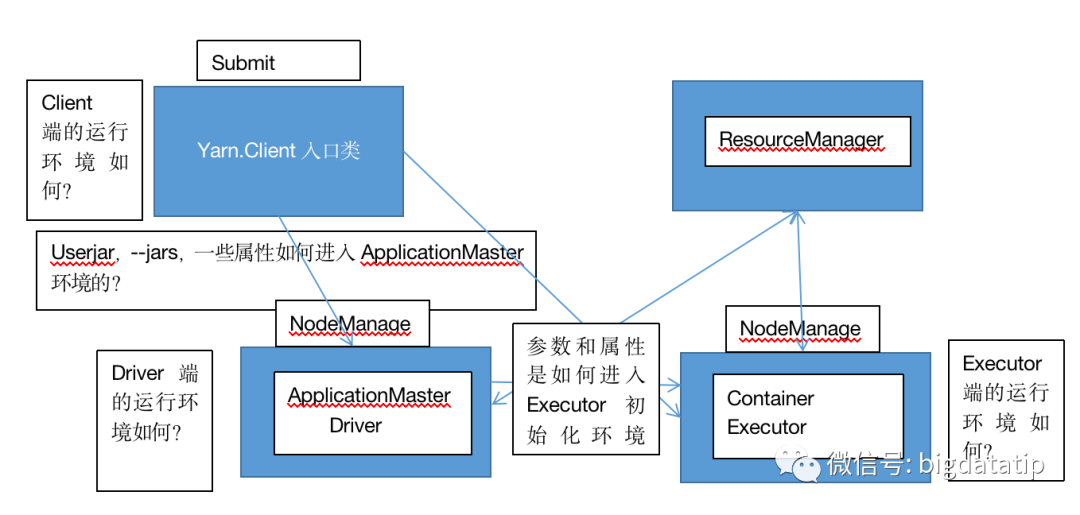
下图是yarn-cluster模式参数传递过程:
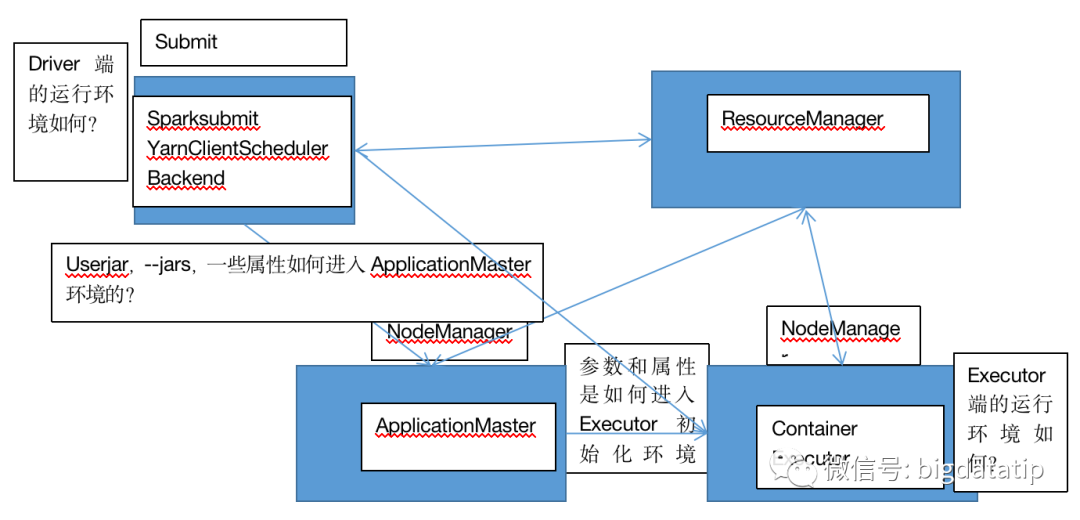
下图是yarn-client模式参数传递过程:
但是java代码,尤其是整合框架,公司大了假如没有统一的java依赖引用规范,解决冲突是必然的。而且有些时候,由于历史及发展原因,也会共存不同的依赖版本,那这个时候就需要我们去了解一下类加载机制了。
https://space.bilibili.com/33162030
2.spark依赖的配置
对于spark的依赖管理,大家比较熟悉的参数,拿spark 2.4 来说首先:
spark.driver.extraLibraryPathspark.executor.extraClassPath上面者两个参数,企业中,一般用来配置spark的lib或者jars目录及一些通用的依赖,比如hbase,hadoop等。对于on yarn模式,常用的配置参数还有yarn.application.classpath,这个对于运行与yarn上的任务都比较适用。比如对于spark on yarn可以配置如下:
Classpath for typical applications. yarn.application.classpath /opt/modules/spark-2.1.2/jars/*,$HADOOP_CONF_DIR,$HADOOP_COMMON_HOME/share/hadoop/common/*,$HADOOP_COMMON_HOME/share/hadoop/common/lib/*,$HADOOP_HDFS_HOME/share/hadoop/hdfs/*,$HADOOP_HDFS_HOME/share/hadoop/hdfs/lib/*,$HADOOP_YARN_HOME/share/hadoop/yarn/*,$HADOOP_YARN_HOME/share/hadoop/yarn/lib/* 其实,上面的配置参数指定的jar包最终都是放到了系统类加载器的classpath里,由系统类加载器完成加载。
有时候用户自己也会引入一些依赖,这些依赖可能和spark的依赖相互冲突的,这个时候最简单的办法是想让程序先加载用户的依赖,而后加载spark的依赖。或者用户自己针对性的改了底层源码这个其实很常见,又不想干扰其他用户。所以,spark引入了两个参数:
spark.driver.userClassPathFirstspark.executor.userClassPathFirst2. 什么是用户jar
在spark中分用户的jar和spark自己的依赖,翻看源码你会发现,指定用户jar的方式,有以下三种:
a. --jars参数。
b. spark.jars配置。
c. sparkContext.addjar。
这几个参数配置的jar,最终会会存储到SparkContext的一个hashmap里:
private[spark] val addedJars = new ConcurrentHashMap[String, Long]().asScala然后在Task调度过程中,TaskSetManager类里,获取:
// SPARK-21563 make a copy of the jars/files so they are consistent across the TaskSetprivate val addedJars = HashMap[String, Long](sched.sc.addedJars.toSeq: _*)private val addedFiles = HashMap[String, Long](sched.sc.addedFiles.toSeq: _*)对于Task调度的过程中实际上是通过TaskDescription类来进行描述传播的。具体在TaskSetManager的resourceOffer函数,封装了TaskDescription。
new TaskDescription( taskId, attemptNum, execId, taskName, index, task.partitionId, addedFiles, addedJars, task.localProperties, serializedTask) }task肯定是在executor内部的线程池里执行咯,但是executor首先要下载jar包到本地,然后放到executor线程的类加载器里,才能正常运行jar。具体位置就是Executor的TaskRunner的run方法里:
updateDependencies(taskDescription.addedFiles, taskDescription.addedJars)其实,在星球里看过浪尖源码视频的球友应该都了解,实际上task调度之后,被CoarseGrainedExecutorBackend接收LaunchTask消息,然后反序列化得到TaskDescription。
用户jar添加到executor的类加载器的过程如下:
/** * Download any missing dependencies if we receive a new set of files and JARs from the * SparkContext. Also adds any new JARs we fetched to the class loader.*/private def updateDependencies(newFiles: Map[String, Long], newJars: Map[String, Long]) { lazy val hadoopConf = SparkHadoopUtil.get.newConfiguration(conf) synchronized { // Fetch missing dependencies for ((name, timestamp) if currentFiles.getOrElse(name, logInfo("Fetching " + name + " with timestamp " + timestamp) // Fetch file with useCache mode, close cache for local mode. Utils.fetchFile(name, new File(SparkFiles.getRootDirectory()), conf, env.securityManager, hadoopConf, timestamp, useCache = !isLocal) currentFiles(name) = timestamp } for ((name, timestamp) val localName = new URI(name).getPath.split("/").last val currentTimeStamp = currentJars.get(name) .orElse(currentJars.get(localName)) .getOrElse(-1L) if (currentTimeStamp < timestamp) { logInfo("Fetching " + name + " with timestamp " + timestamp) // Fetch file with useCache mode, close cache for local mode. Utils.fetchFile(name, new File(SparkFiles.getRootDirectory()), conf, env.securityManager, hadoopConf, timestamp, useCache = !isLocal) currentJars(name) = timestamp // Add it to our class loader val url = new File(SparkFiles.getRootDirectory(), localName).toURI.toURL if (!urlClassLoader.getURLs().contains(url)) { logInfo("Adding " + url + " to class loader") urlClassLoader.addURL(url) } } } }}也就是说task需要的jar,假如是新增的jar包每次都会被executor获取。
假设用户打的jar包比较大或者指定的jar包比较大,但是task又不多,或者很多任务会公用的jar包,就应该放到spark的依赖环境里,避免频繁随着task调度而传输,很浪费性能的。
为啥会有新增jar包?
可以想以下Spark JobServer或者你自己的spark任务服务。
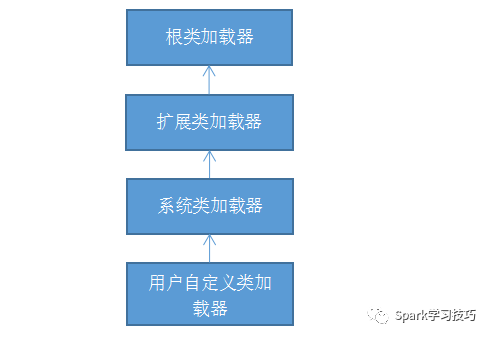
3.java的类加载器
关于类加载器 细节可以阅读:java类加载器学习必备
主要要看懂下面这张图,了解类加载器的双亲委托机制。
4.spark如何实现先加载用户的jar
executor端创建的类加载器,主要有两个:
// Create our ClassLoader // do this after SparkEnv creation so can access the SecurityManager private val urlClassLoader = createClassLoader() private val replClassLoader = addReplClassLoaderIfNeeded(urlClassLoader)第一个就是我们本文会说到的类加载器,而第二个是spark-shell命令或者livy里会出现的交互式查询的情境下的类加载器。
/** * Create a ClassLoader for use in tasks, adding any JARs specified by the user or any classes * created by the interpreter to the search path */ private def createClassLoader(): MutableURLClassLoader = { // Bootstrap the list of jars with the user class path. val now = System.currentTimeMillis() userClassPath.foreach { url => currentJars(url.getPath().split("/").last) = now } val currentLoader = Utils.getContextOrSparkClassLoader // For each of the jars in the jarSet, add them to the class loader. // We assume each of the files has already been fetched. val urls = userClassPath.toArray ++ currentJars.keySet.map { uri => new File(uri.split("/").last).toURI.toURL } if (userClassPathFirst) { new ChildFirstURLClassLoader(urls, currentLoader) } else { new MutableURLClassLoader(urls, currentLoader) } }可以看到,假设配置了优先从用户的classpath里加载类,会使用ChildFirstURLClassloader类加载器。该类具体如下:
/** * A mutable class loader that gives preference to its own URLs over the parent class loader * when loading classes and resources. */public class ChildFirstURLClassLoader extends MutableURLClassLoader { static { ClassLoader.registerAsParallelCapable(); } private ParentClassLoader parent; public ChildFirstURLClassLoader(URL[] urls, ClassLoader parent) { super(urls, null); this.parent = new ParentClassLoader(parent); } @Override public Class> loadClass(String name, boolean resolve) throws ClassNotFoundException { try { return super.loadClass(name, resolve); } catch (ClassNotFoundException cnf) { return parent.loadClass(name, resolve); } } @Override public EnumerationgetResources(String name) throws IOException { ArrayList urls = Collections.list(super.getResources(name)); urls.addAll(Collections.list(parent.getResources(name))); return Collections.enumeration(urls); } @Override public URL getResource(String name) { URL url = super.getResource(name); if (url != null) { return url; } else { return parent.getResource(name); } }}看一下源码你就知道了,这个类内部又专门new了一个ParentClassLoader。然后用来作为ChildFirstURLClassLoader的父类加载器,加载Spark的相关依赖,而用户的依赖加载是通过ChildFirstURLClassLoader自己加载的。
具体过程就在loadClass方法中。
@Override public Class> loadClass(String name, boolean resolve) throws ClassNotFoundException { try { return super.loadClass(name, resolve); } catch (ClassNotFoundException cnf) { return parent.loadClass(name, resolve); } }就此实现了,可以摆脱双亲委托机制,优先从用户jar里加载类。
欢迎,加入浪尖知识星球,与1000+好友共同学习。
深入系统掌握大数据

点击 阅读原文 跳转浪尖b站,查看源码视频。


 5199
5199


 被折叠的 条评论
为什么被折叠?
被折叠的 条评论
为什么被折叠?
 到【灌水乐园】发言


